You are here

2023-03-08 1979 KZ1300 A1 Valve Adjust


2023-03-08 1979 KZ1300 A1 Valve Adjust


Decided to check valve clearances on the 1979 Kawasaki KZ1300. Hard to believe it's been since Feb 2013 this engine started re-assembly.
Looking back at the resto page, mileage was 78,032.

Good to have a FSM...

29mm diameter shim.

Cams still look shiny and bumpy...

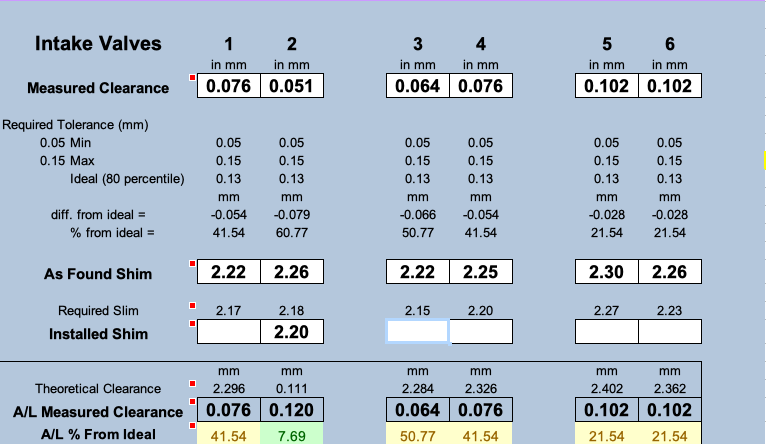
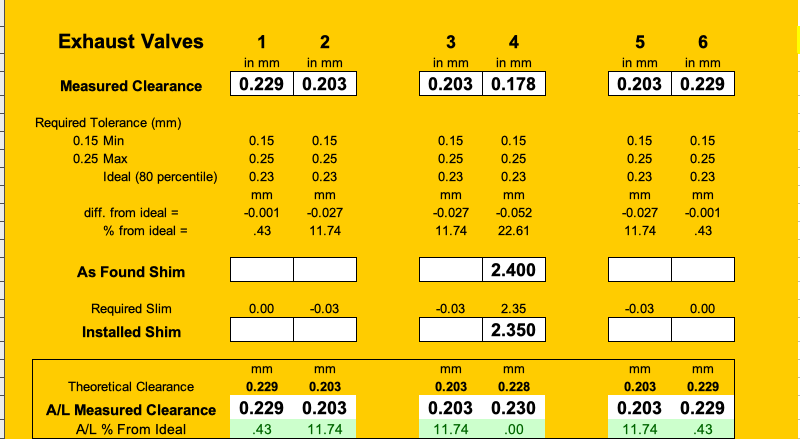
Found this on the internet.. Helpful for when I modified Yamafitter's FJR1300 Excel SS..

This is a shim under cam bucket engine. No need to pull cams to change shims.
And ALWAYS remember to keep Foreign Material Exclusion Areas (FMEA) protected from falling or dropped objects! Like Shims!

The little tool is the 'official' KZ1300 bucket depresser, a total PITA to use...
So I found and used the Snap-On pry-bar, err, I mean 'bucket depresser'! :)

Yeah right. NOT!


x xxxxxx

a


2023-03-15 Kz1300 Valve Adjust Wrap Up

Almost 200 USD later, finally have enough shims to most likely last a lifetime.
Decided to buy a kit and supplement it as the 1980 KZ lies in the wings..

...and I have a lead on another 79 too..

Office view.

I heavily modified Yamafitter's FJR 1300 shim calculator SS, converted it to Libre Office cause I'm too frugal to pay for Excel.

Look at how large an opening is the cam chain tower, you can fit a tennis ball down it! Well, almost.

So I use lots of protective barriers, called Rags!

The mid 2012 MacbookPro has been a workhorse.. and the consumer can still change battery, add Ram, unlike new items.

Smog related reed valve and cover. Checking w my mud Jack J to see if he can fab some plates...

Yucky-Yucky.

Pretty, huh?

Deep into a valve adjust, 79 A1 KZ1300, rainy day.

Surprising to me..

the Exhaust numbers look really good...
Intake not so much.

The numbers show most intakes 'tight'. My experience across FJR Yamahas, (bucket under cam), TT-500's, /2 BMWs, (screw valve lash adjust)  etc... is that exhaust valves typically change faster and more due to temperature exposure.

When looking at existing installed shims, they are all on the 'thin' side to start with.

Had to order more shims from DimeCityCycles, in thinner sizes, as the 'kit' I bought started at 2.3mm...

The smallest available shim I can find is 2.00mm. My guess is that less than 2mm and the bucket 'lip' which restrains the shim may be less than 2mm, allowing the shim to spit out and cause grief?

Sigh.

Did this engine go to together with 'tight' intake valves? The head was built by a BBRP in Bellingham, WA, a shop with a good rep as far as I know.
 

Here's the numbers...
 
 
..and just wondering out loud, was the engine re-assembled with minimum shims? I don't recall where the valves came from.. or if they were oem and lapped? 

Hmmm. Food for thought something to ponder.

Of Weirdness when checking Valve Clearances1 day 7 hours ago#31208

  • Kawboy
  • Kawboy's Avatar
  • Offline
  • Sustaining Member
  • Sustaining Member
  • Posts: 2701
  • Thank you received: 879
  •  
  •  
Sounds like you have questions for BBRP and I would ask.
Did they replace the valves with new ones?
when assembled, what were the shim sizes used?

you might be able to save the assembly with new valves but i doubt it. I was in a similar situation with  a cylinder head I sent in to a reputable machine shop and had the valve faces and seats machined. When I took in the head and valves, I also took in a photocopy of the page in the Service Manual which shows the required height of the valve stem above the cylinder head to allow for shimming When I got the parts back and assembled, I found I needed 1.80 mm shims and of course that's impossible. So I bought new valves and fitted only to find that I was now needing 2.10mm shims So now I know that they overcut the seats and left me with a mess. I swear the guys in these machine shops are all idiots and not to be trusted.
Now I have removed the seats and in the process of machining new seats to fit the head because replacement seats were not made for the size required and I could have ordered new custom seats from KPMI at twice the cost of standard seats, but I have a lathe and I can trim down the seats to fit. Then the seat faces will have to be cut to depth. I will insure that the machine shop is instructed to machine allowing me to fit 2.8 or 2.90 mm shims. This means taking that Valve Installed Height Chart and tightening up the spec 37.20- 38.00m Normal acceptable to read 37.20- 37.30 mm. this will put the shim range in the 2.80- 2.90 mm range.

  
Vaalve installed height.png


Valve installed height chart.png

    Of Weirdness when checking Valve Clearances1 day 6 hours ago#31209

    • Kawboy
    • Kawboy's Avatar
    • Offline
    • Sustaining Member
    • Sustaining Member
    • Posts: 2701
    • Thank you received: 879
    •  
    •  
    The Service Manual really pisses me off. Throughout the entire manual all you'll find is Service Limit specs. Absolutely no information stating desired fitments for new parts installed. In contrast to machine drawings which show actual size of parts with a tolerance Of + - xxxx. So now you have to put on your engineering cap and understand how things wear and how to accommodate that Service Limit.
    With respect to valves- We know that when the valves wear that micro welding of the faces during operation and then the tearing apart of the micro welds happens causing molecules of the valve seat and faces to be blown out with the exhaust. This reduces material on the sealing faces so we know that this will tighten up the valve clearance and we'll have to reshim periodically and that the new shims will be thinner than what was taken out. So, now you're going to machine new parts to rebuild the head. Knowing that as things wear, you'll be going down in shim size so where do you want to start? At the top of the shim size or in the middle of  or down near the bottom? Answer of course is at the top of the shim size allowing you multiple shim changes and when you do need a valve reface job, you will still have material left to accommodate refacing and still be able to shim before a major valve job requiring new seats and new valves.

    As far as available replacement valves- Vesrah is probably the only remaining valve company that makes replacements but to what quality or standard, I don't know. Let's remember that back in the 1980's, valve seats and valves were of a much lower quality than what's available now. So if you buy new valves, you may be buying what I refer to as "Chinese Shit" and not much better off.  You'd be better off going to companies like Supertech or Ferrea and having custom valves made up and as far as valve seats, consider powdered metal seats. These seats are probably 3 times higher in quality than the original cast iron seats
    The following user(s) said Thank You: dcarver220b

    Of Weirdness when checking Valve Clearances5 minutes ago#31220

    • dcarver220b
    • dcarver220b's AvatarTopic Author
    • Online
    • Sustaining Member
    • Sustaining Member
    • Posts: 508
    • Thank you received: 123
    •  
    •  
    •  
    •  
    Completed adjustments yesterday.  I set my nominal at 80% of max clearance. With nearly 200 USD of shims in hand, was able to get the Intakes well within spec. I forgot to update the SS before screen shot, #6 installed shim is 2.25 mm.

    Not sure why image isn't displaying in 'production', it does appear in 'edit' mode. 
    [img]https://candybuttorg.ipage.com/pix/motobikes/wrenching/KZ1300/2023-03-15 Kz1300ValveAdjustContinued/9.jpg[/img]

    Given that later this summer/fall I'll be doing upper end work, think I'll just let this config run for now. Summertime here is HOT and riding the big water heater just isn't as much fun as it should be... 

    So off to find clunk sound (starter motor sprague?), fix leaky mechanical seal, get headers ceramic coated, install new refurb carbs, new rear tire. In-between now and rebuild, source parts and build a 'clean' workshop for engine work.

    "If it isn't a flat tire, it's something else!"


    Theme by Danetsoft and Danang Probo Sayekti inspired by Maksimer