- Home
- Forums
- Ride Reports
- MotoBikes
- Restorations
- Wrenching
- 1963 BMW R69s
- 1969 BMW R60/2
- 1978 Yamaha 125
- 1979 KZ1300
- 1979 Kz1300 - Bob's Beauty
- 1981 CBX SuperSport
- 1981 Kz1300 Model A3 - Chocolatie
- 1984 Ford F250 XL
- 1987 ATK
- 1987 MowieMowie
- 1987 RotoTiller
- 1988 Honda Accord Lxi
- 1990 BMW RT100 - Barrie
- 1991 Harley Davidson FLHTCU
- 1992 Johnnie Deere
- 2000 YZ426
- 2002 Dodge Ram
- 2006 Carson RacerX Trailer
- 2006 Host Camper
- 2006 KrZy8
- 2007 Wabs
- 2012 KTM 690R
- 2013 Naomi - FJR 1300
- 2014-08-01 Air Compressor - Sears
- 2017 Kioti
- 2018 Toy Hauler
- 2020 Honda Fit
- 2021 Miscellaneous
- 2024 Log Splitter
- 2024 NeoDyne MC Lift
- 2050 test
- Lil Trlr
- Eats
- RIP
- PC Not
- Cages
- Test
- FJRF Best
- For Sale
Candy Butt Association
World's Wimpiest Riders
You are here
2017-12-06 Battery Access Mod

Forums:
2017-12-07 Battery Access Mod
I found this on fjrowners.com forum. Given the Photobucket fiasco with blocked pictures.....
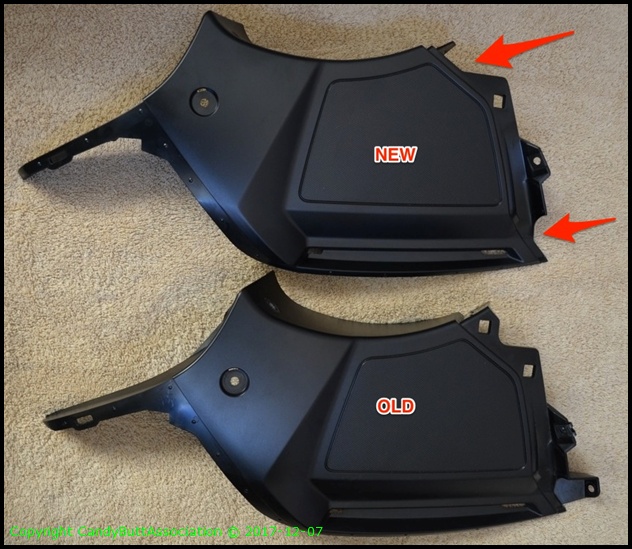
NEW!
Applies to 2013 FJR1300
Yamaha's new inner-fairing cowling panel eliminates the need to remove the whole central cowling assembly to access battery and fuses.
A while back I wrote detailed instructions on the process to get access to the battery and fuses on the 2013 FJR1300 (HERE). At the end of it I pleaded to Yamaha to revise the design and make it retrofit for us poor buggers who bought the 2013s. Did they actually listen? I'd like to take credit, but it's more likely they listened to dealers complaining about it.
Late in the 2013 model year they replaced the right cowling part with a revised one which does not require you to loosen the far left cowling and remove the entire central cowl around instruments (which requires removal of headlight adjuster knobs) just to be able to remove the right cowling covering the battery.
I ordered the part from YamahaGenuineParts.com here in Canada. The part costs about $90 U.S. (about three million Canadian).
YAMAHA PART # 1MC-2836N-01-00
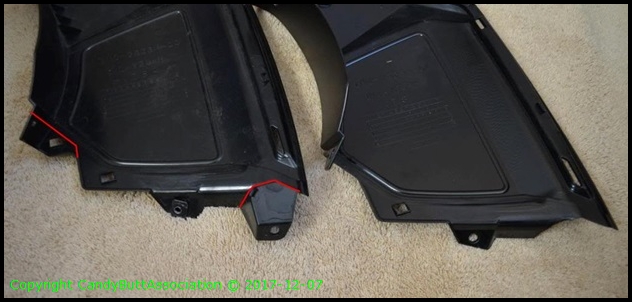
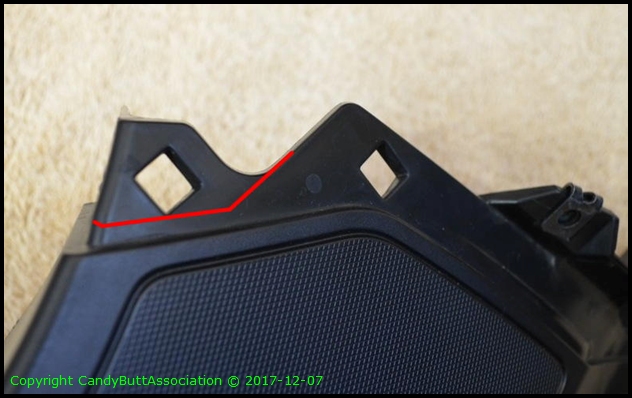
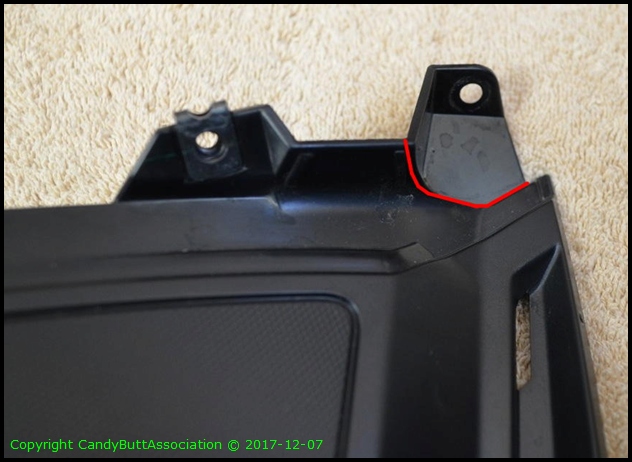
I got it today to see this marvel of design. Huh? It's the exact same thing with 2 chunks cut off (not actually cut off, but new production with the pieces not there any more).
THE RED LINES IN THE PICS ARE WHERE TO CUT TO MODIFY OLD ONE TO BE THE SAME AS THE NEW ONE
I test fit it. It's a wee bit tricky to get on, but you quickly figure out how to slip the front bits under the main cowling, and pretty much carefully 'hinge' it down, pulling the side fairing out away from the bike a bit to let the panel clear. Then you just pop in two screws and two plastic rivets, and you're done! You should still practice it a couple times before having to do it on a cold, dark, wet road. But it's way better than before.
But basically, all they did was lob off a couple bits that went underneath he centre cowling including one part where the panel was screwed to the fairing at the front right corner. Without that, it still fits snug just fine.

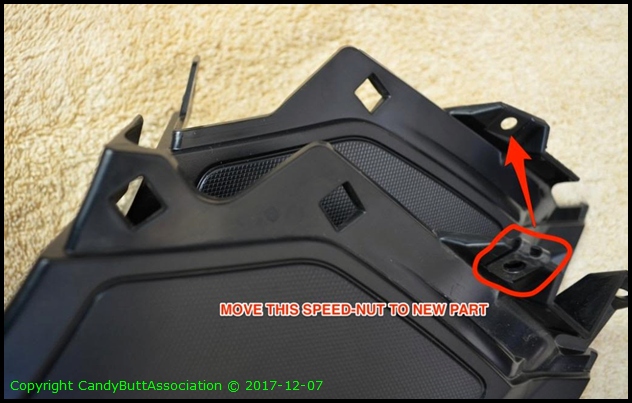
Don't forget to transfer the metal speed nut from the old part.
So, for those of you who would like better access, buy this part. It's the last time you'll need to crap your pants heaving against snaps firmly anchored to your precious and fragile fairing.
But for those who tools, talent, and time; or just too cheap to buy the new part, here's pics to clearly show the difference between the parts, and where to cut to make your 2013 battery cover cowling identical to the 2014 one.
Theme by Danetsoft and Danang Probo Sayekti inspired by Maksimer