You are here

Bent Valves or No?


Photo

Bent Valves or No?


99 replies to this topic

#1 hppants

FJR Commander

  • Members++
  • PipPipPipPipPip
  • 2,637 posts
  • Gender:Male
  • Location:Lafayette, LA
  • 2014A (Gen 3) N. America

Posted 12 March 2016 - 04:44 PM

Helped MikeP1300 check his valves this morning. All were in spec, but a few were close to tight spec (both intake and exhaust). We decided to shim them to the loose side of spec all around, hoping to follow Fred's lead and not have to worry about it for a while.

Mistake #1 - we did NOT put the crank on TDC before starting.

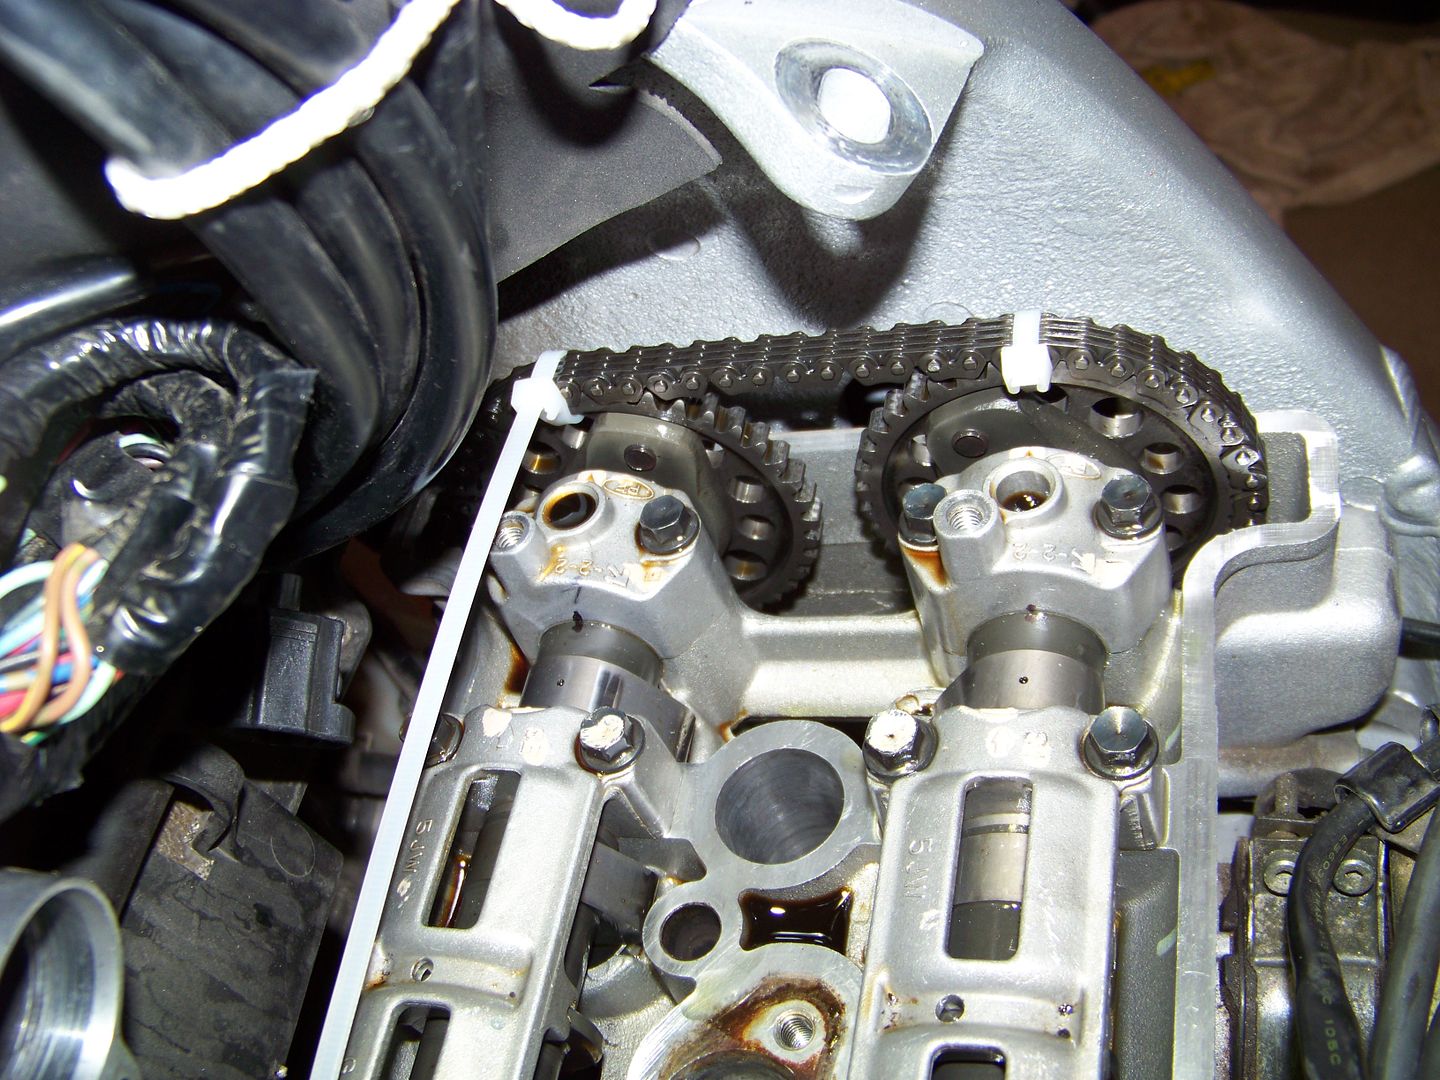
We ziptied both cams to the chain, and ziptied the rotor sensor wheel to the chain as well. Loosened the cam chain and started with the intake. moved the cam over - pulled shims, put back together - all good. One of the intakes (I believe it was #2) had the lobes down. So we had to work against the valves to put the cam on, but it went without trouble.

Pulled the exhaust and the same thing happened.

Mistake #2 - upon trying to reinstall the exhaust cam, lobes on #4 are down, so we rotated the crank slightly to get it to fall in place. Tightened everything down and released the CCT. Untied the zips all around. Now I can't turn the crank a full turn using a rachet on the bolt without hitting something hard.

Oh shit - big mistake #3.

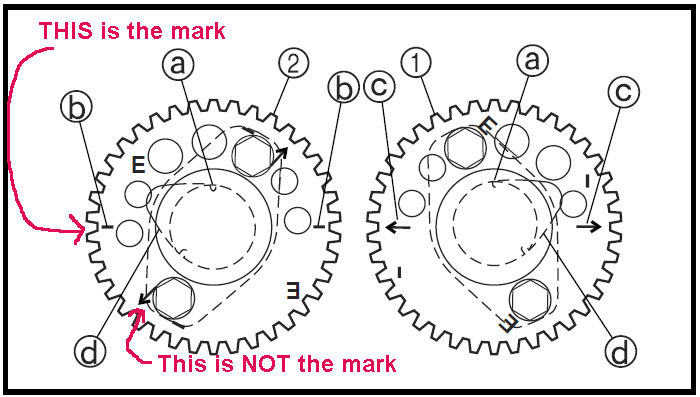
Long story short, we spent the entire afternoon trying to line up the cams and the crank in time. We followed the book except for one thing. The arrows on the cam gears are on the outer side. With the motor in the frame, we can't put our eyes on the arrows. So we pulled the cams and transferred a pencil mark on the inside of the cam gear.

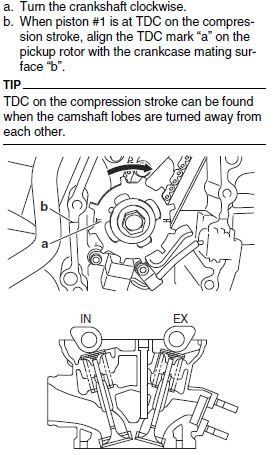
Funny thing about this. On the exhaust side, when the marks are lined up with the cylinder head, the #4 outer cam lobe has the hole at straight up. However, on the intake side, we cannot rotate the camshaft such that the marks are lined up AND the hole is straight up. There are two possibilities for where the cam can be placed. One way, or 180 degress the opposite. On one way, the right most cam lobe is straight up. At 180 degrees opposite, the hole is at about 45 degrees from straight up.

So I put the crank on TDC (with the cams out) and removed the rotor sensor. I then slid the cam chain off the crank gear. We lined up both cams and put the chain on it as tight as we could get between the cam gears. I then moved the chain forward and backward a tooth such that the crank remained on TDC, and both cams lined up with their marks. We then tighten down the camshafts while I held the cam chain in place on the crank gear. After everything is tightened down, the crank has moved about 10 degrees (missed a tooth or two). Again, I can't turn the crank more than about 150 degrees in either direction before I hit a stop.

We tried to repeat with no luck. So on Monday, the bike is going to the dealer.

So.... my biggest questions are:

1. When the crank is at TDC, and the cams are lined up correctly (arrows on the head), do the lobe holes on both the exhaust and intake run straight up and down?

2. When the crank is at TDS, and the cams are lined up correctly, are all of the lobes (intake and exhaust) away from the bottom - that is, are ALL 16 valves supposed to be fully closed at that time?

3. If I pushed one (or more) valves against the top of a piston while trying to set the timing, could I have bent the valve using only the force of 2 or 4 of the cam bearing cap bolts? Or more likely did the valve just push the piston down and rotate the crank (which is probably why my TDC mark didn't line up)?

At this point, it's time to pour money on it.

I feel horrible for Mike. I tried to help him and of course I made matters worse.

I think I'm just about done turning wrenches on motorcycles. 
ce4e895b-c6b5-474c-9ea2-6c60b2778940_zps

#2 RaYzerman19

Go Wings!

  • Members++
  • PipPipPipPipPip
  • 3,508 posts
  • Gender:Male
  • Location:Millgrove, ON
  • 2014A (Gen 3) World
  • 2007 ABS (Gen 2) World

Posted 12 March 2016 - 05:18 PM

I'm trying not to be confused...... but...... I am not sure where the "holes" line up.  To me nothing matters but timing marks.


With crank at TDC and the camshaft sprocket timing marks lined up with the top edge of the cylinder head (gunsight with strong flashlight), I believe the #1 cylinder is at TDC, with camshaft lobes pointed outward as shown in the FSM (provided you had not done anything yet).  It is irrelevant where the cam lobes are on any other cylinder, as they will be "in time" with their relative piston positions.  However, I see the possibility by your description where you may have had the cams rotated incorrectly, and if you bolted the cams down, if that cam wanted the valve to be open and if the piston was up, there MAY be a bent valve........ I don't know if you met a lot of resistance bolting the cam down (if so, lucky you didn't break a cam), but it would be more likely to bend a valve IF you tried to overcome that resistance you felt when you rotated the crank........... how much bend... how hard did you crank on it....... I don't wanna know.


Anyhow, back to square one....... give it one more shot........  if you have #1 piston verified at TDC, camshaft timing marks lined up, verify cam lobes look like the FSM, CCT extended, one should normally be able to spin the motor over without an issue.  IF a valve is bent and sticking in the open position, then yep, you've got a problem.........


Another way to verify this....... all cams out, all valve buckets should be at relatively the same level if all the valve springs were able to do their job, as all valves will be closed.  If you find one that is sitting down, there's your bent valve... it wasn't able to go back in the guide due to the bend, or the valve head was bent off kilter.  What I don't know is how much clearance does a valve have to the piston normally......


Yet another verification while you have all the cams out, and perhaps can't tell if one was bent or not, do a leakdown test (compressed air into the spark plug hole).... if leaky, valve is not seated.  Fingers crossed.

2014A Root Beer

You don't go to Freddy Beach for the beach....

Duct tape can't fix stupid, but it can muffle the sound

#3 hppants

FJR Commander

  • Members++
  • PipPipPipPipPip
  • 2,637 posts
  • Gender:Male
  • Location:Lafayette, LA
  • 2014A (Gen 3) N. America

Posted 12 March 2016 - 05:35 PM

Raz - Thanks for the detailed reply. First, I didn't try to force the crank to turn once I found resistance. With the motor together, I simply rotated the crank clockwise with my rachet - maybe exhibiting 10 ft # of touque and when the crank stopped, so did I. So if I bent a valve(s), I don't think I did it with the rachet on the crank bolt.

Another question - if the cam chain and the cams are not assembled in the motor (all valves closed), does it matter how many times I have to rotate the crank to find #1 TDC? IOW - when the "t" mark is lined up with the split in the case halves, #1 should be on TDC EVERY revolution?

Also, when #1 is at TDC, are any other holes also at TDC?

Thanks for the clarification regarding the cam lobe holes. We basically abandoned looking at those and used the timing marks on the cylinder head to line up our cams. While mike was doing that, I was trying to hold the cam chain on the crank gear where I thought it would be lined up and still hold the crank at TDC. In both cases, after the cams were tightened down, the crank was out of position (about 10 degrees).

So what I think is happening is that I do not have my cam timing correct, and the lobe(s) that are out of time are pushing the valves open. Whichever valve is closest to the #1 piston (and/or any other piston that is at TDC), those valves are moving the piston such that the crank is now also out of time.

What I don't know is if that is enough to bend valves or not.

I can say that when the cams are out of the head, all valves look to be the same - if one is not seating correctly, it's not by much. Of course, I know that it doesn't have to be much. 
ce4e895b-c6b5-474c-9ea2-6c60b2778940_zps

#4 RaYzerman19

Go Wings!

  • Members++
  • PipPipPipPipPip
  • 3,508 posts
  • Gender:Male
  • Location:Millgrove, ON
  • 2014A (Gen 3) World
  • 2007 ABS (Gen 2) World

Posted 12 March 2016 - 06:18 PM

I am just hoping you don't have a bent valve, but it's not certain at this point.


Since you can't rotate the engine, remove the camshafts.  Are the buckets even?  If not, proceed with caution when rotating engine.  Hang cam chain so you don't lose it, ensure it is not hanging up down below.  Rotate the engine 360 degrees clockwise, if you encounter resistance and it's not the cam chain at the crank end, could be hitting a valve.  You can put a long screwdriver or wire in the spark plug holes, two cylinders will be up, two will be down.  1&4 and 2&3 go up/down together.  If you had resistance, of course it is one of the cylinders that is up.


If your rotation went well, time to install the camshafts in the correct location.  Follow the FSM in the engine section (5-12 etc.).  We do want the ignition to fire when that particular cylinder is on compression stroke.


Rotate the crank until #1 is TDC, and ignition timing wheel at crank end is in correct position (should be).  Keep it there while you install the cams in the correct orientation.


If you had bad news on your rotation, I would do a leakdown test.  A bent valve will be very obvious as the leak will be significant pissing of air.  Now, since you rotated the crank both directions during your initial adventure, there may be more than one valveaffected.  But, let's see what you find first before we speculate.

2014A Root Beer

You don't go to Freddy Beach for the beach....

Duct tape can't fix stupid, but it can muffle the sound

#5 wfooshee

O, Woe is me!

  • Members++
  • PipPipPipPipPip
  • 5,862 posts
  • Gender:Male
  • Location:Panama City, FL
  • 2003 (Gen 1) N. America

Posted 12 March 2016 - 07:27 PM

Pants, the cylinders work in pairs, as RaYzerman stated. 1 & 4 move together, and 2 & 3 move together. If 1 is at TDC, so is 4. With the cams not installed, it does not matter if that TDC is compression or exhaust stroke. That difference is valves, not crankshaft position, so if the cams are out, that difference doesn't exist. (I've actually had to drill that into some heads when I've helped them.)


When you install the cams, you actually "lead" the timing, because when the chain tensioner goes tight there will be a position shift in the cams. That could be why you found the timing off when you tightened the cam caps, but 10 degrees? I dunno......

Make sure you're referring to the cylinder numbers correctly. The cam sprockets are at the #4 end. I've seen people try to match the cam lobe direction shown in the service manual to the lobes closest to the sprockets, which is wrong. The manual shows the timing mark positions and the #1 lobe positions (just as a check,) which are at the far end of the cam. I'm just putting that out there to make sure, I have no reason to think that's news to you. With #1 at TDC and the cam timing correct, the lobes at #1 are splayed outward.

crashclub.gif crashclub.gifcrashclub.gifGearbox teardown Darksider #18

Are you the reason I'm so far above average?

#6 RaYzerman19

Go Wings!

  • Members++
  • PipPipPipPipPip
  • 3,508 posts
  • Gender:Male
  • Location:Millgrove, ON
  • 2014A (Gen 3) World
  • 2007 ABS (Gen 2) World

Posted 13 March 2016 - 05:53 AM

Yep, I think wfooshee and I are trying to say the same thing...... the engine doesn't care if it is on compression or exhaust stroke with no cams.  Hopefully if you spin it then, you find no issues.  Putting the cams back in with the timing marks oriented correctly now makes #1 on compression stroke.  I was only concerned that one cam isn't 180 degrees out, that's why follow the FSM for orientation.  Again, fingers crossed.

2014A Root Beer

You don't go to Freddy Beach for the beach....

Duct tape can't fix stupid, but it can muffle the sound

#7 Fred W

1 Wheel Drive

  • Members++
  • PipPipPipPipPipPip
  • 18,703 posts
  • Gender:Male
  • Location:Southern NH
  • 2014ES (Gen 3) N. America

Posted 13 March 2016 - 06:36 AM

1. When the crank is at TDC, and the cams are lined up correctly (arrows on the head), do the lobe holes on both the exhaust and intake run straight up and down?


Yes.  See photo below.  When at #1 TDC the two holes in the back side of the right #4 cams both face straight up to the arrows cast in the cam caps.  These are also alignment marks and a lot easier to see than the marks on the right end of the cam sprockets.  You can see in the photo that before I loosened the chain, I took a sharpie marker and made match marks on the right most cam caps and the cam shafts to further ensure it was all back to correct timing.


100_3802.jpg


To view my "broken" Photobucket images:    Firefox fix  Chrome fix

#8 Redfish Hunter

Gone Fishing

  • Members++
  • PipPipPipPipPip
  • 3,145 posts
  • Gender:Male
  • Location:Prairieville, LA
  • 2007 ABS (Gen 2) N. America
  • 2015ES (Gen 3) N. America

Posted 13 March 2016 - 06:41 AM

Thanks for that Fred.  A picture really is worth a thousand words.  I was lost about the "lobe holes".


I am still thinking this is a job I will be paying someone else to do for me.

Never run out of ideas, real estate and traction simultaneously.

#9 hppants

FJR Commander

  • Members++
  • PipPipPipPipPip
  • 2,637 posts
  • Gender:Male
  • Location:Lafayette, LA
  • 2014A (Gen 3) N. America

Posted 13 March 2016 - 06:46 AM

OK - this is most helpful.  I'm sorry for the long post, but I want to describe my thoughts as accurately as I can.  I don't want you to assume anything from context.  If I were you, I'd wonder if Pants knows the difference between a wrench and a socket, let alone have this conversation.


1.  We are all discussing the correct firing order #1 closest to left turn signal.  Also, if I understand you correctly, we should be able to remove the camshafts, remove the chain from the crank gear, and hold the chain from above to keep it from falling.  From that point, if we can rotate the crank freely by hand without hitting anything, chances are we have not bent any valves.  We can also examine the shim buckets across the board and see if any one of them sits lower than the others.  Admittedly, I don't know how we could ACCURATELY measure this - a valve bent 0.010" is still a bent valve.  But I'm told that this is a true interference motor and if that is the case, a valve bent 0.010" should knock the piston when the crank is turned by hand - yes?


2.  A programming note:  we did not remove the cam gears from the camshafts.  Also, the cam gear alignment marks are on the outside face of the gears.  On the intake side, we can see the alignment mark by looking (steep angle) between the motor and the frame.  However, on the exhaust side, we simply cannot.  Therefore, we transferred our alignment marks with a pencil on the inside of the cam gears.  We fully recognize that our transferred mark might be a few thousands of an inch off, but considering the number of teeth on the cam gears, we figured that it should be close enough.  If that assumption is wrong, then somebody has to pull the motor out for us to continue- yes?
 

3.  My "10 degree" was an estimate, it might have been less, but for sure the "T" mark on the crank was past (in a clockwise direction) the split in the cases when the camshafts were timed up top.


4.  If #1 and #4 are at TDC at the same time, it would stand to reason that when the camshafts are timed correctly, the #1 and #4 cam lobes (both intake and exhaust) should be oriented anywhere EXCEPT down, yes?  IF these lobes were down, then they would be trying to open valves on an interference motor with the piston at the top of the stroke - I don't think that will work.


5.  I'm trying to follow the FSM (Chilton's) for the cam orientation.  It does make sense that the cam marks can be lined up and be 180 degrees out of time.  The FSM says that when the cams are in the correct position, the marks are lined up and there will be a "hole on the lobe closest to the cam gear (#4 right most cam lobe) pointing "up".  I don't know if I should interpret the word "up" literally or relatively.


For the exhaust cam, the "hole" referred to is about 180 degrees opposite of the peak of the cam lobe.  I can line up the timing marks and the lobe hole is straight up top.  Here's the rub:  If #4 is at TDC, and the #4 exhaust lobes are straight down, that would mean that when I tighten up the camshaft, I will be pushing those exhaust valves open and with the piston on TDC, we will have a problem.


For the intake cam, I have a different concern.   The "hole" on the rightmost lobe closest to the cam gear about 90 degrees off of the peak of the cam lobe - not exactly 90 degrees but close.  And it is in that position when the timing marks are lined up.  On one timing mark alignment, the hole is more to toward the top, and on the other, it's more toward the bottom.


6.  Would anybody know which direction I should be "leading" the cams?  Rotate toward the intake side a smidge (counterclockwise looking at the gear from the right side of the motor) or rotate toward the exhaust side a smidge (clockwise)?  Also, how much lead?  1 tooth?  1/2 tooth?


We buttoned the bike back together and are planning to take it to the dealer.  I'm not opposed to taking it back apart and trying again.  It will only cost us time and from what I'm reading here, if we bent valve(s), we can't break it anymore than it's broke.  OTOH - if I go back into it with more knowledge, I may be able to put it back right.


Regardless - I really appreciate all of the help.

ce4e895b-c6b5-474c-9ea2-6c60b2778940_zps

#10 hppants

FJR Commander

  • Members++
  • PipPipPipPipPip
  • 2,637 posts
  • Gender:Male
  • Location:Lafayette, LA
  • 2014A (Gen 3) N. America

Posted 13 March 2016 - 06:58 AM

I wish we had not put it back together - I could have confirmed my thoughts with pictures.


My recollection was that on the intake side, we did NOT have what Fred describes.  It would have been a great idea for me to take a sharpie and mark our holes like Fred did.  Hindsight is clearer....


Edit - Fred, when your motor was orientated for the picture above, did you confirm that the cam gear timing marks were lined up with the top of the cylinder head?  Or did you just confirm the crank at TDS ("T" mark)?


RFH - sage advice.  A parts changer should not be doing this kind of work.  I'm very upset with myself.  I do take some comfort in the fact that no one got hurt and the rest is just metal and money.  But I'm pissed off at myself for thinking I could do this shit in the first place.  On my Gen 1, I checked valves twice, but never attempted to replace a shim.  HUGE difference.


One way or the other, it will work out.

ce4e895b-c6b5-474c-9ea2-6c60b2778940_zps

#11 RaYzerman19

Go Wings!

  • Members++
  • PipPipPipPipPip
  • 3,508 posts
  • Gender:Male
  • Location:Millgrove, ON
  • 2014A (Gen 3) World
  • 2007 ABS (Gen 2) World

Posted 13 March 2016 - 07:42 AM

4.  Ignore #4 cam lobes, concentrate on #1 only..... everything else will fall into place.  If #1 at TDC and #1 cams splayed out per FSM, #4 lobes might be pointing inboard, but who cares.  As long as #1 is TDC, lobes splayed correctly, timing marks on end of cam sprockets lined up with edge of cylinder head, valve timing will be correct. 


5.  Using the lobe holes (per Fred's pic) is a way to indicate you are there.  If you are off a tad, you could be one tooth out, and to me, the only way to prevent that or verify that is to check the end of the cam sprockets...... it is hard to gunsight, but sit on a stool with your head still and a strong flashlight, I don't find it too awful to do.  It helps to highlight the marks with white grease pencil or a dab of paint.


6.  With everything in place, there should be no slack along the forward part of the cam chain...  Recheck everything once you have released the CCT, and before you rotate the engine (cam timing marks, crank TDC timing, backup verification of lobe holes, etc.).


Valve check instruction will help you...... see pic.


FJR%20Valves%201%20TDC_zpsutsyengh.jpg

2014A Root Beer

You don't go to Freddy Beach for the beach....

Duct tape can't fix stupid, but it can muffle the sound

#12 Fred W

1 Wheel Drive

  • Members++
  • PipPipPipPipPipPip
  • 18,703 posts
  • Gender:Male
  • Location:Southern NH
  • 2014ES (Gen 3) N. America

Posted 13 March 2016 - 07:57 AM

Why ignore the #4 cams?  They are directly tied to the rest of the cams on that shaft.


You can see in my photo what the #4 cams look like when the #1 is at TDC and its two cams are pointing upward and splayed out (as in the line drawing from the factory service manual directly above).  The #4 cams are pointing downward and splayed equally inward, as in my photo. 


note: the #4 cams are 180 degrees opposite of #1's on each cam shaft, so they can't be anywhere else when #1 is correct.

To view my "broken" Photobucket images:    Firefox fix  Chrome fix

#13 hppants

FJR Commander

  • Members++
  • PipPipPipPipPip
  • 2,637 posts
  • Gender:Male
  • Location:Lafayette, LA
  • 2014A (Gen 3) N. America

Posted 13 March 2016 - 08:42 AM

This is helping me understand a lot.


Raz - I'm assuming your FSM is the Yamaha book?  It is far different from the Chilton's FSM.


Considering Raz's picture, would it be safe to assume that Fred's picture was taken when his #1 and #4 pistons were at the end of the exhaust stroke (as opposed to compression)?


Also, once this is all together, how do I torque the crank bolt?  Maybe put it in 5th gear, off center stand, bitt the front of the bike against a wall, and pushing the rear brake?

ce4e895b-c6b5-474c-9ea2-6c60b2778940_zps

#14 RossKean

FJR Commander

  • Members++
  • PipPipPipPipPip
  • 3,668 posts
  • Gender:Male
  • Location:Fredericton, NB
  • 2007 ABS (Gen 2) N. America

Posted 13 March 2016 - 08:48 AM

The diagram from the manual (Ray's) is showing the lobes of #1 and Fred's picture is showing #4.  Both #1 and #4 are at TDC but lobes are opposite.

groundspider.jpgYN3DYrL.jpg

#15 hppants

FJR Commander

  • Members++
  • PipPipPipPipPip
  • 2,637 posts
  • Gender:Male
  • Location:Lafayette, LA
  • 2014A (Gen 3) N. America

Posted 13 March 2016 - 08:55 AM

So it would appear that the crankshaft turns exactly twice for every time the cams turn once?


Edit - of course it does.  It's a four stroke motor.  Dumbass, Pants......

ce4e895b-c6b5-474c-9ea2-6c60b2778940_zps

#16 wfooshee

O, Woe is me!

  • Members++
  • PipPipPipPipPip
  • 5,862 posts
  • Gender:Male
  • Location:Panama City, FL
  • 2003 (Gen 1) N. America

Posted 13 March 2016 - 09:18 AM

Why ignore the #4 cams?  They are directly tied to the rest of the cams on that shaft.


Because the lobe orientation specified in the FSM is for the #1 cams. Being aware that the #4 lobes are 180 degrees from that is fine, but you have to know that, and it's not specified in the manual.


Pants, another thing to consider, be sure you're using the correct timing marks on the intake cam (the one you say you can see.) If you use the mark with the arrow, the cam will be about 45 degrees off and you would be trying to open the #4 valves at TDC.


The timing marks for the intake cam do not have the arrow.

Cam%2Bsprockets.jpg


As for the "leading" the timing that I mentioned earlier, the manual simply says to keep the forward side of the chain as tight as possible when installing the cams. The tensioner will pull the cams backwards relative to the crankshaft if the forward side of the chain has any slack at all. I've seen guys say that they leave that side of the chain just a touch loose and put the cams in a tooth ahead (a tooth clockwise from "correct") to leave room for that when the tensioner comes in. It's quite difficult to judge the chain to be tight on that side when you haven't even got the cams in, yet.

crashclub.gif crashclub.gifcrashclub.gifGearbox teardown Darksider #18

Are you the reason I'm so far above average?

#17 hppants

FJR Commander

  • Members++
  • PipPipPipPipPip
  • 2,637 posts
  • Gender:Male
  • Location:Lafayette, LA
  • 2014A (Gen 3) N. America

Posted 13 March 2016 - 09:28 AM

Oh shit - bingo!!!  We have a winner.  I'm almost certain we were using the marks with the arrow for both the intake and exhaust.


Confirming, the EXHAUST cam gear marks are the ones with the arrow.  The INTAKE cam gear marks are the ones without the arrow?

ce4e895b-c6b5-474c-9ea2-6c60b2778940_zps

#18 RossKean

FJR Commander

  • Members++
  • PipPipPipPipPip
  • 3,668 posts
  • Gender:Male
  • Location:Fredericton, NB
  • 2007 ABS (Gen 2) N. America

Posted 13 March 2016 - 09:30 AM

^^^

Diagram and description are on the money! From the pictures in the FSM, it is not 100% obvious that the outlined cam lobe is #1, not #4.


I never had my cams out completely; just moved aside.  I was not aware that you used different index marks for intake vs exhaust.  Never had a problem because, like Fred, I zip tied the cam sprockets to the chain.

groundspider.jpgYN3DYrL.jpg

#19 RossKean

FJR Commander

  • Members++
  • PipPipPipPipPip
  • 3,668 posts
  • Gender:Male
  • Location:Fredericton, NB
  • 2007 ABS (Gen 2) N. America

Posted 13 March 2016 - 09:32 AM

Oh shit - bingo!!!  We have a winner.  I'm almost certain we were using the marks with the arrow for both the intake and exhaust.
 
Confirming, the EXHAUST cam gear marks are the ones with the arrow.  The INTAKE cam gear marks are the ones without the arrow?

Yep

Also remember that the lobe positions for intake and exhaust cams are mirror images to each other. 
groundspider.jpgYN3DYrL.jpg

#20 BobCo

FJR Pilot

  • Members++
  • PipPipPip
  • 123 posts
  • Gender:Male
  • Location:Monument, CO
  • 2008 ABS (Gen 2) N. America

Posted 13 March 2016 - 09:35 AM

note: the #4 cams are 180 degrees opposite of #1's on each cam shaft, so they can't be anywhere else when #1 is correct


The reason for the #4 valves to be slightly open at #1 tdc is cam overlap.  Which allows for exhaust scavenging to take place during #4 exhaust stroke.  Both the intake and the exhaust valves should be slightly open from a few degrees before the top of the exhaust stroke (where the intake valves start to open) to a few degrees after the top of the exhaust stroke (where the exhaust valves close).  Sorry if this comes across as pedantic.


Edited by BobCo, 13 March 2016 - 09:37 AM.

If things are bad, remember . . . It could be raining


Cancer will try to knock you out - Fight back, get treatment & ride a motorcycle. Peace

Redfish Hunter

Gone Fishing

  • Members++
  • PipPipPipPipPip
  • 3,145 posts
  • Gender:Male
  • Location:Prairieville, LA
  • 2007 ABS (Gen 2) N. America
  • 2015ES (Gen 3) N. America

Posted 13 March 2016 - 09:38 AM

Very good stuff in this thread.  I may never do it myself but I am certainly learning a lot here.

Never run out of ideas, real estate and traction simultaneously.

#22 audiowize

FJR Squadron Leader

  • Members++
  • PipPipPipPip
  • 509 posts
  • Gender:Male
  • Location:Seattle
  • 2003 (Gen 1) N. America

Posted 13 March 2016 - 09:53 AM

At the speed available from your wrench and the minimal torque you applied to the crank, I would go back in there and attempt to reset the cams before dropping it off at the dealer.

#23 BobCo

FJR Pilot

  • Members++
  • PipPipPip
  • 123 posts
  • Gender:Male
  • Location:Monument, CO
  • 2008 ABS (Gen 2) N. America

Posted 13 March 2016 - 09:53 AM

Quote

Very good stuff in this thread. 


I've bookmarked this topic for future reference.


Edited by BobCo, 13 March 2016 - 09:54 AM.

If things are bad, remember . . . It could be raining


Cancer will try to knock you out - Fight back, get treatment & ride a motorcycle. Peace

#24 RaYzerman19

Go Wings!

  • Members++
  • PipPipPipPipPip
  • 3,508 posts
  • Gender:Male
  • Location:Millgrove, ON
  • 2014A (Gen 3) World
  • 2007 ABS (Gen 2) World

Posted 13 March 2016 - 11:05 AM

 Out of all this comes some positive learning from a negative experience........ one knows what to do next time or on your first valvecheck/shim change.  While checking your valves, you're spinning the engine, taking your readings, or perhaps taking a second set of readings.  If you are going to change shims, it is best to spin your engine to leave #1 at TDC, crank and cam timing marks aligned, cam chain tie-wrapped at crank and at sprockets, loosen CCT, proceed with shim changes.  With the cams back in, it is then easy to verify the timing marks are all still OK at a glance.

2014A Root Beer

You don't go to Freddy Beach for the beach....

Duct tape can't fix stupid, but it can muffle the sound

#25 Intech

Mr. Camping Meet

  • Members++
  • PipPipPipPipPip
  • 3,909 posts
  • Gender:Male
  • Location:King George, VA
  • 2015ES (Gen 3) N. America

Posted 13 March 2016 - 11:26 AM

I read through this thread and had a major deja-vu! Pants, you did exactly what I did with LCB's bike. I ended up learning a trick to skip a link to adjust with the cams installed too.

RIP BeemerDons....JSNS

#26 PhilJet09

Nondescript FJR Hierarchy Displayed

  • Members++
  • PipPipPipPipPip
  • 1,385 posts
  • Gender:Male
  • Location:Ohio, Toledo suburbs
  • 2009 ABS (Gen 2) N. America

Posted 13 March 2016 - 12:07 PM

 Out of all this comes some positive learning from a negative experience........ one knows what to do next time or on your first valve check/shim change.  While checking your valves, you're spinning the engine, taking your readings, or perhaps taking a second set of readings.  If you are going to change shims, it is best to spin your engine to leave #1 at TDC, crank and cam timing marks aligned, cam chain tie-wrapped at crank and at sprockets, loosen CCT, proceed with shim changes.  With the cams back in, it is then easy to verify the timing marks are all still OK at a glance.


I also made sharpie marks where a tooth sat in the chain for each gear and only removed one cam at a time. After both cams are torqued back down and the tensioner is re-installed, a double check of the marks in all 3 places ensures it's back together right. More of a sanity check really. 
Petey is my hero.

#27 hppants

FJR Commander

  • Members++
  • PipPipPipPipPip
  • 2,637 posts
  • Gender:Male
  • Location:Lafayette, LA
  • 2014A (Gen 3) N. America

Posted 13 March 2016 - 12:21 PM

Wonderful support on this, friends.  Much thanks to everyone.


Mike came over today - we are probably going to give it another shot next weekend.  Yesterday in our deepest frustration, we threw our hands up and started buttoning up the bike to ship off to the dealer.  Looking back, we probably should have just stopped, started this thread, and slept on it.  Things would be much clearer today (as they are).


If it's broke, I don't think we can break it any more by trying again.  Ray's series of steps seems logical.  Take the cams out, spin the crank and verify a couple of knock free revolutions, put the cams in time and install.  If we are able to get the cams to line up in time with the crank, we can spin the crank and verify nothing unusual and the timing marks re-align on time.  Then we can take a compression test on the motor and if we get that far, I think we will be home free.


One way or the other, I will be updating this thread.

ce4e895b-c6b5-474c-9ea2-6c60b2778940_zps

#28 dcarver

FJR Forum Post Whore

  • Members++
  • PipPipPipPipPipPip
  • 13,255 posts
  • Gender:Male
  • Location:Creston, CA
  • Interests:Bikes. Booze. Broads. Dirt. Street. Mud. Guts. Courage. Honesty.
  • 2006 ABS (Gen 2) World

Posted 13 March 2016 - 02:43 PM

Attaboy Pants! Keep after it. punk.gif

    Walked away Posted ImagePosted Image Is it really crashing if you don't fall down?--
    I wouldn't change a fucking thing; I've lived hard, played hard, and I ain't done yet. I've paid some severe penalties along the way, but the rewards have been so much greater; even if for just have participating in the game of life with utmost abandon. It's not who rides the furthest in a day, but rather in a lifetime. CBA member #1, IBA #31845 and very proud of both.
    Posted Image

    #29 wfooshee

    O, Woe is me!

    • Members++
    • PipPipPipPipPip
    • 5,862 posts
    • Gender:Male
    • Location:Panama City, FL
    • 2003 (Gen 1) N. America

    Posted 13 March 2016 - 07:54 PM

    Oh shit - bingo!!!  We have a winner.  I'm almost certain we were using the marks with the arrow for both the intake and exhaust.


    If that's the case and I've cleared it up for you, then it's a bit of karma!!! I'm shifting that transmission you salvaged from Patriot'sbearing-failure motor, so if I helped with this, then it's kind of a payback!  thumbsupsmiley.png

    crashclub.gif crashclub.gifcrashclub.gifGearbox teardown Darksider #18

    Are you the reason I'm so far above average?

    #30 Pterodactyl

    SURVIVOR

    • Members++
    • PipPipPipPipPip
    • 1,206 posts
    • Gender:Male
    • Location:Silver City, Montana
    • 2013A (Gen 3) N. America

    Posted 13 March 2016 - 08:27 PM

    This has been like watching one of those serial adventure shows they used to show before the matinee movies when I was a kid. Our current show leaves us with our stalwart hero resolving to pick himself up and make another charge at the evil forces of Dr. Doom. 

    Can't wait until the next installment....... 
    Kevin, Darksider #81
    Team Pterodactyl Montana Outpost
    CIB_zps97253023.jpg  Ranger_Tab_zps1aef6419.png  ABN_zpsf83b9df5.png  IMG_2507_zps6v85xzxi.jpg

    #31 Fred W

    1 Wheel Drive

    • Members++
    • PipPipPipPipPipPip
    • 18,703 posts
    • Gender:Male
    • Location:Southern NH
    • 2014ES (Gen 3) N. America

    Posted 14 March 2016 - 05:44 AM

    Pants, after you get everything in time and back together, you'll also be re-measuring the clearances.  If any of them has become very large, that's your sign that a valve is bent.  A bent valve will not be able to close fully, so the clearance will be increased


    If they all measure good and what you expected to hit after the adjustments you made, then you are good to go.

    To view my "broken" Photobucket images:    Firefox fix  Chrome fix

    #32 hppants

    FJR Commander

    • Members++
    • PipPipPipPipPip
    • 2,637 posts
    • Gender:Male
    • Location:Lafayette, LA
    • 2014A (Gen 3) N. America

    Posted 14 March 2016 - 06:00 AM

    I for one hope that we have reached the peak of this particular drama (or the rock bottom depending on your perspective).

    It was very good for us to take a break yesterday and simply calm down.

    I went back today and re-read everything, including a very detailed email from Ray (Thanks much, my friend) and I really think things are much clearer now. I do have a few follow up questions:

    1. Ray - in your post #11 - is it your understanding that the orientation of the cam lobes pictured is what the #1 cylinder should look like. IOW - the view of that drawing is looking at the motor from the left turn signal side? If that is true, then the #4 cam lobes would be facing inward toward each other (as in Fred's picture).

    2. Woofooshee - I'm still trying to understand the "lead" the cams part? If I understood you in post #16, by "forward" side, you mean the side of the chain that is closest to the exhaust header? Keep that side tight when installing the exhaust cam. Then keep the chain between the cams tight as we install the instake cam. Have a got that correct? I'm also thinking that I will zip tie the crank at TDC, then zip tie the exhaust cam after it is installed, then zip tie the intake cam after it is installed, then (and only then) release the cam chain.

    3. In the same drawing shown by Woofooshee in post #16, there are cam lobes drawn in hidden lines behind the cam gears. Are those the cam lobes for cylinder #1 (I'm just backing up question #1 in this post)?

    4. Also in the same drawing, on both cam gears, there appears to be some small notches or marks identified by an "A". May I assume that the orientation of the "A" marks ensures that we don't get the cam gears 180 degrees out of sync?

    5. Trivial question - what does the "E" mean that is stamped on both cam gears?

    6. Can anyone confirm that when the crank and both camshafts are oriented correctly for timing purposes, that at this instant, there are NO valves open (partially or fully)? IOW - are all of the lobes off the buckets? I think this is important. The reason we had trouble in the first place was because we were trying to over come the valve spring(s) to set the camshafts down. This very little amount left no slack in the chain to work. We were able to use the bolts (4 of them) on the cam bearing/block (the one with the lateral camshaft guide built in it) to overcome the valve spring. But it would seem to me that it would be a whole lot easier to set the time if we didn't have to fight a valve spring. If one (or more) of the valves is open (or partially open) when the cams are in time with the crank, can anybody indicate which (and by how much)?

    7. Bob - in your post #25, you indicate that you learned a trick by "skipping a tooth". Can you elaborate on this, please?

    8. Finally, thinking positively that we can in fact DO THIS, can anyone provide the torque spec for the crank rotor bolt? There was no lock tight on that bolt, but should we use some and if so, which kind (blue or red). Anybody have a problem with my previously proposed method of torqueing this bolt (bike on the ground in 5th gear, front wheel against a wall, rider sitting on the bike stomping on the rear brake)? Of course the compression of the pistons won't provide enough resistance for me to torque this bolt. If I meet a stop on a stroke, then we know there are much bigger problems than torqueing that bolt. I could use my impact wrench and hunk down on it, but the last thing I need now is a stripped or sheared bolt in a crankshaft. LOL.

    At least for me - when dealing with any challenge, it's very important to fully understand where you came from and how you got here before you start moving forward.

    Based on this, my best guess is that we had the intake cam out of time by about 45 degrees (lined on the arrows, not the straight marks - the difference in the drawing post #15 is about 45 degrees), and this caused the #4 intake valves to push open against the TDC of that piston. The valves moved the piston clockwise about 10 degrees. I know this because after assembly, I could rotate the motor clockwise about 150 degrees before a stop, followed by counter clockwise in the same amount. Upon stopping after the counterclockwise movement, the crank was about 10 degrees clockwise from TDC.

    Of course what we don't know is if I bent #4 intake valves during assembly, or some other valves when I hit the stop 150 rotational degrees later. A set of tests should confirm this one way or the other.

    As for the rest of you (including those of you that have sent PMs with well wishes), I am indeed humbled by your encouragement. We will give it another go and hope for the best. This thing is not the boss of me. I'm the boss of it! 
    ce4e895b-c6b5-474c-9ea2-6c60b2778940_zps

    #33 Fred W

    1 Wheel Drive

    • Members++
    • PipPipPipPipPipPip
    • 18,703 posts
    • Gender:Male
    • Location:Southern NH
    • 2014ES (Gen 3) N. America

    Posted 14 March 2016 - 06:42 AM

    Yes, in that drawing of the cam sprocket and the timing marks, the dashed lines showing cam lobes would be the #1 cams, way on the opposite end of the camshaft.


    Yes, when the #1 cams are in that position, the #4 cams will be in the position shown in my photo.  The #1 and #4 cylinders are 180 degrees apart.


    The FJR engine;'s firing order is 1, 2, 4, 3 so the #2 and #3 cylinders will be exactly 90 degrees and 270 degrees retarded (located CCW from the chain endfrom #1's cams.  They will be depressing some valves slightly at #1 TDC, but do not want to rotate the cam shafts as I recall.


    What Intech was saying is to intentionally skip a tooth in the CW direction when putting the slack chain on the crank sprocket so that you will be on the right tooth when you tension the chain tight.  This is easiest accomplished if you turn the crank backwards a few degrees (CCW) from the timing mark when fitting the chain.  It is impossible to fit a tight chain over the sprocket teeth with everything exactly at the timing marks..

    To view my "broken" Photobucket images:    Firefox fix  Chrome fix

    #34 Intech

    Mr. Camping Meet

    • Members++
    • PipPipPipPipPip
    • 3,909 posts
    • Gender:Male
    • Location:King George, VA
    • 2015ES (Gen 3) N. America

    Posted 14 March 2016 - 11:26 AM

    What Intech was saying is to intentionally skip a tooth in the CW direction when putting the slack chain on the crank sprocket so that you will be on the right tooth when you tension the chain tight.  This is easiest accomplished if you turn the crank backwards a few degrees (CCW) from the timing mark when fitting the chain.  It is impossible to fit a tight chain over the sprocket teeth with everything exactly at the timing marks..

    I was moving the position of the exhaust cam not the crank, so to give me a little more slack I pushed the chain guide up and away from the crank sprocket. I was doing this to move the exhaust cam CW as you look at the sprocket end. It gave me enough slack to take the chain off the cam and rotate it to the right position. The only thing you have to be careful of is to keep the slack at the cam, so it doesn't drop off the crank. It actually was easy to do after I figured out how to position everything. If I had someone else there with me I could have taken a video as it is almost impossible to describe.


    I am not sure what I did wrong in the initial process, but it is likely that the chain moved on the crank as i didn't take that cover off initially. I had it off for the final install, so I could see all the marks. The hardest ones to see are on the cam sprockets. A good light and a straight edge were helpful. It is also helpful to know that the marks you reference are different on the sprockets (noted earlier).

    RIP BeemerDons....JSNS

    #35 Blind Squirrel

    I'm your huckleberry.

    • Members++
    • PipPipPipPipPip
    • 1,047 posts
    • Gender:Male
    • Location:Chesapeake Va.
    • Other or considering FJR

    Posted 14 March 2016 - 11:38 AM

    Bob,


    You should hold a clinic on this at your upcoming tech day http://www.fjrforum....2016/?p=1270366. There has to be someone that wants to do a valve check!

    - Scott (Chesapeake Va.)


    #36 RaYzerman19

    Go Wings!

    • Members++
    • PipPipPipPipPip
    • 3,508 posts
    • Gender:Male
    • Location:Millgrove, ON
    • 2014A (Gen 3) World
    • 2007 ABS (Gen 2) World

    Posted 14 March 2016 - 12:21 PM

    Best keep it as simple as possible....... taking the cams out is like rebooting your computer..... fresh start.....  now you place the cams as shown in the diagram(s), ensure timing marks are aligned as best you can get them, snug down the cam bolts (I do a progressive tightening to avoid any pressure in one spot that would crack/break a cam, even though there may be little danger).  If all is aligned to #1 TDC, etc. then everything else is going to be in the right place.  Verify the timing marks again, and if you have to tweak a cam's position by one tooth, you'll either remove that cam again or use the "skip a tooth" method... verify again once you've released the CCT..........  keep it simple.


    Fred brings up a good point to check the clearances again to let you know if there's an issue with the valves seating....

    2014A Root Beer

    You don't go to Freddy Beach for the beach....

    Duct tape can't fix stupid, but it can muffle the sound

    #37 Fred W

    1 Wheel Drive

    • Members++
    • PipPipPipPipPipPip
    • 18,703 posts
    • Gender:Male
    • Location:Southern NH
    • 2014ES (Gen 3) N. America

    Posted 14 March 2016 - 12:56 PM

    The reason that I mentioned turning the crank backwards slightly while slipping the chain on that crankshaft sprocket is because it is easier to back the crank up than it is to move the cams forward since you'll then be fighting the valve springs. 


    The reason they warn you in the FSM to only rotate the crankshaft in the forward (CW) direction is because that keeps the chain tight on the forward run down from the exhaust cam down to the crank.  Rotating the crank CCW can pull the slack out of the rear chain run and compress the CCT, and would allow the chain to start skipping teeth on the crank or cams.  Since the chain is not yet connected, there is no problem with backing it up a few degrees to slip the chain on.  Then rotate the crank back CW to the timing mark and check the timing marks.   


    Like Bob said, it's easier to do than to describe.

    To view my "broken" Photobucket images:    Firefox fix  Chrome fix

    #38 Intech

    Mr. Camping Meet

    • Members++
    • PipPipPipPipPip
    • 3,909 posts
    • Gender:Male
    • Location:King George, VA
    • 2015ES (Gen 3) N. America

    Posted 14 March 2016 - 01:33 PM

    The reason that I mentioned turning the crank backwards slightly while slipping the chain on that crankshaft sprocket is because it is easier to back the crank up than it is to move the cams forward since you'll then be fighting the valve springs. 


    The reason they warn you in the FSM to only rotate the crankshaft in the forward (CW) direction is because that keeps the chain tight on the forward run down from the exhaust cam down to the crank.  Rotating the crank CCW can pull the slack out of the rear chain run and compress the CCT, and would allow the chain to start skipping teeth on the crank or cams.  Since the chain is not yet connected, there is no problem with backing it up a few degrees to slip the chain on.  Then rotate the crank back CW to the timing mark and check the timing marks.   


    Like Bob said, it's easier to do than to describe.

    Well I must clarify that the technique I was describing was to rotate the exhaust cam with it INSTALLED. That is why I did give the slight CCW turn on the crank AND push the chain guide up enough to get the slack required to disengage the chain from the cam sprocket.

    RIP BeemerDons....JSNS

    #39 hppants

    FJR Commander

    • Members++
    • PipPipPipPipPip
    • 2,637 posts
    • Gender:Male
    • Location:Lafayette, LA
    • 2014A (Gen 3) N. America

    Posted 14 March 2016 - 02:55 PM

    Very good descriptions regarding the "leading" portion of my concerns.  I do understand what you are writing and will hope to get everything correct.  Regardless of how I do it, as long as I get all of the CORRECT timing marks aligned with the chain tight, and the rotate the crank two revolutions and verify all marks re-timed, then I guess I'm good to try a compression test and hope for the best.


    Anybody wanna take a stab at the torque for the crank bolt?

    ce4e895b-c6b5-474c-9ea2-6c60b2778940_zps

    #40 RaYzerman19

    Go Wings!

    • Members++
    • PipPipPipPipPip
    • 3,508 posts
    • Gender:Male
    • Location:Millgrove, ON
    • 2014A (Gen 3) World
    • 2007 ABS (Gen 2) World

    Posted 14 March 2016 - 05:07 PM

    FSM says 47 ft. lbs. for the crank rotor bolt....... seems like a lot....  wait to final torque it after the engine is all back together, spark plugs in.  You might get close.  Be happy if it's close.

    2014A Root Beer

    You don't go to Freddy Beach for the beach....

    Duct tape can't fix stupid, but it can muffle the sound

    wfooshee

    O, Woe is me!

    • Members++
    • PipPipPipPipPip
    • 5,862 posts
    • Gender:Male
    • Location:Panama City, FL
    • 2003 (Gen 1) N. America

    Posted 14 March 2016 - 06:38 PM

    1. Ray - in your post #11 - is it your understanding that the orientation of the cam lobes pictured is what the #1 cylinder should look like. IOW - the view of that drawing is looking at the motor from the left turn signal side? If that is true, then the #4 cam lobes would be facing inward toward each other (as in Fred's picture).


    Answered above


    2. Woofooshee - I'm still trying to understand the "lead" the cams part? If I understood you in post #16, by "forward" side, you mean the side of the chain that is closest to the exhaust header? Keep that side tight when installing the exhaust cam. Then keep the chain between the cams tight as we install the instake cam. Have a got that correct? I'm also thinking that I will zip tie the crank at TDC, then zip tie the exhaust cam after it is installed, then zip tie the intake cam after it is installed, then (and only then) release the cam chain.


    Answered above


    3. In the same drawing shown by Woofooshee in post #16, there are cam lobes drawn in hidden lines behind the cam gears. Are those the cam lobes for cylinder #1 (I'm just backing up question #1 in this post)?


    Answered above


    4. Also in the same drawing, on both cam gears, there appears to be some small notches or marks identified by an "A". May I assume that the orientation of the "A" marks ensures that we don't get the cam gears 180 degrees out of sync?


    a refers to the holes in the #4 lobe closest to the sprocket. Those holes are straight up on a correctly timed cam when #1 is at TDC on compression, and line up with the arrow on that cap nearby..


    5. Trivial question - what does the "E" mean that is stamped on both cam gears?


    The E is for "Exhaust." The holes by the stamped 'E' are where the bolts go through the sprocket to attach to the exhaust cam. those holes are empty on the sprocket attached to the intake cam.


    6. Can anyone confirm that when the crank and both camshafts are oriented correctly for timing purposes, that at this instant, there are NO valves open (partially or fully)? IOW - are all of the lobes off the buckets? I think this is important. The reason we had trouble in the first place was because we were trying to over come the valve spring(s) to set the camshafts down. This very little amount left no slack in the chain to work. We were able to use the bolts (4 of them) on the cam bearing/block (the one with the lateral camshaft guide built in it) to overcome the valve spring. But it would seem to me that it would be a whole lot easier to set the time if we didn't have to fight a valve spring. If one (or more) of the valves is open (or partially open) when the cams are in time with the crank, can anybody indicate which (and by how much)?


    I'm pretty sure one of the cams has valves opening on one of the cylinders 2 or 3, and the other one has the other cylinder with some valves partly open.


    7. Bob - in your post #25, you indicate that you learned a trick by "skipping a tooth". Can you elaborate on this, please?


    Answered, but I'll add that my term "leading" and his term "skipping a tooth" are the same thing. It's impossible to install the cams with the marks lined up and the chain tight. You either back the crankshaft a few degrees to give the chain enough slack to get the cams in, or you install the cams a tooth ahead of where they belong so that when the tensioner comes down on the chain, they'll back into the correct position.

    Once the cams are in and the chain on them, ONLY turn the crankshaft clockwise. That's why you start with the crankshaft backed a few degrees rather than setting the cams forward; gives you space to turn the crank to its mark without having to go all the way around.


    8. Finally, thinking positively that we can in fact DO THIS, can anyone provide the torque spec for the crank rotor bolt? There was no lock tight on that bolt, but should we use some and if so, which kind (blue or red). Anybody have a problem with my previously proposed method of torqueing this bolt (bike on the ground in 5th gear, front wheel against a wall, rider sitting on the bike stomping on the rear brake)? Of course the compression of the pistons won't provide enough resistance for me to torque this bolt. If I meet a stop on a stroke, then we know there are much bigger problems than torqueing that bolt. I could use my impact wrench and hunk down on it, but the last thing I need now is a stripped or sheared bolt in a crankshaft. LOL.


    First, not sure why that bolt would have been pulled. No reason for it just for the cams.

    But since you asked, the manual does not call for locktite there, and the torque is 45 n-m, or 33 lb-ft.

    The manual does call for for locktite on the bolts for the pickup coil itself.
     

    crashclub.gif crashclub.gifcrashclub.gifGearbox teardown Darksider #18

    Are you the reason I'm so far above average?

    #42 RaYzerman19

    Go Wings!

    • Members++
    • PipPipPipPipPip
    • 3,508 posts
    • Gender:Male
    • Location:Millgrove, ON
    • 2014A (Gen 3) World
    • 2007 ABS (Gen 2) World

    Posted 14 March 2016 - 08:17 PM

    Double-checked torque for the rotor bolt..... '06 FSM is 45 n-m/32 lb-ft. but Gen III FSM says 65 n-m/47 lb-ft...... this may be an error, and I thought it high, so I'd go with the '06 spec.  I don't see the harm in using loctite.

    2014A Root Beer

    You don't go to Freddy Beach for the beach....

    Duct tape can't fix stupid, but it can muffle the sound

    #43 Mihalis fjr

    FJR Commander

    • Members++
    • PipPipPipPipPip
    • 2,214 posts
    • Gender:Male
    • Location:Athens Greece
    • 2003 ABS (Gen 1) Euro/Other

    Posted 14 March 2016 - 11:36 PM

    hppants,it isn't so easy to bent the valves by your hand and your ratchet,no.gif so don't worry about that..Don't ask me how i know it...rolleyes.gif smile.png

    Powercommander III USB,(Helibars risers,MV Motorrad handlebar adapter plate,Not both installed).Gsg frame sliders,Oem windshields standard+tall,Laminar lip,OEM Top case+backrest,Gipro gear indicator,Glover tank bag,Touratech rear seat bag,Saddlemen fleece seat gel pad,Beowulf radiator cover,Gen 2  mirrors + oem knuckle visors,Remote controller for klan heated gloves.Go-cruise,Grip Puppies,MCL Foot Peg Lowering Brackets.


    My other bike:Yamaha XTZ 750 Super Tenere

    #44 hppants

    FJR Commander

    • Members++
    • PipPipPipPipPip
    • 2,637 posts
    • Gender:Male
    • Location:Lafayette, LA
    • 2014A (Gen 3) N. America

    Posted 15 March 2016 - 05:39 AM

    Ray - thanks for the clarification re: rotor bolt torque.  I removed that bolt in order to remove the chain from the crank during our debacle last weekend.  Mike's bike is a Gen II, we will go with the 32 ft. #.


    Wfooshee - and thanks to you as well.  Your most recent post (ref #4) will be helpful.


    Mahalis - I think we will be OK.  I called the dealer yesterday just to get some vocal information and advice.  Like all of you, they actually encouraged me to continue.  The service manager quite matter of factly told me that ".... if you know enough to describe the problem as you just have, then you know enough to put it back together right....".  Like many of you, he said that if we actually bent a valve from turning it by hand, that would be the first time he has heard of it (20+ year mechanic).  Oh - he's heard of many a bent valve from RUNNING the motor out of time.  He's also heard of many a motor in our situation - turned by hand out of time - thankfully, no bent valve stories yet.


    Someone please correct me if I'm wrong, but don't the pistons tops for the FJR have recesses in them in the shape of the valves?  If so, that definitely helps, IMO.  When I pushed a valve(s) against the top of the piston by hand, the entire surface of the valve mated with the piston.  When thinking about bending valves, that would be more stable than just touching (lightly banging) the edge of the valve at an angle against the top of the piston.


    "It ain't what you don't know that gets you in trouble.  It's what you know for sure that just ain't so."  Mark Twain


    Mike and I are going to give it another try Friday afternoon.  Will update as we go.

    ce4e895b-c6b5-474c-9ea2-6c60b2778940_zps

    #45 wheatonFJR

    ...

    • Banned
    • PipPipPipPipPipPip
    • 16,348 posts
    • Gender:Male
    • Location:Greenville,SC
    • 2013A (Gen 3) N. America

    Posted 15 March 2016 - 09:03 AM

    Drink lots of beer.  Say the words, "Watch this..." before you start.


    .


    .


    Okay, maybe not.


    But take video of the engine running after you get it back and running...and then crack open that Hamms beer.

    Iggy's a douchetard.  JSNS
     

    #46 Mihalis fjr

    FJR Commander

    • Members++
    • PipPipPipPipPip
    • 2,214 posts
    • Gender:Male
    • Location:Athens Greece
    • 2003 ABS (Gen 1) Euro/Other

    Posted 15 March 2016 - 10:16 AM

    Here are the fjr pistons.Again,it is very difficult or better,impossible to bend the valves by your hand and a ratchet.So,don't worry about that!smile.png The valves are made from a very strong alloy steel!

    s-l500_zpsqkamyjfk.jpg

    Powercommander III USB,(Helibars risers,MV Motorrad handlebar adapter plate,Not both installed).Gsg frame sliders,Oem windshields standard+tall,Laminar lip,OEM Top case+backrest,Gipro gear indicator,Glover tank bag,Touratech rear seat bag,Saddlemen fleece seat gel pad,Beowulf radiator cover,Gen 2  mirrors + oem knuckle visors,Remote controller for klan heated gloves.Go-cruise,Grip Puppies,MCL Foot Peg Lowering Brackets.


    My other bike:Yamaha XTZ 750 Super Tenere

    #47 wfooshee

    O, Woe is me!

    • Members++
    • PipPipPipPipPip
    • 5,862 posts
    • Gender:Male
    • Location:Panama City, FL
    • 2003 (Gen 1) N. America

    Posted 15 March 2016 - 06:06 PM

    They do indeed have the dimples, but that's for how close stuff gets during compression and exhaust and not to clear a fully open valve

    crashclub.gif crashclub.gifcrashclub.gifGearbox teardown Darksider #18

    Are you the reason I'm so far above average?

    #48 Mihalis fjr

    FJR Commander

    • Members++
    • PipPipPipPipPip
    • 2,214 posts
    • Gender:Male
    • Location:Athens Greece
    • 2003 ABS (Gen 1) Euro/Other

    Posted 16 March 2016 - 12:29 AM

    Yes, ^^^^^ but these dimples can help a lot in a mistake ''by hand,ratchet'' to protect the valves because the slope that they have i believe..

    Powercommander III USB,(Helibars risers,MV Motorrad handlebar adapter plate,Not both installed).Gsg frame sliders,Oem windshields standard+tall,Laminar lip,OEM Top case+backrest,Gipro gear indicator,Glover tank bag,Touratech rear seat bag,Saddlemen fleece seat gel pad,Beowulf radiator cover,Gen 2  mirrors + oem knuckle visors,Remote controller for klan heated gloves.Go-cruise,Grip Puppies,MCL Foot Peg Lowering Brackets.


    My other bike:Yamaha XTZ 750 Super Tenere

    #49 yamafitter

    Reigning NERDS Granite Lane Gold Medalist

    • Members++
    • PipPipPipPipPip
    • 3,150 posts
    • Gender:Male
    • Location:Bowmanville, ON
    • 2006 ABS AE (Gen 2) World

    Posted 16 March 2016 - 03:02 AM

    Placing a straightedge across the head will help you see if the alignment marks on the cams are in the correct position. It just helps reduce any parallax issues and a really good flashlight (or torch for our friends across the pond) is a good tool to have for this task. 

    Confucius say: "No matter where you go ..... there you are"

    #50 DezzertRider

    FJR Pilot

    • Members++
    • PipPipPip
    • 188 posts
    • Gender:Male
    • Location:Phoenix AZ
    • 2004 ABS (Gen 1) N. America

    Posted 16 March 2016 - 02:29 PM

     Out of all this comes some positive learning from a negative experience........ one knows what to do next time or on your first valve check/shim change.  While checking your valves, you're spinning the engine, taking your readings, or perhaps taking a second set of readings.  If you are going to change shims, it is best to spin your engine to leave #1 at TDC, crank and cam timing marks aligned, cam chain tie-wrapped at crank and at sprockets, loosen CCT, proceed with shim changes.  With the cams back in, it is then easy to verify the timing marks are all still OK at a glance.


    I just did my first valve check and set the cams aside only.  I only removed the cams when #1 was at TDC and the alignment holes were aligned with the arrows on the #3 camshaft caps.  I never spun the motor unless the cams shafts were back in place and the alignment holes lined back up with the #3 camshaft cap marks.  If you remove the cams and then spin the motor, then you have a whole new alignment issue.

    "I don't want a pickle, I just want to ride on my motor-sikle" - The Motorcycle song by Arlo Guthrie

    2004 FJR Superior Gen-I

    2006 Triumph Bonneville T100

    #51 wfooshee

    O, Woe is me!

    • Members++
    • PipPipPipPipPip
    • 5,862 posts
    • Gender:Male
    • Location:Panama City, FL
    • 2003 (Gen 1) N. America

    Posted 16 March 2016 - 03:42 PM

    Yes, ^^^^^ but these dimples can help a lot in a mistake ''by hand,ratchet'' to protect the valves because the slope that they have i believe..


    Not much. Those dimples do not clear the valves if the valve is actually open from a mistimed cam (i.e. cam chain skipped some teeth.)

    crashclub.gif crashclub.gifcrashclub.gifGearbox teardown Darksider #18

    Are you the reason I'm so far above average?

    #52 Intech

    Mr. Camping Meet

    • Members++
    • PipPipPipPipPip
    • 3,909 posts
    • Gender:Male
    • Location:King George, VA
    • 2015ES (Gen 3) N. America

    Posted 16 March 2016 - 05:04 PM

     Out of all this comes some positive learning from a negative experience........ one knows what to do next time or on your first valve check/shim change.  While checking your valves, you're spinning the engine, taking your readings, or perhaps taking a second set of readings.  If you are going to change shims, it is best to spin your engine to leave #1 at TDC, crank and cam timing marks aligned, cam chain tie-wrapped at crank and at sprockets, loosen CCT, proceed with shim changes.  With the cams back in, it is then easy to verify the timing marks are all still OK at a glance.


    I just did my first valve check and set the cams aside only.  I only removed the cams when #1 was at TDC and the alignment holes were aligned with the arrows on the #3 camshaft caps.  I never spun the motor unless the cams shafts were back in place and the alignment holes lined back up with the #3 camshaft cap marks.  If you remove the cams and then spin the motor, then you have a whole new alignment issue.

    Wait! A valve clearance check is done with the cams INSTALLED. Why would you set them aside?

    RIP BeemerDons....JSNS

    #53 Constant Mesh

    FJR Commander

    • Members++
    • PipPipPipPipPip
    • 1,762 posts
    • Gender:Male
    • Location:Tenn
    • 2004 (Gen 1) N. America

    Posted 16 March 2016 - 07:50 PM

    You can easily check the cam position using a simple right triangle.  The camshaft caps with the alignment arrows have a vertical line extending out on the side next to the cam lobes with the alignment pips.  Lay the right triangle down on its side atop the cam lobe with one edge against the side of the cap with the right angle corner against the vertical line on the cap.  See where the lobe pip is relative to the edge of the triangle.  If everything is correct the pip should just be visible at the edge of the triangle.


    You don't need to look at the marks on the sprockets just use the cam lobe pips.


    With the triangle down on the cam lobe it's easy to see the pip's location with very good precision.

    #54 Mihalis fjr

    FJR Commander

    • Members++
    • PipPipPipPipPip
    • 2,214 posts
    • Gender:Male
    • Location:Athens Greece
    • 2003 ABS (Gen 1) Euro/Other

    Posted 17 March 2016 - 12:02 AM

    Yes, ^^^^^ but these dimples can help a lot in a mistake ''by hand,ratchet'' to protect the valves because the slope that they have i believe..


    Not much. Those dimples do not clear the valves if the valve is actually open from a mistimed cam (i.e. cam chain skipped some teeth.)

    Agree if the engine runs!But if you turn the engine by your hand and if there something is out of alignment,these dimples can help to absorb some force from the pistons to the edge of the valves..My opinion.

    Powercommander III USB,(Helibars risers,MV Motorrad handlebar adapter plate,Not both installed).Gsg frame sliders,Oem windshields standard+tall,Laminar lip,OEM Top case+backrest,Gipro gear indicator,Glover tank bag,Touratech rear seat bag,Saddlemen fleece seat gel pad,Beowulf radiator cover,Gen 2  mirrors + oem knuckle visors,Remote controller for klan heated gloves.Go-cruise,Grip Puppies,MCL Foot Peg Lowering Brackets.


    My other bike:Yamaha XTZ 750 Super Tenere

    #55 hppants

    FJR Commander

    • Members++
    • PipPipPipPipPip
    • 2,637 posts
    • Gender:Male
    • Location:Lafayette, LA
    • 2014A (Gen 3) N. America

    Posted 17 March 2016 - 05:39 AM

    C/M - I'm trying to picture what you have described, but it's not clicking. It sounds like you are suggesting a way for me to verify correct timing without having to look at the alignment marks on the outside of the cam gears. This is desirable because, as you know, seeing the gear alignment marks with the engine in the frame is difficult at best.

    What is an "alignment pip"?

    A picture might help, although you might not be able to provide one.

    Regardless, I'd just use this as a triple check to the traditional FSM method. Transferring the marks to the inside of the gear will definitely get me within 1/2 of a cam gear tooth, which is accuracy needed to meet the objective. I can then use a dental mirror and head light to verify the actual marks on the outside of the cam gear.

    Mahilis gets what I was suggestion re: piston tops. It's an interference motor - one revolution at speed and it's grenade city. But just turning by hand, I'd rather have a valve touch (or lightly tap) the top of the piston across the entire diameter of the valve than have it only touch one point on the circumference.

    Obviously, I don't trust anything in the Chilton's manual anymore. Can anyone please verify the torque spec for the cam bearing caps as 88 inch pounds?

    Also, what does the Yamaha FSM say regarding compression test pressures? I realize that if I have a bent valve(s), the numbers should be proportionately lower in that hole(s), but I'd like to know what is considered normal?

    I really feel that I have a true understanding of this now. I definitely know what I need to do. Hopefully tomorrow, we will have some good news. 
    ce4e895b-c6b5-474c-9ea2-6c60b2778940_zps

    #56 Fred W

    1 Wheel Drive

    • Members++
    • PipPipPipPipPipPip
    • 18,703 posts
    • Gender:Male
    • Location:Southern NH
    • 2014ES (Gen 3) N. America

    Posted 17 March 2016 - 05:46 AM

    Pips = the dimples in the back of the #4 right-most cams that I posted a picture of previously.  Those holes can be used to confirm the proper cam timing, but I would also attempt to use a mirror and view the marks on the right end sprockets. 


    Two alignment checks are better than one.  wink.png

    To view my "broken" Photobucket images:    Firefox fix  Chrome fix

    #57 El Toro

    Innocent Bystander

    • Members++
    • PipPipPipPipPip
    • 1,707 posts
    • Gender:Male
    • Location:50 North and 40 West
    • 2009 ABS AE (Gen 2) N. America

    Posted 17 March 2016 - 06:47 AM

    Pants, the more time you throw at this to try to fix it yourself, the more money you will have to pour on it later.


    The questions you are asking, and the follow up questions that you are asking, indicate that it is not really fair to the owner of this bike that you continue to work on it.


    Find a dealer with a good mechanic and trailer it to them.


    The bad news is that this is their busy season, and the bike may have to wait for some time.


    The other thing you could do that might be fair to your friend is accidentally back over it in your driveway ... of course I'm kidding (wink, wink, wink), but you get the picture.


    You're two torque wrenches away from owing your friend a bike, and you can't dig out of a whole with torque wrenches.

    Patience isn't a virtue.... It's a coping skill.
    Ignorance can sometimes be fixed. Ignorance of ignorance often leads to arrogance.

    JSNS, RIP Don

    #58 Constant Mesh

    FJR Commander

    • Members++
    • PipPipPipPipPip
    • 1,762 posts
    • Gender:Male
    • Location:Tenn
    • 2004 (Gen 1) N. America

    Posted 17 March 2016 - 07:01 AM

    Fred's photo shows the pips, small holes in the intake and exhaust cam lobes, visible between the long camshaft caps and the chain sprockets.


    You can see one intake and one exhaust cam lobe between the end of the long caps and the sprockets.


    If you had a reverse view of Fred's photo we could see a vertical line on the end of the caps adjacent to the cam lobes with pips.


    The side of the cap is flat and perpendicular to the camshafts.  There's a vertical line in the center protruding out just a bit from those flat surfaces.  If the timing is correct the vertical lines with align with the pips.


    If you lay a thin flat object like a right triangle or any object with two straight edges with a right angle down on top the cam lobe, push one of the edges up flat and square against the cap and slide the right angle corner against the vertical line on the cap you can easily and precisely eyeball whether the pip is aligned correctly with vertical line on the cap.


    With the triangle down touching the lobe you can eyeball the pip's location with great precision.


    I believe there are 38 teeth on those sprockets so a one tooth timing error would be an almost 10 degree error of misalignment for the pips.  A 10 degree error is very easy to see with the right triangle technique.

    #59 Big Sky

    Dr. Gonzo

    • Members++
    • PipPipPipPipPip
    • 1,316 posts
    • Gender:Male
    • Location:Butte, MT
    • 2005 ABS (Gen 1) N. America

    Posted 17 March 2016 - 07:17 AM

    This thread reinforces some things for me. I have much respect for Pants and others on this forum. If it's troublesome for Pants, I sure as hell am not even gonna try. Besides, many years ago I tried checking valves on a 750 Sabre (screw-type adjustment but four cams!) and wound up taking it to the shop to get it done right. Lesson learned. I have not attempted it since and have no inclination. I admire and envy the folks with the ability to do these things, but I respect those, too, who know better than to try it.

    "Let us endeavor so to live, that when we come to die, even the undertaker will be sorry."
    - Mark Twain

    "The Edge... There is no honest way to explain it because the only people who really know where it is are the ones who have gone over. The others - the living - are those who pushed their luck as far as they felt they could handle it, and then pulled back, or slowed down, or did whatever they had to when it came time to choose between Now and Later."
    - Dr. Hunter S. Thompson

    #60 Redfish Hunter

    Gone Fishing

    • Members++
    • PipPipPipPipPip
    • 3,145 posts
    • Gender:Male
    • Location:Prairieville, LA
    • 2007 ABS (Gen 2) N. America
    • 2015ES (Gen 3) N. America

    Posted 17 March 2016 - 09:50 AM

    Pips = the dimples in the back of the #4 right-most cams that I posted a picture of previously.  Those holes can be used to confirm the proper cam timing, but I would also attempt to use a mirror and view the marks on the right end sprockets. 
     
    Two alignment checks are better than one.  wink.png


    Okay, NOW I understand why you were so grouchy earlier about the importance of the #4 end!  It is great to have you here but I do not always understand your logic or your irritability.  I guess if you had tried to explain it then it would have made no sense.  Thanks for the info and for being so subtle with your "I told you so".  Good Stuff, my friend.


    Pants, the more time you throw at this to try to fix it yourself, the more money you will have to pour on it later.
     
    The questions you are asking, and the follow up questions that you are asking, indicate that it is not really fair to the owner of this bike that you continue to work on it.
     
    Find a dealer with a good mechanic and trailer it to them.
     
    The bad news is that this is their busy season, and the bike may have to wait for some time.
     
    The other thing you could do that might be fair to your friend is accidentally back over it in your driveway ... of course I'm kidding (wink, wink, wink), but you get the picture.
     
    You're two torque wrenches away from owing your friend a bike, and you can't dig out of a whole with torque wrenches.


    I 1000% disagree.  The questions he is asking, the information he has received, and in fact this entire thread has boosted my confidence tremendously.  With the best minds of this forum backing him, 'Pants can fix anything.  At this stage, I am prepared to bring both my '15 and Dad's '07 over there for him to do the valve check/adjustment to them.


    I won't of course, because I would rather take up his time with riding on bikes instead of working on bikes, but that is not the point.


    Another factor to consider is that MikeP (the bike owner) went into this with both eyes open.  He and Joey have been riding together and working on their bikes together for some time.  IF the bike were toast, which it is not, he would be shouldering at least half of the responsibility.  Mike is a smart guy, he has confidence in his friend.  I do too.

    Never run out of ideas, real estate and traction simultaneously.

    Intech

    Mr. Camping Meet

    • Members++
    • PipPipPipPipPip
    • 3,909 posts
    • Gender:Male
    • Location:King George, VA
    • 2015ES (Gen 3) N. America

    Posted 17 March 2016 - 10:03 AM

    I agree RFH. I was in a similar situation with someone else's bike. Had already done 2 valve clearance checks, but didn't have to adjust anything. I think they are approaching it the same way I did. Ask a lot of questions here and not rush the job. I got frustrated a few times, so I just walked away. They will earn some valuable experience. It really isn't that difficult either. It is the unknowns and needing piece of mind that you get it back together properly. The FSM is good, but reassurance and assistance from the forum collective is invaluable!  Rock on Joey and Mike!

    RIP BeemerDons....JSNS

    #62 Mihalis fjr

    FJR Commander

    • Members++
    • PipPipPipPipPip
    • 2,214 posts
    • Gender:Male
    • Location:Athens Greece
    • 2003 ABS (Gen 1) Euro/Other

    Posted 17 March 2016 - 10:04 AM

     The torque spec for the cam bearing caps is 10 Nm/7.4 ft/lb.Compression normal approximately 198-228 psi as Yamaha FSM say.


    Powercommander III USB,(Helibars risers,MV Motorrad handlebar adapter plate,Not both installed).Gsg frame sliders,Oem windshields standard+tall,Laminar lip,OEM Top case+backrest,Gipro gear indicator,Glover tank bag,Touratech rear seat bag,Saddlemen fleece seat gel pad,Beowulf radiator cover,Gen 2  mirrors + oem knuckle visors,Remote controller for klan heated gloves.Go-cruise,Grip Puppies,MCL Foot Peg Lowering Brackets.


    My other bike:Yamaha XTZ 750 Super Tenere

    #63 ionbeam

    2 FUN

    • Members++
    • PipPipPipPipPip
    • 9,485 posts
    • Gender:Male
    • Location:Sandown, NH
    • 2004 ABS (Gen 1) N. America
    • 2015ES (Gen 3) World

    Posted 17 March 2016 - 10:15 AM

     The torque spec for the cam bearing caps is 10 Nm/2.25 lb.Compression normal 15-16 bar/198-228 psi as Yamaha FSM say.


    10 Nm = 7.4 ft/lb & the bar to psi is correct.  You won't measure the full 230 psi, typically it will be in the 200 - 210 psi range.

    #64 Fred W

    1 Wheel Drive

    • Members++
    • PipPipPipPipPipPip
    • 18,703 posts
    • Gender:Male
    • Location:Southern NH
    • 2014ES (Gen 3) N. America

    Posted 17 March 2016 - 10:23 AM

    I was never being grouchy.  I just gave some information that I thought may be helpful in setting the timing. 

    To view my "broken" Photobucket images:    Firefox fix  Chrome fix

    #65 Mihalis fjr

    FJR Commander

    • Members++
    • PipPipPipPipPip
    • 2,214 posts
    • Gender:Male
    • Location:Athens Greece
    • 2003 ABS (Gen 1) Euro/Other

    Posted 17 March 2016 - 10:37 AM

     The torque spec for the cam bearing caps is 10 Nm/2.25 lb.Compression normal 15-16 bar/198-228 psi as Yamaha FSM say.


    10 Nm = 7.4 ft/lb & the bar to psi is correct.  You won't measure the full 230 psi, typically it will be in the 200 - 210 psi range.

    You are right!My fault when i did the conversion..

    Powercommander III USB,(Helibars risers,MV Motorrad handlebar adapter plate,Not both installed).Gsg frame sliders,Oem windshields standard+tall,Laminar lip,OEM Top case+backrest,Gipro gear indicator,Glover tank bag,Touratech rear seat bag,Saddlemen fleece seat gel pad,Beowulf radiator cover,Gen 2  mirrors + oem knuckle visors,Remote controller for klan heated gloves.Go-cruise,Grip Puppies,MCL Foot Peg Lowering Brackets.


    My other bike:Yamaha XTZ 750 Super Tenere

    #66 Donal

    FJR Squadron Leader

    • Members++
    • PipPipPipPip
    • 989 posts
    • Gender:Male
    • Location:Holt, Norfolk, UK.
    • 2009 ABS (Gen 2) World

    Posted 17 March 2016 - 03:53 PM

    There is a good convert utility here. It is free to download, it used to be possible to make a payment via Paypal but that seems to have disappeared..............

    Look before you leap may be good advice - but if you really intend leaping, don't spend too long looking...........

    #67 hppants

    FJR Commander

    • Members++
    • PipPipPipPipPip
    • 2,637 posts
    • Gender:Male
    • Location:Lafayette, LA
    • 2014A (Gen 3) N. America

    Posted 19 March 2016 - 06:07 AM

    Well - we pulled it apart and the motor spun freely without the cams in it.


    Next, we were able to put the cams in time with the crank following the instructions in this thread.  Assembled, we spun the motor by hand 8 revolutions and every two, all marks came right back to right.


    Next, we checked the valve lash and it was adjusted with the new shims as we expected all around.  I feel this important because even if a valve is bent slightly, a different reading of some sort should be expected on that valve lash measurement.  Does anybody agree with this?


    So far, so good.


    Uh... maybe not.


    Next up, we bought a compression tester from O-reiley Auto Parts and here's what we got:


    #1 - 180

    #2 - 175

    #3 - 180

    #4 - 100-105


    All seem low based on info in this thread, but that could be the gage and other factors (cold engine).  What worries me is the difference in the #4 hole.  Based on the previous info on this thread, I know that the intake camshaft was out of time, and the #4 intake lobes were straight down.  I'm hoping that I pushed the piston with the valve, but who knows?


    Two things may have affected the c-test.


    1.  We did it with the motor stone cold.  FSM says to do this test with the motor hot.  I suppose metals to expand and perhaps seal up better at running temperature.


    2.  The battery didn't seem to have full punch.  We put the battery on the tender overnight and will check it again this morning.


    Also - each cylinder holds pressure on the gauge, but I think the gage may have a check valve in it, so that doesn't mean the pressure is holding in the hole - yes?


    I don't know how to do a leak down test.  I'm going to try to research that this morning.


    Edit - I learned about this on Youtube.  I'm going to see if we can rent a tester at the parts house.  I have compressed air.  The Chilton's manual doesn't give a leak down speck (what % of air leaking is acceptable).  Also, what air pressure does Yamaha say we have to pump in the cylinder before the leakage is measured?  Can anyone attest to this spec per the Yamaha FSM?


    We couldn't get the valve cover gskt to stay put up re-assembly, so we cleaned and dried it up and put a little RTV in the cover, set the gskt in place, and allowed it to dry over night.


    We will see what happens this morning.  I'm inclined to believe, again - that I can't hurt it anymore than I already have - if I have at all.  I think we are going to put it back together and see what happens.

    ce4e895b-c6b5-474c-9ea2-6c60b2778940_zps

    #68 RossKean

    FJR Commander

    • Members++
    • PipPipPipPipPip
    • 3,668 posts
    • Gender:Male
    • Location:Fredericton, NB
    • 2007 ABS (Gen 2) N. America

    Posted 19 March 2016 - 06:19 AM

    I don't have a warm and fuzzy feeling about #4.

    Good luck with it. Hopefully the low reading has another cause. In any case, you don't really have much to lose by firing it up since you know the timing is correct. Once it has been run (if it will run) you can do the compression and leakdown tests again. If the valveis bad, I'm wondering if an Ebay engine replacement is a cheaper bet than the head work. 
    groundspider.jpgYN3DYrL.jpg

    #69 Fred W

    1 Wheel Drive

    • Members++
    • PipPipPipPipPipPip
    • 18,703 posts
    • Gender:Male
    • Location:Southern NH
    • 2014ES (Gen 3) N. America

    Posted 19 March 2016 - 06:28 AM

    Since it is still open, are you absolutely certain that the clearances on #4 are exactly what you expected? If they are, I really do not see how a valve could be bent and not seating properly. 

    You can repeat the compression test after squirting some oil in cyl 4. If compression is then good it would indicate the rings were the leak, which would have absolutely nothing to do with the valve issue.


    I would finish putting it back together and see how it runs. 

    To view my "broken" Photobucket images:    Firefox fix  Chrome fix

    #70 RossKean

    FJR Commander

    • Members++
    • PipPipPipPipPip
    • 3,668 posts
    • Gender:Male
    • Location:Fredericton, NB
    • 2007 ABS (Gen 2) N. America

    Posted 19 March 2016 - 06:29 AM

    Oops - posting error. 
    groundspider.jpgYN3DYrL.jpg

    #71 ionbeam

    2 FUN

    • Members++
    • PipPipPipPipPip
    • 9,485 posts
    • Gender:Male
    • Location:Sandown, NH
    • 2004 ABS (Gen 1) N. America
    • 2015ES (Gen 3) World

    Posted 19 March 2016 - 06:31 AM

    The cold compression readings are typical.


    Put a little oil in cylinder #4, spin the engine a bit and try the test again.  If the readings go up the issue is the rings on the piston sticking.  This is common for the FJR and a little Yamaha Ring Free will sort it out.  Ring Free is highly concentrated so read the container and dose accordingly.


    If a valve were  bent you would have almost no compression.  I'm pretty sure it'll be sticking rings (or a gauge that wasn't fully threaded in and sealed).


    Edit:  I see Fred posted the correct troubleshooting process while I was typing in the Spark thread.

    #72 wfooshee

    O, Woe is me!

    • Members++
    • PipPipPipPipPip
    • 5,862 posts
    • Gender:Male
    • Location:Panama City, FL
    • 2003 (Gen 1) N. America

    Posted 19 March 2016 - 10:55 AM

    The #4 difference is meaningless without a baseline of what it was before. As has been stated, rings can cause low compression just as much as valves. Also, if there's a valve problem that was already there, such as a burned valve or a carbon deposit, you again might be reading what you'd have read prior to the work. A leakdown would tell you more about that.


    Since it goes around cleanly by hand, you're not sticking a valve into a piston. It's ready to run, then you can repeat the compression check when warm.

    crashclub.gif crashclub.gifcrashclub.gifGearbox teardown Darksider #18

    Are you the reason I'm so far above average?

    #73 TownsendsFJR1300

    FJR Commander

    • Members++
    • PipPipPipPipPip
    • 1,887 posts
    • Gender:Male
    • Location:SW Florida, USA
    • 2004 (Gen 1) N. America

    Posted 19 March 2016 - 11:35 AM

    leak down test with the engine on the  COMPRESSION stroke @ TDC for the cylinder being tested will tell all.  (engine locked down so it WON'T SPIN OVER)


    It'll give you a good idea of the health of the internals.  


    You'll either hear air come out of the TB's (intake valve(s), exhaust (exhaust valve(s), or crankcase-(piston rings)


    Per OTC, a difference of 5 PSI between the cylinders is satisfactory. 10-15 PSI, you need to start digging..


    This is what I use and seems to be very accurate... : https://www.otctools...kage-tester-kit


    With 100 PSI on compression on #4, I suspect a valve is bent there...

    Scott

    2007 Yamaha FZ6
    - BD43 headlight mod, PIAA bulbs, Stebal air horn, Scorpion SS pipes-(no DB killers), Speedohealer, HEL SS brake lines, Fenda Extenda, K&P SS re-usable oil filter, custom mounted BMW style electrical outlet(L.S.), Techmount GPS mount with handlebar bar risers/set backs, additional helmet lock, custom mod'ed seat(Spencers), Hyper light-rear running/brake light, custom radiator/fan protector, Techspec tank pads, Grip Puppies, Yamaha rear rack with custom aluminum flat rack.


    #74 wheatonFJR

    ...

    • Banned
    • PipPipPipPipPipPip
    • 16,348 posts
    • Gender:Male
    • Location:Greenville,SC
    • 2013A (Gen 3) N. America

    Posted 19 March 2016 - 11:46 AM

    However they were turning the crank by hand. Suspect other causes that ion beam and others pointed out. 
    Iggy's a douchetard.  JSNS
     

    #75 TownsendsFJR1300

    FJR Commander

    • Members++
    • PipPipPipPipPip
    • 1,887 posts
    • Gender:Male
    • Location:SW Florida, USA
    • 2004 (Gen 1) N. America

    Posted 19 March 2016 - 12:36 PM

    The leak down test will just confirm if the head needs to come off for certain.  


    Weather the valve got just slightly bent, not enough to seat FULLY or something else, 100 PSI is NOT good..

    Scott

    2007 Yamaha FZ6
    - BD43 headlight mod, PIAA bulbs, Stebal air horn, Scorpion SS pipes-(no DB killers), Speedohealer, HEL SS brake lines, Fenda Extenda, K&P SS re-usable oil filter, custom mounted BMW style electrical outlet(L.S.), Techmount GPS mount with handlebar bar risers/set backs, additional helmet lock, custom mod'ed seat(Spencers), Hyper light-rear running/brake light, custom radiator/fan protector, Techspec tank pads, Grip Puppies, Yamaha rear rack with custom aluminum flat rack.


    #76 Colin24

    IBA# 446

    • Members++
    • PipPipPip
    • 335 posts
    • Gender:Male
    • Location:Carleton Place, ON
    • 2005 ABS (Gen 1) N. America

    Posted 19 March 2016 - 01:58 PM

    A little late for this job.  But a couple tricks others might keep in mind for when they do this.  Some of this may be obvious and you may have already done it.  In no particular order:

    1) Pull the spark plugs.  Makes turning the cylinders way easier.

    2) Put a long screwdriver into the #1 cylinder spark plug hole.  Makes it very to visually see when you are approaching TDC on that cylinder.

    3) Take a ton of pictures before every single step.  Digital film is cheap and the ability to go back and see what something was earlier is incredibly handy.  Take pics from every conceivable angle, close ups, overall shots, everything.  It can all help if you make an oops!

    4) The markings on the cam sprockets are indeed a pain to align since the frame is in the way.  I think they were designed assuming you had the engine out of the frame and on a workbench.  So scribe a copy of the alignment mark that you are matching to on the backside of the sprocket.  Makes it much easier to see alignment during reassembly.

    5) Use zip ties with different colors to indicate both which is intake and which is exhaust,  You can also put the zipties through the holes in the sprockets so that they (roughly) line up with the cylinder head.  Makes it very easy to immediately see if cams are aligned properly.


    Hope this helps

    - Colin

    #77 Redfish Hunter

    Gone Fishing

    • Members++
    • PipPipPipPipPip
    • 3,145 posts
    • Gender:Male
    • Location:Prairieville, LA
    • 2007 ABS (Gen 2) N. America
    • 2015ES (Gen 3) N. America

    Posted 19 March 2016 - 02:18 PM

    Just letting you guys know you can stop stressing over the low reading on #4.  The advice given by ionbeam and Fred W about squirting oil into that cylinder brought the pressure up.  I am quite certain hppants will be along shortly to share the results of his work.  I would tell, but it is not my story...rolleyes.gif

    Never run out of ideas, real estate and traction simultaneously.

    #78 Fred W

    1 Wheel Drive

    • Members++
    • PipPipPipPipPipPip
    • 18,703 posts
    • Gender:Male
    • Location:Southern NH
    • 2014ES (Gen 3) N. America

    Posted 19 March 2016 - 02:46 PM

    Good news for the owner. The low reading may have just been a dry cylinder after the engine sitting for a while. He can redo the test after running it and getting the engine warm and the oil redistributed, or just forget about it and ride it. Unless it doesn't run right I sure the hell wouldn't be ripping the engine apart any further. 

    To view my "broken" Photobucket images:    Firefox fix  Chrome fix

    #79 hppants

    FJR Commander

    • Members++
    • PipPipPipPipPip
    • 2,637 posts
    • Gender:Male
    • Location:Lafayette, LA
    • 2014A (Gen 3) N. America

    Posted 19 March 2016 - 03:49 PM

    *
    POPULAR

    I love a story with a happy ending and this one will not disappoint.


    I searched high and wide for a leakdown tester, but could not find one in town to ether, buy, beg, borrow, or steal.  So we put that issue aside and checked in on this thread.  Happy to hear from Ionbeam, Fred, and others, we decided to squirt about 10ml of oil into the #4 hole.  I rotated the crank by hand about 5 revolutions to try and circulate the oil.  Compression test on this hole  bumped up to just under 150 psi.  Very encouraged, we decided to press on.


    We buttoned up the motor, double (TRIPLE) checked everything, and .....


    Once the engine was up to full running temperature, the large hose behind the coolant pipe was seeping a little, so we broke for lunch.


    In the afternoon, we were able to sync the Throttle bodies (Cylinder 2, 3, and 4 were all off from #1) and seal everything up.  We adjusted the throttle cables and even re-torqued the engine mounting bolts (both bolts for the frame sliders were not tight enough).


    We did not perform another compression test to see if things are more normal after the motor is up to operating temp.


    I followed Mike on a 40 mile test ride and everything is good to go.


    Few things learned to wrap this up:


    1.  We used liquid paper to highlight the timing marks on the outside of the cam gears.  That helped a ton and with a more directed light beam, we were able to use line of sight down the top plane of the cylinder head to confirm good timing.


    2.  We did transfer some penciled marks onto the inside of the cam gears and that helped to get us on the right tooth.


    3.  Intech's "leading a tooth" method was the shit and was very helpful in setting the cams on the right tooth.


    4.  If I was just checking valves or changing the CCT, I would not remove the timing rotor cover.  However and otherwise, I absolutely would.  There is a plug you can remove to simply turn the crank (you can also spin the wheel with the bike in gear), and there is an inspection bolt that you can remove and look at a mark that is supposed to show you #1 TDC.  But for my money, I'll spend the $7 on a cover gskt and see the proper timing mark on the crank gear with my own eyes.


    5.  A small squirt of silicon spray on the cooling pipe barbs was very helpful in installing the pipe (especially on the big hose).


    6.  I think this has been mentioned elsewhere, but rotating that hose clamp for the big hose about 45 degrees clockwise makes it much easier to install and tighten.


    7.  I need to stop over thinking the valve lash.  I have some "go or no go" feeler gages.  Earlier this week, I called Friendly Yamaha to discuss the situation and see if they would be willing to put it back together if it came to that.  This guy told me that DIY mechanics over think valve clearances way too much.  The spec given from Yamaha is a go or no go spec.  He said that if at 26,000 miles (for example), you check the exhaust and a 0.007" feeler gage can fit in (tight or otherwise), then it is in spec and you can leave it alone.  Yamaha offers this spec such that even if the lash is at the tightest point of the interval, then it won't tighten enough over the next 26,000 miles to cause engine damage.  At the next check, it will need a different shim.  But at this check, it's a "go" and you can leave it alone.  Forget about this "loose 7" or "tight 6" crap.  It's either a go or a no go, plain and simple.


    Finally, and MOST importantly, we couldn't have finished without you guys.  Admittedly, we probably wouldn't have started in the first place without you guys anyway.  But I'm humbled by your willingness to help.  I hope to return the favor in my own way some day.  I sincerely appreciate your advice, one and all.


    Tomorrow, I think I will go for a ride....


    ce4e895b-c6b5-474c-9ea2-6c60b2778940_zps

    #80 wheatonFJR

    ...

    • Banned
    • PipPipPipPipPipPip
    • 16,348 posts
    • Gender:Male
    • Location:Greenville,SC
    • 2013A (Gen 3) N. America

    Posted 19 March 2016 - 04:13 PM

    Kudos to bothayooz guys. My salute and a hearty handshake! 
    Iggy's a douchetard.  JSNS


    wfooshee

    O, Woe is me!

    • Members++
    • PipPipPipPipPip
    • 5,862 posts
    • Gender:Male
    • Location:Panama City, FL
    • 2003 (Gen 1) N. America

    Posted 19 March 2016 - 04:21 PM

    Party time!!!!!


    (Except it doesn't let us see the video.... "this video is private."


    But I don't think we really need to see it. :)

    crashclub.gif crashclub.gifcrashclub.gifGearbox teardown Darksider #18

    Are you the reason I'm so far above average?

    #82 hppants

    FJR Commander

    • Members++
    • PipPipPipPipPip
    • 2,637 posts
    • Gender:Male
    • Location:Lafayette, LA
    • 2014A (Gen 3) N. America

    Posted 19 March 2016 - 04:23 PM

    I think I've fixed it such that the video is public.  I forgot to click the "publish" button.


    Pants is not very good at this Youtube shit.

    ce4e895b-c6b5-474c-9ea2-6c60b2778940_zps

    #83 RaYzerman19

    Go Wings!

    • Members++
    • PipPipPipPipPip
    • 3,508 posts
    • Gender:Male
    • Location:Millgrove, ON
    • 2014A (Gen 3) World
    • 2007 ABS (Gen 2) World

    Posted 19 March 2016 - 04:39 PM

    Glad you got it all sorted out.  I think your low reading on #4 was just because you had a cold engine.  Should have been done on a warm engine that had a chance to circulate all it's oil..... anyhow, you're good to go!

    I'll bet your next valve check will go much differently!

    2014A Root Beer

    You don't go to Freddy Beach for the beach....

    Duct tape can't fix stupid, but it can muffle the sound

    #84 escapefjrtist

    Searching for Dry Roads

    • Members++
    • PipPipPipPipPip
    • 9,954 posts
    • Gender:Male
    • Location:Snohomish, WA
    • 2015A (Gen 3) World

    Posted 19 March 2016 - 07:48 PM

    Congrats on a successful check and re-assembly 'pants. Glad to hear everything worked out in the end.


    Hopefully the next one is less stressful!


    --G

    IBA 34365

    '15 FJR

    '12 Super Tenere

    #85 AlleyCat

    FJR Pilot

    • Members++
    • PipPipPip
    • 319 posts
    • Gender:Male
    • Location:Ontario, Canada
    • 2014ES (Gen 3) N. America
    • 2009 ABS (Gen 2) N. America

    Posted 20 March 2016 - 03:27 AM

    Good job !!!  Hats off to you for sticking it through to the end.  I am really not sure I am ready to handle a valve adjustment job.  Still lots to learn.  But this post sure taught me a lot.  :)

    IBA Member #61237

    #86 RossKean

    FJR Commander

    • Members++
    • PipPipPipPipPip
    • 3,668 posts
    • Gender:Male
    • Location:Fredericton, NB
    • 2007 ABS (Gen 2) N. America

    Posted 20 March 2016 - 06:05 AM

    Great news!
    I'm betting you know a lot more about valve checks and cam timing than you did a couple of weeks ago.
    I was going to suggest you might want to do the compression and leakdown tests but then I thought anything less than excellent results would just make you worry and spoil the fun of riding. That's why I haven't done it on my '07 with close to 150,000 miles. If its good I would be thrilled but if its anything less-than-perfect (and not burning oil etc.) I'm not going to do anything about it anyway; it would just piss me off.. As long as it performs well, that's all I need.

    One comment on point #4:

    "If I was just checking valves or changing the CCT, I would not remove the timing rotor cover"

    I would definitely remove the timing cover for a CCT change. Otherwise, you can't secure the chain to make sure you don't slip a tooth. There have been a number of instances where someone had timing problems after they (or a dealer) did a CCT swap.

    groundspider.jpgYN3DYrL.jpg

    #87 ionbeam

    2 FUN

    • Members++
    • PipPipPipPipPip
    • 9,485 posts
    • Gender:Male
    • Location:Sandown, NH
    • 2004 ABS (Gen 1) N. America
    • 2015ES (Gen 3) World

    Posted 20 March 2016 - 06:15 AM

    ...One comment on point #4:

    "If I was just checking valves or changing the CCT, I would not remove the timing rotor cover"

    I would definitely remove the timing cover for a CCT change. Otherwise, you can't secure the chain to make sure you don't slip a tooth. There have been a number of instances where someone had timing problems after they (or a dealer) did a CCT swap.


    If someone is changing the CCT I would also advise to remove the timing cover and keep tension on the cam chain.  Being off a tooth or two on the cam gears is ungood, but being off a couple of teeth on the crank sprocket can be disastrously bad, that's the fast track to bent valves.

    #88 hppants

    FJR Commander

    • Members++
    • PipPipPipPipPip
    • 2,637 posts
    • Gender:Male
    • Location:Lafayette, LA
    • 2014A (Gen 3) N. America

    Posted 20 March 2016 - 06:37 AM

    *
    POPULAR

    Interesting - guess I hadn't thought about that.  If you zip tie both cams and release the CCT, you can force the crank to skip a tooth - I know because that is really what started our debacle last weekend.  But I don't think you can do it without turning the crank with a rachet.  Looking at the timing rotor cover, the right most cam guide is wedged down to the crank gear. The left one pivots on that pin and there is a bit of a gap between the chain and the guide at the crank sprocket. I suppose when you release the CCT, the slack on the chain starts on that left side. If it is going to skip a tooth on the crank, it will do it there.
     
    I do know a lot more about it now.  I venture to say I would do it on my bike and other FJRs as well. This morning, I printed this thread and wrote down some more specific notes to keep with my other FJR documents.

    El Toro - I understand what you were saying, I just don't agree with it. I do realize that in many things technical, knowing a little can be worse than knowing nothing at all. But for every one of us, for everything and anything (not just valve shim replacement), there was always a first time. Some of us had the benefit of experienced help holding our hand. Some had to do it alone. Some before us blazed the trail, trusting their good sense and judgment would see them through. But if no one ever tried to venture into the unknown (whatever that means), we would be a society of zombies living literally in boxes.

    Of course, the other part of the equation is not giving up when the going gets rough. This thing almost beat me down. A younger me might have started waling on it with a dead blow hammer. But I'm getting older now and thinking differently. No one got hurt. The rest is just metal, time, and money. I slept on it, and with some encouragement from our friends, resumed my resolve.

    I've never been afraid to try anything. I figure as long as it can't eat me, I'll survive one way or the other. Have I gotten myself painted in corners? You bet. Have I had to pour money on things to correct my screw ups? Absolutely. But more times than not, it works out. I truly hope that I never give up that way of thinking. 
    ce4e895b-c6b5-474c-9ea2-6c60b2778940_zps

    #89 wfooshee

    O, Woe is me!

    • Members++
    • PipPipPipPipPip
    • 5,862 posts
    • Gender:Male
    • Location:Panama City, FL
    • 2003 (Gen 1) N. America

    Posted 20 March 2016 - 08:56 AM

    Good job, 'pants! Y'all ask me how many engine cases i'd split when I tackled my shifter issue a couple of Junes ago. Machines are just devices. Parts go where they go, and line up how they line up. When they don't line up, you find out why. It's not like you need differential equations to undo a bunch of bolts.

    There are folks who just don't get mechanical things..... My son was out in the driveway to change the oil in his Miata some years ago. he asked me what needed to be done, and I outlined the process. Put the car up on stands, get the drain pan under it, find the plug bolt on the bottom of the oil pan, which is the big, mostly smooth thing on the bottom of the motor. unscrew the filter, which I'd shown him the location of. Just as I was thinking it was taking an awfully long time and thinking about going out to check, he came in to ask for help, said he couldn't get the bolt off. I go out, get underneath and ask him what's wrong, and he shows me the bolt. He points to one of the transmission mount bolts.

    But generally, if you have any kind of mechanical inclination, one kind of machine is just like any other kind of machine, and except for tools needed beyond what's in a general wrench, socket, and screwdriver set, working on one isn't any different from working on another, especially when you have the documentation with you.

    I think one issue here was aftermarket manual instead of Yamaha, the difference in markings on the intake versus exhaust cam looks like it might not have been clear.

    crashclub.gif crashclub.gifcrashclub.gifGearbox teardown Darksider #18

    Are you the reason I'm so far above average?

    #90 dcarver

    FJR Forum Post Whore

    • Members++
    • PipPipPipPipPipPip
    • 13,255 posts
    • Gender:Male
    • Location:Creston, CA
    • Interests:Bikes. Booze. Broads. Dirt. Street. Mud. Guts. Courage. Honesty.
    • 2006 ABS (Gen 2) World

    Posted 20 March 2016 - 12:39 PM

    First off - Congrats to both of you! 


    Regarding the low compression... I've often seen this. Folks concentrate on problem 1. Have some technical issues so start troubleshooting. Discover 'problem' 2. Go down the proverbial bunny hole with problem 2. Later on, realize problem 2 has nothing at all to do with problem 1. At least that's the way I roll... smile.png 

    Walked away Posted ImagePosted Image Is it really crashing if you don't fall down?--
    I wouldn't change a fucking thing; I've lived hard, played hard, and I ain't done yet. I've paid some severe penalties along the way, but the rewards have been so much greater; even if for just have participating in the game of life with utmost abandon. It's not who rides the furthest in a day, but rather in a lifetime. CBA member #1, IBA #31845 and very proud of both.
    Posted Image

    #91 El Toro

    Innocent Bystander

    • Members++
    • PipPipPipPipPip
    • 1,707 posts
    • Gender:Male
    • Location:50 North and 40 West
    • 2009 ABS AE (Gen 2) N. America

    Posted 20 March 2016 - 02:58 PM

    I'm glad it worked out.  It could have gone either way.  There are a lot of helpful fellows who are willing to share their knowlege on this forum, and that works in favor of those who are adventurous.  But you have to be bright enough to benefit, and it appears that you were.


    So ... good job, and keep up the good work!


    Meanwhile, the machines are worthy of respect.  Even if they are just machines.

    Patience isn't a virtue.... It's a coping skill.
    Ignorance can sometimes be fixed. Ignorance of ignorance often leads to arrogance.

    JSNS, RIP Don

    #92 Mihalis fjr

    FJR Commander

    • Members++
    • PipPipPipPipPip
    • 2,214 posts
    • Gender:Male
    • Location:Athens Greece
    • 2003 ABS (Gen 1) Euro/Other

    Posted 20 March 2016 - 03:15 PM

    Congratulations!Glad that everything is ok!smile.png

    Powercommander III USB,(Helibars risers,MV Motorrad handlebar adapter plate,Not both installed).Gsg frame sliders,Oem windshields standard+tall,Laminar lip,OEM Top case+backrest,Gipro gear indicator,Glover tank bag,Touratech rear seat bag,Saddlemen fleece seat gel pad,Beowulf radiator cover,Gen 2  mirrors + oem knuckle visors,Remote controller for klan heated gloves.Go-cruise,Grip Puppies,MCL Foot Peg Lowering Brackets.


    My other bike:Yamaha XTZ 750 Super Tenere

    #93 audiowize

    FJR Squadron Leader

    • Members++
    • PipPipPipPip
    • 509 posts
    • Gender:Male
    • Location:Seattle
    • 2003 (Gen 1) N. America

    Posted 20 March 2016 - 09:37 PM

    This guy told me that DIY mechanics over think valve clearances way too much.  The spec given from Yamaha is a go or no go spec.  He said that if at 26,000 miles (for example), you check the exhaust and a 0.007" feeler gauge can fit in (tight or otherwise), then it is in spec and you can leave it alone.  Yamaha offers this spec such that even if the lash is at the tightest point of the interval, then it won't tighten enough over the next 26,000 miles to cause engine damage.  At the next check, it will need a different shim.  But at this check, it's a "go" and you can leave it alone.  Forget about this "loose 7" or "tight 6" crap.  It's either a go or a no go, plain and simple.


    This is very good advice!

    #94 Fred W

    1 Wheel Drive

    • Members++
    • PipPipPipPipPipPip
    • 18,703 posts
    • Gender:Male
    • Location:Southern NH
    • 2014ES (Gen 3) N. America

    Posted 21 March 2016 - 02:39 AM

    Interesting - guess I hadn't thought about that.  If you zip tie both cams and release the CCT, you can force the crank to skip a tooth - I know because that is really what started our debacle last weekend.  But I don't think you can do it without turning the crank with a rachet. 


    No, it can, and does, happen all the time.  I know the chain seems tightly constrained down at the crank end, but that chain is like a mouse.  It gets through cracks you would never expect it to fit through.  


    As you found, if the engine is not at #1 TDC there will very likely be one or more cam lobes depressing a valve.  As soon as you loosen that CCT the cams under tension will want to yank the chain one way or the other and it will skip teeth on the crank sprocket.  Like I said, this isn't theory.  It has happened multiple times before.  Yes, you could position the engine at #1 TDC and lessen the chance of this happening, but if you are just changing a CCT how do you know you are TDC unless you remove the timing chain cover?  If you bother removing that cover you may as well just ty wrap restrain it (or stuff a socket behind the tensioner guide)

    To view my "broken" Photobucket images:    Firefox fix  Chrome fix

    #95 mikep1300

    Training Pilot

    • Members++
    • PipPip
    • 73 posts
    • Gender:Male
    • Location:Louisiana
    • Other or considering FJR

    Posted 22 March 2016 - 07:15 AM

    *
    POPULAR

    I guess it's time for me to enter here and give a big ole THANK YOU to everyone that shared their knowledge and experience with the 2 knuckle heads taking part in this project.  Especially to my good buddy, Pants, mostly for not giving up when we were both in that deep pit of despair after that "oh shit, we screwed up" moment. 


    The guys here are truly a great bunch of obsessive compulsive, FJR fanatics (lucky for us)  that really know some shit. 


    Once Pants did the research and we learned from you guys what we should've known going in, it wasn't too bad. 


    Virtual,  Salute! to everybody.

    2015 Kawasaki Versys 1000LT

    2011 FJR Sold


    #96 mikep1300

    Training Pilot

    • Members++
    • PipPip
    • 73 posts
    • Gender:Male
    • Location:Louisiana
    • Other or considering FJR

    Posted 22 March 2016 - 07:36 AM

    As far as the Haynes manual compared to the Yamaha, the Haynes did show pics and say to align the "Lines" and "Arrows" for the appropriate cams. 

    When we read it, we just didn't SEE the difference.  I read that page I don't know how many times, just didn't pay attention.  That and not aligning #1 at TDC,  doomed from the start. 

    2015 Kawasaki Versys 1000LT

    2011 FJR Sold


    #97 TownsendsFJR1300

    FJR Commander

    • Members++
    • PipPipPipPipPip
    • 1,887 posts
    • Gender:Male
    • Location:SW Florida, USA
    • 2004 (Gen 1) N. America

    Posted 22 March 2016 - 08:16 AM

    Did that manual mention keeping the chain taught between the crank to exhaust cam, then taught to the intake? (with all marks aligned)


    That, IS critical. 

    Scott

    2007 Yamaha FZ6
    - BD43 headlight mod, PIAA bulbs, Stebal air horn, Scorpion SS pipes-(no DB killers), Speedohealer, HEL SS brake lines, Fenda Extenda, K&P SS re-usable oil filter, custom mounted BMW style electrical outlet(L.S.), Techmount GPS mount with handlebar bar risers/set backs, additional helmet lock, custom mod'ed seat(Spencers), Hyper light-rear running/brake light, custom radiator/fan protector, Techspec tank pads, Grip Puppies, Yamaha rear rack with custom aluminum flat rack.


    #98 RaYzerman19

    Go Wings!

    • Members++
    • PipPipPipPipPip
    • 3,508 posts
    • Gender:Male
    • Location:Millgrove, ON
    • 2014A (Gen 3) World
    • 2007 ABS (Gen 2) World

    Posted 22 March 2016 - 08:23 AM

    We learn the most from actual experience.  Glad you got it all sorted out, Mike, happy riding!

    2014A Root Beer

    You don't go to Freddy Beach for the beach....

    Duct tape can't fix stupid, but it can muffle the sound

    #99 ionbeam

    2 FUN

    • Members++
    • PipPipPipPipPip
    • 9,485 posts
    • Gender:Male
    • Location:Sandown, NH
    • 2004 ABS (Gen 1) N. America
    • 2015ES (Gen 3) World

    Posted 22 March 2016 - 08:30 AM

    Experience is something you don't get until just after you need it.


    Learning:  what you get overcoming failure

    #100 mikep1300

    Training Pilot

    • Members++
    • PipPip
    • 73 posts
    • Gender:Male
    • Location:Louisiana
    • Other or considering FJR

    Posted 22 March 2016 - 08:33 AM

    Yep, see below.  LOL
     
    ex·pe·ri·ence
    ˌikˈspirēəns/
    noun
    noun: experience
    1.
    practical contact with and observation of facts or events.
    "he had already learned his lesson by painful experience"

    2015 Kawasaki Versys 1000LT

    2011 FJR Sold


    Theme by Danetsoft and Danang Probo Sayekti inspired by Maksimer