You are here

An Excel Valve Clearance Spreadsheet


Photo

An Excel Valve Clearance Spreadsheet


42 replies to this topic

#1 yamafitter

Reigning NERDS Granite Lane Gold Medalist

  • Members++
  • PipPipPipPipPip
  • 3,150 posts
  • Gender:Male
  • Location:Bowmanville, ON
  • 2006 ABS AE (Gen 2) World

Posted 14 April 2011 - 07:11 AM

In preparation of the recent Bustanut Tech Weekend in Owosso I put together a prototype Excel spreadsheet to help calculate the required shim and to act as a log for future reference.
I have shown this to RaYzerman19 and we used the prototype and found it useful.
When I got back I had posted about the spreadsheet and Fred W stepped up to the plate to massage it to make it more user friendly and griffisi also made some suggestions about a metric version.
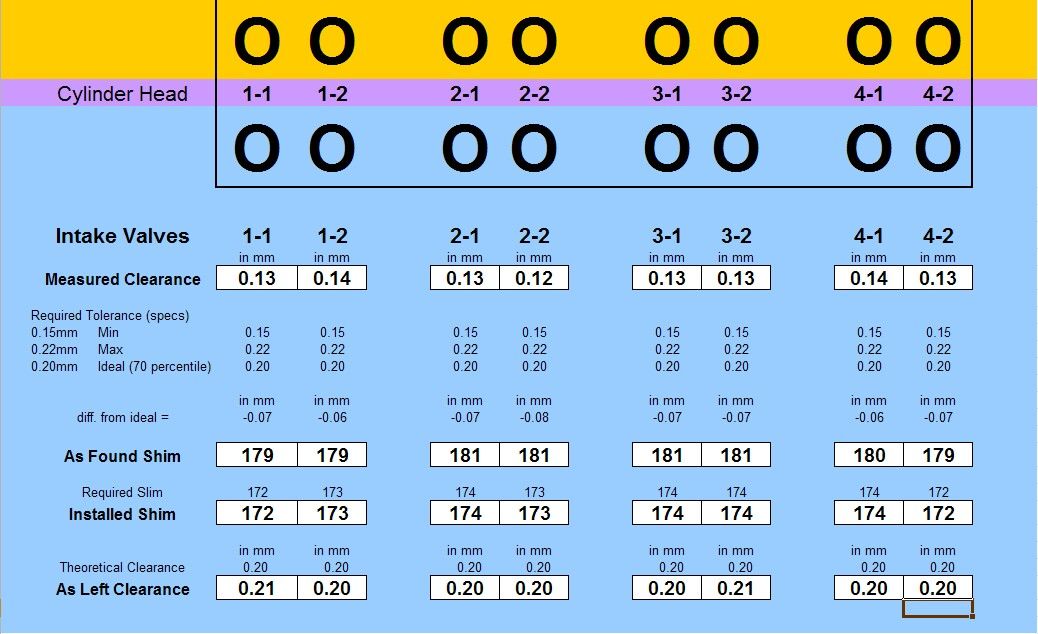
Here are some screen shots of the final product...

Posted Image

And the metric version...

Posted Image

Posted Image 

The top section is for the exhaust valves. I used the specifications for tolerance as per the Gen II manual for my '06 AE but all FJR's are the same.
If you are out of spec when you remove the shims you should measure them so that you have an accurate reading of the 'As Found' shim. With the 'As Found' Clearance input the spreadsheet calculates the difference from ideal in millimeters. The speadsheet then uses the 'difference' calculation and the 'as found' shim measurement to calculate the ideal shim thickness in millimeters. 
Since the new shim will not likely be the exact thickness value when you input the actual thickness of the new shim (in millimeters) the spreadsheet will then calculate the 'expected' or theroetical clearance with the new shim installed. This acts as a check when you perform the final readings. 
You can also use this part of the speadsheet to perform 'what if's' by plugging shim numbers in at the 'installed' row and see how much clearance that shim would produce.

The middle section is just a graphical representation of the valve layout and the bottom section is for the intake valves. The intake section is identical to the exhaust section except for the changes in specs.

As per Fred's & Ray's suggestion we used 70% of the maximum clearance to calculate the 'ideal' clearance to allow more tolerance for the valves to 'tighten up' between valve checks.

Fred has graciously offered to host the spreadsheet as part of the FJR NERDS file. Both Fred & I find this highly appropriate.

If you have a way of using an Excel file on your computer and think you would like this here's how to order...

Valve Clearance Spreadsheet

At the bottom of the spreadsheet you will see tabs labelled "Inch Measurement" & "Metric Measurement". Click on the tab for whichever type of feeler gauges you have. I'm old enough to use furlongs per fortnight myself.

Enjoy! 

Confucius say: "No matter where you go ..... there you are"

#2 mdisher

formerly Renegade, get used to it.

  • Members++
  • PipPipPipPipPip
  • 2,872 posts
  • Gender:Male
  • Location:Trenton, OH
  • 2006 ABS (Gen 2) World

Posted 14 April 2011 - 07:16 AM

Brilliant! 

Chief stirrer of the shit.
~ When you start hiding from the public, the public starts wondering what you're hiding.
'06 Yamaha FJR 1300A | IBA#21342 Web: www.dishers.com
There used to be a few nice images here but I tried to add one and now the board bitches that they are too large when they in fact aren't :/
I see dumb people.

#3 RossKean

FJR Commander

  • Members++
  • PipPipPipPipPip
  • 3,668 posts
  • Gender:Male
  • Location:Fredericton, NB
  • 2007 ABS (Gen 2) N. America

Posted 14 April 2011 - 04:52 PM

Glad to see that I'm not the only one using the "old" Excel! I have been a heavy user of Excel for many years and HATE the "new and improved" versions.

Nice little application. I'll use it when I eventually get around to doing my valves. I'm a little timid about diving into it without the watchful eye of a more experienced individual. 

Ross 
groundspider.jpgYN3DYrL.jpg

#4 escapefjrtist

Searching for Dry Roads

  • Members++
  • PipPipPipPipPip
  • 9,954 posts
  • Gender:Male
  • Location:Snohomish, WA
  • 2015A (Gen 3) World

Posted 14 April 2011 - 07:11 PM

Nice, thanks for the effort! Glad to see you're using .xls for those of us too cheap to upgrade. 

--G 

IBA 34365

'15 FJR

'12 Super Tenere

#5 Queensland Ken

FJR Squadron Leader

  • Members++
  • PipPipPipPip
  • 902 posts
  • Gender:Male
  • Location:Toowoomba, Queensland
  • 2014ES (Gen 3) World

Posted 14 April 2011 - 11:42 PM

Thanks so much, brilliant :clapping: :yahoo:

2014 AE   aka the Aussie ES

2013 MG Stelvio

2011 Spyder RT-S Limited Edition

2007 GSX 1400

2002 TL1000R


#6 yamafitter

Reigning NERDS Granite Lane Gold Medalist

  • Members++
  • PipPipPipPipPip
  • 3,150 posts
  • Gender:Male
  • Location:Bowmanville, ON
  • 2006 ABS AE (Gen 2) World

Posted 15 April 2011 - 01:38 AM

When we pulled the cams from BikerGeek's Gen I and checked the shims we were somewhat surpised to find shims that only had one number that did not seem to correspond to the shim's actual thickness when we measured it with Ray's digital micrometer. Even if you had the original shims I believe it is good practise to actually measure the shims rather than trusting the numbers on the shim.
I had my digital venier calipers but it did not seem as accurate as Ray's micrometer for this task when we were checking the new shims. 
If you are going to purchase a micrometer I would recommend that you get a digital unit that has the ability to display both inch and metric measurements. Mitutoyo is a well respected brand name in measurement equipment but Craftsman makes a perfectly acceptable unit. It would make for a nice Christmas present ;)

Confucius say: "No matter where you go ..... there you are"

#7 RaYzerman19

Go Wings!

  • Members++
  • PipPipPipPipPip
  • 3,508 posts
  • Gender:Male
  • Location:Millgrove, ON
  • 2014A (Gen 3) World
  • 2007 ABS (Gen 2) World

Posted 15 April 2011 - 12:08 PM

'Tis now a thing of beauty, Bill. Very nice.

FYI, I got what I think is a pretty good digital mike at Harbor Fright, about $35. I don't see it on the website any more. 

2014A Root Beer

You don't go to Freddy Beach for the beach....

Duct tape can't fix stupid, but it can muffle the sound

#8 Fred W

1 Wheel Drive

  • Members++
  • PipPipPipPipPipPip
  • 18,703 posts
  • Gender:Male
  • Location:Southern NH
  • 2014ES (Gen 3) N. America

Posted 15 April 2011 - 12:12 PM

Glad to see that I'm not the only one using the "old" Excel! I have been a heavy user of Excel for many years and HATE the "new and improved" versions.


FWIW, when I was re-formatting the sheets for yamafitter I was actually using Office 2010. 
It was saved in an "Excel 97-2003" version format for backwards compatibility, but it works just fine on the dreaded "new and improved" version too. ;)

To view my "broken" Photobucket images:    Firefox fix  Chrome fix

#9 RossKean

FJR Commander

  • Members++
  • PipPipPipPipPip
  • 3,668 posts
  • Gender:Male
  • Location:Fredericton, NB
  • 2007 ABS (Gen 2) N. America

Posted 15 April 2011 - 03:30 PM


Glad to see that I'm not the only one using the "old" Excel! I have been a heavy user of Excel for many years and HATE the "new and improved" versions.


FWIW, when I was re-formatting the sheets for yamafitter I was actually using Office 2010. 
It was saved in an "Excel 97-2003" version format for backwards compatibility, but it works just fine on the dreaded "new and improved" version too.;)


I don't like it but I use 2010 out of necessity - any new computers at work come with the latest and greatest from Microsoft. If I am preparing stuff for customers, I also use the "save as" option since many (most) seem to still be using the older versions. Still have 2003 on my home computer and plan to keep it that way as long as possible. 
groundspider.jpgYN3DYrL.jpg

#10 Greb

FJR Pilot

  • Members++
  • PipPipPip
  • 379 posts
  • Gender:Male
  • Location:DFW
  • 2008 ABS (Gen 2) N. America

Posted 16 April 2011 - 10:03 AM

very nice work! Thanks 
Posted Image Posted Image

#11 ktown

Training Pilot

  • Members++
  • PipPip
  • 56 posts
  • Gender:Male
  • Location:Whitewright, Tx
  • 2006 ABS (Gen 2) World

Posted 20 April 2011 - 07:30 PM

Ditto on the good work - saved me a copy! 

#12 03HiYoSilver

FJR Commander

  • Members++
  • PipPipPipPipPip
  • 1,947 posts
  • Location:Atlanta, GA
  • 2003 (Gen 1) N. America

Posted 20 April 2011 - 07:38 PM


Glad to see that I'm not the only one using the "old" Excel! I have been a heavy user of Excel for many years and HATE the "new and improved" versions.


FWIW, when I was re-formatting the sheets for yamafitter I was actually using Office 2010. 
It was saved in an "Excel 97-2003" version format for backwards compatibility, but it works just fine on the dreaded "new and improved" version too.;)


Fred,
Thanks for thinking like (and doing) this... my Excel 97 appreciates it !

Yamafitter,
Very Nice job putting this together...Thanks! 

#13 HaulinAshe

FJR Commander

  • Members++
  • PipPipPipPipPip
  • 3,998 posts
  • Gender:Male
  • Location:Dallas, NC
  • 2016ES (Gen 4) World
  • 2007 ABS (Gen 2) N. America

Posted 20 April 2011 - 07:57 PM

Definitely nice work. I'm going to tuck a copy away on Google Docs.

Anybody paying for a valve check should insist on that spreadsheet being completed. I've talked to way too many people lately who paid good money for a valve check that yielded no report of the actual measurements found. Bad business! 
The older you are, the faster you used to be.

#14 Fred W

1 Wheel Drive

  • Members++
  • PipPipPipPipPipPip
  • 18,703 posts
  • Gender:Male
  • Location:Southern NH
  • 2014ES (Gen 3) N. America

Posted 26 March 2013 - 06:07 AM

Based on some feedback I received, I've taken the liberty to make a few "improvements" to Yamafitter's MESS (Most Excellent SpreadSheet) to make it even easier to use, especially if all you have are inch based feeler gauges and an inch based micrometer.  If you have previously downloaded the spreadsheet and saved it you may want to get the new one.  It still works essentially the same.


If you hadn't previously seen Bill's MESS, and you are even considering doing your own valve adjustment at sometime in the future, grab yourself a copy and tuck it away.  It really is quite nice!

To view my "broken" Photobucket images:    Firefox fix  Chrome fix

#15 dcarver

FJR Forum Post Whore

  • Members++
  • PipPipPipPipPipPip
  • 13,255 posts
  • Gender:Male
  • Location:Creston, CA
  • Interests:Bikes. Booze. Broads. Dirt. Street. Mud. Guts. Courage. Honesty.
  • 2006 ABS (Gen 2) World

Posted 26 March 2013 - 07:06 AM

Am I to assume the link in the first post has been updated for download?

    Walked away Posted ImagePosted Image Is it really crashing if you don't fall down?--
    I wouldn't change a fucking thing; I've lived hard, played hard, and I ain't done yet. I've paid some severe penalties along the way, but the rewards have been so much greater; even if for just have participating in the game of life with utmost abandon. It's not who rides the furthest in a day, but rather in a lifetime. CBA member #1, IBA #31845 and very proud of both.
    Posted Image

    #16 Fred W

    1 Wheel Drive

    • Members++
    • PipPipPipPipPipPip
    • 18,703 posts
    • Gender:Male
    • Location:Southern NH
    • 2014ES (Gen 3) N. America

    Posted 26 March 2013 - 08:34 AM

    correctamundo!

    To view my "broken" Photobucket images:    Firefox fix  Chrome fix

    #17 MCRIDER007

    FJR Commander

    • Members++
    • PipPipPipPipPip
    • 2,293 posts
    • Gender:Male
    • Location:Kennewick, WA
    • 2014ES (Gen 3) N. America

    Posted 22 April 2013 - 08:47 AM

    For those that have actually replaced shims, what size of shims were originally installed? It appears that the shims are around 1.80mm but I think it would be useful for anyone planning a valve check to have the correct shims on hand.....you can buy them from Jake Wilson for $1.49 each (plus a $7.00 shipping charge). 

    #18 Fred W

    1 Wheel Drive

    • Members++
    • PipPipPipPipPipPip
    • 18,703 posts
    • Gender:Male
    • Location:Southern NH
    • 2014ES (Gen 3) N. America

    Posted 22 April 2013 - 09:07 AM

    I only had to do my intakes so unsure what they have going on under the exhaust buckets.  All 8 of my intakes were under the .15mm  spec by from .01 to .03 mm at 75k miles.  They had previously always been on the low end of spec range since the first check at 25k.  Exhausts were all in spec.


    The shims I took out miked out to be between 1.79 and 1.81, so it appears the factory aims for a 1.80 but has increments of .01 for setting the initial clearances.


    If I was using Yamaha shims, only available in .05mm increments,  I would have just stuck in 8 of the 1.75 mm shims and called it good.  Instead, I sanded the shims to the exact thickness I wanted and got all 8 clearances to .20 mm, the high end of spec range (.15-.22 mm)


    Here's the whole story:


    ShimCalculations.jpg

    To view my "broken" Photobucket images:    Firefox fix  Chrome fix

    #19 MCRIDER007

    FJR Commander

    • Members++
    • PipPipPipPipPip
    • 2,293 posts
    • Gender:Male
    • Location:Kennewick, WA
    • 2014ES (Gen 3) N. America

    Posted 22 April 2013 - 09:56 AM

    Thanks Fred, I would guess that all of the shims you removed were "intended" to be 1.80mm....which is surprising based my experience with a ZX-6 and my C-14 this spring.  The C-14 had intake shims that were 2.25-2.33mm and exhaust shims that were 2.28-2.38mm.  Definitely not as consistent as the FLR but the difference in sizes allowed me to change all 16 shims with only 6 new shims.  I could have skipped the shim change (this time) since there was virtually no movement since the first valve check but 14 of the clearances were either at the minimum (or slightly past) so I decided to set all 16 at the ideal clearance and call it a lifetime valve adjustment.

    #20 ULEWZ

    FJR Pilot

    • Members++
    • PipPipPip
    • 489 posts
    • Gender:Male
    • Location:Northridge, CA
    • 2007 ABS (Gen 2) N. America

    Posted 22 April 2013 - 11:38 AM

    I put an excel spreadsheet together for my dirtbike and posted it on Thumpertalk. Definately not as spiffy as yours, but I did include a "what if" calculation on mine. With the measured clearance, existing shim, and recommended clearance, you can enter shim sizes to see where your clearance will end up. This is handy since the shims in the Hot Cams kit have big differences between shims, and sometimes you need to make a compromise. Too high, or too low. Just a thought if you want to get frisky.
    Here is a link: http://www.thumperta...-hope-it-works/

    Cee Bailey Windscreen, autoretract deactivated, PCV, Recall ECU, Recall grounds, Recall key ignition, Frame sliders. Highway pegs in frame sliders, Penske 8983, Race Tech Gold valves, Sonic springs, Sargeant seat, Rear trunk, Trooper Exhaust mod, Shorter Jester racing bog bones (removed), Progrip 714 grips, Throttle Rocker, Vario adjustable foot pegs, Ram mount for GPS, Garauld highway peg mounts with Rivco pegs , All balls steering stem bearings, Audiovox CCS-100 cruise control, Delkevic hex pipes, Baldwin leather seats, EBC HH pads Sold!

    Fred W

    1 Wheel Drive

    • Members++
    • PipPipPipPipPipPip
    • 18,703 posts
    • Gender:Male
    • Location:Southern NH
    • 2014ES (Gen 3) N. America

    Posted 22 April 2013 - 12:07 PM

    The Hot Cams kits come in .05mm increments (same as the stock shims).  Sandpaper and a micrometer are your friends here.


    The "what if" feature is included in the Billy Yamafitter's spiffy spreadsheet too.

    To view my "broken" Photobucket images:    Firefox fix  Chrome fix

    #22 MCRIDER007

    FJR Commander

    • Members++
    • PipPipPipPipPip
    • 2,293 posts
    • Gender:Male
    • Location:Kennewick, WA
    • 2014ES (Gen 3) N. America

    Posted 22 April 2013 - 12:36 PM

    The Hot Cams kits come in .05mm increments (same as the stock shims).  Sandpaper and a micrometer are your friends here.
     
    The "what if" feature is included in the Billy Yamafitter's spiffy spreadsheet too.


    I had access to a Hot Cam kit and used Jake Wilson to fill in the gaps since they sell shims in .025mm increments. I don't think anyone recommends sanding shims but I haven't heard of any problems from those that have done it. 

    #23 wheatonFJR

    ...

    • Banned
    • PipPipPipPipPipPip
    • 16,348 posts
    • Gender:Male
    • Location:Greenville,SC
    • 2013A (Gen 3) N. America

    Posted 22 April 2013 - 12:41 PM

    ...I don't think anyone recommends sanding shims but I haven't heard of any problems from those that have done it.


    Besides being a pain in the ass, what could be the possible downside?

    Iggy's a douchetard.  JSNS
     

    #24 Fred W

    1 Wheel Drive

    • Members++
    • PipPipPipPipPipPip
    • 18,703 posts
    • Gender:Male
    • Location:Southern NH
    • 2014ES (Gen 3) N. America

    Posted 22 April 2013 - 12:52 PM

    I'll let you know in another 20k miles...  ;)

    To view my "broken" Photobucket images:    Firefox fix  Chrome fix

    #25 MCRIDER007

    FJR Commander

    • Members++
    • PipPipPipPipPip
    • 2,293 posts
    • Gender:Male
    • Location:Kennewick, WA
    • 2014ES (Gen 3) N. America

    Posted 22 April 2013 - 02:56 PM

    ...I don't think anyone recommends sanding shims but I haven't heard of any problems from those that have done it.


    Besides being a pain in the ass, what could be the possible downside?


    That the shim does not have uniform hardness throughout  and will start to wear if the outer layer is sanded away.

    #26 Fred W

    1 Wheel Drive

    • Members++
    • PipPipPipPipPipPip
    • 18,703 posts
    • Gender:Male
    • Location:Southern NH
    • 2014ES (Gen 3) N. America

    Posted 22 April 2013 - 03:35 PM

    ...I don't think anyone recommends sanding shims but I haven't heard of any problems from those that have done it.


    Besides being a pain in the ass, what could be the possible downside?


    That the shim does not have uniform hardness throughout  and will start to wear if the outer layer is sanded away.


    There is no friction against the shim, only pressure.  It just sits as a spacer under the bucket, which does get the friction and potential for wear from the cam swiping across it, and the valve stem, whose motion is only up and down so no potential.   


    The chances of it "wearing" are slim to none.  I do not believe these shims are even hardened based on how easy they are to sand down.

    To view my "broken" Photobucket images:    Firefox fix  Chrome fix

    #27 MCRIDER007

    FJR Commander

    • Members++
    • PipPipPipPipPip
    • 2,293 posts
    • Gender:Male
    • Location:Kennewick, WA
    • 2014ES (Gen 3) N. America

    Posted 22 April 2013 - 04:22 PM

    ...I don't think anyone recommends sanding shims but I haven't heard of any problems from those that have done it.


    Besides being a pain in the ass, what could be the possible downside?


    That the shim does not have uniform hardness throughout  and will start to wear if the outer layer is sanded away.


    There is no friction against the shim, only pressure.  It just sits as a spacer under the bucket, which does get the friction and potential for wear from the cam swiping across it, and the valve stem, whose motion is only up and down so no potential.   


    The chances of it "wearing" are slim to none.  I do not believe these shims are even hardened based on how easy they are to sand down.


     I am just the messenger on this one since I don't have any first hand expertise.....but based on all the warnings I have read saying not to sand down the shims (and this may not be applicable to shim under bucket valve trains), my preference is to buy the shims in the smaller increments to get the desired clearances.


    Back to the original question.........does anyone else have input on the FJR's installed shim sizes?

    #28 ULEWZ

    FJR Pilot

    • Members++
    • PipPipPip
    • 489 posts
    • Gender:Male
    • Location:Northridge, CA
    • 2007 ABS (Gen 2) N. America

    Posted 22 April 2013 - 07:47 PM

    The Hot Cams kits come in .05mm increments (same as the stock shims).  Sandpaper and a micrometer are your friends here.


    The "what if" feature is included in the Billy Yamafitter's spiffy spreadsheet too.

    You are right. The what if calculation is there, I just missed it because I failed to read the notes and only relied on my poor interpretation of the text by the boxes. Very good.

    Cee Bailey Windscreen, autoretract deactivated, PCV, Recall ECU, Recall grounds, Recall key ignition, Frame sliders. Highway pegs in frame sliders, Penske 8983, Race Tech Gold valves, Sonic springs, Sargeant seat, Rear trunk, Trooper Exhaust mod, Shorter Jester racing bog bones (removed), Progrip 714 grips, Throttle Rocker, Vario adjustable foot pegs, Ram mount for GPS, Garauld highway peg mounts with Rivco pegs , All balls steering stem bearings, Audiovox CCS-100 cruise control, Delkevic hex pipes, Baldwin leather seats, EBC HH pads Sold!

    #29 VMaxChuck

    FJR Pilot

    • Members++
    • PipPipPip
    • 288 posts
    • Gender:Male
    • Location:West Michigan area
    • 2016A (Gen 4) World

    Posted 23 April 2013 - 03:57 AM

    Thanks for the spreadsheet! Hope it comes in handy for ME on a future purchase!! bike.gif

    #30 Constant Mesh

    FJR Commander

    • Members++
    • PipPipPipPipPip
    • 1,762 posts
    • Gender:Male
    • Location:Tenn
    • 2004 (Gen 1) N. America

    Posted 23 April 2013 - 05:05 AM

    One might assume that the lifters rotate a bit as they move up and down.  So there may be some rotary movement between the shim and lifter.  The thickness marking on the shim typically faces up against the lifter.  The markings on most of the shims I've inspected have all but disappeared.

    #31 Fred W

    1 Wheel Drive

    • Members++
    • PipPipPipPipPipPip
    • 18,703 posts
    • Gender:Male
    • Location:Southern NH
    • 2014ES (Gen 3) N. America

    Posted 23 April 2013 - 05:25 AM

    One might assume that the lifters rotate a bit as they move up and down.  So there may be some rotary movement between the shim and lifter.  The thickness marking on the shim typically faces up against the lifter.  The markings on most of the shims I've inspected have all but disappeared.


    You are correct, the buckets do tend to rotate, but the rotation would happen when they are unloaded.  There is nothing forcing them to rotate, they just sort of do it on their own, so no real wearing at the surfaces.  The markings are just stamped ink, so the fact that there is ever any of the original marking left on them at all is evidence that there is no real friction or wear going on here.

    To view my "broken" Photobucket images:    Firefox fix  Chrome fix

    #32 RaYzerman19

    Go Wings!

    • Members++
    • PipPipPipPipPip
    • 3,508 posts
    • Gender:Male
    • Location:Millgrove, ON
    • 2014A (Gen 3) World
    • 2007 ABS (Gen 2) World

    Posted 23 April 2013 - 09:20 AM

    If you buy the Hot Cams shim kit, you'll have a whole mess you'll never use, and one of the two boxes can be put on the shelf as a paperweight....  Just buy a few individual shims, say 3, 4, or 5 each around the 175-185 mark and you'll be good to go.

    http://www.rockymoun...ro-X-Valve-Shim

    http://www.rockymoun...ro-X-Valve-Shim

    2014A Root Beer

    You don't go to Freddy Beach for the beach....

    Duct tape can't fix stupid, but it can muffle the sound

    #33 PhilJet09

    Nondescript FJR Hierarchy Displayed

    • Members++
    • PipPipPipPipPip
    • 1,385 posts
    • Gender:Male
    • Location:Ohio, Toledo suburbs
    • 2009 ABS (Gen 2) N. America

    Posted 07 December 2013 - 02:22 PM

    Thanks for making this spreadsheet. I'm in the process of doing my second valve check and this makes it easier. 
    Petey is my hero.

    #34 MrM0t0

    FJR Pilot

    • Members++
    • PipPipPip
    • 348 posts
    • Gender:Male
    • Location:Providence, RI
    • 2008 ABS AE (Gen 2) N. America

    Posted 03 April 2017 - 08:47 AM

    Does anyone have this spreadsheet? The original link appears to be dead. TIA

    #35 thomasgif

    Training Pilot

    • Members+
    • PipPip
    • 35 posts
    • Gender:Male
    • Location:Millersville, PA
    • 2005 (Gen 1) N. America

    Posted 03 April 2017 - 09:14 AM

    I remade it a couple weeks ago.  PM me your email and I'll send it along.

    IBA #61898

    #36 MrM0t0

    FJR Pilot

    • Members++
    • PipPipPip
    • 348 posts
    • Gender:Male
    • Location:Providence, RI
    • 2008 ABS AE (Gen 2) N. America

    Posted 03 April 2017 - 09:56 AM

    Thanks! PM Sent

    #37 Fred W

    1 Wheel Drive

    • Members++
    • PipPipPipPipPipPip
    • 18,703 posts
    • Gender:Male
    • Location:Southern NH
    • 2014ES (Gen 3) N. America

    Posted 03 April 2017 - 11:08 AM

    Original is here:


    Valve Clearances Spreadsheet


    (I was hosting that spreadsheet on a comcast web account that no longer exists.  The first post is not mine so I cannot edit the link)

    To view my "broken" Photobucket images:    Firefox fix  Chrome fix

    #38 MrM0t0

    FJR Pilot

    • Members++
    • PipPipPip
    • 348 posts
    • Gender:Male
    • Location:Providence, RI
    • 2008 ABS AE (Gen 2) N. America

    Posted 18 April 2017 - 01:36 PM

    Fred - What grade of sandpaper did you use? I tried 220 and didn't even make a dent!

    #39 Fred W

    1 Wheel Drive

    • Members++
    • PipPipPipPipPipPip
    • 18,703 posts
    • Gender:Male
    • Location:Southern NH
    • 2014ES (Gen 3) N. America

    Posted 18 April 2017 - 01:52 PM

    It was about the same as that.  What kind of sandpaper are you using?  Wet or Dry? 


    I was using some woodworking finishing paper.  I'd have to go find my old posts to see what the grits were.  


    It does take some persistence.  ;)

    To view my "broken" Photobucket images:    Firefox fix  Chrome fix

    #40 Viper Pilot

    FJR Pilot

    • Members++
    • PipPipPip
    • 185 posts
    • Gender:Male
    • Location:Pewaukee, WI
    • 2005 (Gen 1) Euro/Other

    Posted 18 April 2017 - 02:28 PM

    I use fine Emery cloth for 'sanding' my shims. Works great.

    RossKean

    FJR Commander

    • Members++
    • PipPipPipPipPip
    • 3,668 posts
    • Gender:Male
    • Location:Fredericton, NB
    • 2007 ABS (Gen 2) N. America

    Posted 18 April 2017 - 02:45 PM

    Wet 220 grit carbide to remove material. Finer to finish. (400, I think.) 
    groundspider.jpgYN3DYrL.jpg

    #42 MrM0t0

    FJR Pilot

    • Members++
    • PipPipPip
    • 348 posts
    • Gender:Male
    • Location:Providence, RI
    • 2008 ABS AE (Gen 2) N. America

    Posted 18 April 2017 - 04:59 PM

    It was about the same as that.  What kind of sandpaper are you using?  Wet or Dry? 


    I was using some woodworking finishing paper.  I'd have to go find my old posts to see what the grits were.  


    It does take some persistence.  wink.png

    I'll try Ross' carbide idea.

    #43 RossKean

    FJR Commander

    • Members++
    • PipPipPipPipPip
    • 3,668 posts
    • Gender:Male
    • Location:Fredericton, NB
    • 2007 ABS (Gen 2) N. America

    Posted 18 April 2017 - 05:59 PM

    Paper on flat smooth surface. Shim on the paper with a little water. Finger on shim and move in a figure 8 with moderate pressure. I used a good digital caliper to check thickness frequently. Micrometer is more accurate but caliper is faster and I was satisfied with my accuracy. Verified by measuring known shims and feeler gauge blades with the caliper. I went through about two or three pieces of 220 grit to do 6 shims. 
    groundspider.jpgYN3DYrL.jpg


    Theme by Danetsoft and Danang Probo Sayekti inspired by Maksimer