I replaced my steering head bearings with the All Balls Racing (AB) set (22-1003) from All Balls Racing All Balls Racing which as you will see, are much more substantial then the OEM bearings. I will caveat this by saying that I was not unhappy with the OEM bearings and I wasn’t having any problems – I was overdue for the bearing maintenance (I’m at 25k+) and figured I’d go the whole route and put in new ones.
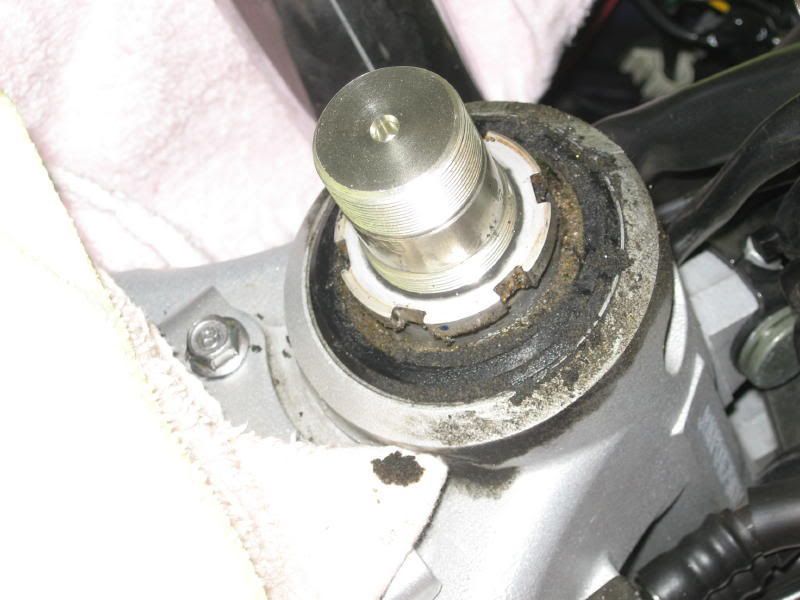
To get this done you have to remove the side plastic, front wheel, forks, and the upper and lower brackets. Here’s a picture of what my upper setup looked like with the upper bracket removed, looks dirty but the grease/dirt wiped right of and the components looked good.
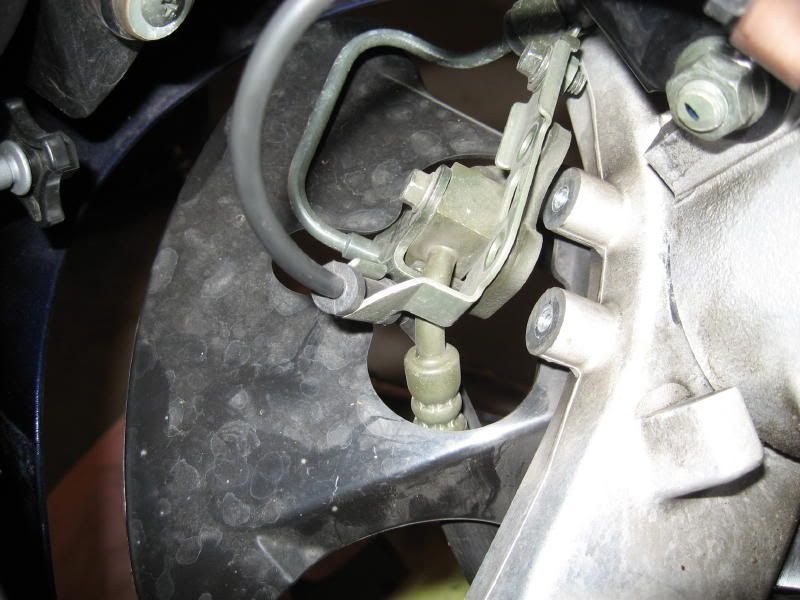
One note of caution – you must remove the brake wire jumble that is attached to the lower bracket. There are 2 horizontal screws (bolt head) that go in front to rear and 2 vertical Allen head bolts that go in from the bottom up. Do not get in a hurry and loosen the single larger bolt underneath (vertical) – brake fluid will leak out and you will realize you screwed up! I got done yesterday, put Maxine back together, crossed my fingers, …nope, no front brakes – no I have to bleed them before I test ride.
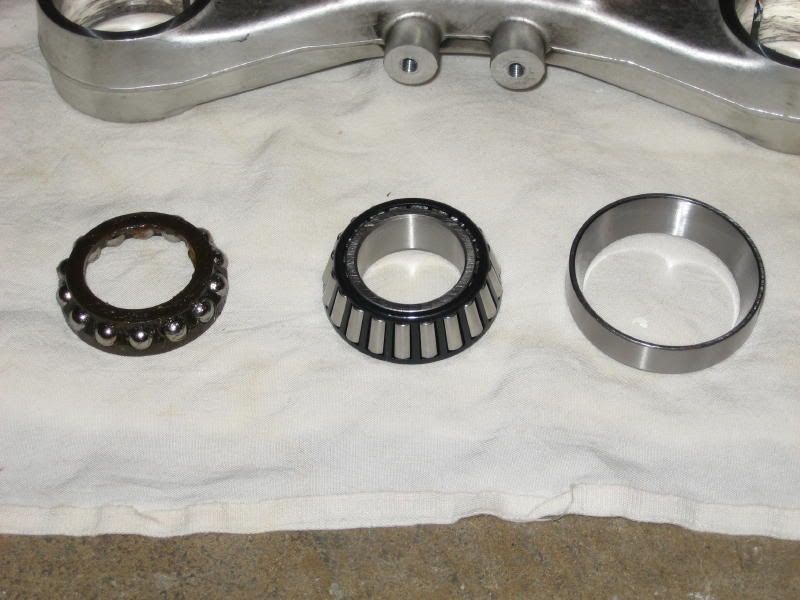
The upper and lower bearings consist of 3 parts; inner race, bearings, outer race. This is a mixed picture, it shows the OEM bearings on the left, and the All Balls bearings in the center (inner race comes installed inside) and the All Balls outer race on the right.
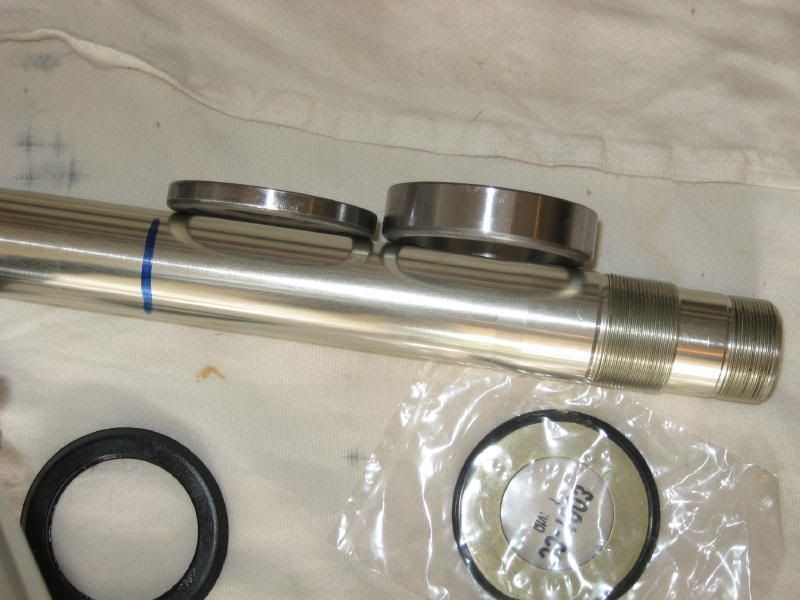
EDIT - here's another picture that shows the difference between the OEM outer race (left) and the AB outer race (right); AB is significantly more robust!
When you pull the lower bracket you’ll see the inner race which is pressed onto the steering stem (pull the rubber dust shield off), it’s a different color then everything else;
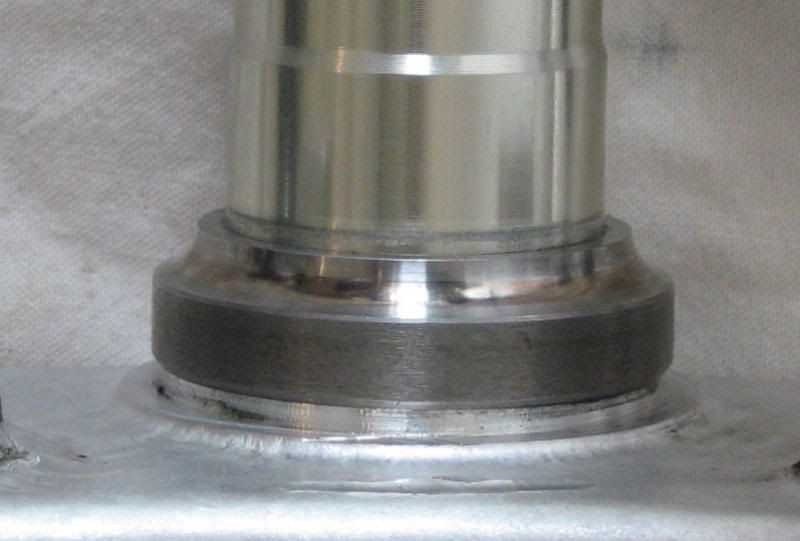
the bearings which are ball bearings in a plastic race; and the outer bearing which is pressed into the steering head. Upper bearing: the outer race is likewise pressed into the top of the steering head, the bearings are the same as the lower bearings, and the inner race is easily removed as it just sits on top of the bearings. I should mention here that the AB bearing sets only have 2 components, the outer race and the bearings which have the inner race already installed.
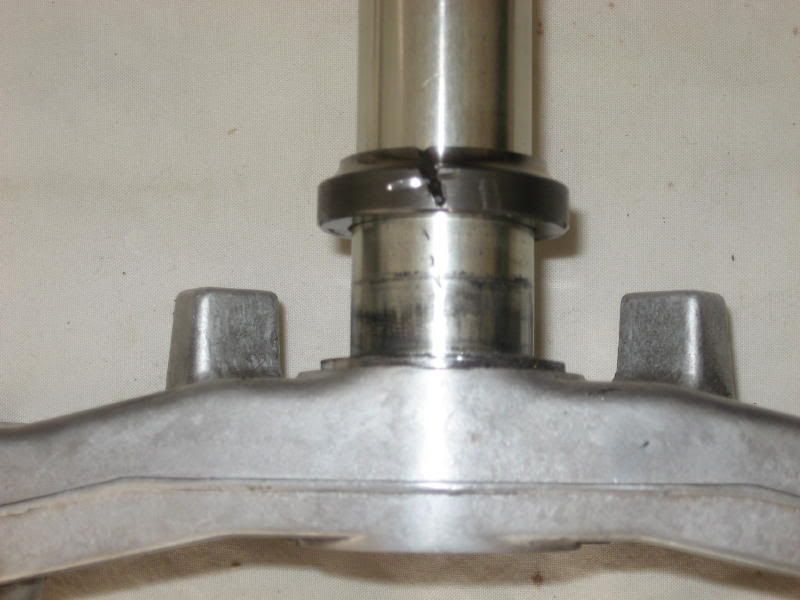
You need to remove the lower inner race off of the steering stem. I went to 2 dealers (1 Yami and 1 BMW) and neither would remove the bearing (I suspect that didn’t want to take the 30 seconds necessary). So, I took Smitty’s advice and used my handy Dremel with a cutoff wheel and cut a slot in the lower inner race (being careful not to cut into the steering stem) – I whacked it occasionally with a cold chisel hoping it would snap, what finally worked was using the cold chisel at an angle in the slot as if to unscrew the inner race, that did loosen the inner race and I was able to tap it off. This probably took all of 10 minutes.
To remove both the lower and upper outer bearings (in the steering head), you take a Drift (a. A tool for ramming or driving something down; b. A tapered steel pin for enlarging and aligning holes) and drive the outer races out of the steering head. As you look down into the steering head, you can see where the race sits, you will also see at 3 and 9 O’clock small indents (I should add that the outer race is already gone in this picture).
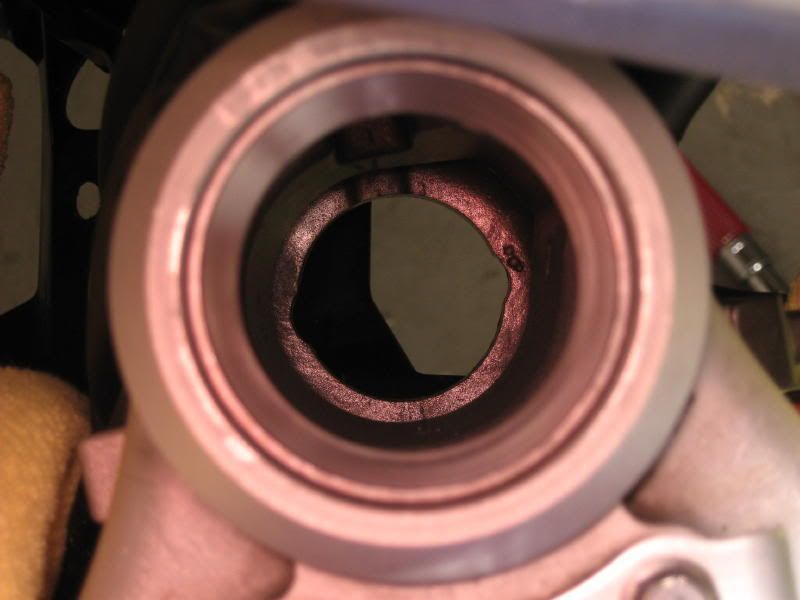
You position your drift on the race within those indents and tap away. You don’t need to whack away for all you’re worth, but “firm” taps are called for. Alternate from side to side and eventually the race will pop out. Put a towel over your gas tank so the upper inner race won’t scratch it when it pops out.
Clean the grease off of everything. I installed the new lower and upper inner races first. I used the old OEM outer races on top of the new outer races to tap the new ones in. When you place the new race into the steering head it will go in about half way or more (just try and get it evenly inserted). I then placed the old race over top of the new race matching their edges, and tapped away with what is actually a small upholstery hammer – rotate your tapping around and you’ll feel the race seating itself. You can feel when it’s reached bottom by the feedback you feel in the hammer, it’ll sound solid and bounce back. The upper is much easier to insert – for the bottom race you’re working on your back looking up, and you have the brake lines in the way, but neither job is difficult.
Getting the lower inner race on the steering stem is next. You first put the dust shield on the stem (you’ll find that the dust shield will actually snap onto the lower part of the bearing to help you tell which side is up/down) then the bearing. You will have to drive the bearing onto the shaft. I put the bearing on the shaft and then used the old inner race (the one I cut off) on top of that. That lets you hit the inner race on the AB inner race and not the entire bearing (put the old inner race on upside down, skinny part down). I then used a 1 ¼” PVC pipe over that, put a piece of wood on top of that, and whacked away. Note – the bottom of the lower bracket is not level, the ends stick down and the center is not supported – put the center of the bracket on something solid to support it, an anvil would be nice if you have one handy. Now, my bearings did not seat all the way down, there is a small gap. But, I did get the feedback that indicates that the race is as far down as it’s going to go. I’ll keep an eye on it in the future, but I’m confident it’s seated as far as it’s going to go. (Edit – sitting in a meeting a few minutes ago I was bored and jotted down a picture of the stem/lower inner race – lo and behold it hit me like a freight train – the lower inner race is wide at the bottom and narrows at top to accept the bearings. In other words, the bearings actually sit on the lower inner race above the bottom of the stem! So, if the AB bearings are to seat at the same place on the stem, there will be a gap at the bottom – that’s my story.)
Grease, I did use the grease in the palm and run the bearing over your hand method before I drove on the bearing – I also put more on the outside just before inserting the lower bracket/stem back inside the steering head.
Next, I greased the upper bearing and put it all back together, wiggling the bracket every once in a while to make sure it was seating/seated and moving properly. The upper bearing goes in like this – outer race (already in the steering head) bearing, dust seal then the various nuts, etc. The book says to torque the nut (the one you need the million dollar spanner to properly tighten) to an initial 37 Lbft, then back off and retorque to a final 13 lbft. Smitty (my guide in this process who deserves and has my appreciation!) said that because these are tapered bearings, he added 10 lbft to both. I split the difference and initially torqued to 43 lbft, backed off and torqued to a final 18 lbft.
Once I got everything back together, I found I had no clutch and no front brakes! No clutch I assume because I had the handlebars laying on top of the bike at strange angles and I assume the fluid was “upset.” (Note – I have the D&D risers and have to remove the handlebars from the upper bracket (triple tree) in order to get the socket on my million dollar nut (Stem nut). After letting the bike sit and squeezing the lever a few times, the clutch is back to normal. I’m sure my brake line harness loosening fubar let air into the front brake system and I will need to bleed the brakes to get them back – it did.
I think this job is well within the capabilities of most shade tree mechanics and those who want to learn to do stuff to their bikes. Looked at in its entirety it might seem a daunting task, but when you break it down into its component parts, nothing is difficult The only special tool you need is the spanner and a drift – frankly, any long, thin, probably metal rod will work in place of the drift (stout screwdriver, metal rod, etc). This took me almost a week because I was doing it in between doing other household chores and duties. If I have set aside the time to do it all at once, I would guess 3 – 5 hours would probably be total time from start to finish with disassembly/assembly taking the majority of the time.
Additionally, the folks at All Balls Racing agreed to send me 2 sets of the bearings to give out as door prizes at EOM – so 2 folks out there will have an opportunity to do this thanks to “All Balls.”
Got my brakes bled last night and rode on Tuesday. Steering feels very nice, smoother at low speeds and I guess I’d say more solid at higher speeds; not difficult to turn, but it does feel more solid. I’ll also add that I did have the “wobble under deceleration” that some folks have mentioned. Yes, it was after I put on my Avons, but it was also after 19,000 or so miles without steering head maintenance. And, it was not at all noticeable unless I took my hands off the handlebars while decelerating (and even then it wasn’t a big deal). That is now gone – can’t say whether that’s because of the tapered bearings, or whether normal maintenance and retorqueing of the OEM bearings would provide the same results. The All Balls are a nice addition and now I know more about my bike then I did before.
I hope this helps explain in sufficient detail (w/pictures) how to do this for those sitting on the fence not sure if they have the skill or not. Not that you need to do this, but if you want to, it’s not too difficult. As a way of thanks one more time, Smitty was very helpful to me on this project and his advice was much appreciated. If anyone has any questions, I’m more than happy to try and answer them based on my vast, vast experience of having done this exactly 1 time.
And I did this in Aug 2007:


continued...
FJRMGM
FJRMGM
Posted 29 January 2012 - 08:53 AM
Its your bike and you can do what you want with it.
But, every time I see someone doing this I say to myself: "man, what a lot of effort to fix a non-problem."
I now live in motorcycling paradise - NW Arkansas!!
#62 TomInPA
FJR Commander
Posted 29 January 2012 - 12:18 PM
Molybdenum grease is the product of choice for splines to provide an extremely high pressure, high temperature lubricant that works by coating the gears in a micro-thin protective metal coating. Again, not for ball bearings, and I have no idea what the long-term wear and performance would be because as far as I know, it is not tested for that application.
Mama Yama recommends a high quality lithium grease, and synthetics should work fine for steering and wheel bearings. I'm going to stick to that recommendation. Lithium grease is cheaper, and cleaner to apply and is what is recommended. As far as these metallic alternatives, I don't get it.
#63 John_Dumke
FJR Pilot
Posted 06 July 2012 - 12:49 PM
I have always felt like the FJR is a little vague at speed (100+mph), so hopefully this mod will help improve steering precision. Thanks for the right up.
03 CRF450,00 WR40006 FJR1300A,
98 YZF1000,89 GSXR-750 w/Built 1100 motor,86 GSXR-750,83 GS1100,81 GPZ550#64 Nikk
Nikk
FJR Pilot
Posted 09 March 2013 - 02:49 PM
Question about heating the lower AllBalls bearing.
Given that the All Balls bearing seal must be on the steering stem before seating the lower bearing, has anyone melted the seal with a 300F bearing?
[DRZ-400: ]
]
2006, Yamaha FJR1300: G2, PCiii, Penske shock, GP fork kit, PIAA, Sargent, Givi, P.A.I.R. Job, risers.
2005, Suzuki DRZ400S: Jetted.
#65 Brisendines
FNG
Posted 27 April 2013 - 05:05 PM
Just tried to install the bearings on my 07, but the lower steering stem bearing split apart on me, even though I was using the old race and some hard plastic sleeve to drive it on. I heated the bearing and froze the steering stem.... Extremely frustrating. Need to get this nack together ASAP as it is my primary mode of transportation.
#66 kamal
kamal
No longer frightened by corners!
Posted 27 April 2013 - 05:23 PM
Sorry to hear this.
I installed these in my Gen1 over the winter without any heating or freezing. Only PITA was installing the lower race.
Good luck.
Al.
#67 Queensland Ken
FJR Squadron Leader
Posted 27 April 2013 - 06:14 PM
I normally leave the bearing in the oven at 200F for about 1/2 hour, likewise the steering stem in the deep freeze for about an hour.
Used to use an induction heater at work but the oven works well and you have one shot to do it.
I had everything set up at a table just outside the kitchen, drifts and the old race, slipped on perfectly.
Have had 2 good successes and only one time where I had to use a drift and the old race.
Have a set of welders gloves now if I ever do it again.
2014 AE aka the Aussie ES
2013 MG Stelvio
2011 Spyder RT-S Limited Edition
2007 GSX 1400
2002 TL1000R
#68 ULEWZ
ULEWZ
FJR Pilot
Posted 28 June 2013 - 08:44 PM
I just did this and it was not too difficult, but not for the weak or mechanically challenged. I used a long socket extension do drive the old races off the neck. The new bearing wacked on really easy with a 30 lb sledge. Make sure the driving tube fits over the inner race of the new bearing, not the outer race or it will damage it. 5 hits and it was on. The old race works good to seat the new races in the neck. I will try it out tomorrow to see how it feels. Oh, I used the All Balls kit.
And thanks for the write up. Why did I do this? My front end felt loose so I tightened it up. Then it was too tight. No happy medium, so tapered bearings it was.
Cee Bailey Windscreen, autoretract deactivated, PCV, Recall ECU, Recall grounds, Recall key ignition, Frame sliders. Highway pegs in frame sliders, Penske 8983, Race Tech Gold valves, Sonic springs, Sargeant seat, Rear trunk, Trooper Exhaust mod, Shorter Jester racing bog bones (removed), Progrip 714 grips, Throttle Rocker, Vario adjustable foot pegs, Ram mount for GPS, Garauld highway peg mounts with Rivco pegs , All balls steering stem bearings, Audiovox CCS-100 cruise control, Delkevic hex pipes, Baldwin leather seats, EBC HH padsSold!#69 Canadian FJR
FJR Commander
Posted 22 February 2015 - 03:29 PM
After just replacing my steering head bearings (2nd time) I thought that this thread deserved a bump.
Canadian FJR
#70 PhilJet09
Nondescript FJR Hierarchy Displayed
Posted 22 February 2015 - 04:06 PM
How many miles did you have on each set?
#71 Canadian FJR
FJR Commander
Posted 22 February 2015 - 04:33 PM
I repacked and re-torqued the stock ones several times and they lasted 163,000 km
The first set of All Balls only lasted a little over 50,000 km but I'm pretty sure that the Trans Lab trip last summer pretty much killed them. There was a very significant notch straight ahead.
Time will tell how long these ones last.
Canadian FJR
#72 hppants
FJR Commander
Posted 24 February 2015 - 08:48 AM
Just curious
#73 Bounce
Chicks Dig Scars
Posted 24 February 2015 - 09:05 AM
When was the last time you actually cleaned and adjusted your steering head bearings?
http://www.fjr-tips....nt/shb/shb.html
Ft. Worth, TX, IBA #288
FJR-Tips.org
#74 FJRay
FJRay
FJR Commander
Posted 24 February 2015 - 10:16 AM
That's a good link for those getting ready to do the job. I've done my 03 twice in a 100k and am still on the original bearings. Next time I'll change to the tapered just cause I've got a set that was for another customer that sold his bike. I'm sure that most never get touched for the life of the bike.
2-03 FJR1300 sold
03 GL1800 "The Prom Queen" sold
02 KLR 650 again. Sold
15 Spyder RT limited. Sold
06 GL1800 " White Whale "
04 FJR 1300
Sarcasm is just one more service we offer !!
The poster does not take any responsibility for any hurt or bad feelings. Reading threads poses inherent risks. This poster would like to remind readers to make sure they have a functional sense of humor before they visit any discussion board.
IBA#33731
#75 hppants
FJR Commander
Posted 24 February 2015 - 11:18 AM
Bounce - I haven't taken the steering head apart yet. I have checked the torque on the nut (I have the spanner) and the bearings are packed full of grease. There is no notch anywhere full left to right. I went to tapered roller bearings for an older nighthawk back in the day and driving those outer races out is a PITA. I'm trying to avoid this if possible, but we'll see.
#76 Geezer
Parsimonious Curmudgeon
Posted 24 February 2015 - 11:46 AM
I am surprised. I would expect that tapered roller bearings would take a lot more abuse than ball bearings. Maybe the bearings themselves that All Balls uses are not up to par with the stock Yamaha stuff.
#77 HotRodZilla
GOD BLESS AMERICA
Posted 24 February 2015 - 12:12 PM
"Direct on the training and cutting off Gordon's head."
---One of my guys...03/31/2017
"...get the wind out of your vagina and mount up."
---FJROB 06/29/15
#78 Denver_FJR
FJR Squadron Leader
Posted 24 February 2015 - 07:22 PM
Yeah, I've picked up on similar internet lore about All-Balls, but this is the first report I've heard where someone has actually replaced a set due to wear. And while folks dis' them, I've never heard what's actually inferior about them. Hardness? Dimensions? Pot metal?
Digging the Super Tenere lifestyle!
#79 HotRodZilla
GOD BLESS AMERICA
Posted 24 February 2015 - 08:50 PM
"Direct on the training and cutting off Gordon's head."
---One of my guys...03/31/2017
"...get the wind out of your vagina and mount up."
---FJROB 06/29/15
#80 Brisendines
FNG
Posted 25 February 2015 - 08:27 AM
I would have preferred Timkin if I knew it was an option. Great to hear that the All Balls stuff is garbage after putting it in about 15k miles ago. At least I've acquired a press since then.
Bounce
Chicks Dig Scars
Posted 25 February 2015 - 08:46 AM
Odd that there didn't seem to be any issues being reported since AB was recommended as upgrades back on Gen 1 bikes. Did I miss the complaint threads?
Ft. Worth, TX, IBA #288
FJR-Tips.org
#82 rbentnail
Economic Plankton
Posted 25 February 2015 - 08:53 AM
Oh yeah, there sure is! For me it was 2 things:
I always developed a decel wobble from 50 to 40 when about 1/2 the front tire life was used. Replacing the tire always got rid of it. Until last summer. Symptom #1.
I developed a clunk when applying front brakes. Subtle at first, more like a feel than a noise, then progressing to noise. Symptom #2. I found the clunk- it was the steering stem moving in the frame. When front brakes were applied, the front tire moved toward the rear and the handle bars moved forward. Clunk!
Checked the bearing nut torque. No problem. But still F'd up clunk. Got the replacement All Balls set and disassembled. Found plenty of grease (routine maintenance every 2 yrs) but the bottom OEM bearing had a busted plastic ball-alignment thingee. Bearing balls literally hit the floor upon steering stem removal. New All Balls and problems went away. Even the decel wobble, first time since the bike was new in '08 I haven't had that.
Russ- Darksider #64
#83 hppants
FJR Commander
Posted 25 February 2015 - 11:21 AM
#84 rbentnail
Economic Plankton
Posted 25 February 2015 - 11:28 AM
The only complaints I've heard about over the yrs were during installation. IIRC there were 2 or 3 races that busted from pounding them on rather than cleaning/sanding/heating/freezing for a good fit. As far as I'm concerned if they crap out I'll try something else, and if not I'll be a satisfied customer.
Russ- Darksider #64
#85 Kelvininin
FJR Pilot
Posted 03 April 2017 - 11:49 AM
Zombie Thread Alert!
My bike has had the decel head shakes since I bought it last winter. New tires, tightening the steering nut didn’t help. So I decided it was time to commit to the some new bearings. Did some research, bought the all balls tapered steering bearings kit. Finished the install over the weekend, no more head shake. In fact I feel like the steering response has improved, just feels more stable overall to me.
Some notes on the installation. The bearings and races fit really tight. I have changed bearings before. I felt like they were a lot tighter than bearings I have changed in the past. It took some really healthy hammer hits to get everything in. I didn’t have to chisel the old race off. While grinding away at it with the dremmel tool, it cracked on its own. Use a metal pipe to beat on the new bearing. You’re not going to get enough power to it with PVC. The seals the all balls kit came with are ok. I ended up reusing the top OEM seal. It’s a much higher quality seal. If I had to do it over again, I would buy two OEM top seals for both. The tapered bearings are just a tick thicker than the OEM rollers. This gap was soaked up by the seal, both on the upper and lower head (yes the races were set fully). Change the fork oil while you have everything off. My fork oil was pretty dirty for only 12K miles. I ended up using Bel-Ray 10w oil.
Rides like new….. or as far as I can tell anyway.
2010 FJR1300
#86 Geezer
Parsimonious Curmudgeon
Posted 03 April 2017 - 12:43 PM
Just curious, but were you able to see any obvious problem or wear with the original bearings that you took off?
#87 Kelvininin
FJR Pilot
Posted 03 April 2017 - 06:56 PM
The stock bearings looked brand new, even the grease was nice and clean.
2010 FJR1300
#88 Geezer
Parsimonious Curmudgeon
Posted 03 April 2017 - 07:02 PM
Thanks. That's what I found when I did mine years ago.
I had a '76 Suzuki RE5 that had bad steering head bearings, and there was an obvious notch that I could feel when turning the bars. That never happened to me on any other bike.
#89 flars
flars
Training Pilot
Posted 11 April 2017 - 07:33 AM
Does anyone have the castellated socket that Just Roy used to make that I can borrow?
#90 TomInPA
FJR Commander
Posted 11 April 2017 - 07:57 AM
Spanner wrenches are easily found on EBay. I have one like this http://www.ebay.com/...oFXsT1Z&vxp=mtr
Works great and can be set to torque.
#91 flars
flars
Training Pilot
Posted 11 April 2017 - 08:15 AM
Thanks, Tom.
#92 bergmen
FJR Pilot
Posted 11 April 2017 - 10:07 AM
Bearings will have a number on them that typically can be used to cross-reference to other makes. I bought the All Balls set just so I could do the cross-reference, not intending to use them in the FJR. They are still sitting on my bench unopened. I will be going with Timken or SKF when I do get around to replacing these.
Dan
#93 Brisendines
FNG
Posted 11 April 2017 - 02:09 PM
#94 flars
flars
Training Pilot
Posted 12 April 2017 - 02:36 PM
Brisendines -- you've go mail