...(joe2lmaker) prototype install of custom built for FJR tank
Posted 22 March 2010 - 08:16 AM
joe2lmaker has been designing and building an aux tank for the FJR. I was lucky enough to get SN1, a prototype, for testing. Yes, I paid hard money for this tank. No, I have no financial interests or investment in his aux tank endeavors. Yes, I paid less than full price - Joe has told me I paid less than it cost him to build. The trade off is that I'm testing his tank and providing feedback for future improvements, and the tank to me is 'as is'. My job then, is to report the good and the bad ("things needing improvement").
If you're OK with this, then, let's get going.
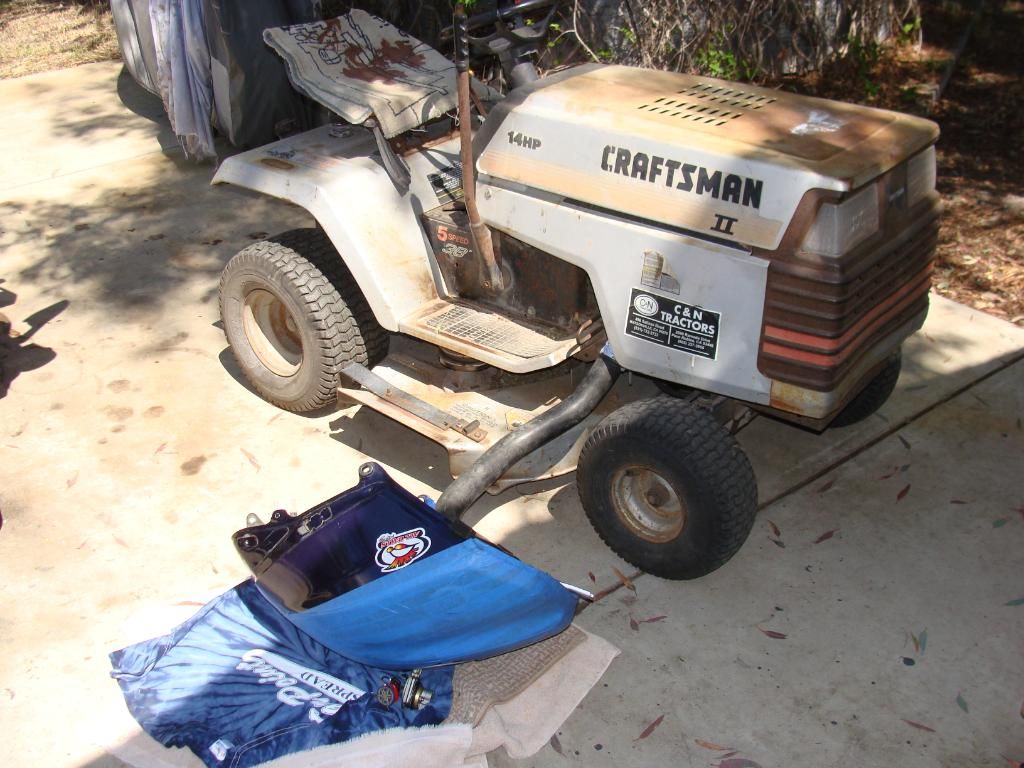
SN 1 arrives well packaged
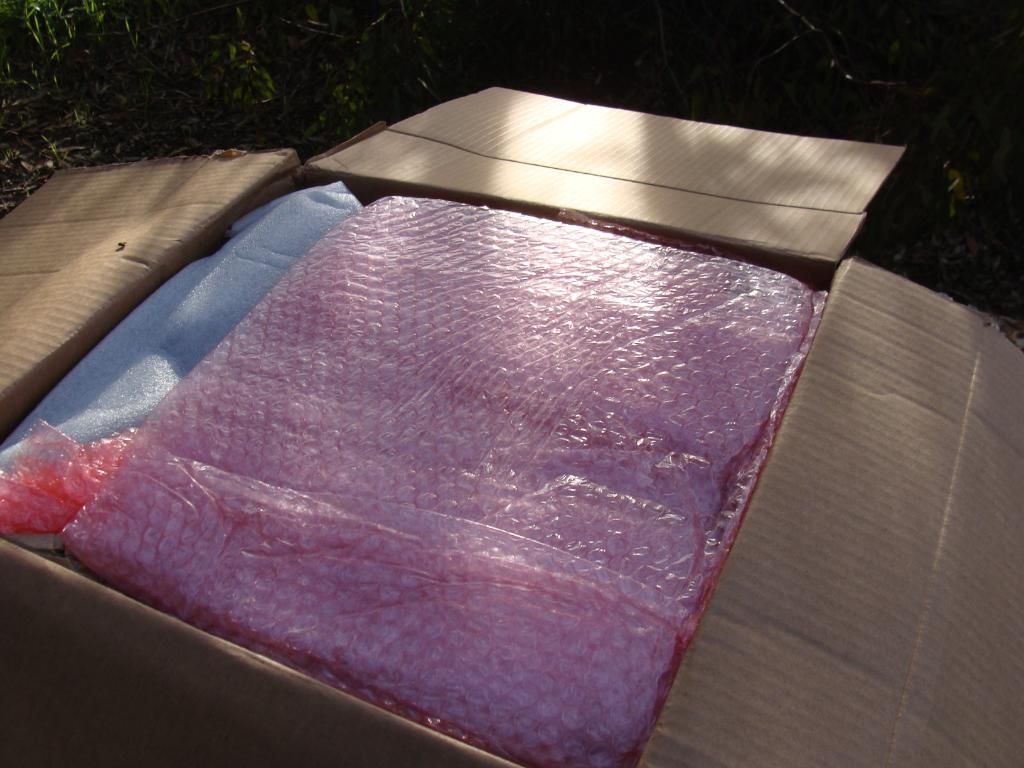
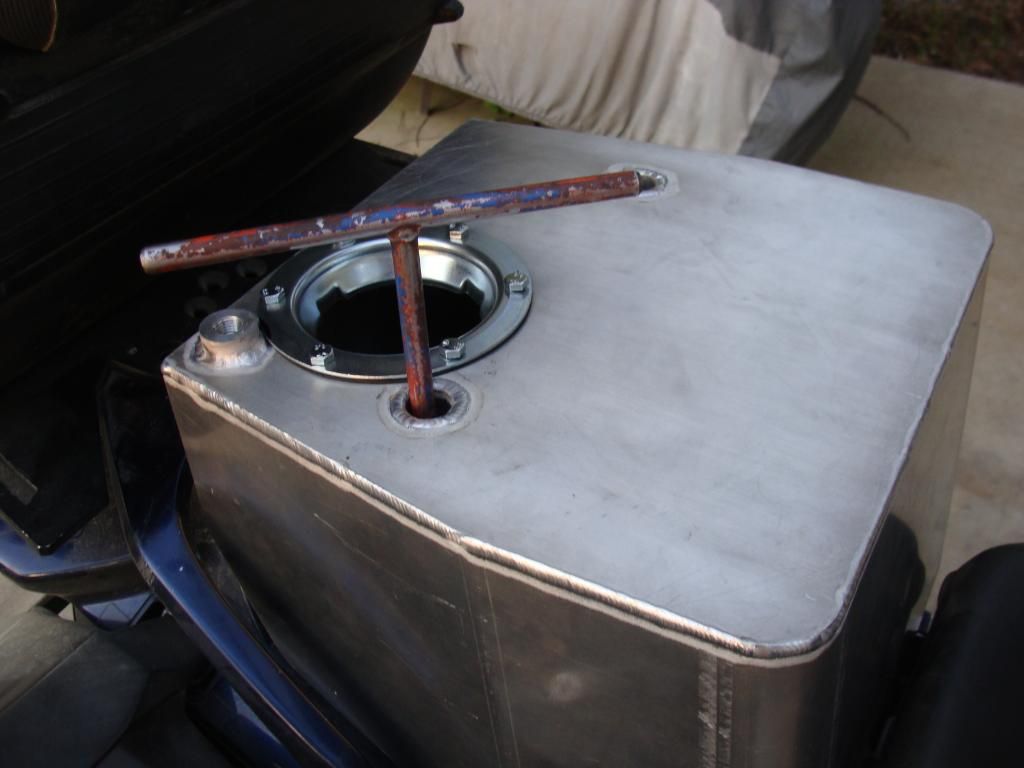
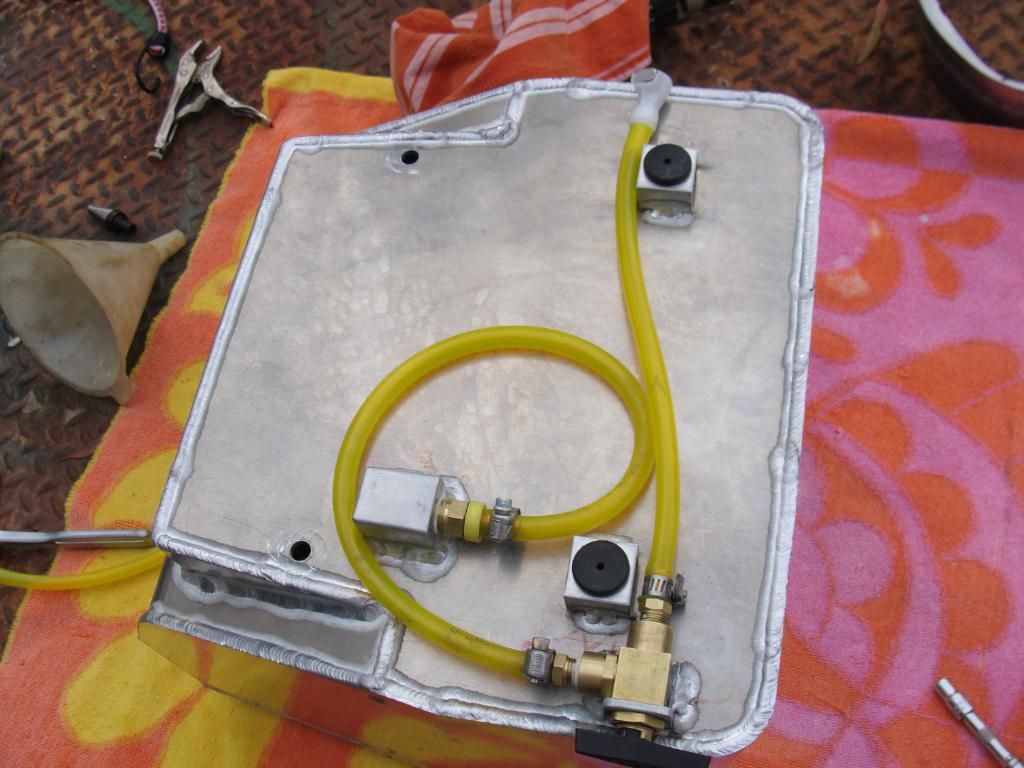
On the bench for initial inspection with the goodies too. The welds and bends are top quality, gorgeous.
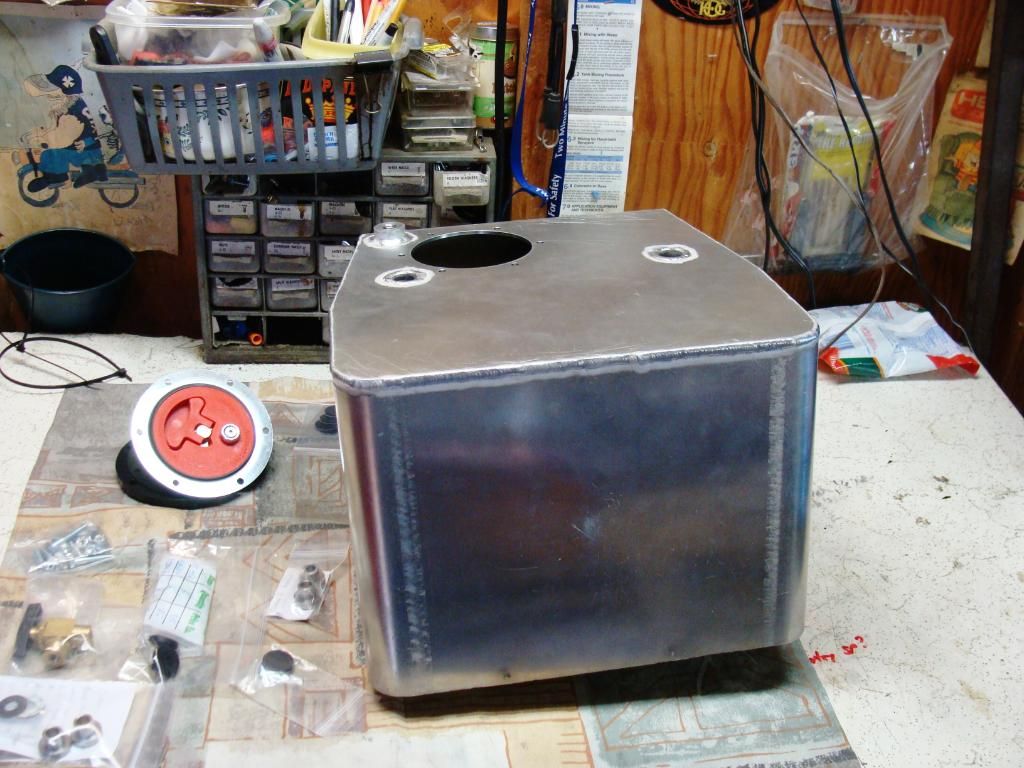
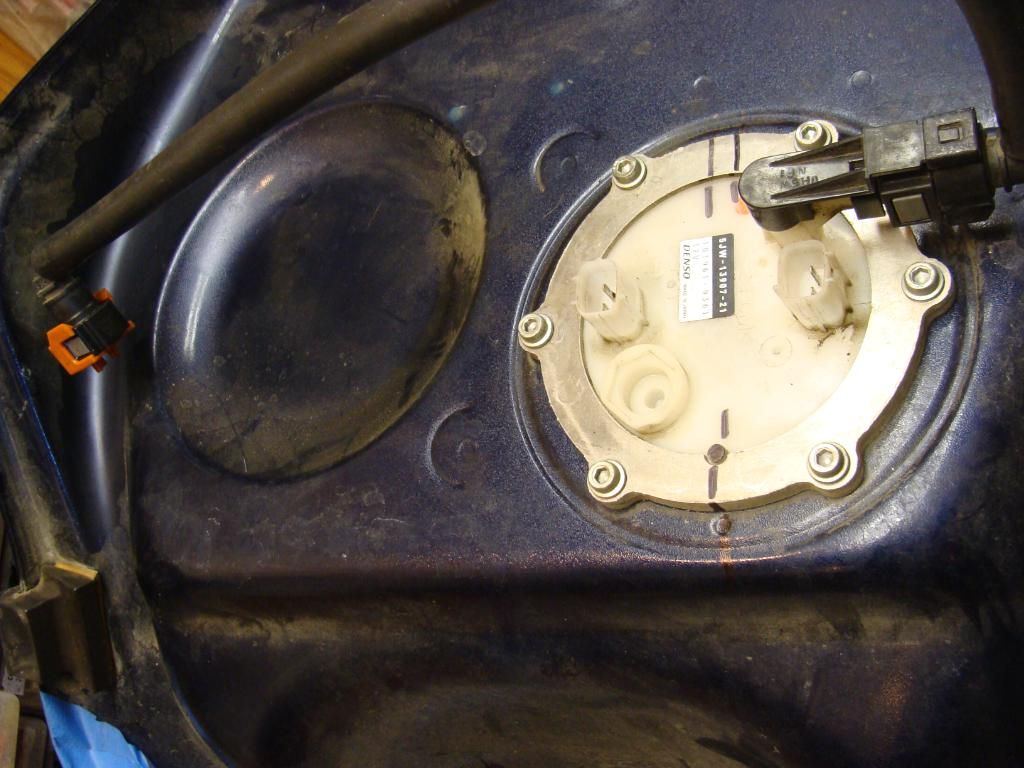
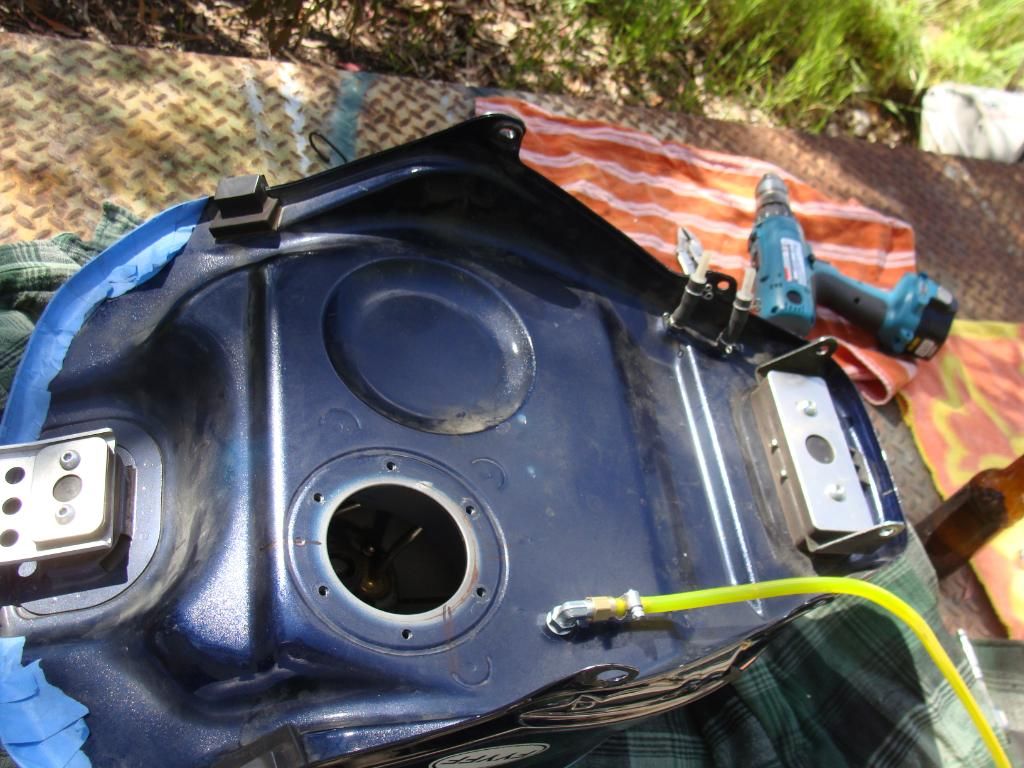
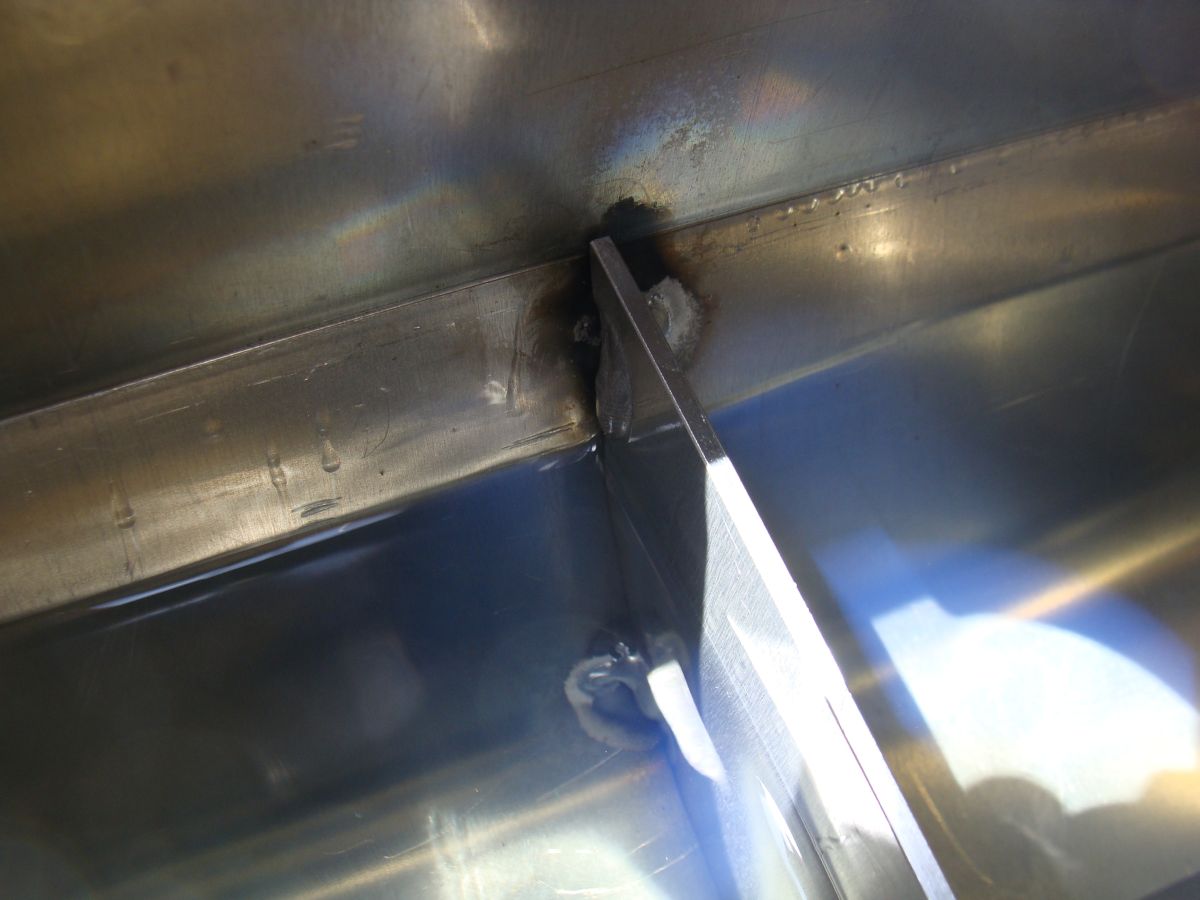
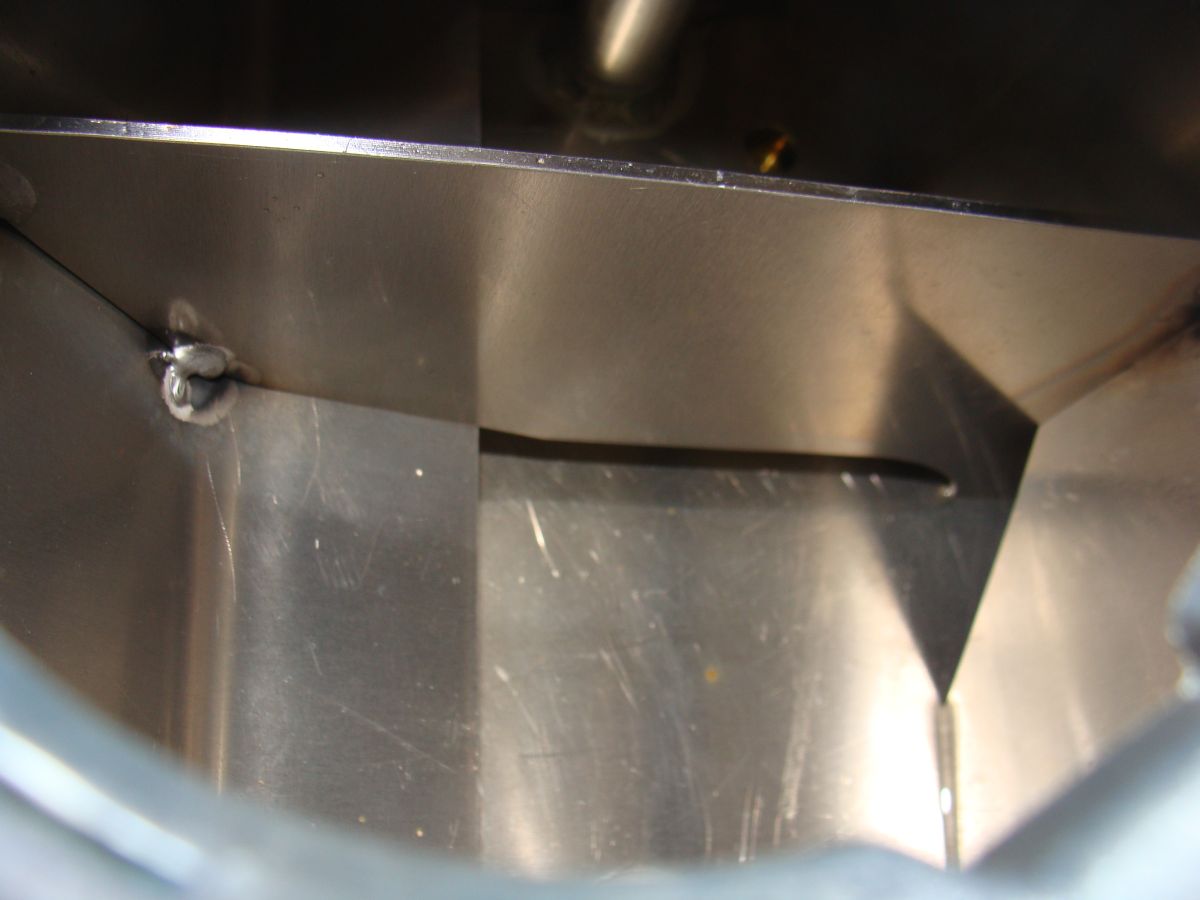
Tank interior, it says so! Good baffles to prevent sloshing effect.
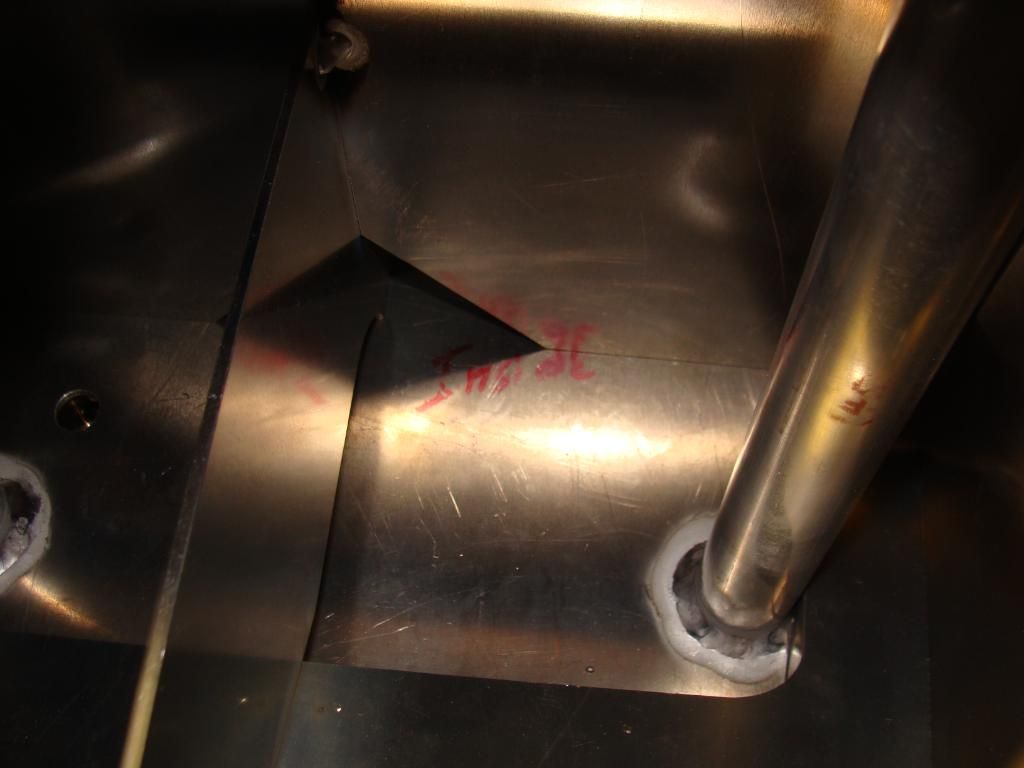
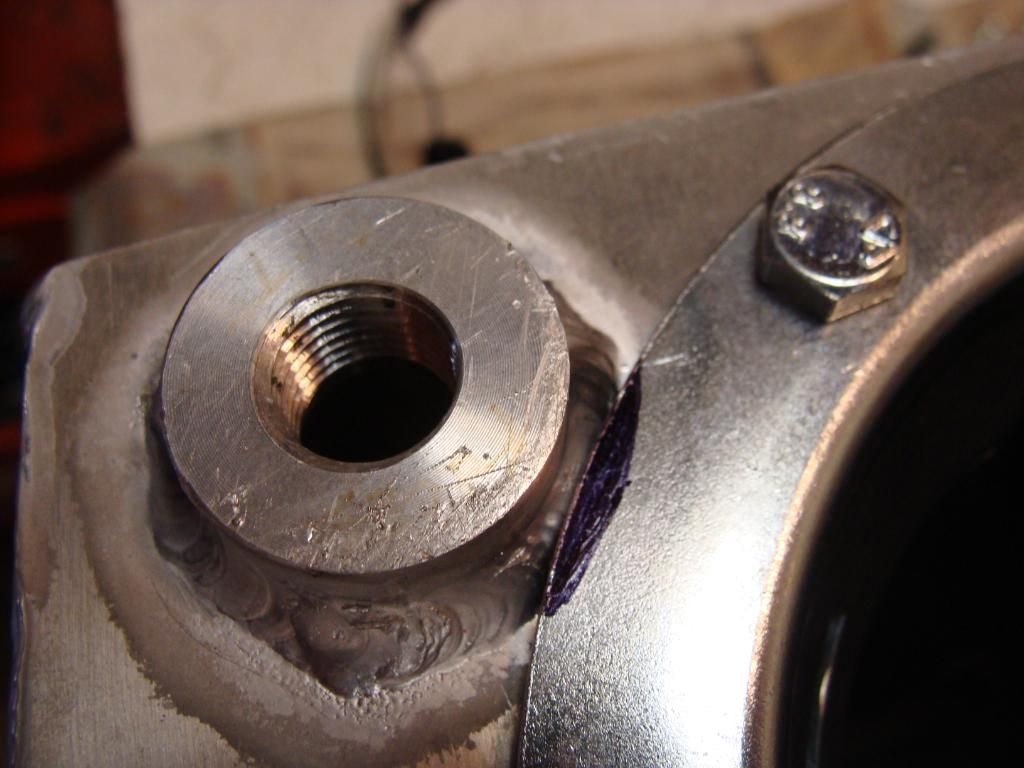
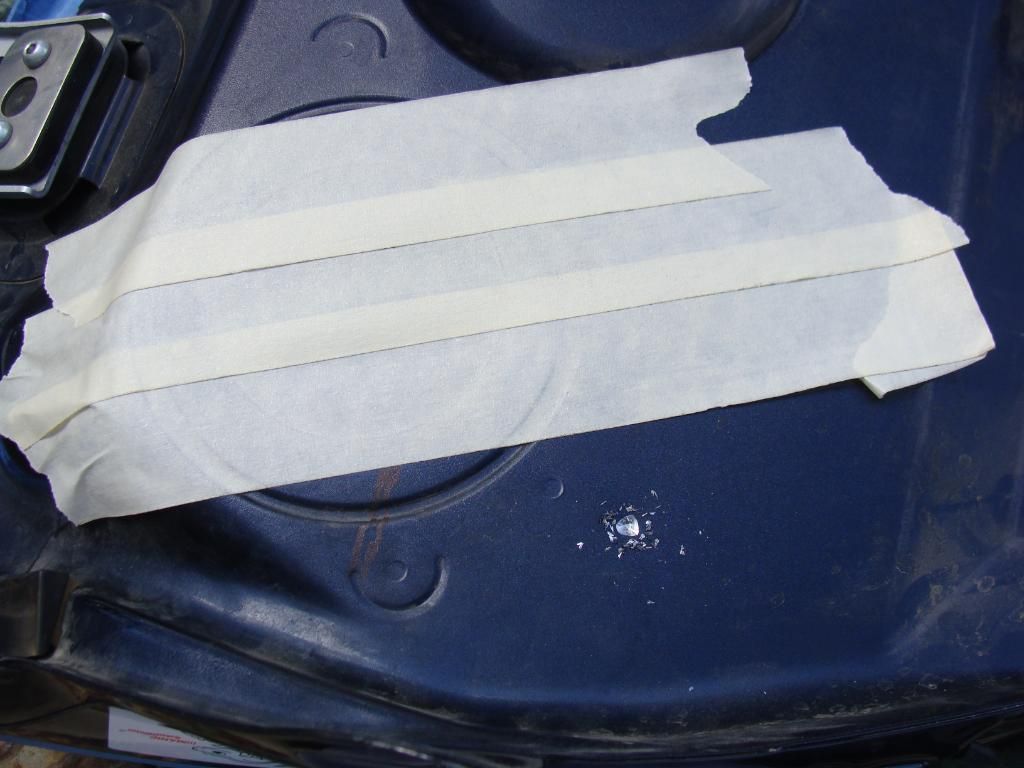
My first task was to fit the JAZ cap to the tank. SN1 required some modification, as the Jaz cap flange interfered with the vent bung hole weld. Here is the interference line. Joe has already corrected this on later tanks.
My sophisticated machining mill...
The final product. I was chicken to reduce the weld. I don't have alum weld equipment, and I can always buy another flange if needed..
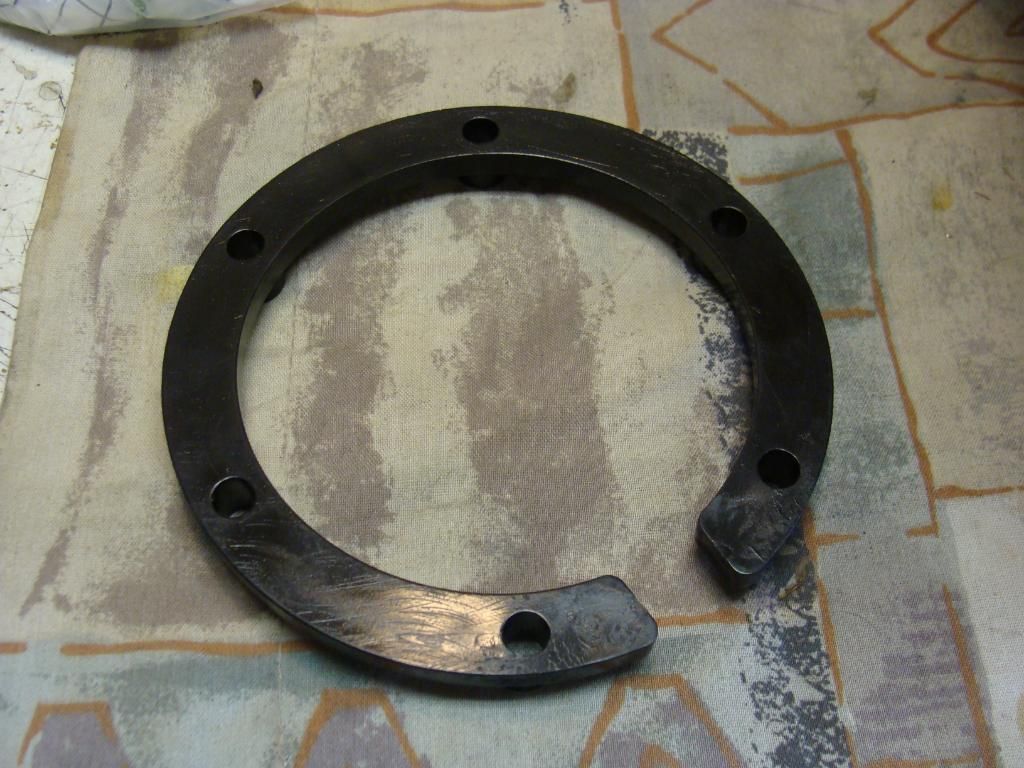
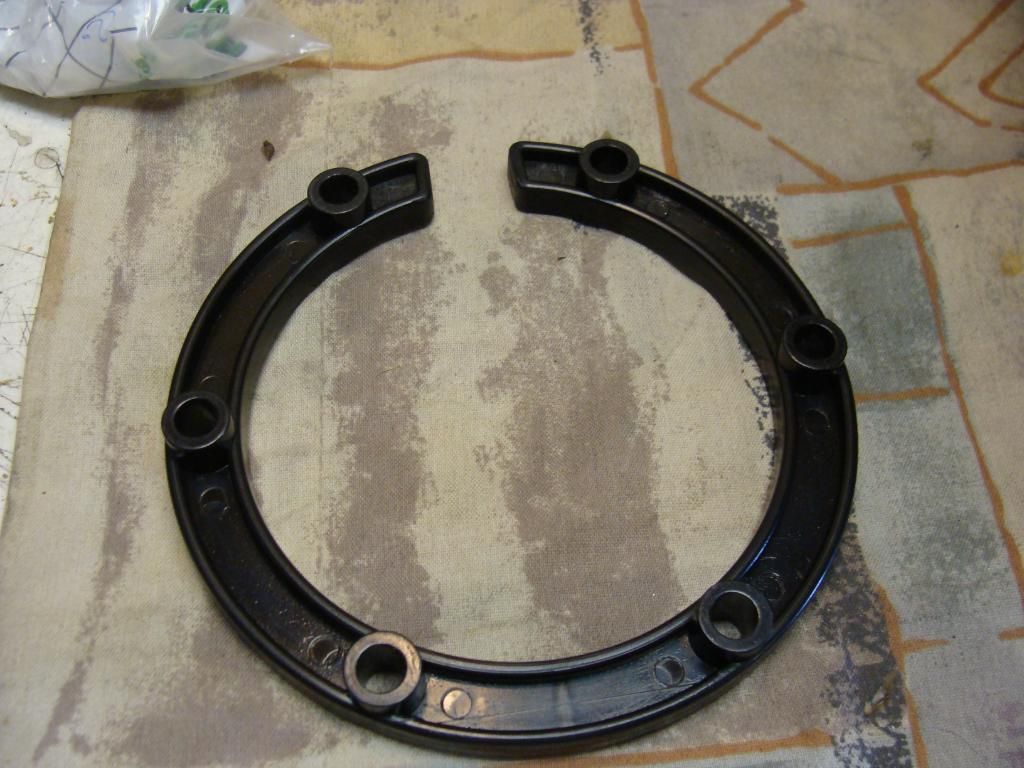
The next thing to look at was the cap ring. I couldn't figure out what the purpose was for this. Supposedly, it fits inside the tank. I think it might be for tanks with a bladder. I saw no need for it, and haven't used it.. unless I find out there is a good reason to.
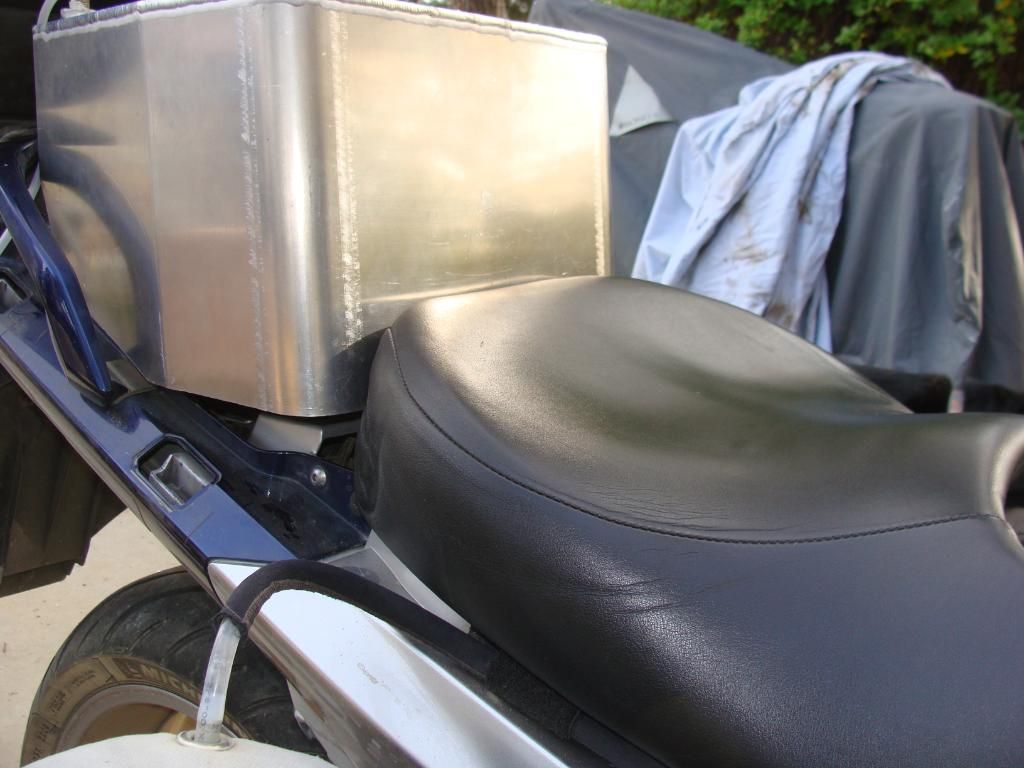
Ok then, let's mount this tank on the Gen2 06.
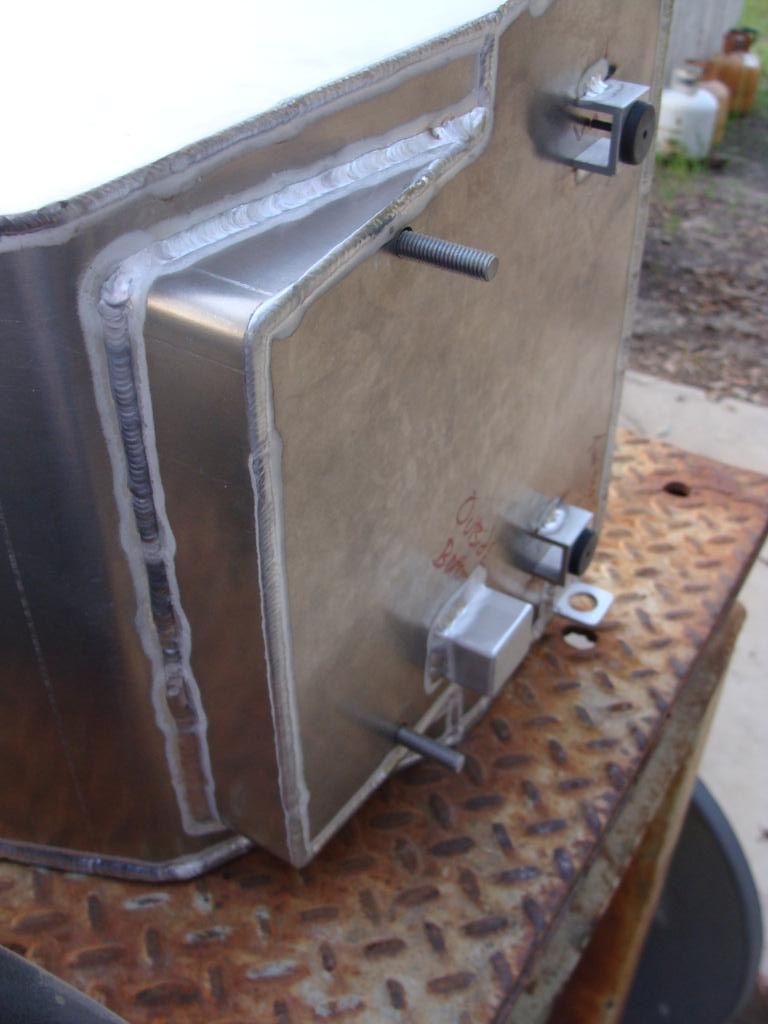
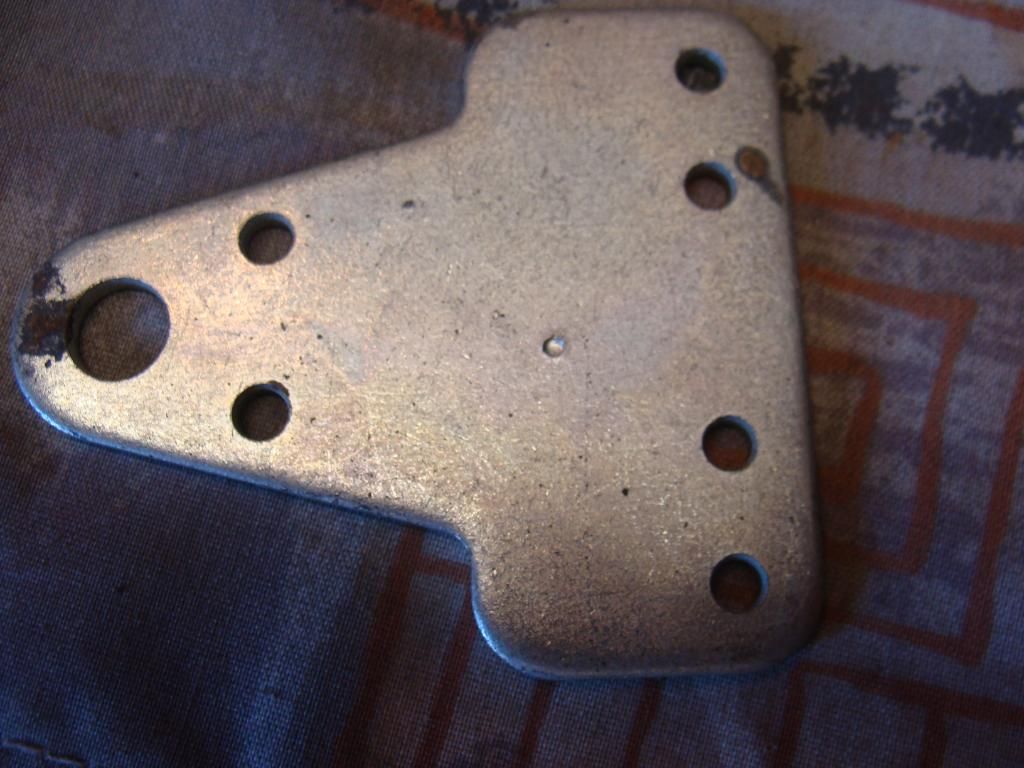
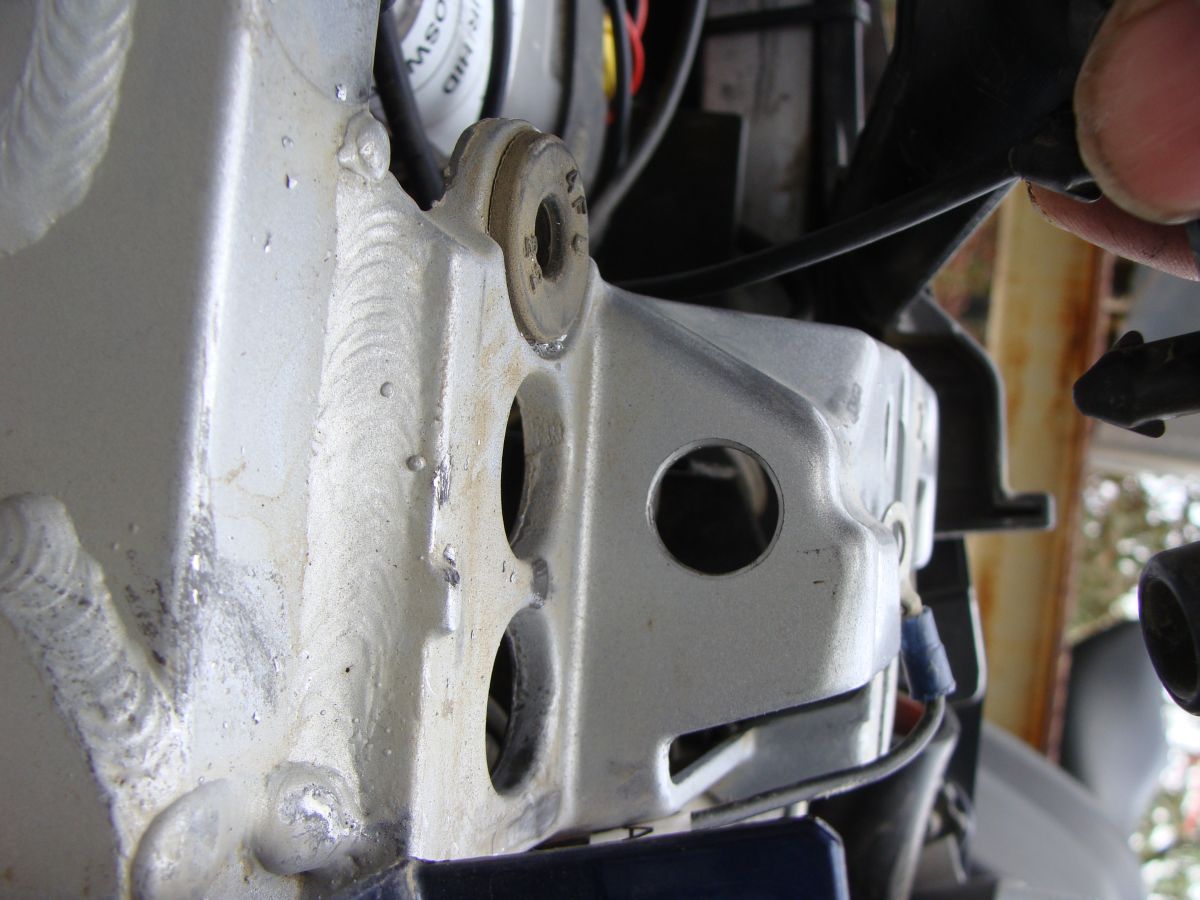
Provided are new collars for the primary tank mounts, to the grab rail. OEM on left, new on right. They are well done, nice machining.
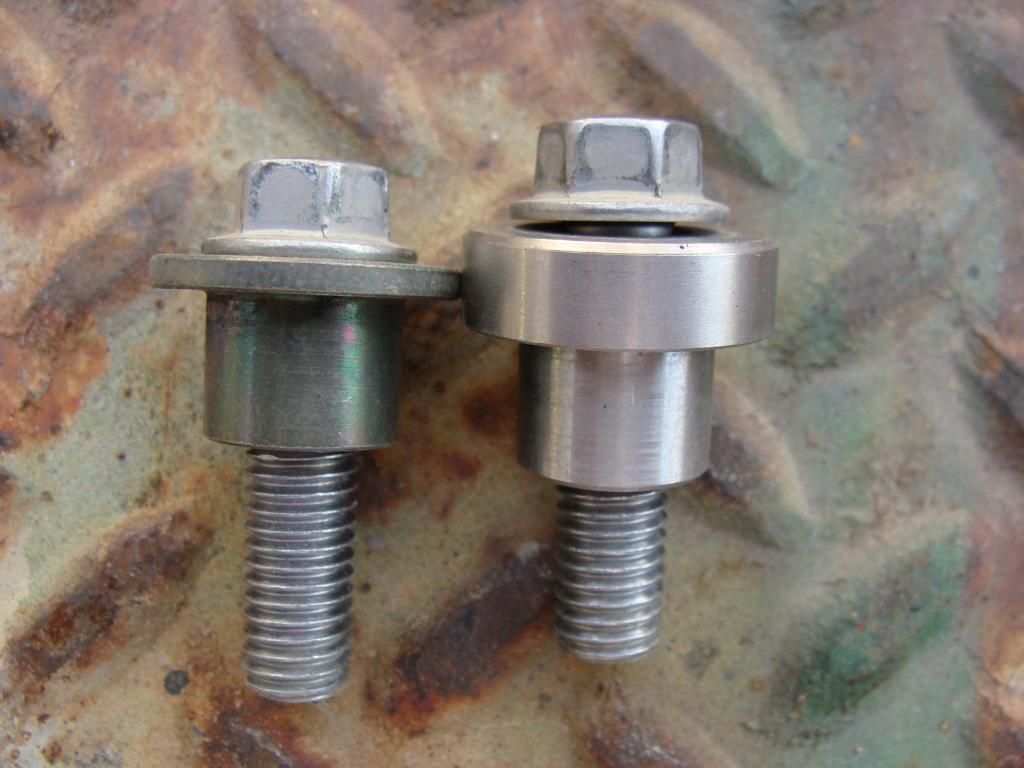
Bolts pass through the hollow tubes for easy install. I bought some longer bolts so that there is a full 1/2" thread engagement.
Stock bolts are 30 mm I used 35 for more thread engagement. In hindsight, the stockers would probably be OK, but once full of fuel I'd rather have the additional threads.
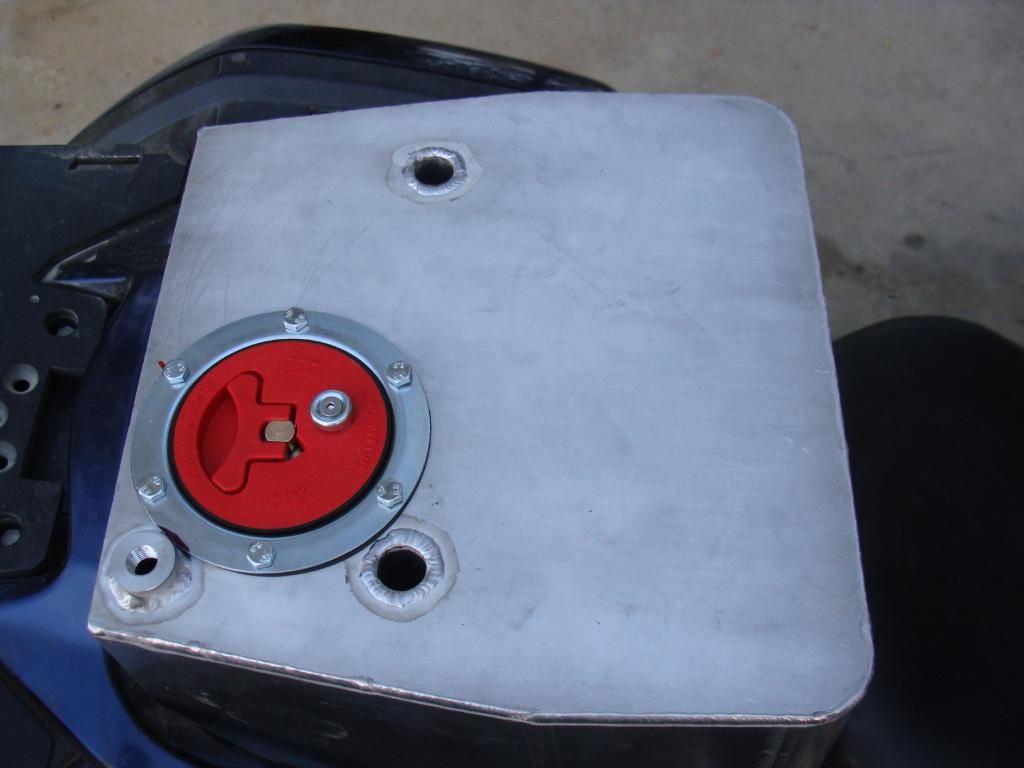
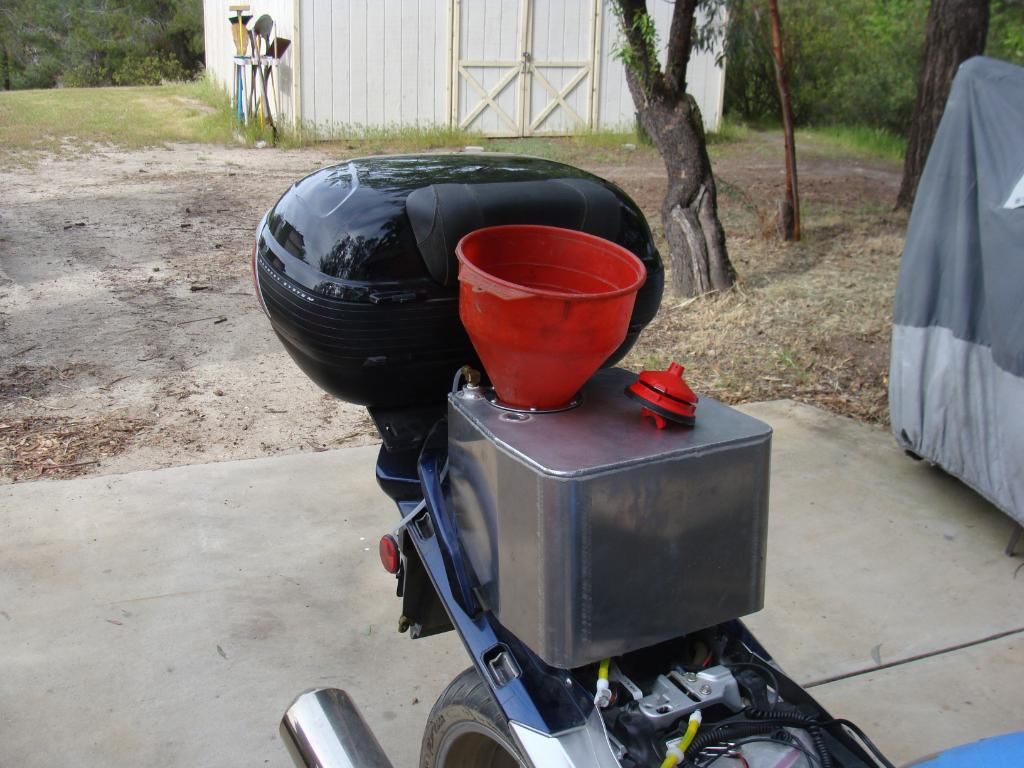
On the bike, it fit perfectly - a huge thing.
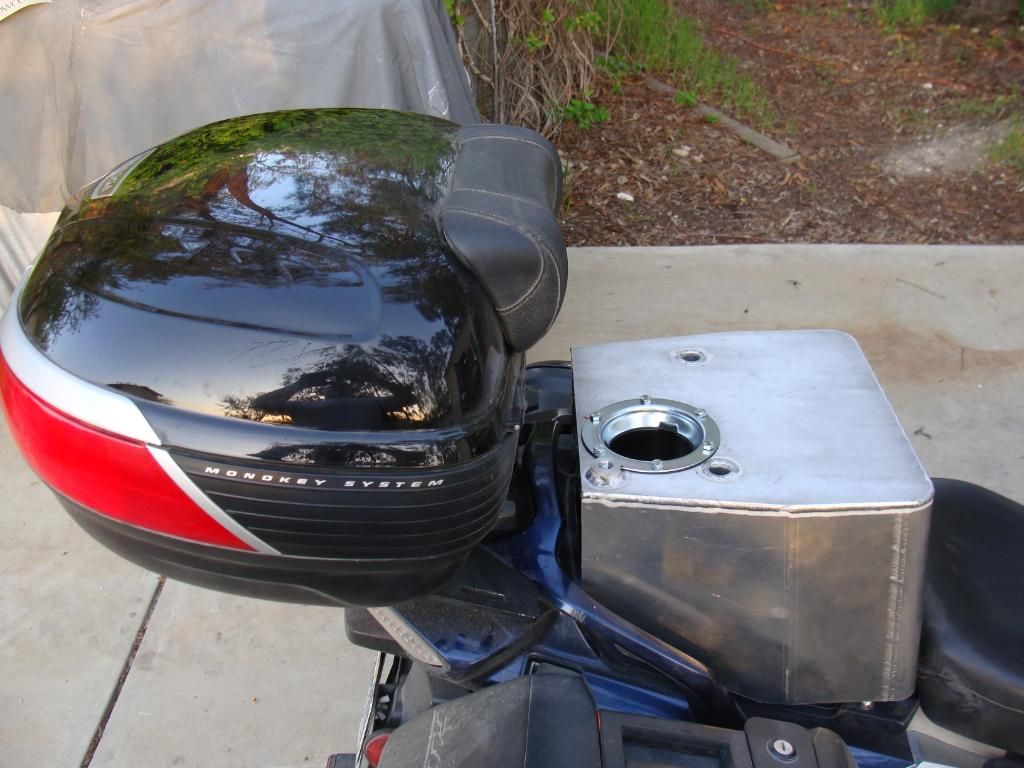
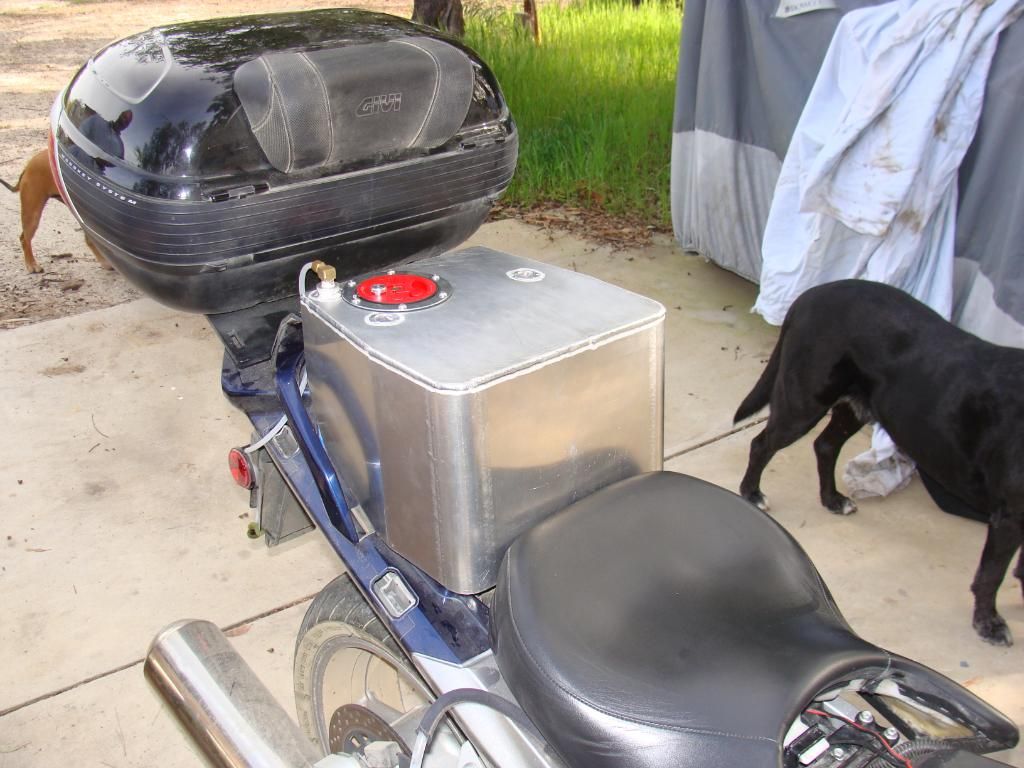
Brodie just happened to be in the Hondarosa hood and wanted to see how his seat, which has been extended rearward to accommodate his long legs, fit. It's a custom Bill Mayer seat. The tab and hole at lower left is for the valve. What a great guy Brodie is.


The dude has some seriously long legs.

I replaced the stock Jaz flange bolts
with some nice stainless button heads. Not needed, just nicer.
Finally, I added water to the tank to check for leaks and see what the additional weight felt like when riding.
Couldn't test it because of a stoopid mistake.
If you have any questions, please ask. I'll answer honestly.
to be continued
Walked away :)  Is it really crashing if you don't fall down?--
Posted 22 March 2010 - 12:04 PM
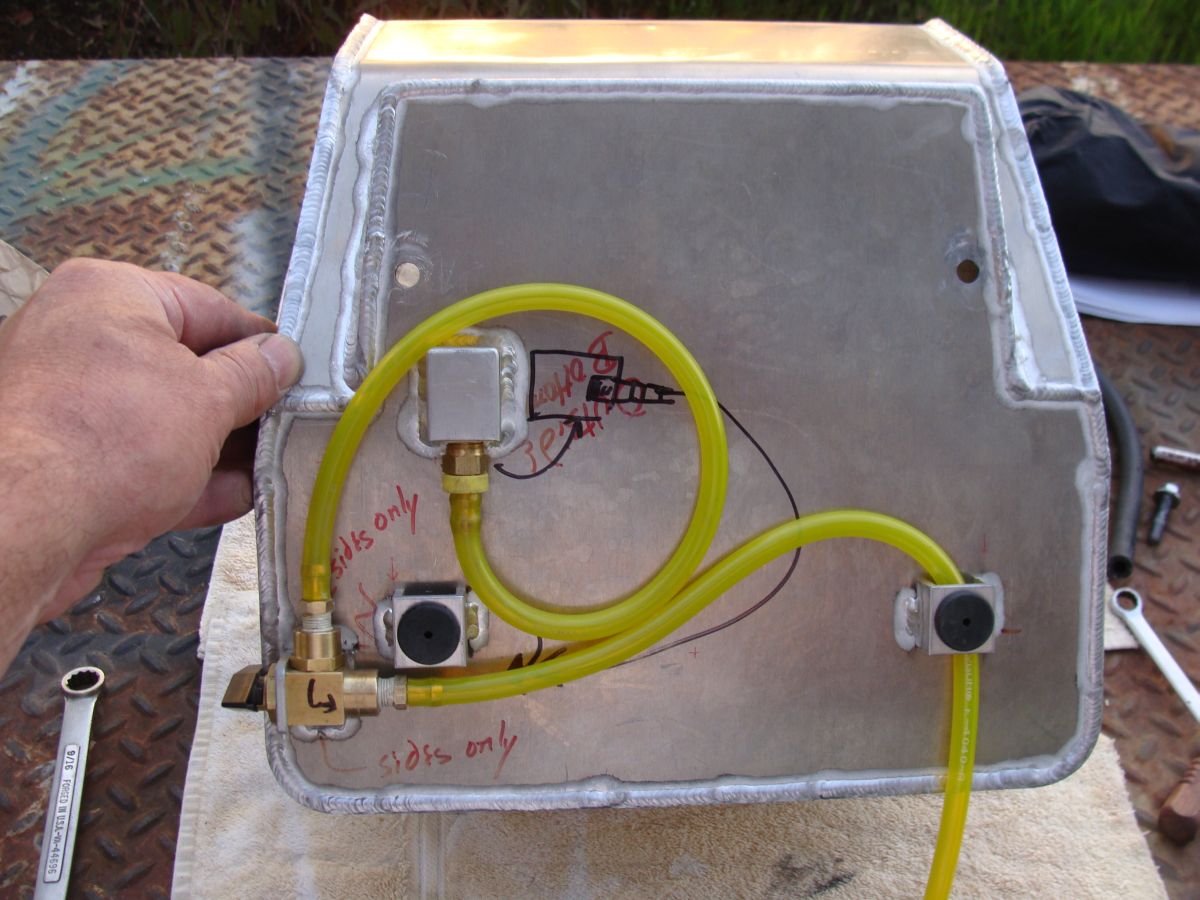
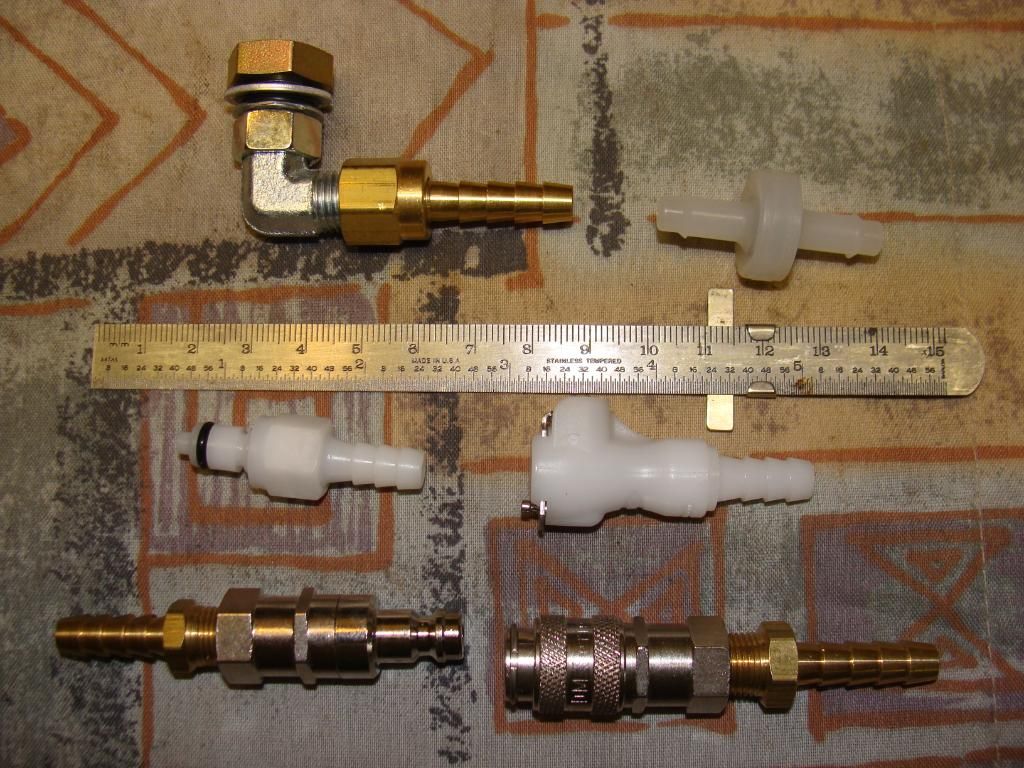
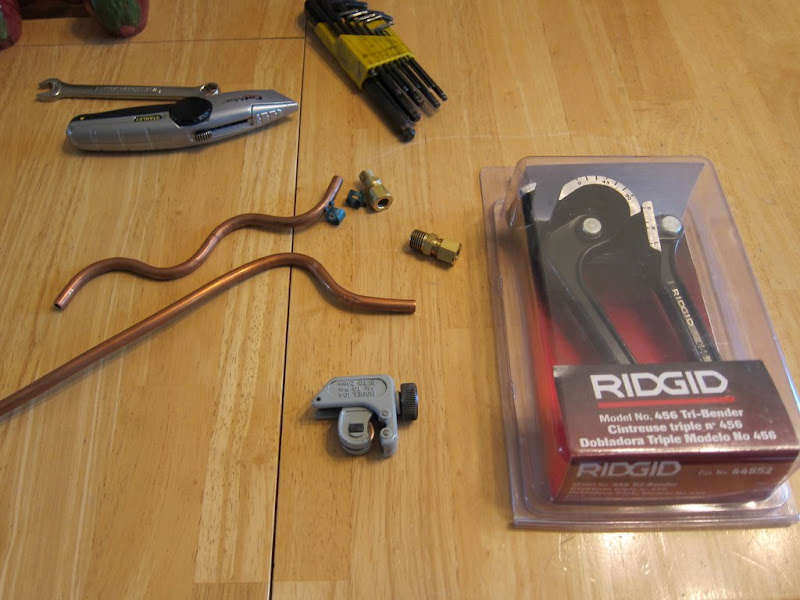
Just purchased some hardware for the tank.
Quick disconnect fittings (I used 5/16" id for max flow, less restriction)

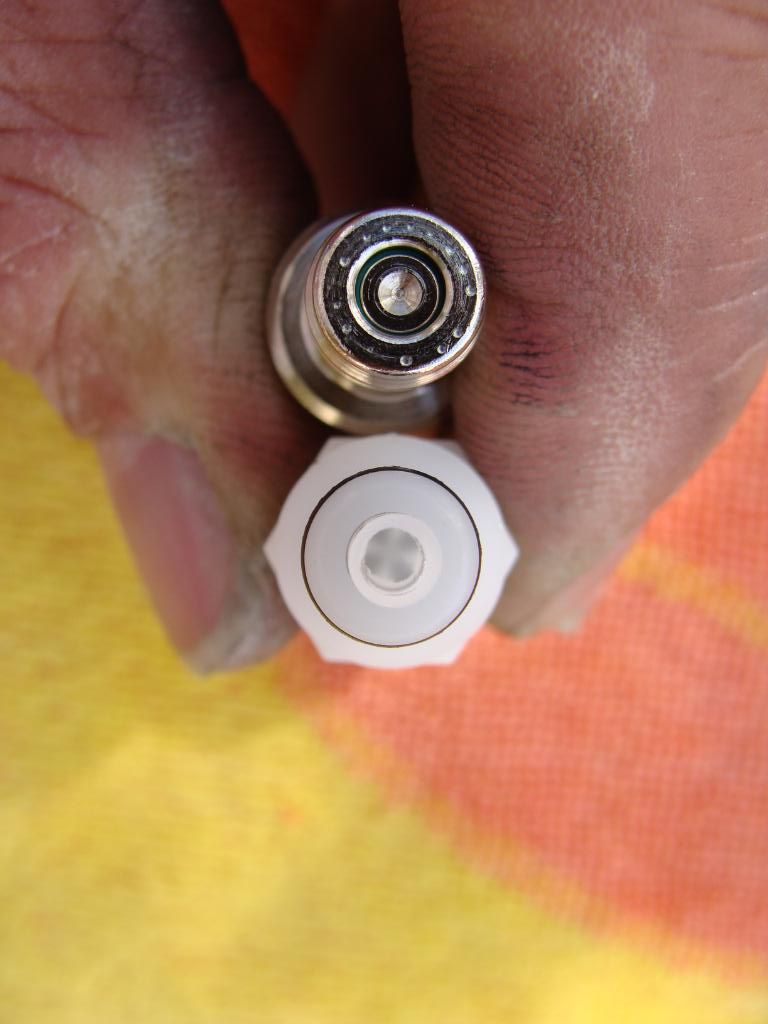
and this bulkhead fitting-

From a KaitsDad post, 2006, he used this Loctite stuff, so I need to source it and also the cool blue fuel line he used too.
QUOTE
Note the Loctite 567 sealant on the threads - if you use this stuff, please remember to use the recommended primer. 567 PST Thread Sealant High Temperature You will need to enter "567" in the search field for the info. I used this on the penetration fitting, the tank petcock, and even the vent tube fitting.

Walked away :) Is it really crashing if you don't fall down?--
Posted 23 March 2010 - 07:39 PM
Fuel line routing..
My first thought was to use 5/16 id hose for less restriction. Then I tried routing that fat hose and realized what a PITA it was. I recalled KaitsDad saying he used 1/4 plastic so the bends could be tighter... and I gave up on 5/16 for now.
Here's a pix of my proposed 5/16 routing..
And the 1/4 plastic routing -
The plastic hose is so much more workable...
After all is done, I may try to find 5/16 plastic (heat resistant, gasoline proof, yada yada yada) *if* the 1/4 doesn't adequately flow the main tank. I'll cross that bridge later, if the problem exists.
On a side note, not much sleep lately, server issues at work and long nights.
Good night RenoJohn-Boy!
Walked away :) Is it really crashing if you don't fall down?--
Posted 25 March 2010 - 05:40 PM
So today I rode with the tank full of *water* just to see how it affected handling. I'm very relieved that the additional weight produced minimal handling/concerning/braking issues. No sloshing feeling. I could tell the additional weight, it actually settled the rear suspension a bit when pushing hard in corners on 229, but I was pushing harder than what I honestly feel most peeps on this forum ride. (don't flame me, just sayin)
It was funny, once at work, decided to drain the tank so I could do a back to back comparison, weighted vs. unweighted so I opened the valve to drain the water out of the 'gas' tank. Did anyone say anything? Nope, not a darn word. I even watched from my office window as folks walked by, noticed, then kept on walking... 
Walked away :) Is it really crashing if you don't fall down?--
Posted 26 March 2010 - 07:53 AM
So today I rode with the tank full of *water* just to see how it affected handling.
Jesus Cristo!
Quit being such a FUCKING PUSSY. That's right, a FUCKING PUSSY!
Put some damned dead dinosaurs in the thing and go for a FUCKING RIDE. And not a Candy-Ass ride, but a REAL MAN'S ride.
Yo RenoJohn! You want to do me a favor and ride down to the Honderosa and slap some fucking testosterone into this girly-assed hippy?
Christ Carver, why don't you put a fucking dress on the next time you go for a ride. From now on, your girly-FJR ain't allowed within 100 yards of RJ or my FJRs. Otherwise, they'll be apt to bitch-slap yours. Kinda like a reverse restraining order. Don't want none of your feeble FJR DNA thinning down the rest of the studly bikes.
For crying out loud! I can't believe this!

Talk about a Fucking Pussy! Jeesh, you ain't man enough to ride to the Hondarosa yerself to apply an ass whipping? WhatsDaMattU, afraid some good Whiskey will unwad your panties? 
Yo RenoJohn! You want to do me a favor and ride down to the Honderosa and slap some fucking testosterone into this girly-assed hippy?
I know for damn sure he didn't get the water on the Hondarosa -as there ain't anything liquid form on the ranch but high octane moto-fuel, high octane beer and high octane whiskey. Trust me on that, I've still got the 3rd-degree scars, and that's not even taking into account the emotional scars left from a Hondarosa experience.
Skootie, like you, our faggy little friend has me shaking my head at times, .....but sometimes he surprises me. All along we thought this was a fuel cell, ....uhh, seems it's just a fancy hydration gizmo ....and while you and I expect to see the thing finished off with fancy disconnect fittings and such, ....Most likely well see the lines from this going to a Coors Light Tap mounted on the handle bars.
Which raises the next question: Donald, are you going to push that beer with CO2 or Nitrogen? ...nitrogen is more stable when going through various elevations.
At least you manned up and experienced the Hondarosa Reno. Unlike all bark no bite SkooterG who just talks about it.. and talks some more about it, then gets really wound up and talks even more...
Silly kids, I just couldn't wait to see how the additional weight would affect handling when aggressively cornering. So in the water went! I'm still waiting on parts....
Oh, and Reno, does 'smoke on the water' mean anything to you?  It has water, it has air space, it has tubes....
Damn, I can hardly wait for the next CBA Convention - my bet is SkooterG folds after the 2nd round - any takers?
Walked away :)
Is it really crashing if you don't fall down?--
Posted 27 March 2010 - 07:41 AM
Per a forum members succinct advice, I've drained the tank of water as water is corrosive to aluminum. Then sprayed it down with carb cleaner and silicone spray. My Tag-Along tank is the cleanest of clean!
Hoping for parts to be delivered today!
Walked away :) Is it really crashing if you don't fall down?--
Posted 30 March 2010 - 08:48 AM
My fittings arrived yesterday. Ordered both from Samspon and McMaster-Carr. The Sampson, being metal are sturdier and look cool, but they are kinda long and bulky. I'm going to try the much cheaper McM-C first. The piece at upper right is one way valve to prevent back flow from main to aux tank. It has a pretty stiff pop-off point, to allow flow, and I think it might be too restrictive for a gravity feed tank. I'll try it anyway.
Walked away :) Is it really crashing if you don't fall down?--
Posted 31 March 2010 - 07:34 AM
Ok, so old Joe2Maker got me all in a tizzy about having to cut the bracket, find a welder, blah blah blah. Then I realized, WTFO, I've already had this tank on bike, valve installed, with fittings too!
How else would I drain the water out of the tank for a rate of flow test? Well, then huh? I'm waiting!
Unlike my Minnesotian friends, we in Kali like to only use fitting sizes appropriate to the task at hand.... (oooh, ouch)
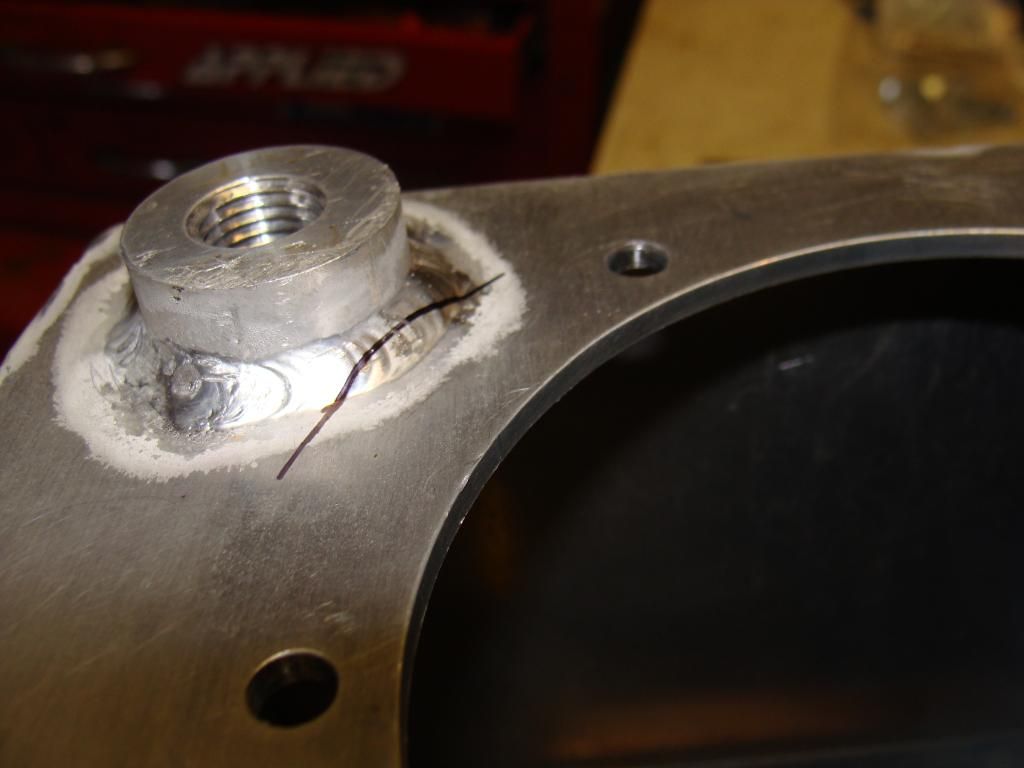
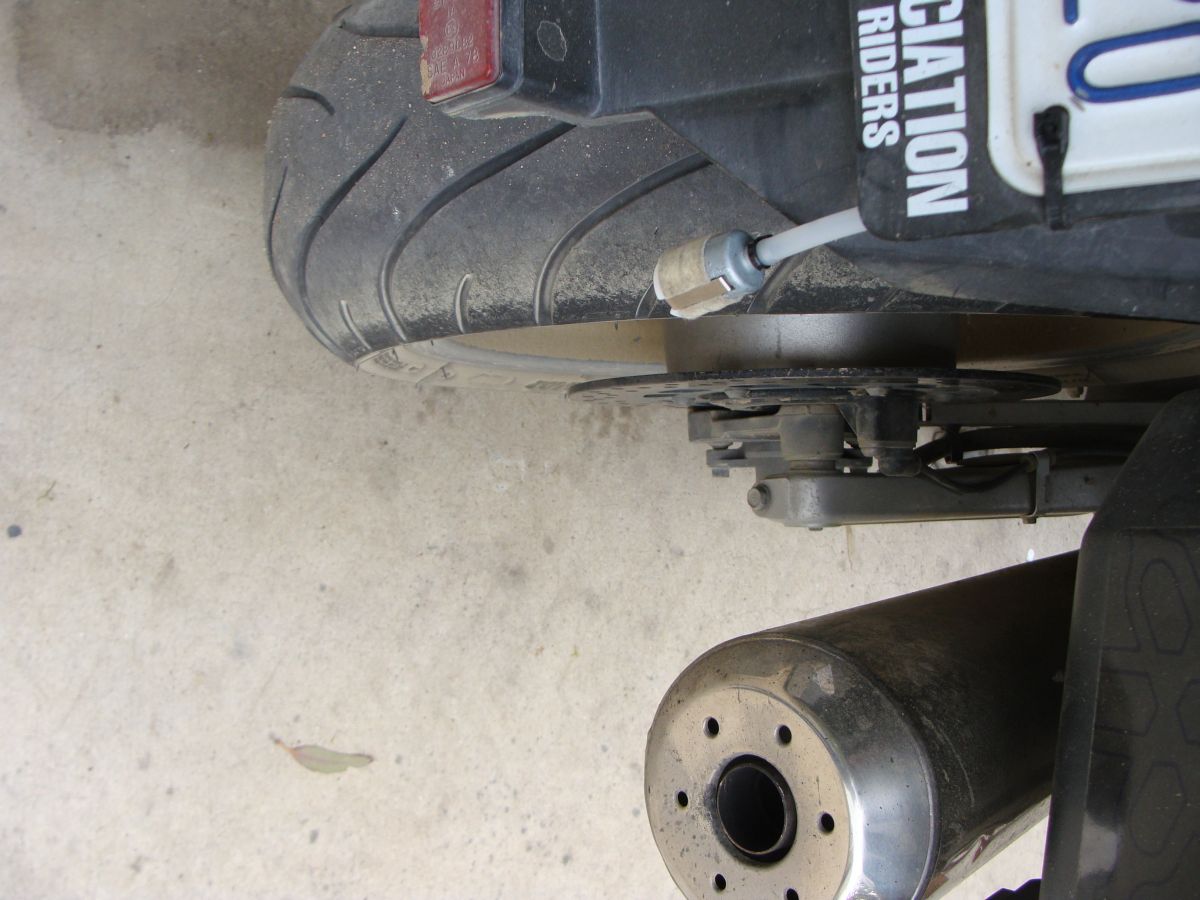
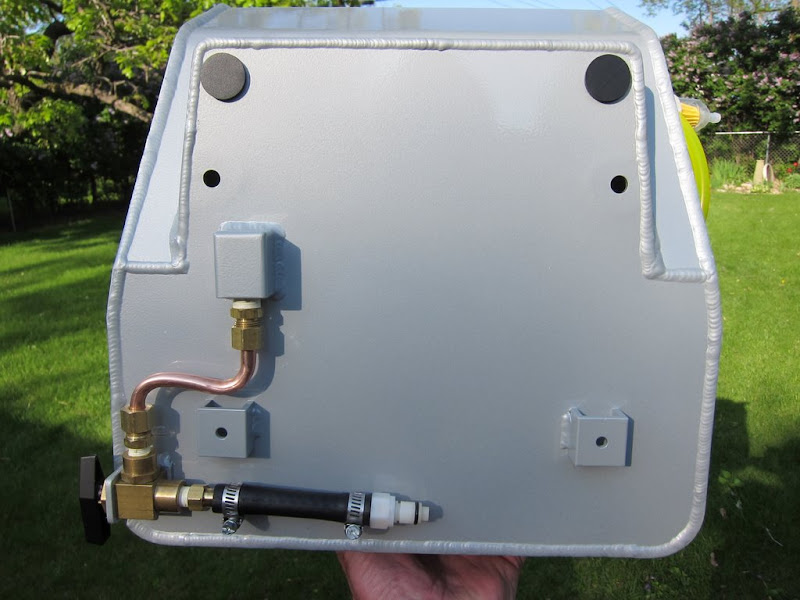
In other words, I luckily used smaller fittings and did not, do not, have an interference problem. Check it out.
Walked away :) Is it really crashing if you don't fall down?--
Posted 31 March 2010 - 07:25 PM
Hopefully, some other FJR peep, at a later time, will enjoy/appreciate these moments I had today, for today was 'drill the tank' day. And I'm nervous. I *really* don't want to phook this up.
Disclaimer - I ain't no machinist (although I would love to apprentice for a summer, just to learn) and I have only basic tools, and basic knowledge, but lots of FJR folks on this forum who I could (and DID) call, I decided to forge forward.
Worst case scenario? I put this tank in the rafters for use to run CrZy8 when doing maintenance. I've have several such tanks for various bike breeds, and it works well.
Best case scenario? All turns out well and I'm off and running like a true CBA prezident, and only having to gas up once every 3 weeks or so..
After removing the tank, I marked the retaining ring - even though Yamaha provided marks too - see the dimple?
Try and try again, I could NOT get the fuel pump out of the tank. Joe2lMaker, being a machinist, said he can. I tried for over 20 minutes. Called KaitsDad, since he had posted up a wonderful how-to, asked him. What a great guy. But he couldn't recall how the sending unit 'popped' off the main fuel pump. We talked for about 5 minutes, and gave me the needed clue. Here's the problem - the plastic tang that limits float travel won't clear. Unless of course, you're Joe2lMaker or Brodie.
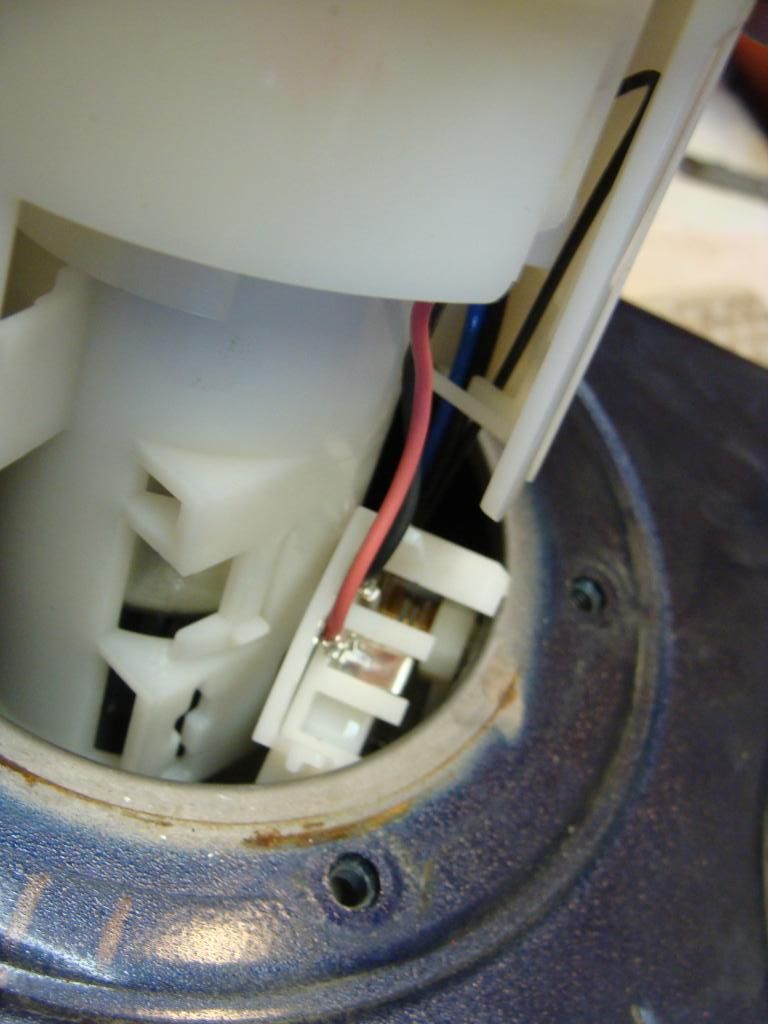
Ok, here's the tip. The sending unit attachés to the fuel main with one 'tang'. Pry the tang downward, (see black horizontal mark) gently, with a small flat blade screwdriver, then push the sending assembly downward about 1/8". You will need good close up vision (not me) and nimble fingers (again, not me), but you *can do this*.

I then drained the rest of the gas from the tank.

Blew the tank free of gas vapors using a leaf blower. Best use of this POS since it was given to me 15 years ago, just sayin'.. I let this pup run for about 20 minutes, didn't want to wait 24 hours like most peeps. Called my bud Guppie, who said it wouldn't be a problem.. See his solution soon..
I also used compressor air to remove all gas liquid from the cap area.
After this, I couldn't smell any gas vapors at all. Then again, I can't smell shit, literally.
So then, per Guppies, advice, ran some good fashioned carbon-monoxide through the tank. No oxygen = no blast, and I had alot fun rigging this contraption up.. Let it run for about 10 minutes.. 
Getting close to drilling time, and I'm avoiding it..
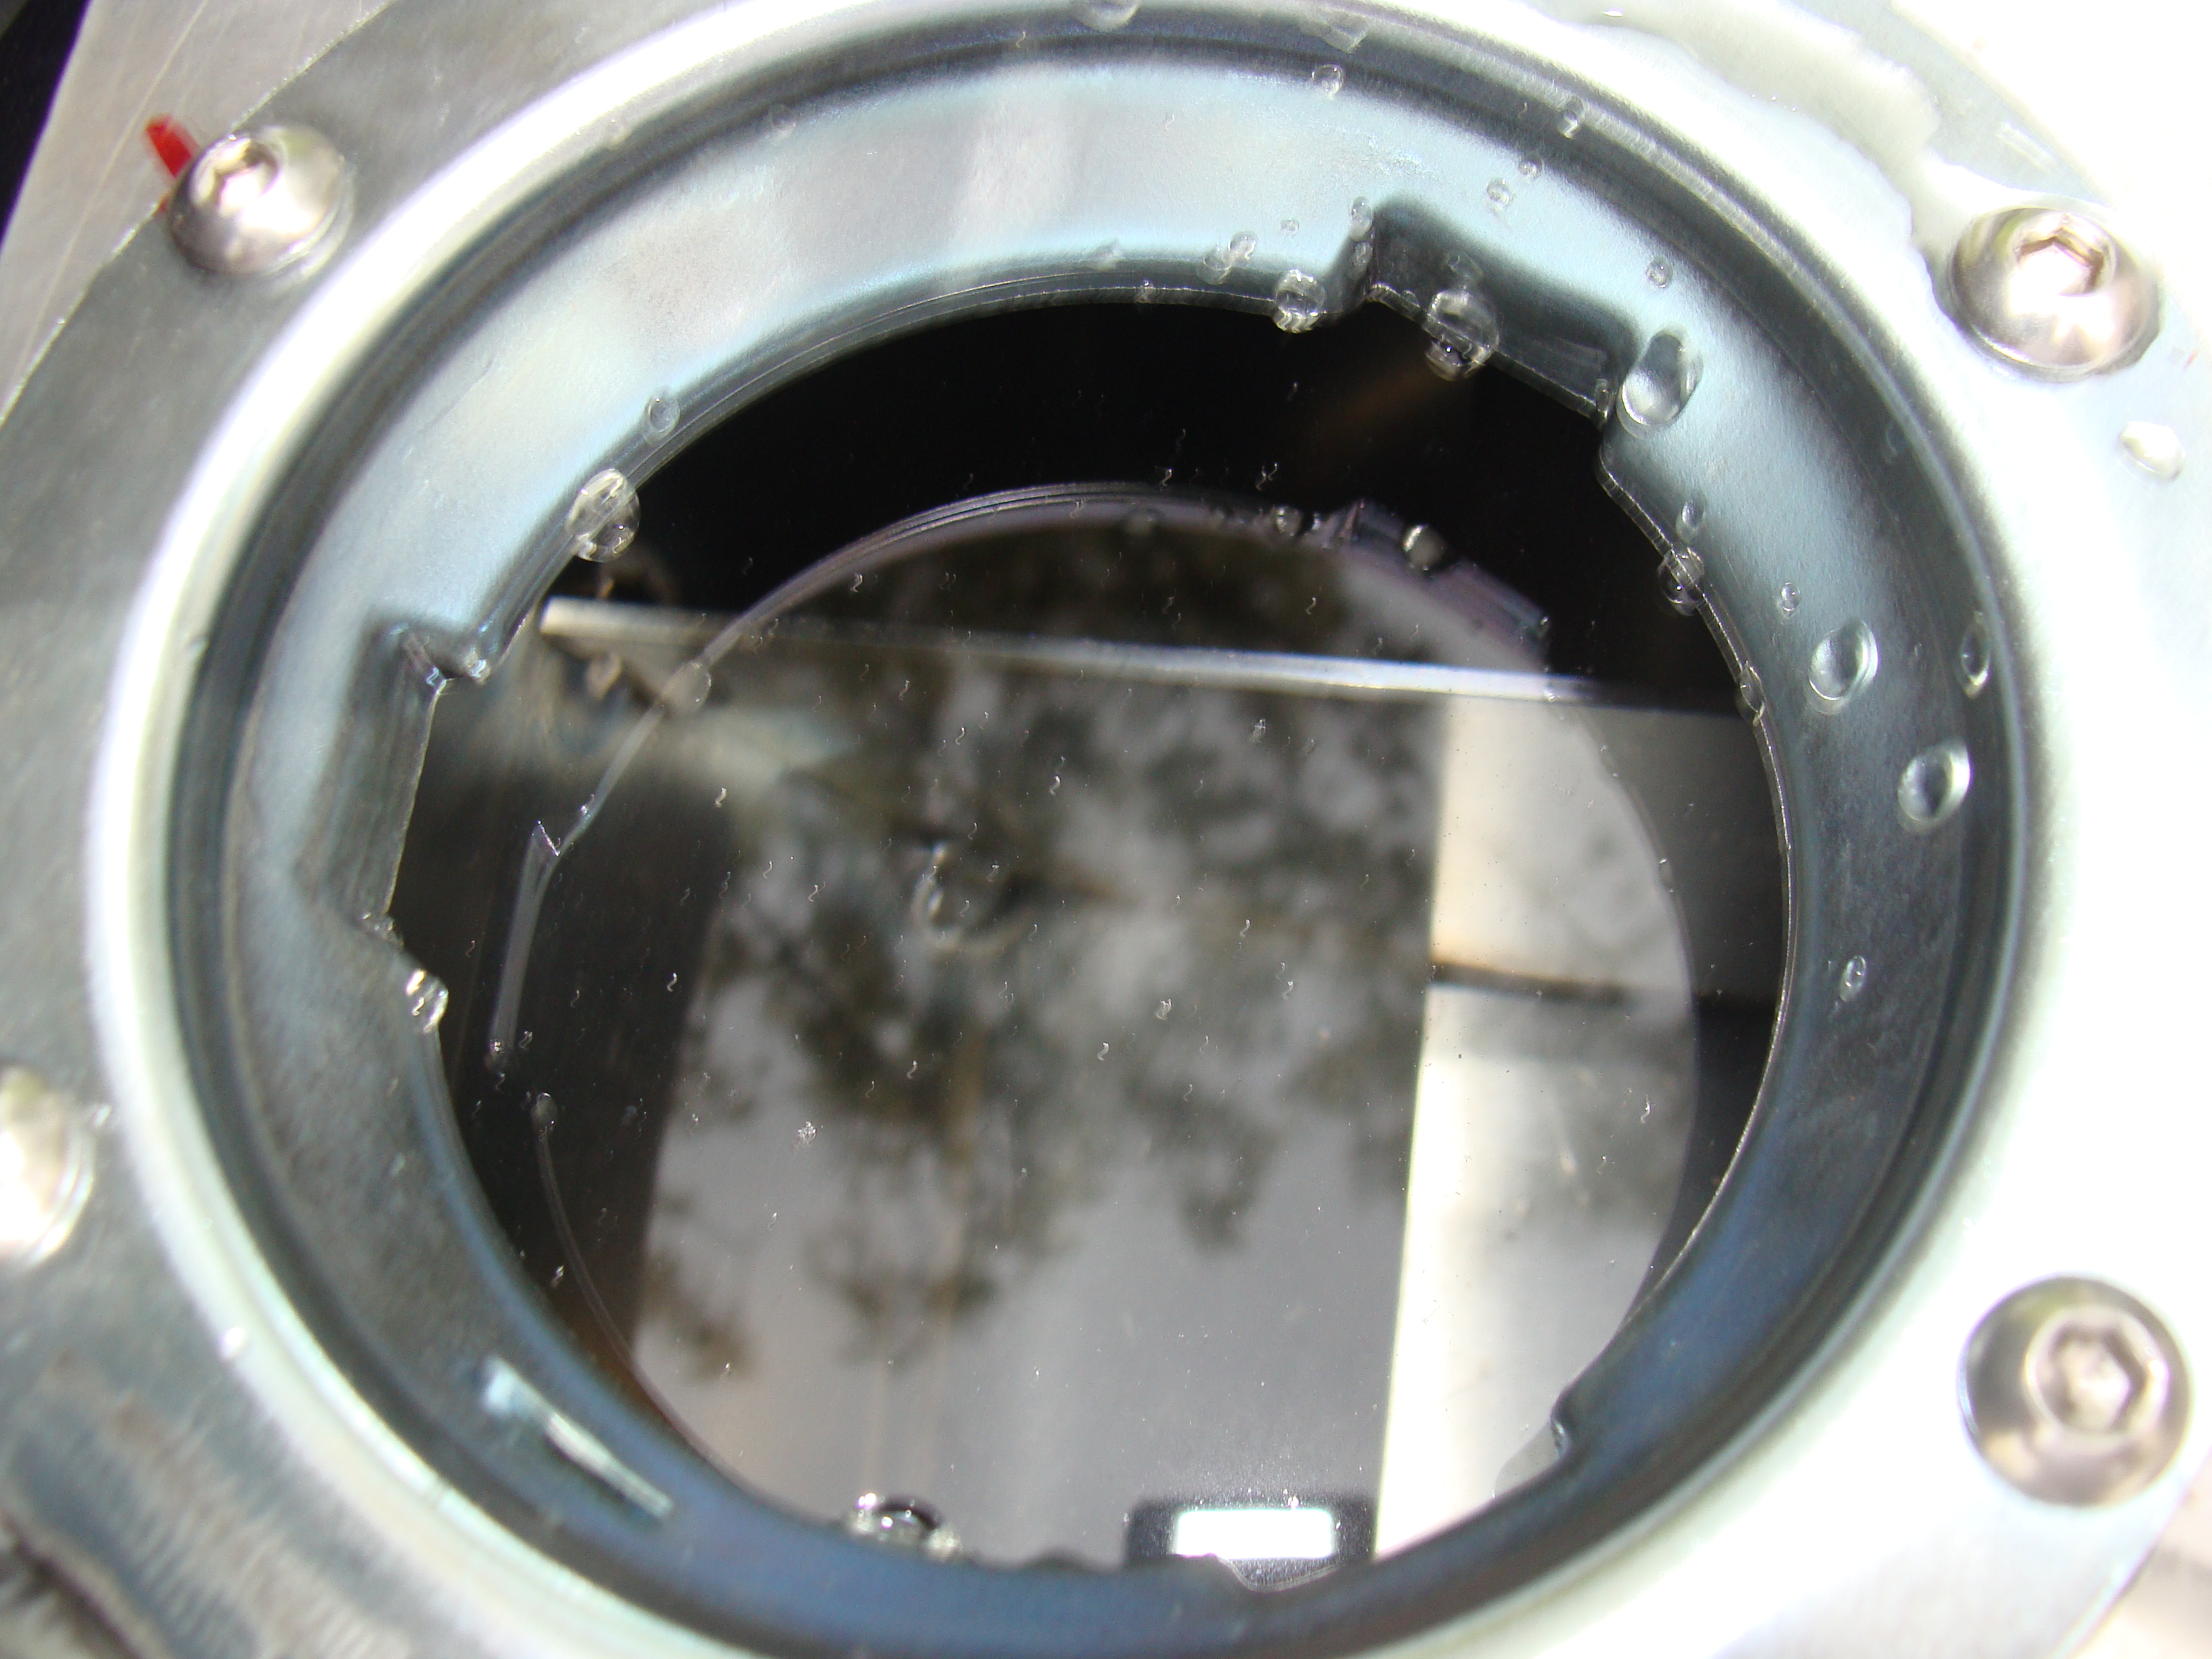
Measured the bulkhead OD at 18 mm. Found the equivalent 'step' on the UniBit and marked the next higher step.. do NOT cross the mark, dcarver!
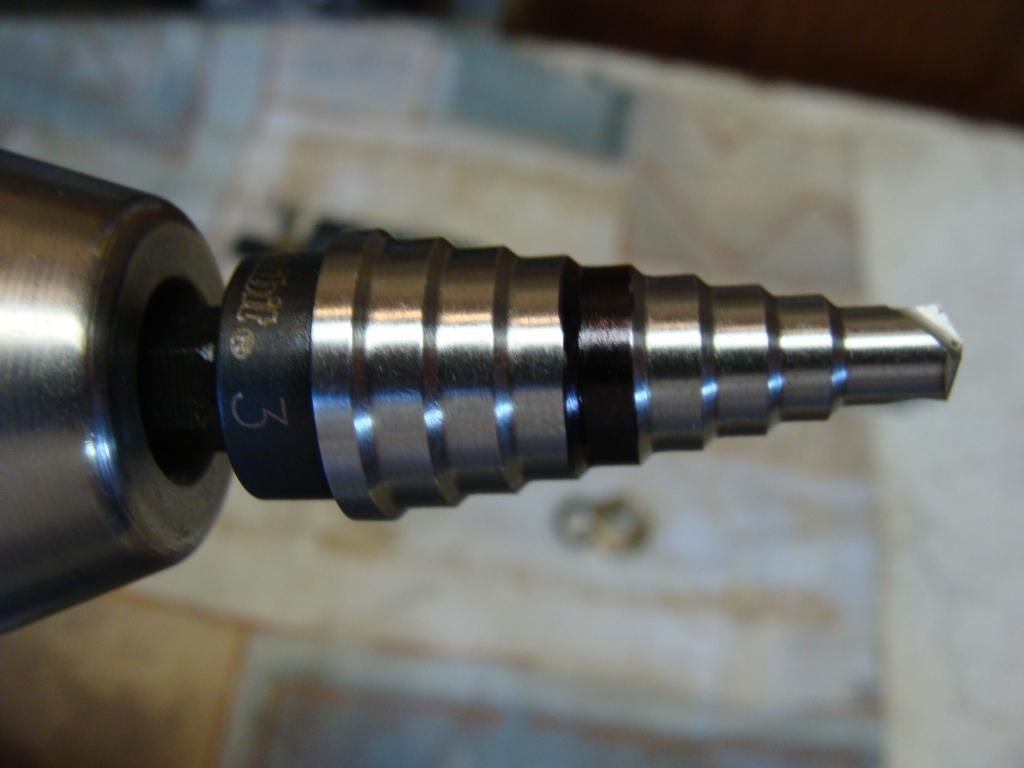
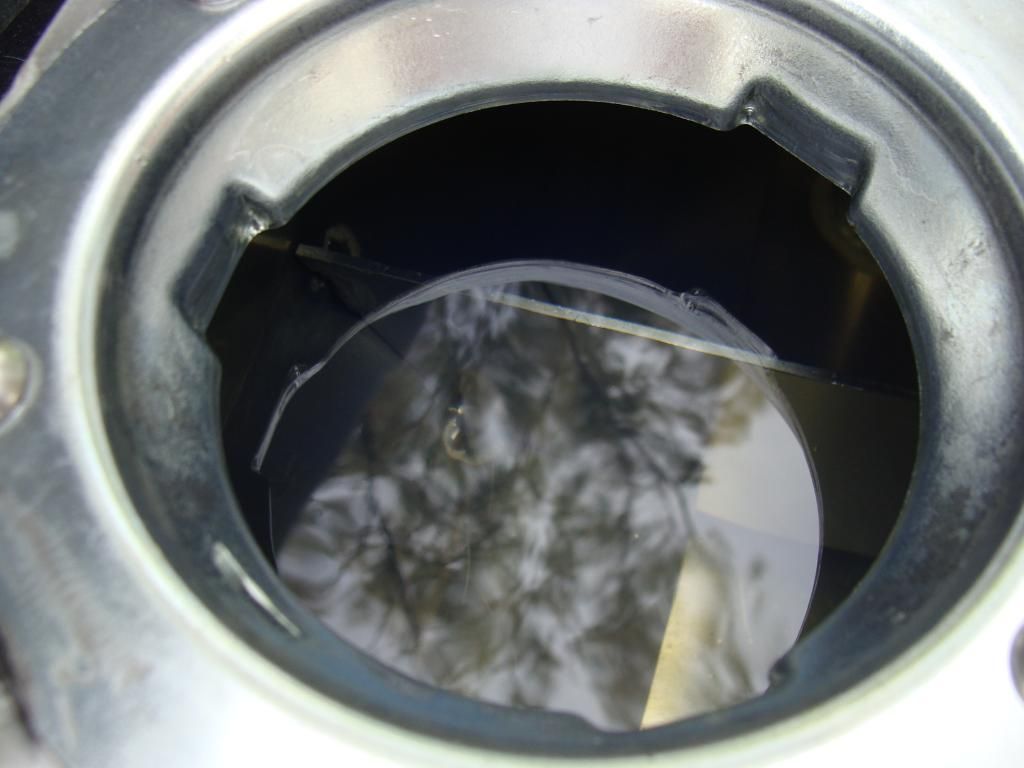
Practiced first - the entry point looks clean.
Not so much the exit -
There's a 'rubber' o-ring that has to seal and this is not going well...

Thinking that the tank steel will be thinner, and 'harder material' I forge on .
Call Hal again, get some good advice.. Jeesh, the moment of truth looms.
Better be sure my location is OK. Make a block of wood scraps the same height as the fitting and test the tank. All is good.
Placed towel in tank to catch shavings.
Block off the main tank fuel pump hole with tape for a "Foreign Material Exclusion Zone"..
After drilling, used old paint brush to remove metal shavings from around fuel pump hole. Removed tape then rag from tank inside. Used magnetic probe to pick up remaining metal shavings. Also used balled-up masking tape and tamped around tank inside to pick up pieces.
The inside of the tank had a ledge from the drilling. Unacceptable. Place the UniBit inside tank, posting out wards, then chucked it to my Makita. Ran the Makita back-wards to 'chamfer' the inside hole area. Be careful doing this - don't go crazy, just enough to remove the burr material.
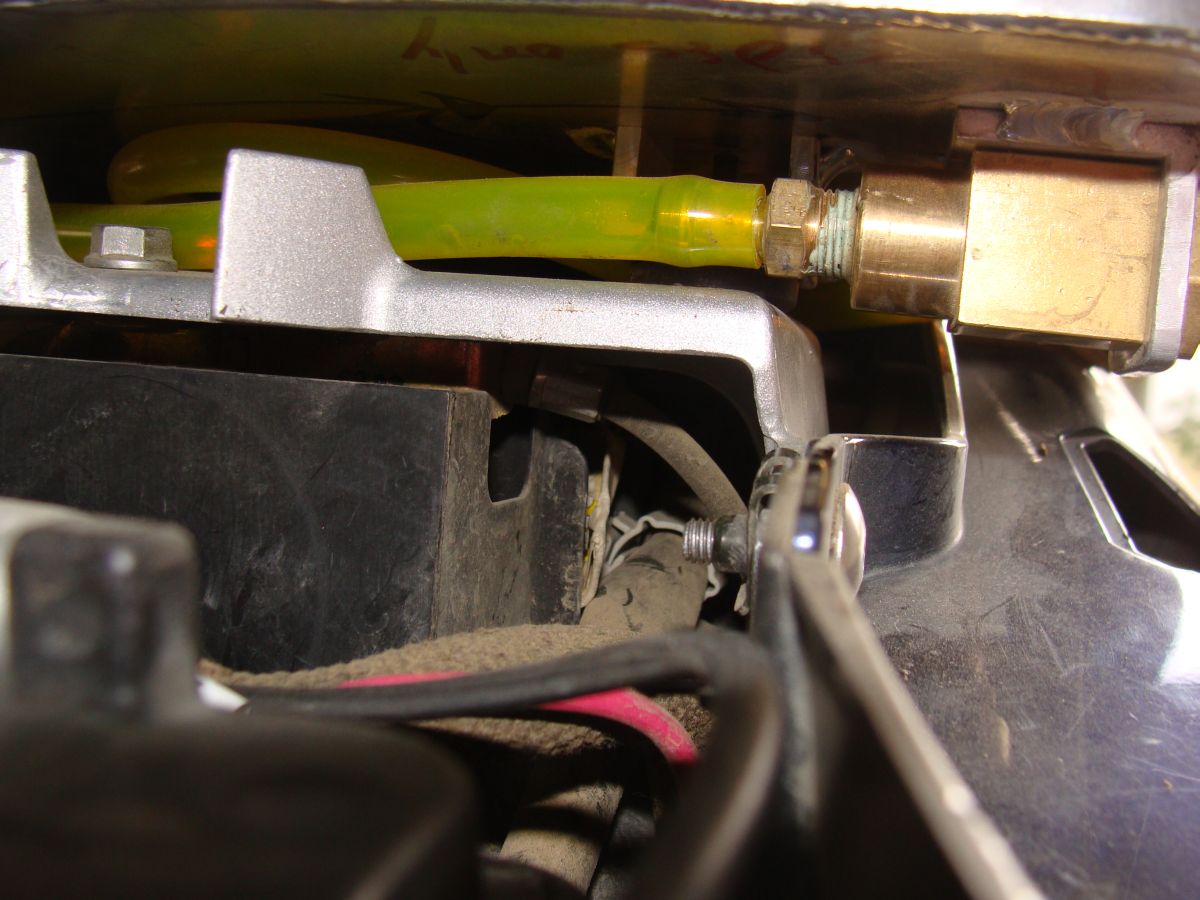
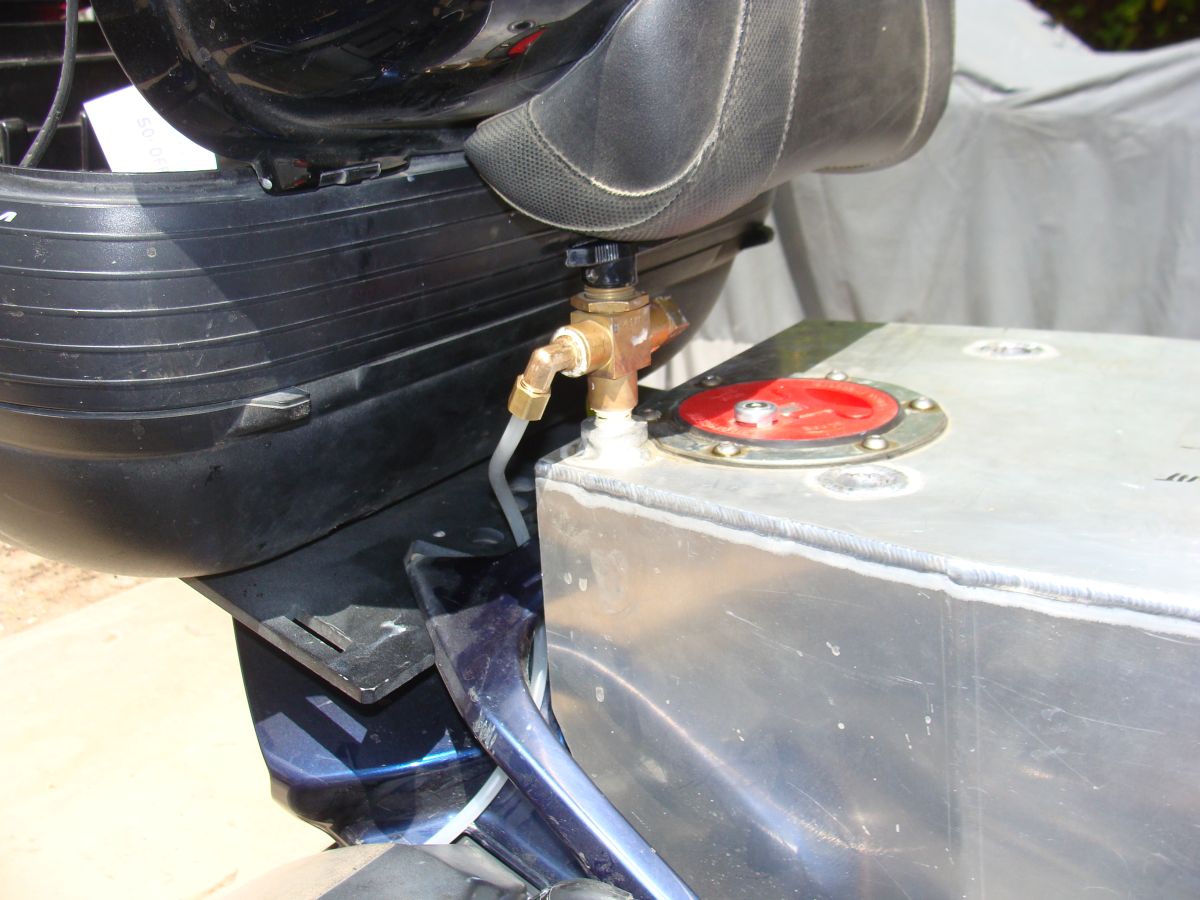
Getting closer! Like others, used a 90 degree ratchet to secure the bulkhead fitting.
Bulkhead installed!
Time to start assembling stuff.
When stuffing the fuel pp back in, first connect the sender unit. It will go in much easier than coming out. It's damn hard to align then pop the tab into place once halfway stuffed into the tank.
Hey hay - the bike runs, and the fuel gage is working too!
I had to shit-can the one way valve. It was waay to restrictive for a gravity feed system.
Also decided to run the Sampson tank QD fittings - they appear to flow much better, with less restriction, than the MacMaster-Carr ones.
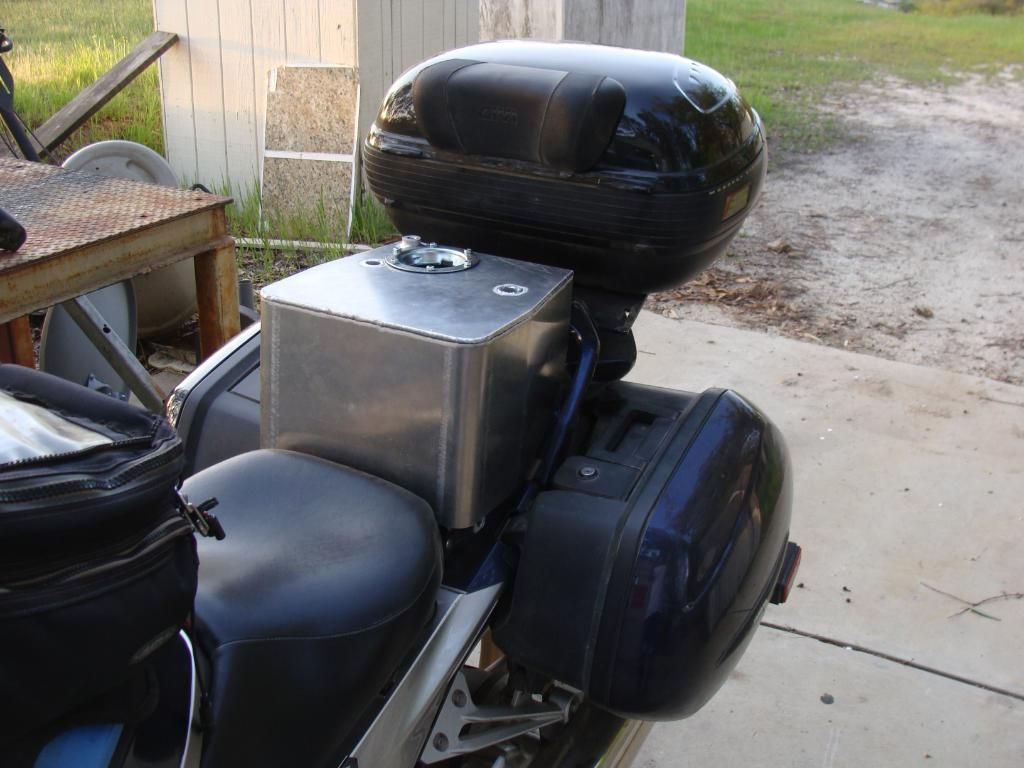
Final routing of lines..
Ready for GAS this time!
Aux tank full, main tank real low (just enough to check for leaks and make sure everything worked)
Opened the aux tank valve, no flow. 
Remove the one-way valve - some flow..
Replace the McMaster-Carr QD with Sampson, and hey, hey, look at dat! Fuel be flowin'.. 
More later, I'm tired.
Walked away :) Is it really crashing if you don't fall down?--
Posted 02 April 2010 - 08:17 PM
Ok, more flow experiments today -
Per a Tanji tank user, who has run, and placed very high in the IBR, the recommendation was "run the main tank down to approx 50-70 miles" then open (the full) aux tank. Per said inside informant, many various designs of gravity fed aux tanks have had weird issues in draining at different main/aux tank fuel levels. (I will ask this person if it's OK to post his PM to me, won't do so unless approved. )
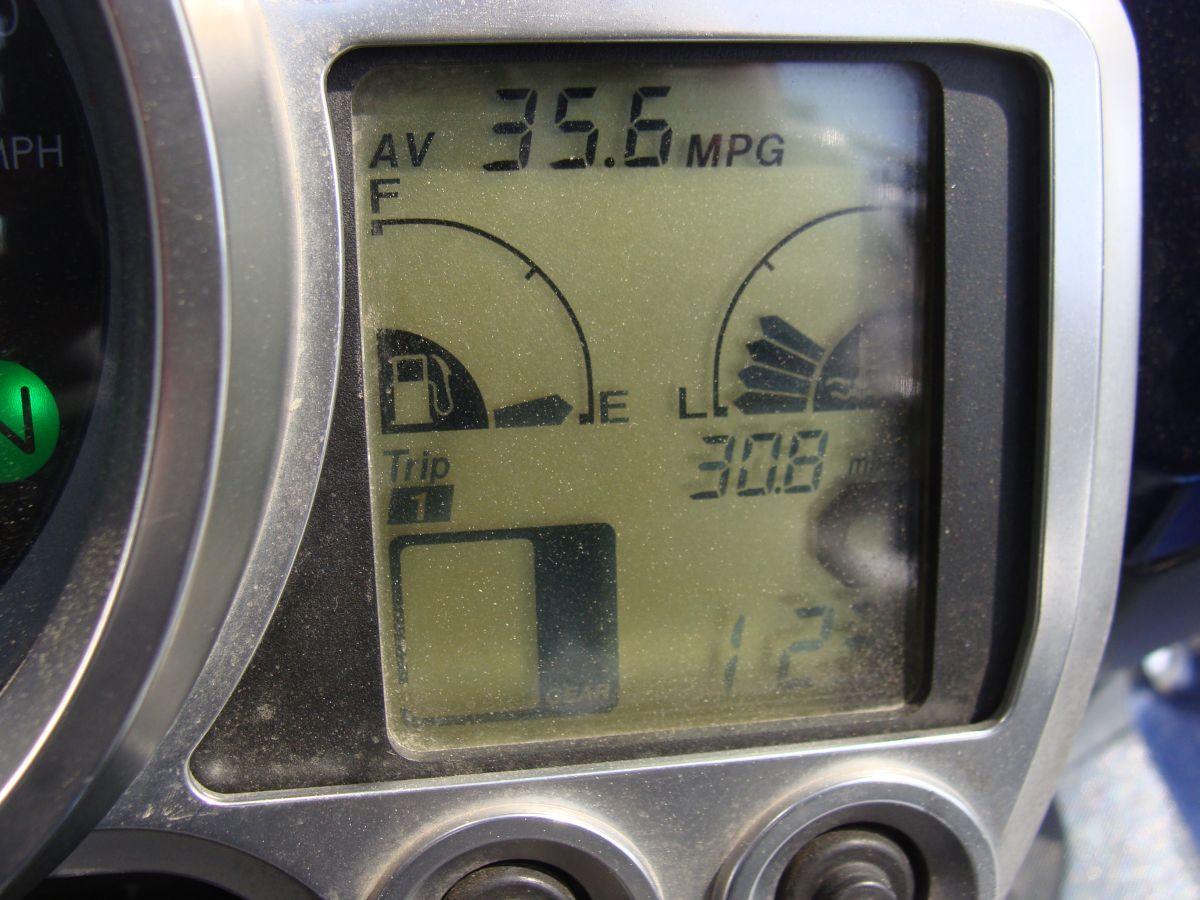
So, I did. Can't argue with a LDR who has been there, done that. Ran the main to 65 miles, showing 33 mpg avg, yes, I speed. Opened the fully filled aux and rode for about an hour.
Results = static. I started at 3 bars down, and the fuel gauge remained at 3 bars down for over an hour. The only real indication was the miles traveled. Normally at 100, I'm at least at half tank indicated. This time, I remained at 3 bars consumed and it just stayed there at 150 miles. Obviously, the fuel is transferring.
My deduction is that with the main at 3/4 full, and the Aux at 4/4 full, at speed, the fuel consumed +delivery rate = 0. Meaning the aux tank was delivering the same flow rate as consumption. Tomorrow I'll test more.
BTW, since the one-way valve was too restricitve, I removed it, meaning the main can fill the aux, as RenoJohn once experinced. So I even pulled off the road to see if the main tank was *back-flowing* the aux, it was not - the filter sock was dry. BTW, I found a cool solution for keeping the vent line clean yet still able to drain, check later for pix.
Arrived home, 3 bars down, looked inside the aux tank and it's about 1/3 consumed. Very cool.
Hope this helps.
Walked away :) Is it really crashing if you don't fall down?--
Posted 03 April 2010 - 08:09 AM
Your description tells me that once you open the valve, the fuel levels in the aux and main tanks equalize. As you consume fuel, with the aux valve still open, the levels continue to equalize, resulting in miles traveled but your fuel gauge remaining at 3 bars down. I presume this "self equalization" will take place until both tanks are empty (?).
I'll do some static testing today, with various scenarios, (main 3/4 full, main nearly empty, etc).
I've been under the impression that one would want to open the valve when the main is nearly empty, to dump the contents of the aux into the main...my main concern with the tag along design was that no one had proven this would actually happen. But if what I wrote is true, this "self equalization" would work as well.
I already tested that, and the aux does fill the main, just not very fast. I believe this is common with all gravity feed tanks that have little head pressure, e.g. height differential between tanks. I guess I could try my engineer hat and calculate flow rate through 1/4" id tube at X inches H2o differential. Then again, not. I'll just test it in the real world.
My insider informant had mentioned his Tanji sometimes has issues flowing when the main is nearly empty and the aux tank is full. The speculation is that the air in the main tank compresses, impeding flow. Yes, I know it's a venting main tank, but it can and does still build some pressure, and when dealing with minimal head pressure, I could see how it's enough. Anyway, what works best for him is to use the method I just tested e.g. open aux when main has about 50 miles on it.
Either method, we know that fuel does flow, and that's the goal. 
Let me know if I'm way off base here; I've only started reading about this aux tank stuff within the past few months, and am still learning.
See in line red comments.
Walked away :) Is it really crashing if you don't fall down?--
Posted 03 April 2010 - 08:21 AM
Ok, said inside informant gave me permission to post the PM.. Thanks SkooterG!
(minor editing for typos)
"Many of us had transfer 'issues' with the Tanji when we first bought them. Most of us have solved them in our own ways. Whatever cell you buy, you definitely need to get some miles with it to 'learn' it's characteristics and how it will and won't work.
Here's what I learned with my Tanji, and some of the same things most likely apply to most gravity fuel cells. Other's experiences may vary.
I open the valve to my cell after only 30-50 miles. (After filling both tanks) It works better this way. I don't know why. It doesn't make sense. If I let the main tank get low, I tend to have more problems with transfer. I think it has to do with the big pocket of air in the main tank not venting, building up pressure, and restricting, stopping, or even reversing flow. It doesn't seem to do this with a 'small' pocket of air. See more about this below.
One of the big issues initially with my Tanji (and it being gravity fed) was air in the line between cell and fuel tank. Gravity and the only slight difference in head pressure doesn't give a real big 'push'. Any air or bubbles in the fuel line and it can stop, or severely restrict flow. I learned early on that when filling the cell after it's been totally dry and/or off the bike that sealing my mouth around the cell filler and blowing would give that extra 'push' to get the air out of the line. I would have the fuel cap on the main tank open, and could hear the bubbles coming out. I would continue this until they stopped coming out. When doing this, especially if the fuel cell is totally dry, make sure the cell is full, and the main tank almost empty to get as much head pressure helping as you can. After the initia 'blow-job' to get things flowing, I don't have to do it again.
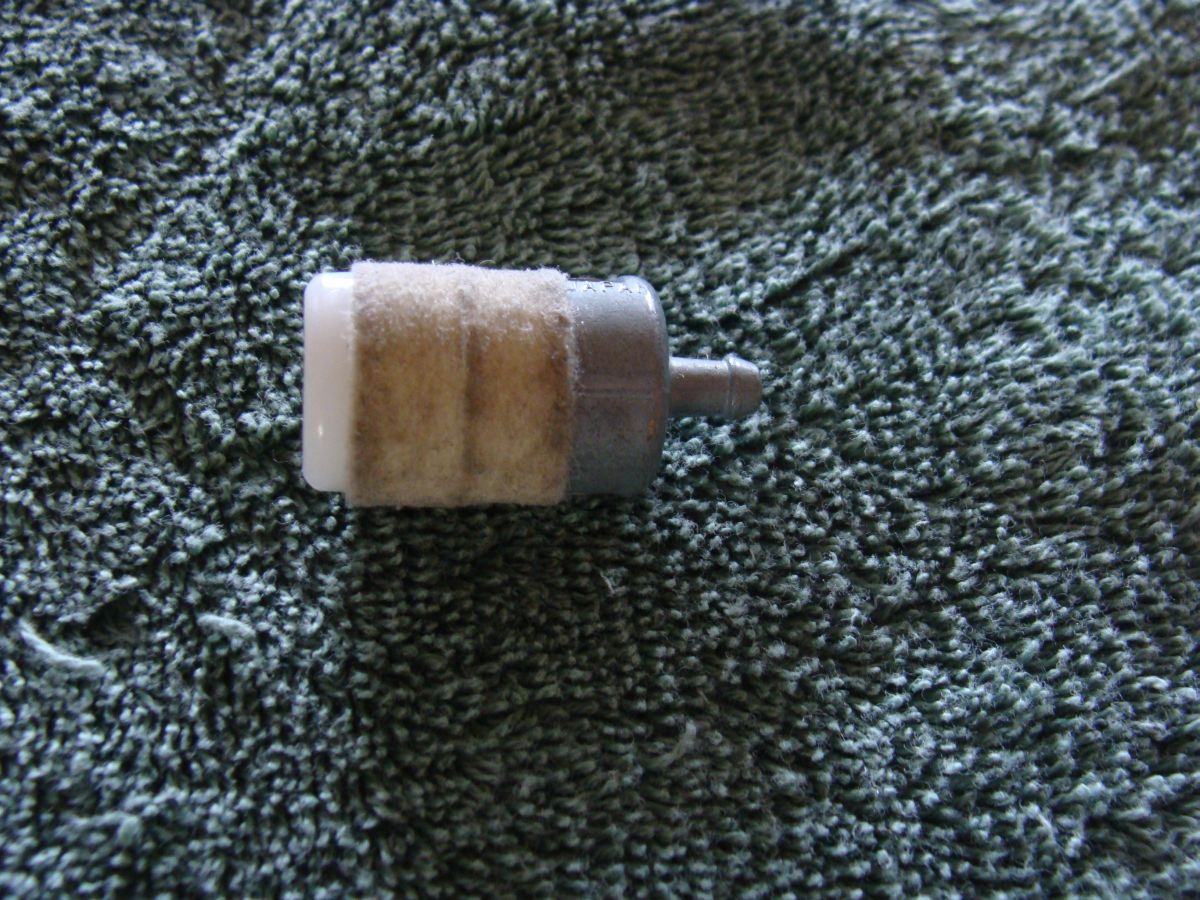
Another is the fuel filter installed in the line between cell and main if you have one. I don't know what kind of filter Dean installed on the cell when hem made it, but after two years I replaced it with one of those clear plastic or glass marine units. Well, after I put the new filter on, I observed my flow rate improve. So, obviously the original filter was a bit restrictive for gravity feed. If you need the particulars about the one I am using now, let me know.
Ok, for the biggie. For whatever phooked up reason, gravity feed cells can occasionally have issues with pressure building up in the main tank, and then reversing flow TO the cell, and in the case of the Tanji, dumping fuel out the vent line. This happens ALMOST exclusively with REALLY hot ambient temps. I have no idea why it does this. And I've spent a lot of time thinking about it. The thing is, in over 200k, my main tank (with no cell) has built up pressure to where the fuel cap 'pops' and hisses out the built-up pressure when opening it only once or twice. Yet with the cell, it's done this a dozen or two times. Why? I have no phooking idea. I used to think it had something to do with the Tanji cell, but that is not the case: Last June during the Utah1088 there were 3 of us that went to Las Vegas in the afternoon when it was 115+. Me, with the Tanji cell, Iggy with the BLM cell, and RenoJohn with the Skyway cell. Well, ALL of us had several instances of the main tank building pressure and reversing flow of fuel to the cell and out the vent. Three different gravity cells, in REALLY hot weather, experiencing the SAME problem MULTIPLE times.
For me, I had only had the pressure build-up thing occur 2-3 times in the last couple years. But on that afternoon, every time I filled it I experienced the problem. 4 or 5 times just that one afternoon. Of course, later that night when it was cooler, everything worked fine again.
To this day, it still drives me nuts why it happens with the cell installed, and not without. To me, the root cause is the FJR's main tank venting system. Adding a cell and hot ambient temps somehow triggers some kind of problem where it doesn't properly vent. I think the partial solution is installing a one way check-valve in the line between cell and main to at least keep fuel from flowing backwards, but I haven't been able to find one yet, and I am a bit worried about adding any undo restriction to a gravity feed system. Still, it sucks when you realize you have dumped a good gallon or more out the fuel cell's vent. Only way I know it is doing that is when the fuel bars on the fuel gauge start decreasing a lot more rapidly than they should.
As I said above, what I have found is that turning on the cell as early as practical helps, even with the heat issue. For whatever phooked up reason, less air space in the main tank is good thing for gravity transfer of fuel from the cell. It's not 100%, but definitely seems to help. Much less likely to encounter main tank venting issues and pressure build-up. I don't get it. I mean, as both the cell and main empty, let's say to half, there is more air in both tanks but I don't seem to have problems then. I just don't get it. BTW, at the last IBR I talked to some other east coast IBR riders who I can't remember right now and they told me they modified their main tank fuel cap (by removing the ball I believe - the ball that is designed to stop fuel from flowing out the filler cap when the FJR is on it's side) and that they have not had any issues since. Like I said, root cause is the main venting system.
Edit: I forgot to mention my re-fueling procedure which seems to work for me. When on the road and re-fueling, I try to have the main tank as empty as possible. I then close the cell valve and first fill the cell. I then open the valve and let it flow for a few seconds before closing the valve. While doing this, I can check to see that the fuel is slowly going down in the Tanji filler neck. Oh, and also I make sure the main tank fuel cap open. The reason I do all that is that almost all the time, I am running the whole system pretty dry. It's not uncommon for me to put in 10.3 - 11.2 gallons when re-fueling. And when I do this, I am pretty sure I am running the Tanji cell dry. I don't think it tends to get air in the lines, but I do the above to ensure I get good flow (with the head pressure help).
I'll be interested to hear your experiences with your new cell. I hope you get as much enjoyment out of it as I have mine. Even with your CandyAss.
Hugs & Kisses, babe."
This post has been edited by SkooterG: 03 April 2010 - 08:52 AM
Reason for edit: Edited my initial write-up in some locations with some amplifying information.
Posted 03 April 2010 - 08:52 PM
I found what I think is a cool over-flow vent device. I'm never going to run an IBR, so a catch tank means nothing to me. This is a fuel pick up from a Husqvarna chain saw..
The installation -
Well now, somebody has to go riding to test this new tank... who, ME?
Just in case..
My first test scenario -
Empty main tank.
With full aux tank, and empty main, see if xnfr rate was sufficient to keep motoring.
..So I siphoned the main tank (pretty difficult to completely empty it using siphon hose)
.. Filled up the aux tank
.. went riding
Evidently, even with about 1/2 to 3/8" (visual, not measured) of gas in the main, it will start to starve and stumble. I made it less than 6 miles when sputtering happened. I could keep it alive if running about 45 - 50 and turning left and right. But the end was near. Thinking of dry fuel pump destruction horror stories, I stopped. And opened the aux tank.
Looking into the main, flow was evident. So off I went, riding at 45-65 depending upon traffic. No problems, the aux was feeding the main sufficient to keep the fuel pump happy.
At 30.5 miles, the fuel gauge went from flashing empty to 1 bar.
Corresponding aux tank level - notice is has dropped from 4/4 full to this -
At one point in time, I saw 2 bars on the fuel gauge. Then I wicked it up and had some fun in straights and corners, running at triple+ and pushing hard. Then, the blinking gauge came back on - I guess this means I was consuming more than delivering. (but I was pushing it, hard)
Back at the Hondarosa, I measured fuel height in main and aux
Main = 1 5/8
Aux = 1 3/8
Opened aux valve, weed whacked a mountain, came back later. BTW, FJR on center stand..
Main = 1 3/4, Aux = 1 3/8 to 1 1/4, depending upon my measuring 'technique'. Call it half way between.
I then siphoned the main -
Main = 1/2" at test start
with bike on center stand, 40 minutes,
Main = 1/2.
Bike on side stand - no change.
Evidently, once you're down to 3/8 to 4/8 in main or aux, you're a done doodle.
So what is learned from all this?
1. The aux tank will flow (given *my* configuration) down to 1/2"
2. If the main is empty, the full aux flows adequately to maintain motoring speeds (worst case scenario - who is stupid enough to run the main completley dry before opening the aux? )
3. At some point in time, at low levels, the aux and main 'equalize'
The next test?
Given a nearly empty main and aux, while connected, how far can one go?
That will be tomorrow.
I hope this helps -
and will be very curious to see what others experience, especially those that run 5/16" line not 1/4" like I have. Per SkooterG's post, all gravity tanks with minimal head pressure have 'issues', requiring a learning curve of what does and does not work.
From what I've seen today, Joe2lMakers tank feeds the main as it should!
I'll test more soon.
Walked away :) Is it really crashing if you don't fall down?--
Posted 03 April 2010 - 09:00 PM
Forgot this -
My first one way valve was from MacMaster-Carr. It failed miserably for gravity feed use due to a high 'pop-off pressure. Too restrictive.
Then I got to thinking of my dirt bikes... they have a cool 1-way valve that allows the tank to vent yet not allow gas to escape..
I gave it the SkooterG blow test and determined it was a prime candidate for use on Aux tanks..
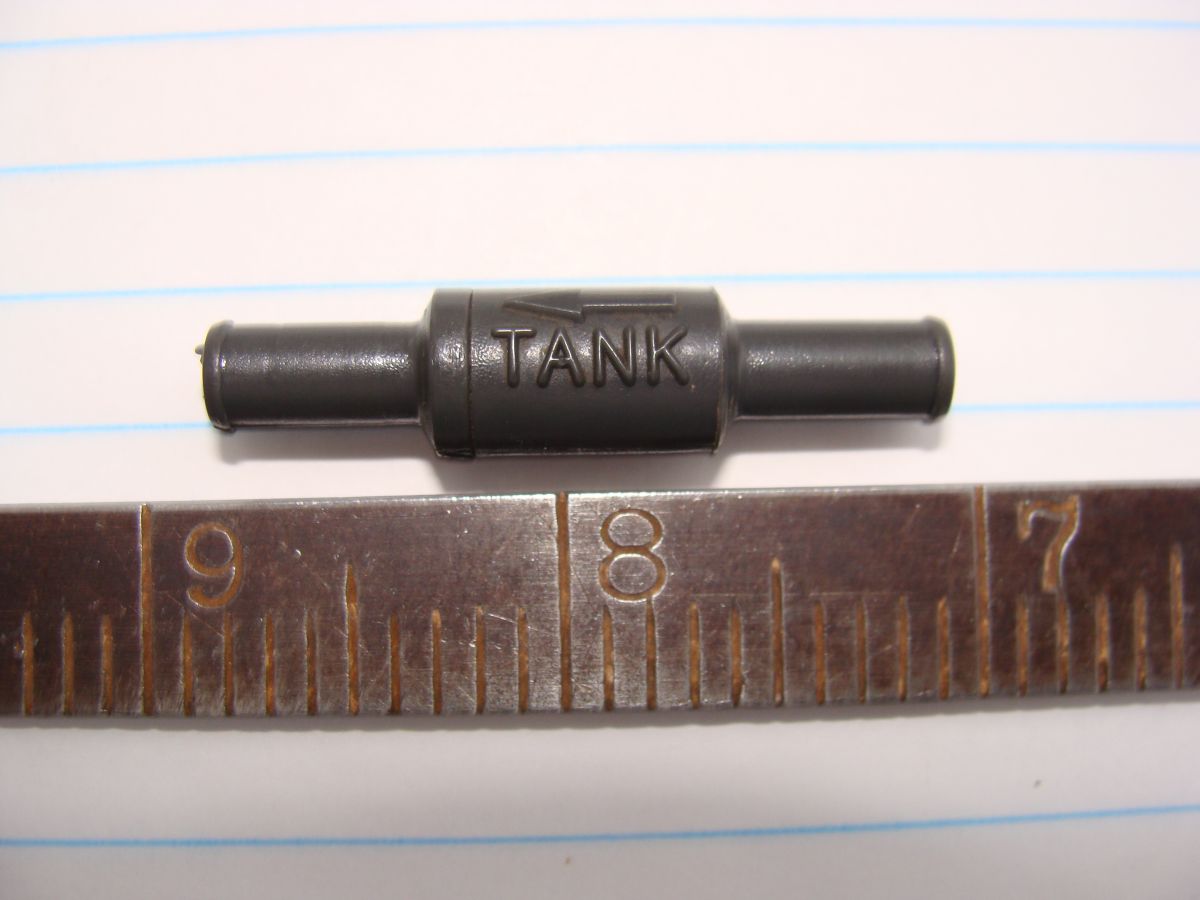
20 USD from your local YamaMamma dealer, any Yz426 - Yz450...
BTW - it's not a perfect fit for 1/4" line, a tad undersized. For gravity systems, no problem is my guess (and I'll test) but most likely not suitable for pressurized systems.
Walked away :) Is it really crashing if you don't fall down?--
Posted 04 April 2010 - 03:15 PM
Left the aux valve open last night, bike on side stand - all gas flowed to main tank!
Posted 04 April 2010 - 03:33 PM
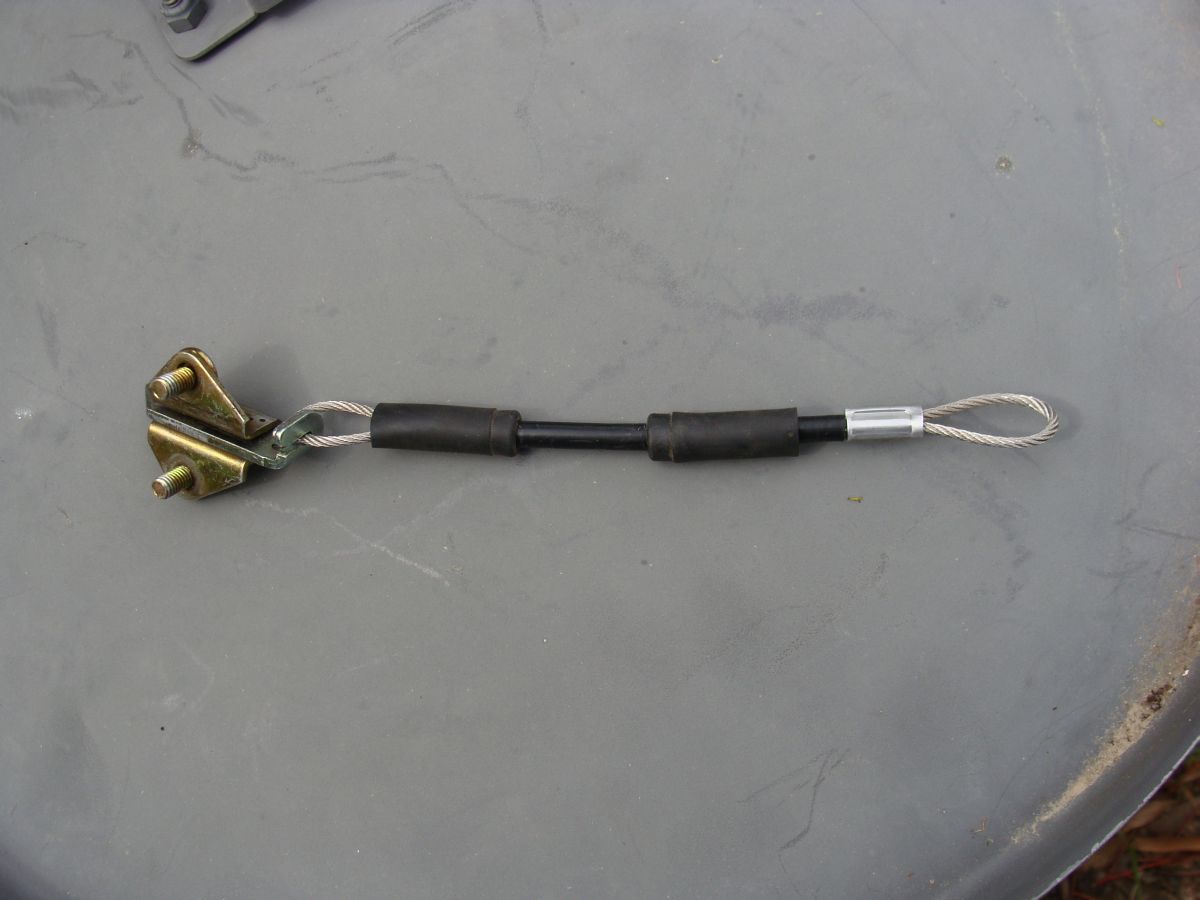
Had a few hours before Easter dinner and company so I rigged up an external seat latch release device. My hands and fingers are too manly to release rider seat with aux tank and Bill Mayer saddle. Also,I envision a back rest, which would completely block access.

My first idea was to use some real cool wire 'rope', looped at each end, one end attached to the release tab, the other to grab and pull with. That idea failed miserably, so plan 'B', although less eloquent, was fully functional and implemented.
So, here it is, my idea, in all her glory..
Drill a pass-through hole.
Connect ty-rap to lever arm after first removing rubber 'boot' from arm. Ty-rap end to latch slot.
Note - this pix from abandoned idea..
Drill pass-through hole through plastic side plate.
Final installation -
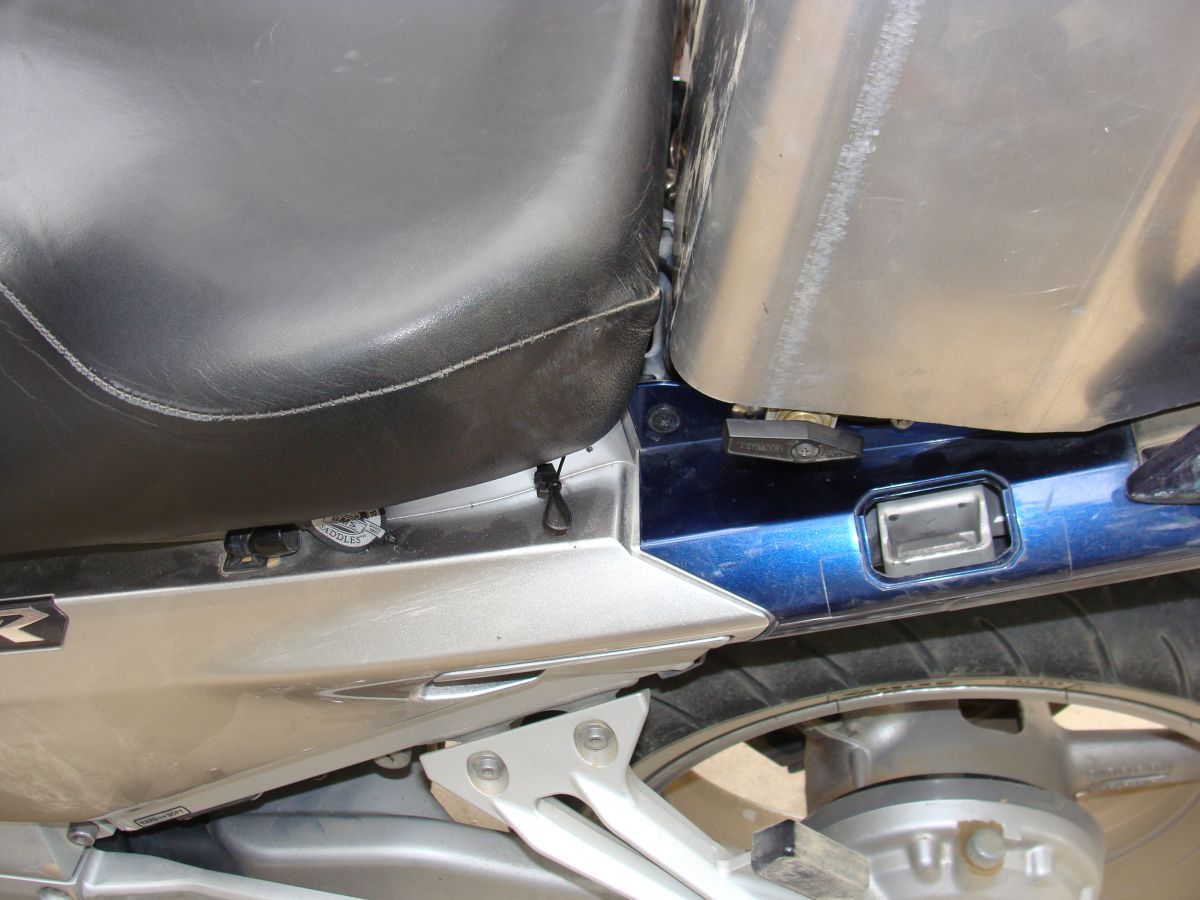
If doing it again, the first hole would smaller diameter and to the right. I miscalculated the clearance from the plastic seat base bracket and metal thing I drilled the hole into. Then again, the larger hole lightened the bike by .185 grams thus improving top end speed!
Yeah, yeah, you machinists types will probably come up with some high dollar zoot suit stainless steel knurled and polished shaft... 
Walked away :) Is it really crashing if you don't fall down?--
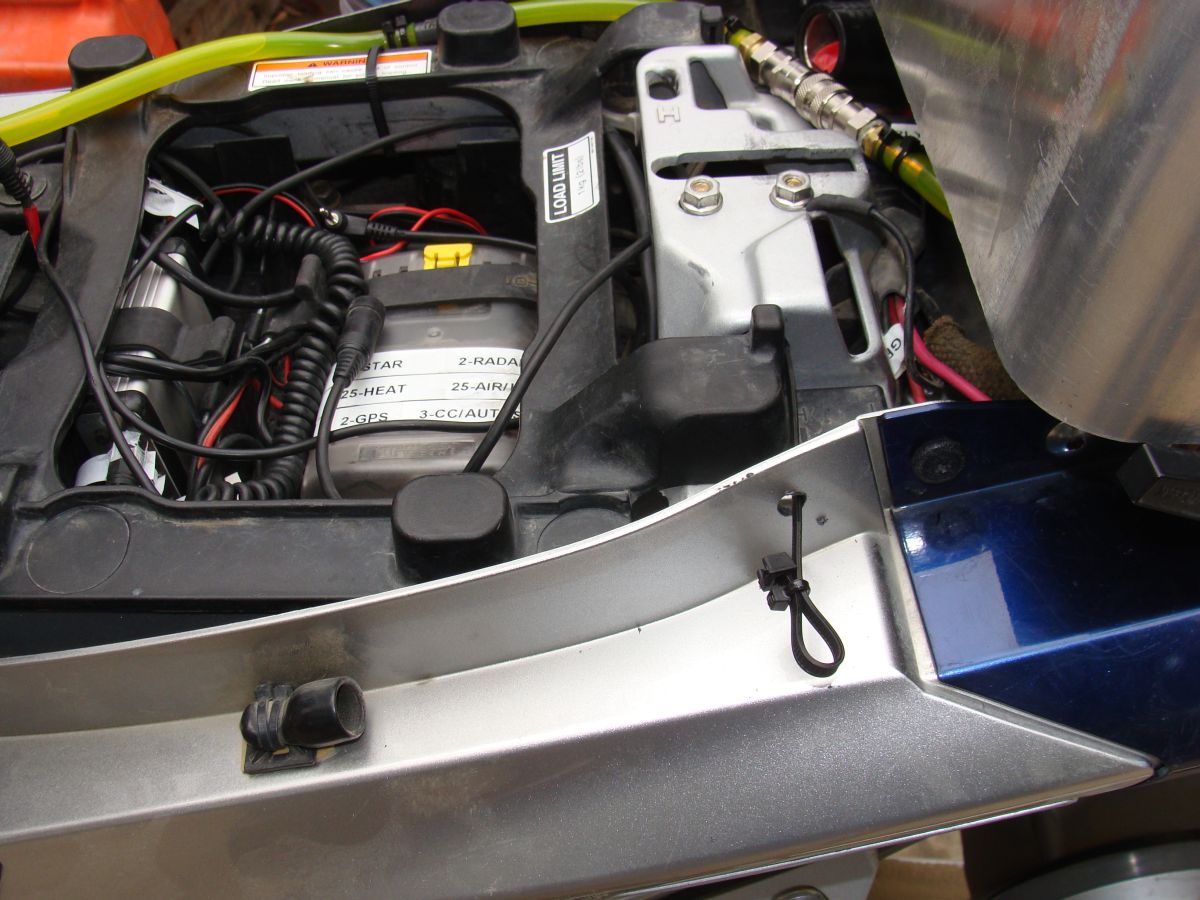
Posted 04 April 2010 - 03:39 PM
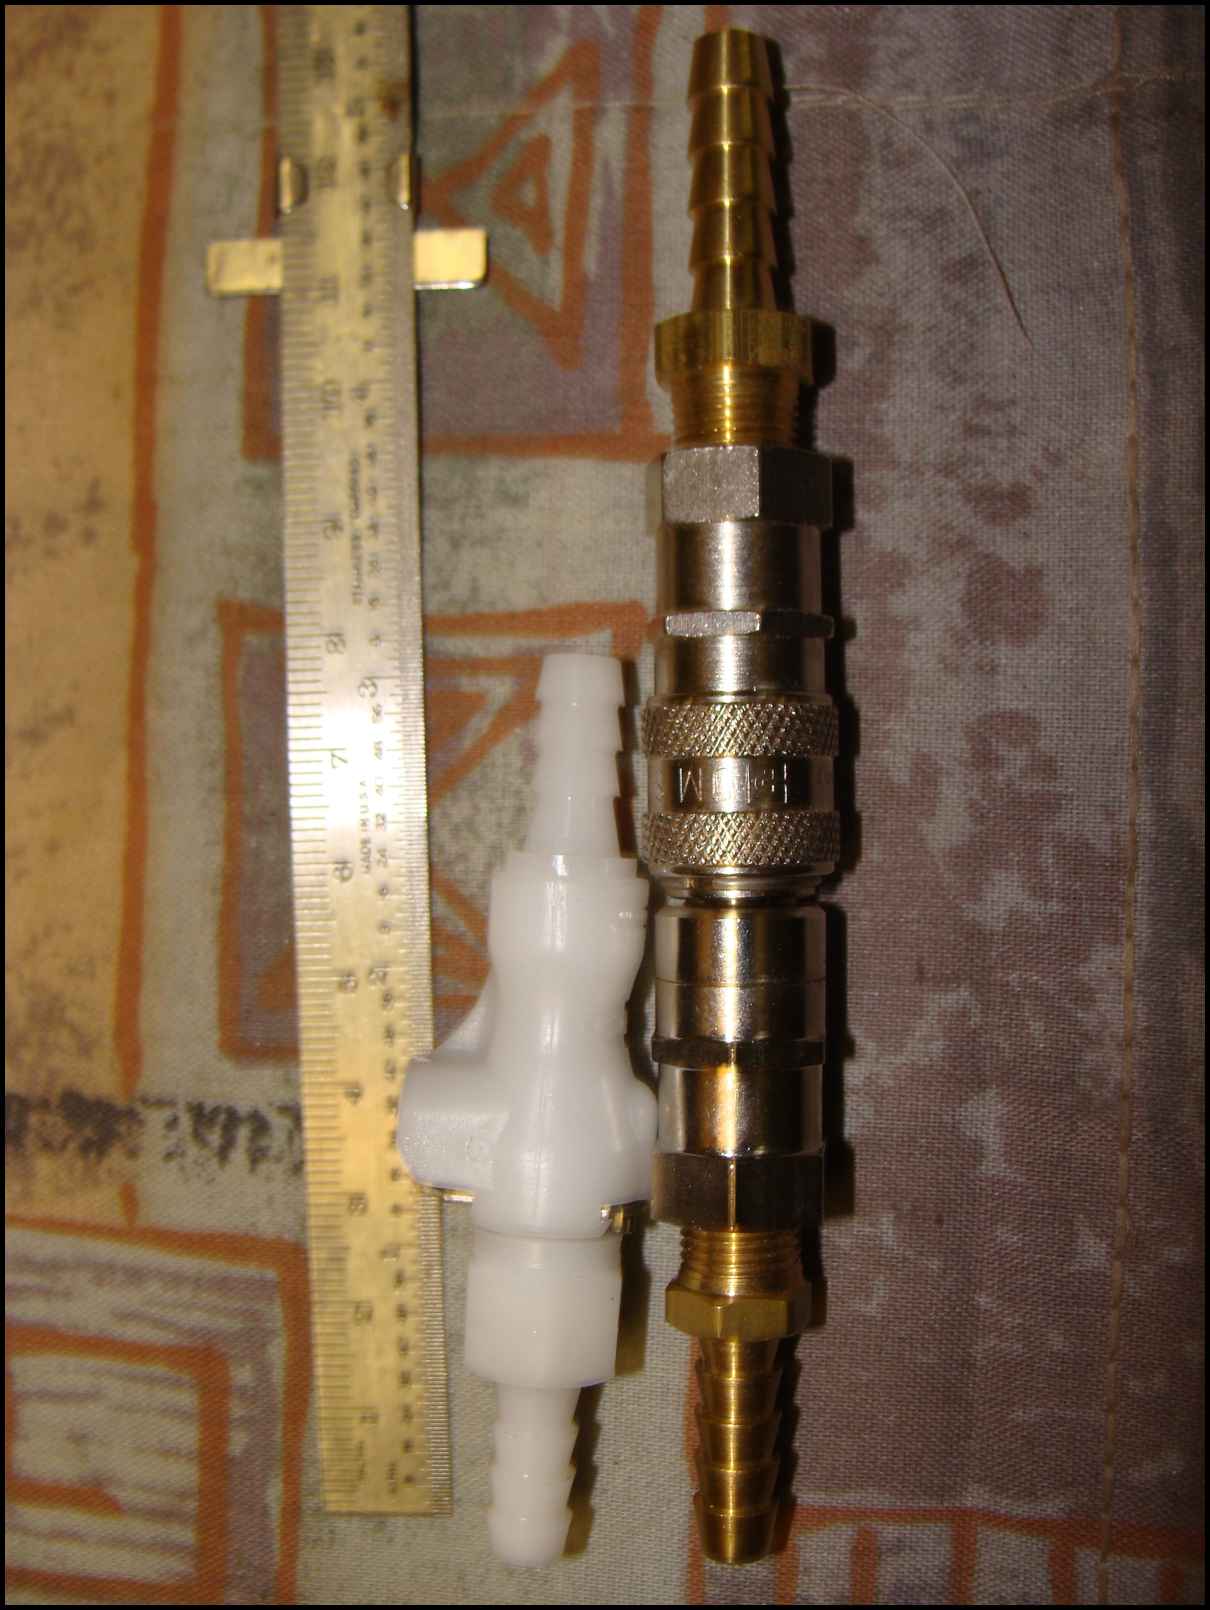
The next item on the list was to install my yz426 one way check valve into the gas delivery line. This item is the cats meow excepting it's a *tad* undersized. Also, I learned that the QD fitting should be located somewhere else than under rider seat for easier tank removal, so I relocated it.
Here's the installed yzValve
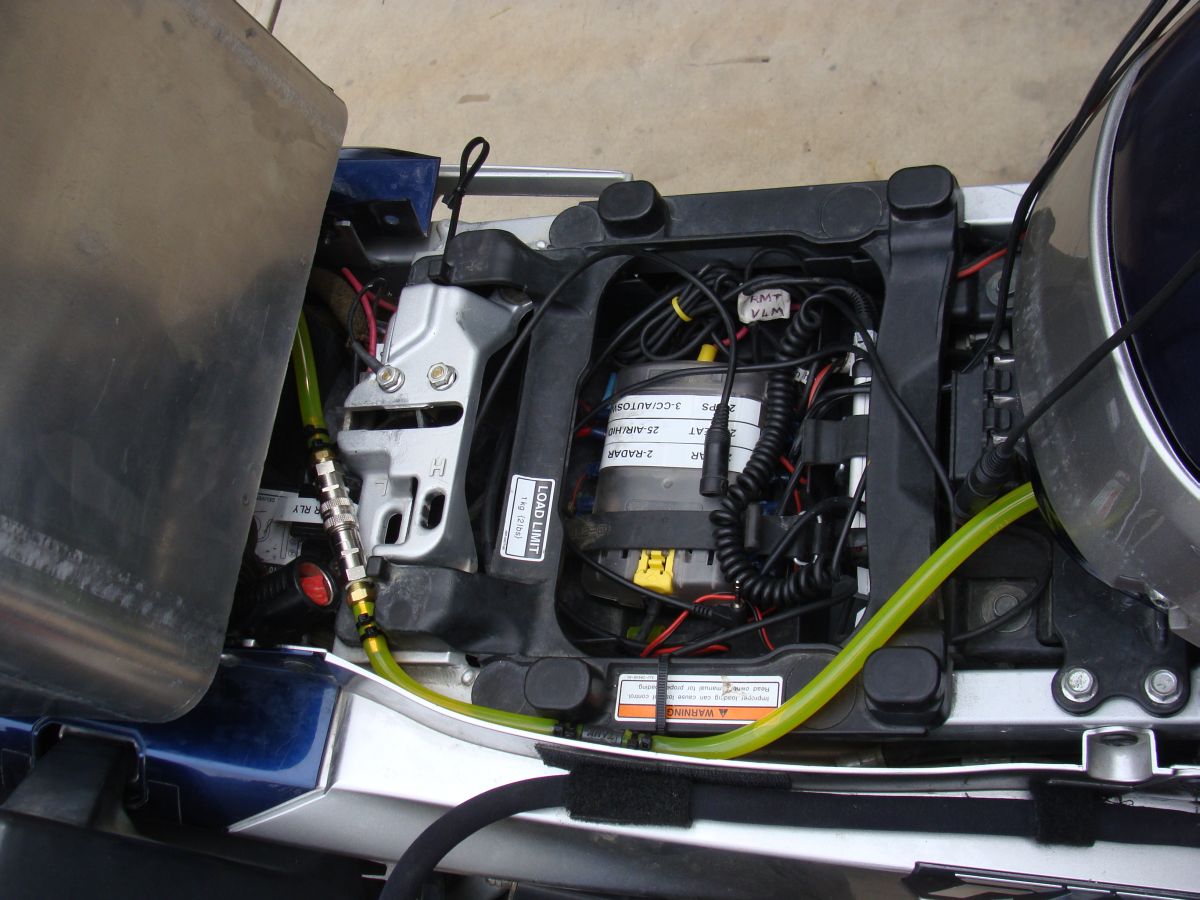
It sealed no problem with 2 small zip ties.
Walked away :) Is it really crashing if you don't fall down?--
Posted 07 April 2010 - 06:53 PM
Okie-Dokie then, aux tank drain put to the test today!
Rode till dry, aux tank feeding main tank. Made it 56.5 miles before the main was empty. Looked in the aux tank, just a little tiny splash of gas left, maybe *maybe* a cup full. With bike on side stand, pressurized the aux tank by applying a SkooterG BlowJob () and after only seconds heard air bubbles in the main tank.I was running 65-75 on the freeway then 45-85 on back roads for this test.
In other words, the aux tank drained fabulously!
Actually, I was really surprised the aux tank drained as well as it did. Dare I say even better than the proven 'standard' tank design?
I'll summarize better tomorrow, list part numbers and what not, but given that I'm running:
- 1/4" line (not 5/16)
- a one way check valve
I'm really happy with the results!
Excellent Mr. Joe2Lmaker, Excellent!
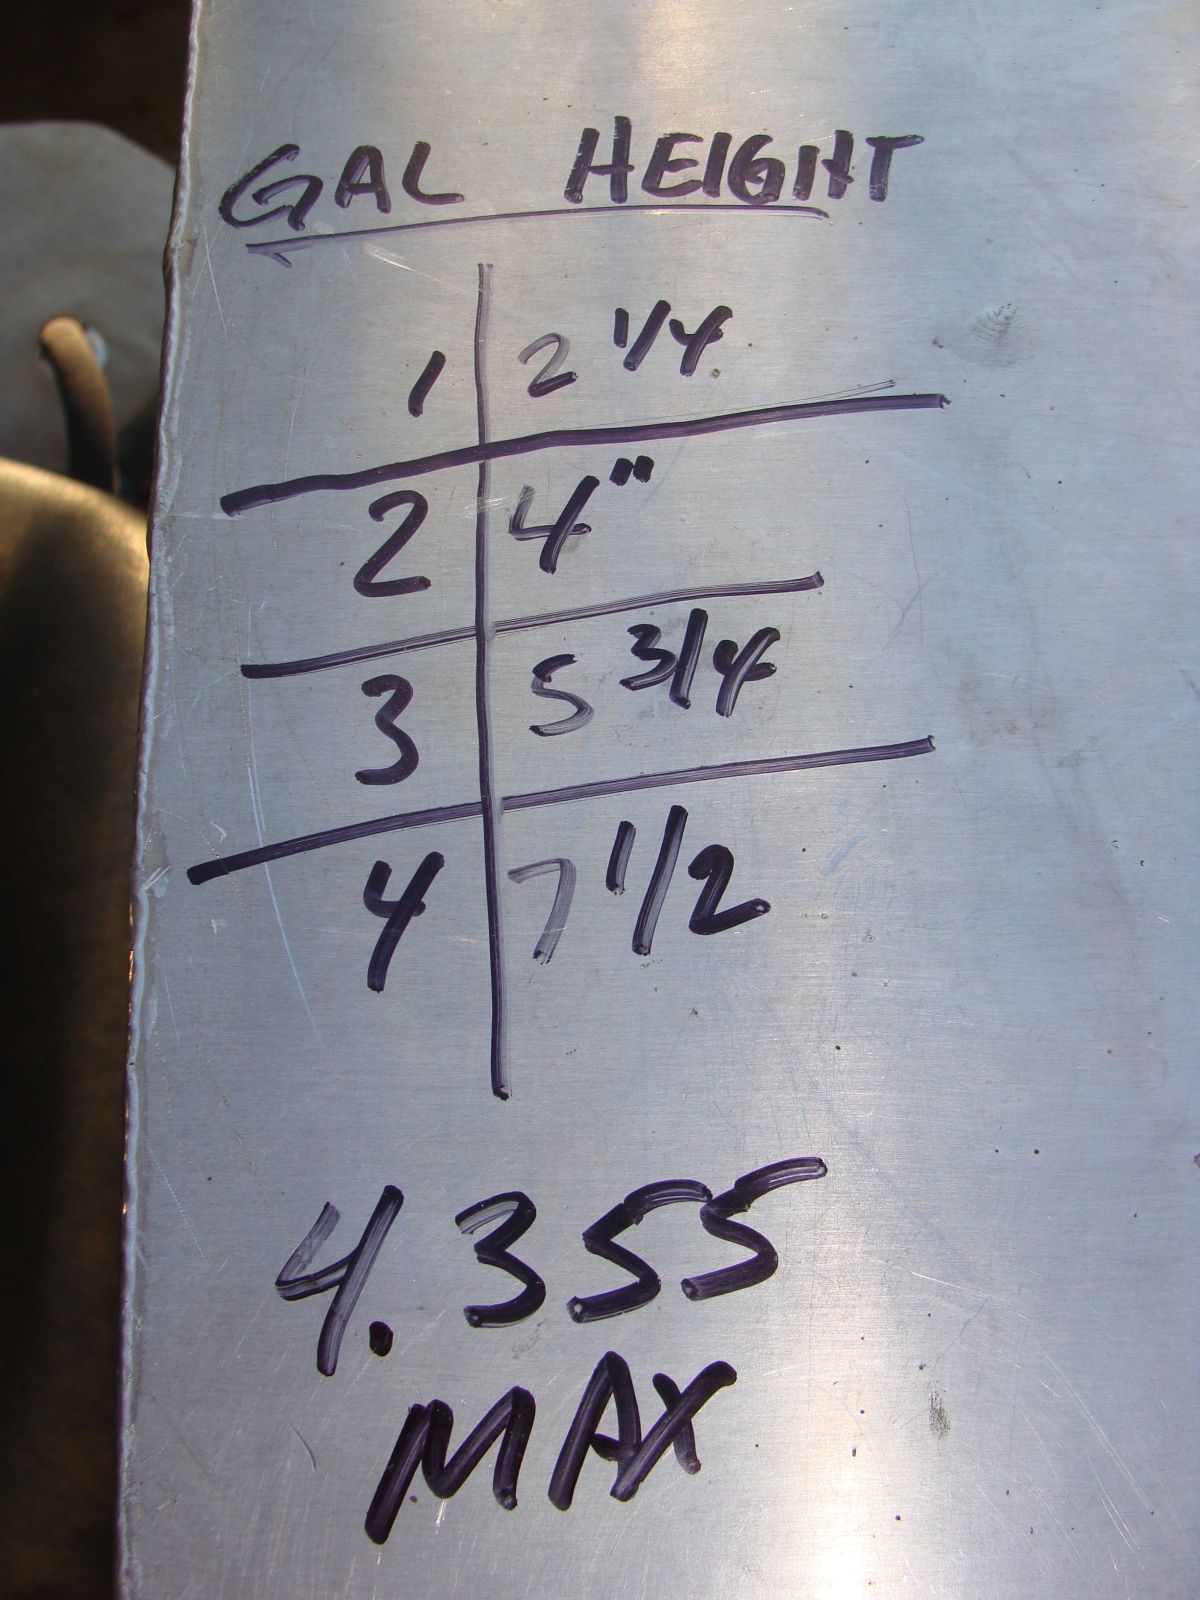
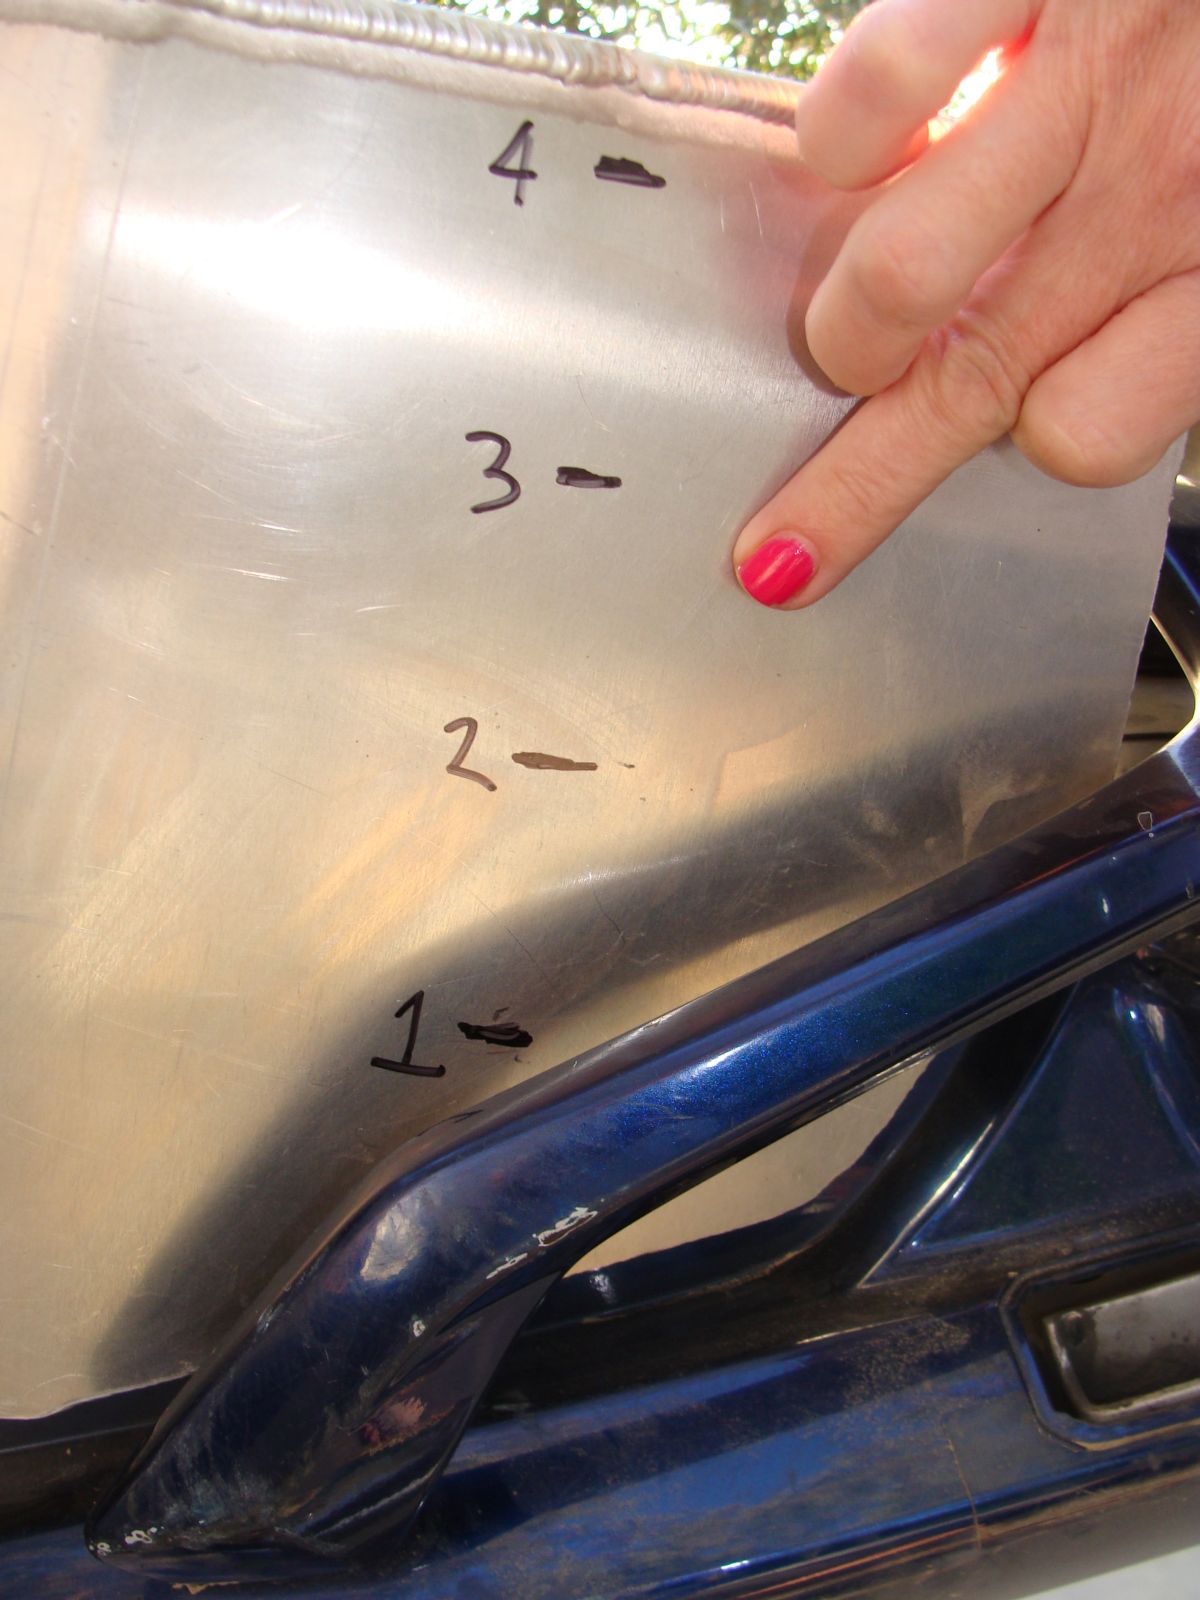
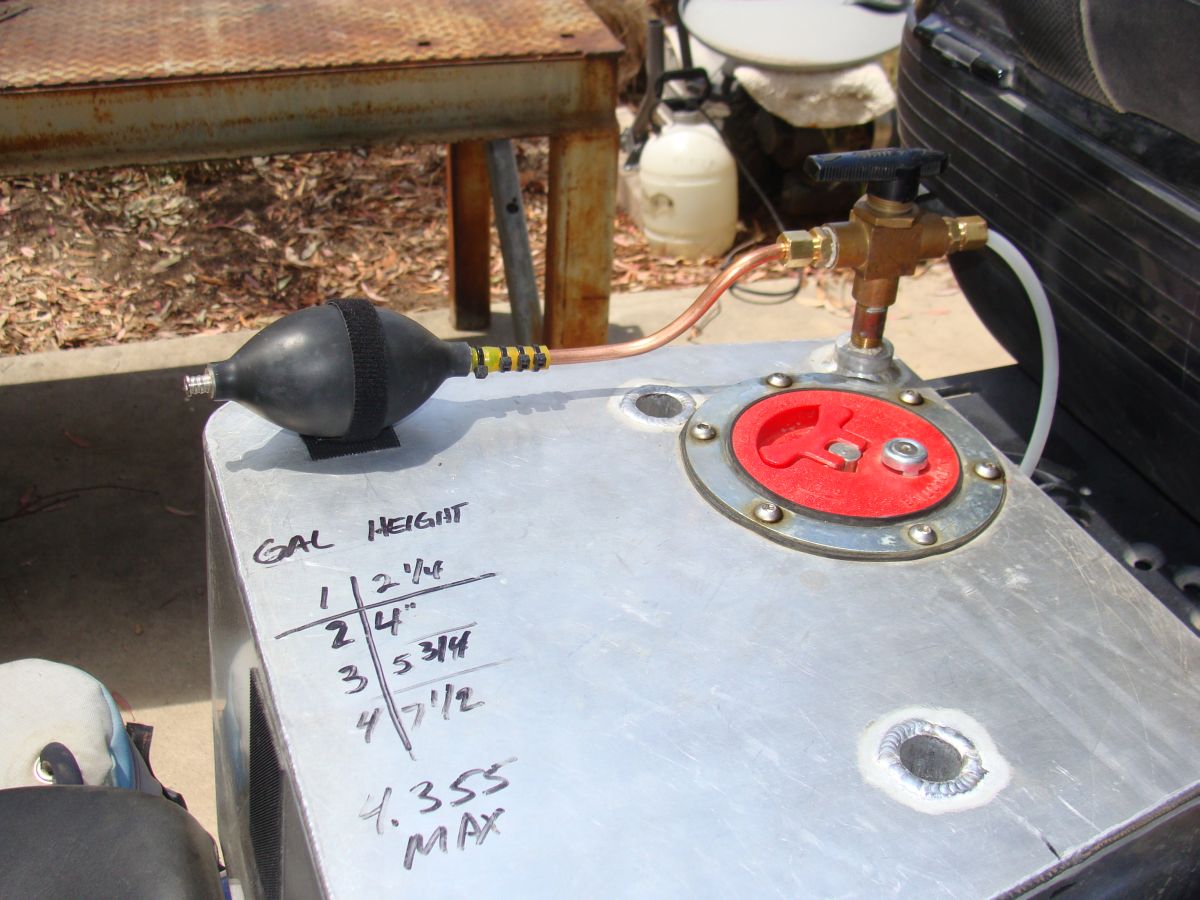
Tomorrow I'll fill the completely dry aux tank and mark each gallon's level point. I think it would be handy to have a crude 'gauge', based upon a dip stick, of gallons remaining based on tank level.
PS - a lesson learned too... If'n yer going to do a test like this, and you're carrying a 1 measly gallon of replacement fuel, don't be taking 'the long way' home that's more than about, oh, say, 35 miles where there is no gas available? I did some quick mental calcs (my Zumo is in for repair) and suddenly realized... oh shit, I'm past range! When I hit the driveway, it was surging and sputtering... 
Walked away :) Is it really crashing if you don't fall down?--
Posted 08 April 2010 - 07:20 PM
Level versus Gallons measurements..
Walked away :) Is it really crashing if you don't fall down?--
Posted 09 April 2010 - 05:17 AM
Yeah, I was surprised too. Tank was bone dry when starting, full to the brim when done. Maybe Chevron at Foothill is having a rebate program?

Did you compensate volume loss attributed to the two bolt shaft tunnel thingies?
WTF?

A half gallon short? Now I have to calculate volume using specific gravity?
I'll call the fab shop and tell 'em to hold everything.
Let you know what I find...
(I'm not sure we can trust a guy who paints his middle finger before flipping us off) 
Walked away :) Is it really crashing if you don't fall down?--
Posted 09 April 2010 - 02:59 PM
Another update -
- I had to remove my trick 1-way valve. It was weeping.
- I also replaced the Tygon line with regular line. When I proudly showed my tech the aux tank, and line, he said, "Uhh, I really recommend you replace the plastic line. When it gets hot, it swells and causes problems." Sure enough the end at the tank exit valve was already flaring. I had also noticed that some brand new Tygon line fit 'tighter' than my 1 week old line. So the Tygon is gone. Damn, SkooterG was right. Too bad, that stuff is sweet for routing and looking at air bubbles.
- I bought 10 feet of Gates and Goodyear 1/4" line. The Goodyear bends much tighter than the Gates.
- The Gates has a smaller ID - I have on barb, off the valve, that's undersized as compared to all other barbs. With the Goodyear hose, it was loosy-goosy. The Gates was a nice tight fit.. oooooh yeahhh.
Ok, I ain't done yet! I can't stand it. I'm off to town - 35 miles RT, to fill that aux tank again. This time, with Pix!
Walked away :) Is it really crashing if you don't fall down?--
Posted 09 April 2010 - 04:24 PM
All righty then.. round two of capacity testing.
Nearly empty tank - less than 1/8" at bottom (did not apply SkooterG BlowJob this time). Rather, had tank off bike, siphoned out then drained out.
Fuel pump at zero!
Aux tank full! (centerstand, level)
BTW - wiggled the bike, no level change.
And the final gallons - very close to last time of 4.335 IIRC? Uhh, what's work out to, 0.05 gal delta between measurements?
Don't know what to think other than -
- Are you sure they built the tank to your exact specs?
- Are you sure you're calculating volume on tank *interior* not *exterior walls?
- Me, I don't know. What I do know is that my tank holds very close to 4.3 gallons. Should I ask for a refund? Or a spare plastic 1/2 gallon tank? I mean, geesh, when I'm running the next Candy Butt Association rally, I need a full 11.1 gallons, damn nab it!!
It will be curious to see what your tank actually holds, and I'm willing to take measurements of mine based upon your drawings. But not right now, I have weeds to mow!
Walked away :) Is it really crashing if you don't fall down?--
Posted 09 April 2010 - 04:28 PM
I think I've figured it out.
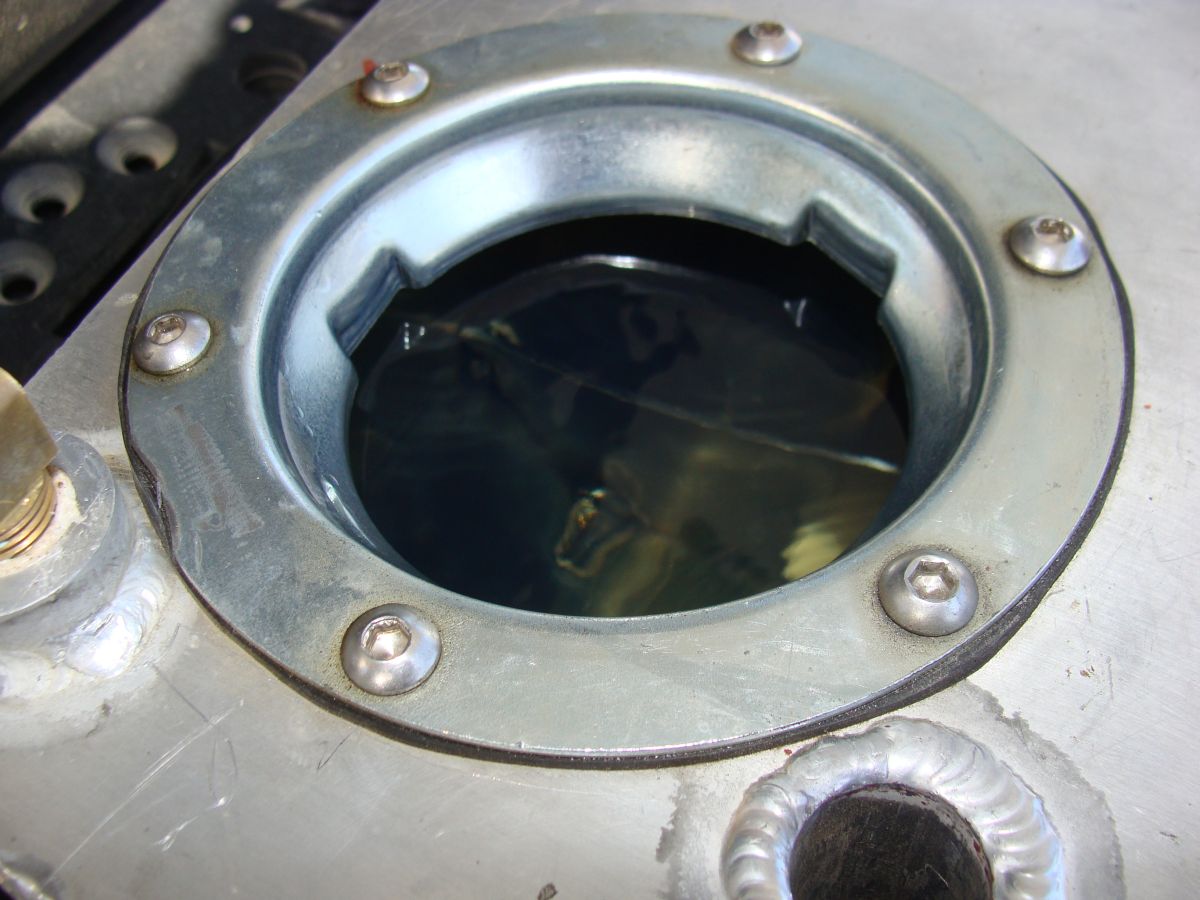
It's the cap assembly. It sits down about 1/2" into tank, making that area 'unfillable'. Tanks with a filler neck could fill the entire volume, and my money says that would gain about .5 gallons.
What do you think?
Walked away :) Is it really crashing if you don't fall down?--
Posted 09 April 2010 - 04:34 PM
That's it.
The JAZ flush mount fill cap doesn't allow you to fill to capacity.
Hhhmmm
Solution? Would you like me to make you a spacer to raise the flush mount cap?
Posted 12 April 2010 - 11:33 AM
Walked away :) Is it really crashing if you don't fall down?--
Posted 13 April 2010 - 11:02 AM
I'm checking into check valves now, pun intended!
Didn't see anything possible from McMaster Carr.
Have email pending with microchek.
Walked away :) Is it really crashing if you don't fall down?--
Posted 07 May 2010 - 08:07 PM
So I've been prototyping a pressurized TAT system to force aux fuel to the main tank. I just put it together tonight, in true 'use what you got' fashion.. and tested. I completely drained the TAT to main tank in 16 minutes with the main tank fuel cap closed. I'll post more after I test it mananna in the real world.
Walked away :) Is it really crashing if you don't fall down?--
Posted 09 May 2010 - 04:35 PM
This needed to be done by 8:30 AM Thursday morning.
I didn't have it done. It cost me a trip to Florida.
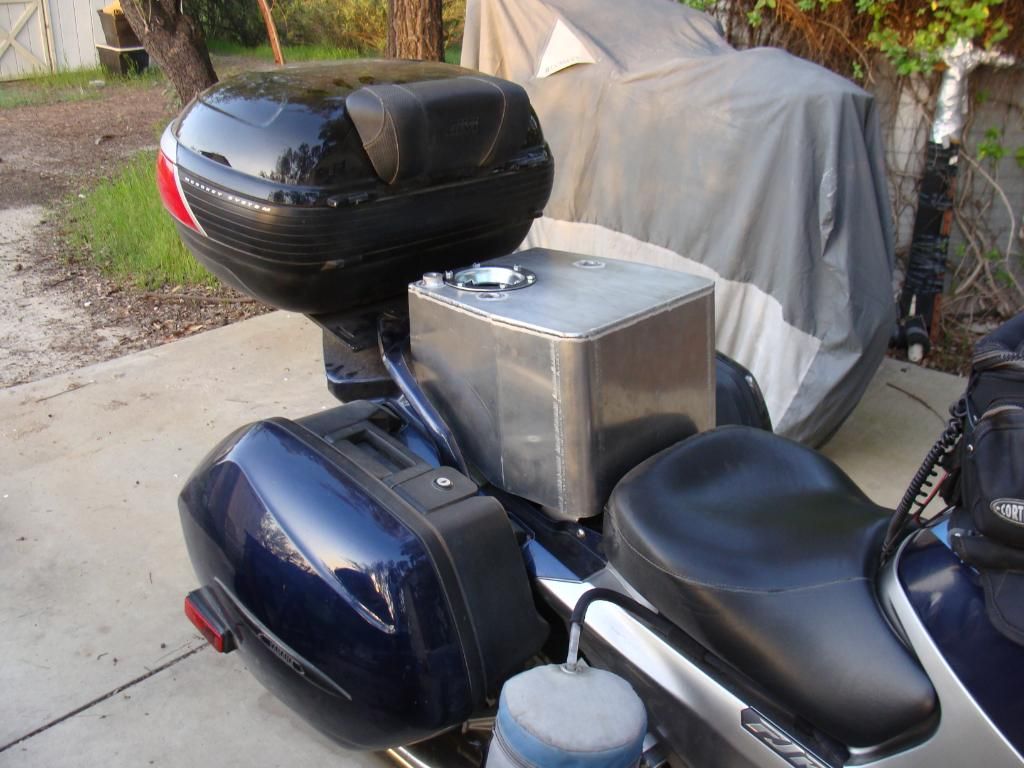
Here is S/N 2, finished, finally:
See that little "S" curve in the copper tubing? Don pointed out that the prototypes are a little difficult to plumb. "I've got a solution for that. I'm a toolmaker after all", said the loud, proud voice in my head.
Here are the first attempts at that solution:
My faithful tubing bender couldn't quite make the sharp bends necessary. "I've got a solution for that. I'm a toolmaker after all", said the loud, proud voice in my head.
I worked out the dimensions and figured out what size rollers would work.
It looks complicated. But, "I've got a solution for that. I'm a toolmaker after all", said the loud, proud voice in my head.
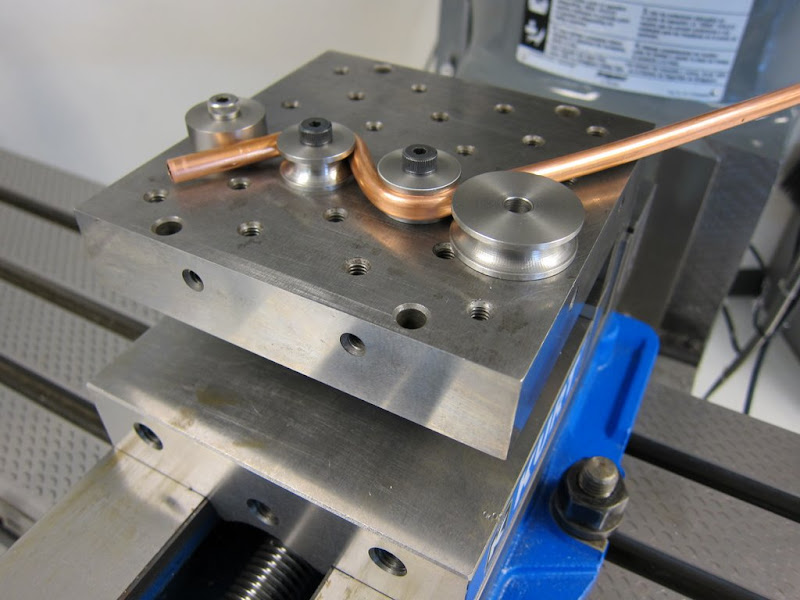
Here it is:
 - -
- - 
"Thank God it's finished", said a quieter, humbler voice in my head.
Posted 10 May 2010 - 05:37 PM
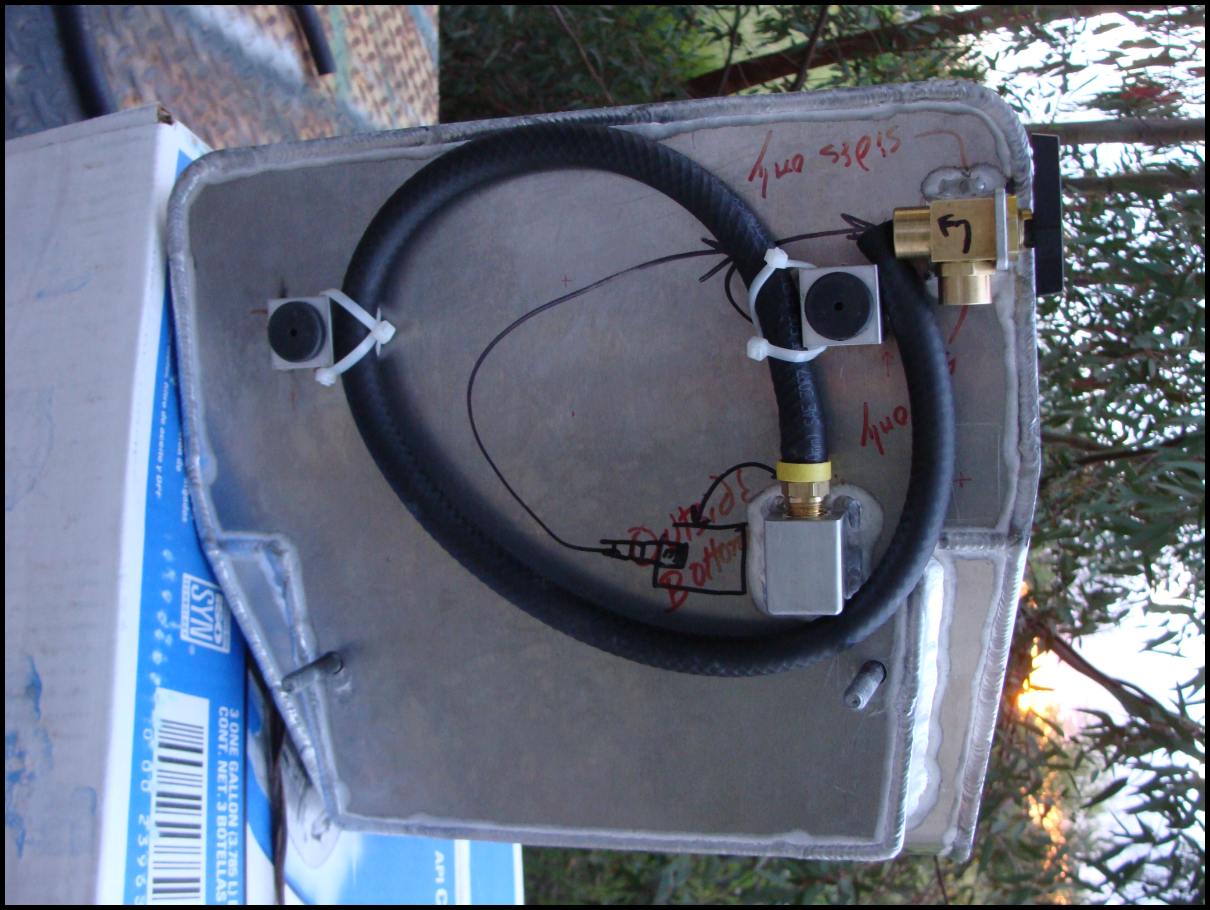
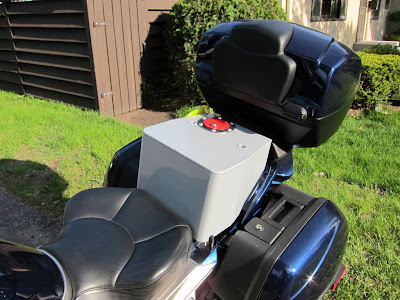
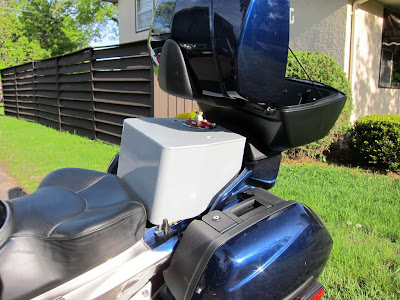
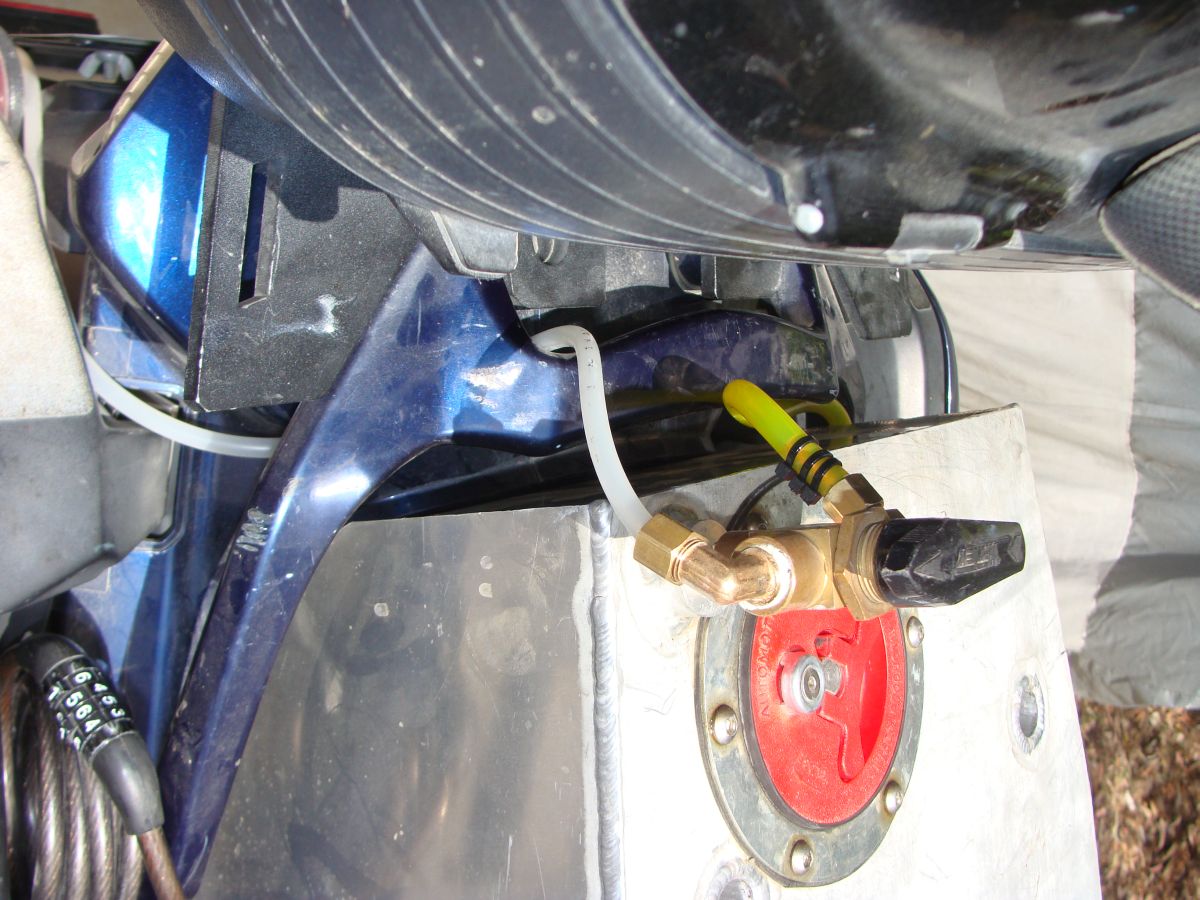
OK, the pressurized tank proof-of-concept solution. One two-way valve. Position 1 vents as normal. Position 2 closes vent path, opens path to pressurizer bulb (from a blood pressure cuff). The bulb provides more than enough pressure (inches of water, no problem of stressing the tank) that pushes fuel from TAT to main tank. It works really, really well.
Now for the next to final install.. I want to buy a valve with npt threads in order to reduce valve height. I found a shorter nipples, shown below. As is, it clears the Givi back rest, but want a cleaner look. Additionally, after I get a Lynda or other cover, the bulb will be inside a pocket.
Oh, the overall reason for pressurizing the tank is to A) quickly displace fuel from TAT to main,  more importantly, when both main and TAT are close to reserve levels, I want to move all TAT fuel up front. That way I KNOW exactly how many miles I have left. Otherwise, knowing me, I'd think 'WTFO, I *should* have some left in the TAT, it will be OK." But since I've not found a low pressure pop-off check valve, if running uphill, you can actually drain the main back to the TAT. This way, fuel levels are a known constant, not a variable. And for a CandyButt Association Rider like me, that's very important you know.
Relocated the bulb so I can access it when riding..
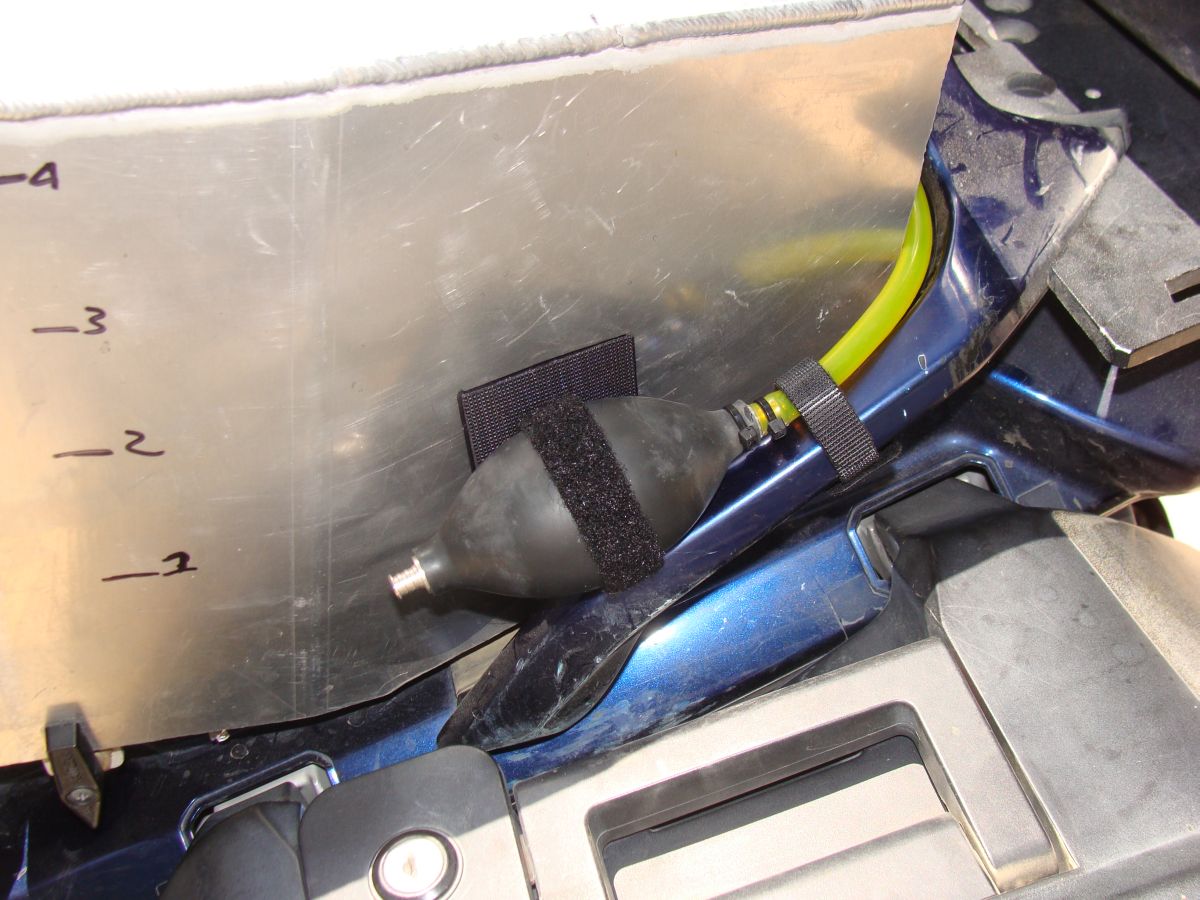
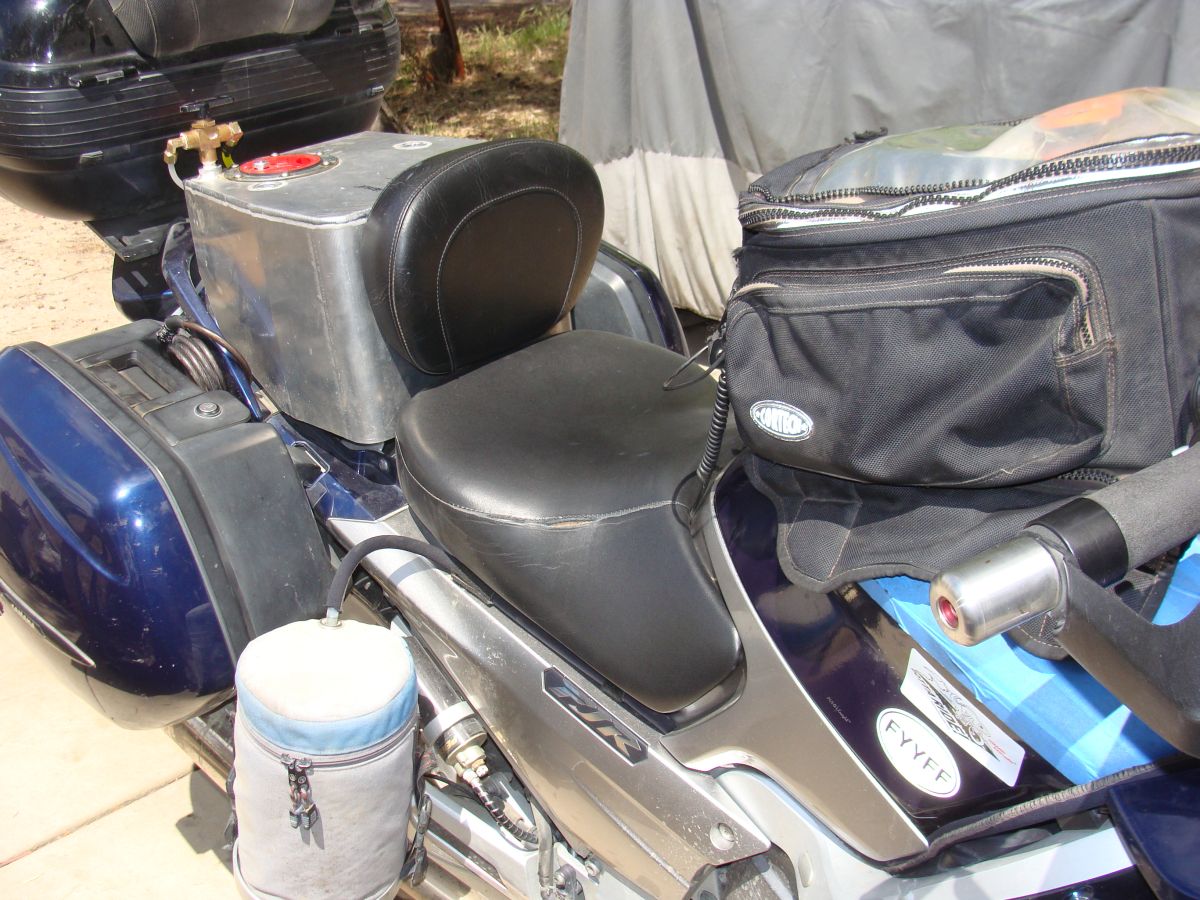
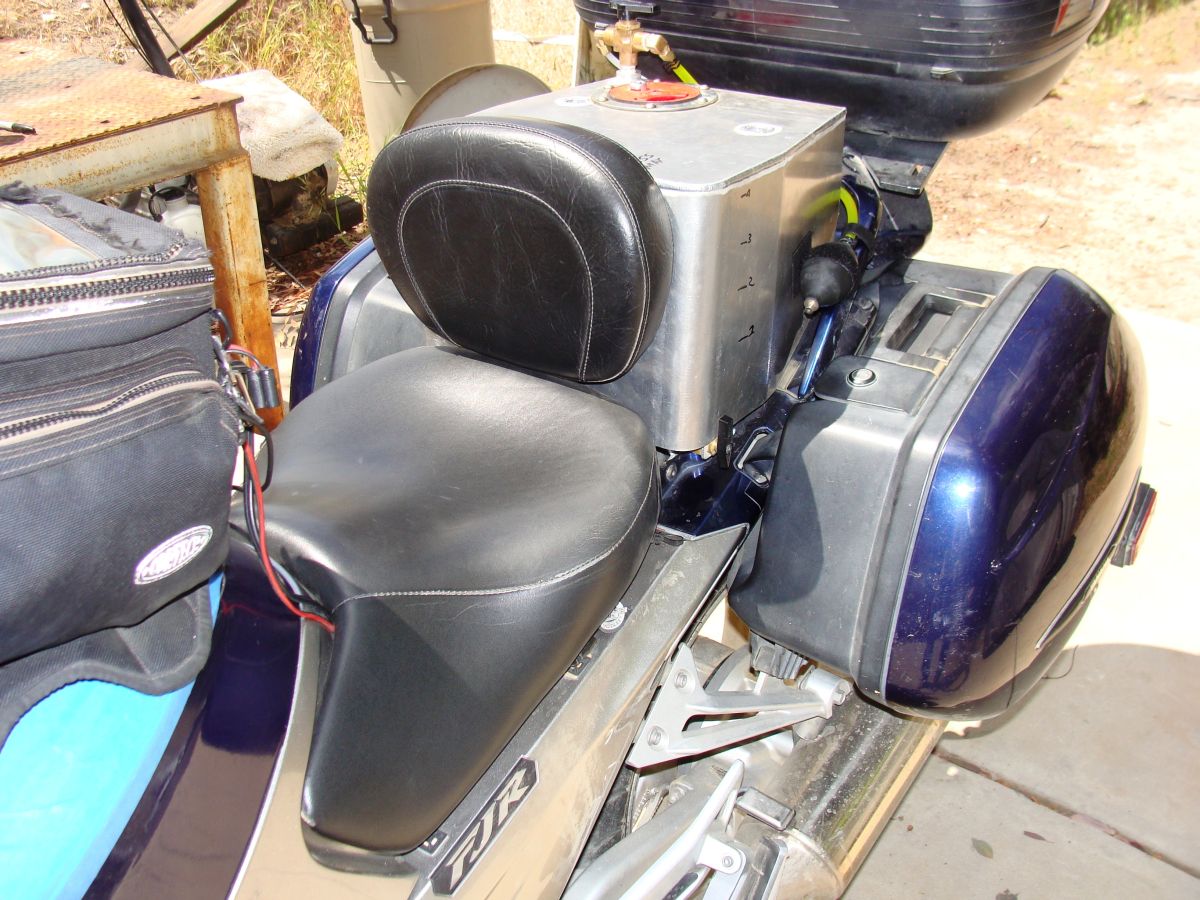
Added a back rest - here's the views. The back rest needs be cut down by at least 50% to provide seat room, but the concept works. Currently, I'm using Velcro. After determining the correct thickness, I'll fab and weld an adjustable rail to the tank so I can raise and lower it, and hopefully even have the pad articulate vertical position.
BTW - I hit a MAJOR pot hole last Saturday while on a goat trail - lost focus, was watching a huge RedTail hawk with dinner in the claws.. Nailed that pothole square, rear tire off the ground, magnetic tank bag flying loose, feet off the pegs kind of ride - and TAT did just fine. Thankfully, so did the front rim.
Walked away :) Is it really crashing if you don't fall down?--

