- Home
- Forums
- Ride Reports
- MotoBikes
- Restorations
- Wrenching
- 1963 BMW R69s
- 1969 BMW R60/2
- 1978 Yamaha 125
- 1979 KZ1300
- 1979 Kz1300 - Bob's Beauty
- 1981 CBX SuperSport
- 1981 Kz1300 Model A3 - Chocolatie
- 1984 Ford F250 XL
- 1987 ATK
- 1987 MowieMowie
- 1987 RotoTiller
- 1988 Honda Accord Lxi
- 1990 BMW RT100 - Barrie
- 1991 Harley Davidson FLHTCU
- 1992 Johnnie Deere
- 2000 YZ426
- 2002 Dodge Ram
- 2006 Carson RacerX Trailer
- 2006 Host Camper
- 2006 KrZy8
- 2007 Wabs
- 2012 KTM 690R
- 2013 Naomi - FJR 1300
- 2014-08-01 Air Compressor - Sears
- 2017 Kioti
- 2018 Toy Hauler
- 2020 Honda Fit
- 2021 Miscellaneous
- 2024 Log Splitter
- 2024 NeoDyne MC Lift
- 2050 test
- Lil Trlr
- Eats
- RIP
- PC Not
- Cages
- Test
- FJRF Best
- For Sale
Candy Butt Association
World's Wimpiest Riders

Theme by Danetsoft and Danang Probo Sayekti inspired by Maksimer
2011-11-03 KZ 1300 mechanic?
dcarver,,, hmmm, I guess I should know ya,,, especially since you list that you have a KraZee 1300. Zoom that thing by the shop one of these days. I just sold my KZ about two months ago. I need another one,,, or maybe,,, just maybe,,, if Suzuki brings that Stratosphere to the states.... Say, I wonder If I could just put a Kawasaki sticker on the gas tank?!?
Note to dcarver... I dropped you an e-mail. If you wish to call me at work (Marietta Motorsports) tomorrow, the number is 770-425-5252. Thanks And yes, I do know KZ1300s and your oil consumption was a common problem. The cylinders are not out of round. Thanks, Bill
Marietta Motorsports
1011 S. Marietta Pkwy
Suite 7
Marietta, GA 30060
(770) 425-5252
UPdate - Called Marietta Motorsports, Bill no longer works there - but got his cellie - number stored in protected area...
From fjrforum.com
2011-11-16 Pistons needed
Phone call from Bill, TurboDuck, he's having problems finding 1st oversized pistons for my 79 A1 KZ130
Found this - <clicky>
Since there are very little pistons available for the six-cylinder Z1300 e developed a NEW oversize PISTON-KIT for all A1-A7 engines. The kit contains 6 forged PISTONS from J.E. , 6 sets of springs and 6 piston-pins. We can deliver it in 1st oversize 63mm or even 2nd oversize 63,5mm !!! We are located in Holland, but can ship around the world. Hopefully you find it interesting enough to let your members know. For more info please contact us at: JSPP@WXS.NL
Sincerely, Jan Smit (www.jspp.nl) JAN SMIT POWER PARTS
Sent this email 11-17-2011
Hi Jan,
Saw your post here http://www.dreadsbikersite.com/Z1300/for_sale.htm which led me to your site –
Do you still have 1st oversize KZ1300 piston kits available?
If so, approximate cost?
I’m restoring my KZ, I live in California, USA.
Thanks Jan,
Don Carverhttp://candybutt.org/cba/node/180
2011-11-17 Wiseco
Left vmail with Tom Davis, of Wiseco. 1-800-321-1364 ext 3109. The first guy I spoke to indicated he thought they had built pistons for Z1 Enterprises under private label and if not they can build from scratch for me. Awaiting phone call back.
2011-11-17 Z1 Enterprises and Tom from Wiseco
Spoke with Rob from Z1 Enterprises -
2011-11-17 Parts Suppliers
MCG
Obere Str.8
89143 Blaubeuren
Germany
Tel +49-7344-21294
Fax: +49-7344-21399
email: mcg@...www.Z1300.de
2011-11-17 Extra alternator on my KZ
<Clicky>
This info was supplied by Don Carver, one of our members. Thanks Don! There are a few members that have one of these kits installed on their bikes. They were typically used on sidecar conversions and overseas models. This is all the information we have available on this conversion and these parts are not available anywhere that I'm aware of.
The best way to prevent problems with your existing alternator on any year 1300 is to cut the plug out where your stator wires connect to the voltage regulator & solder the wires back together for a better connection. The plug either gets a bad connection over time or won't carry enough current. Either way it burns up. I find that plug melted on most the bikes I come across, even on the ZN1300 Voyager models that come stock with a sub-alternator. Better to solder the wires & prevent the problem than to get stranded with charging problems or have to replace the stators often because of a bad connection.
The Voyager right side alternator covers won't fit a 79' - 81' model bike because they're shaped slightly different, so you can't use the right side Voyager alternators or covers on these year bikes. However, all 82' - 83' models have dual alternators and though the right side cover is shaped differently and wouldn't bolt to an older 79' - 81' engine, the left side sub-alternator cover will fit. It wouldn't work on an 81' because that year has the ignition pickups mounted on the left, but it will work on the left side of the 79' - 80' models. I know of at least one member who has mounted a left side Voyager alternator, cover and regulator on an 80' KZ1300 to give it dual alternators.
To do this conversion you'll need the whole left side assembly with the starter clutch and gear because the starter ring gear and idler gear are different from a KZ and must be swapped together. So you just need to swap everything from the left side of an 82' or newer KZ or ZN motor. It would even be better to get the Voyager starter too if you're using parts from a Voyager motor because the Voyager starters are 4-pole versus the 2-pole KZ starters and they have more starting torque.
The only issue in this conversion is the rotor bolt or crankshaft bolt that holds everything on to the end of the crankshaft. The 79' - 80' KZ bolt is a different diameter than the ZN bolt and most likely the 82' and up KZ bolt is also the larger diameter and they're also longer bolts. So you need a small diameter 79' - 80' KZ bolt that's longer and this is not a common bolt. As I recall this is a left hand thread so you'll end up having a custom fastener manufacturer make this. I'm sure this is a high strength heat treated bolt so it won't be a piece of cake to have one made.
Click on pix for full size
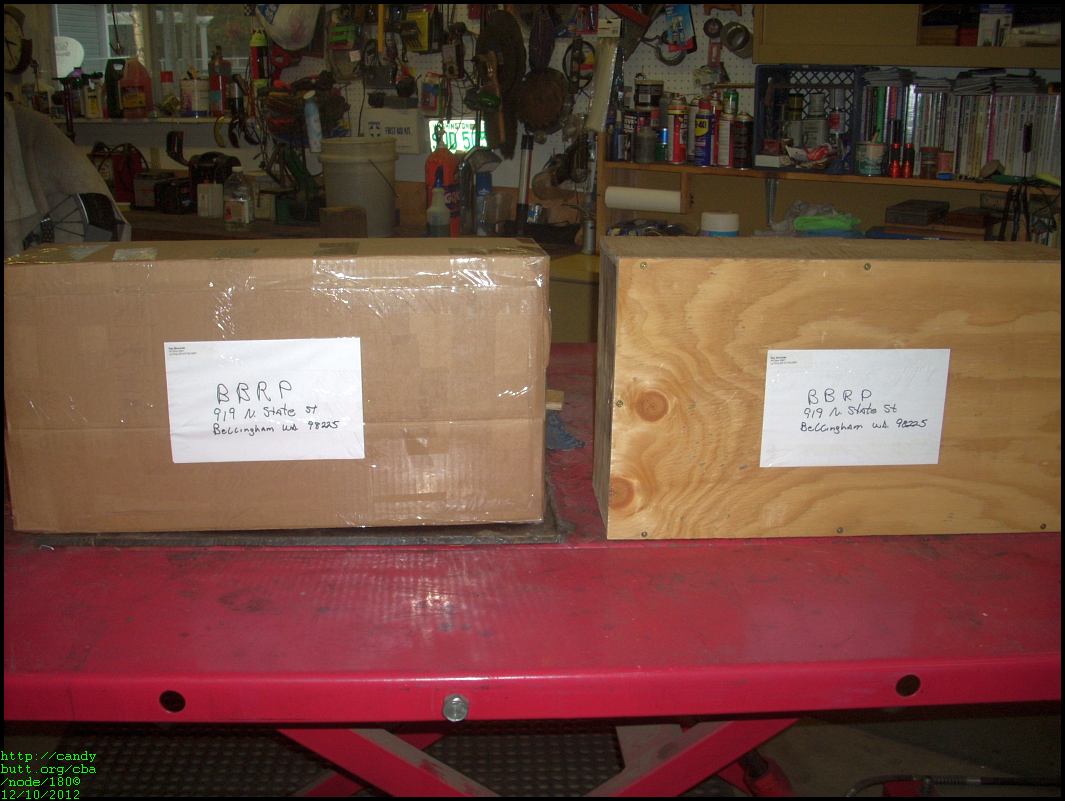
2011-12-27 - Found one on EBAY!
http://www.ebay.com/itm/79-80-Kawasaki-KZ1300-Sub-Alternator-Kit-RARE-Auxiliary-Alternator-/330654053656?hash=item4cfc847518&item=330654053656&pt=Motorcycles_Parts_Accessories&vxp=mtr
541-461-9279
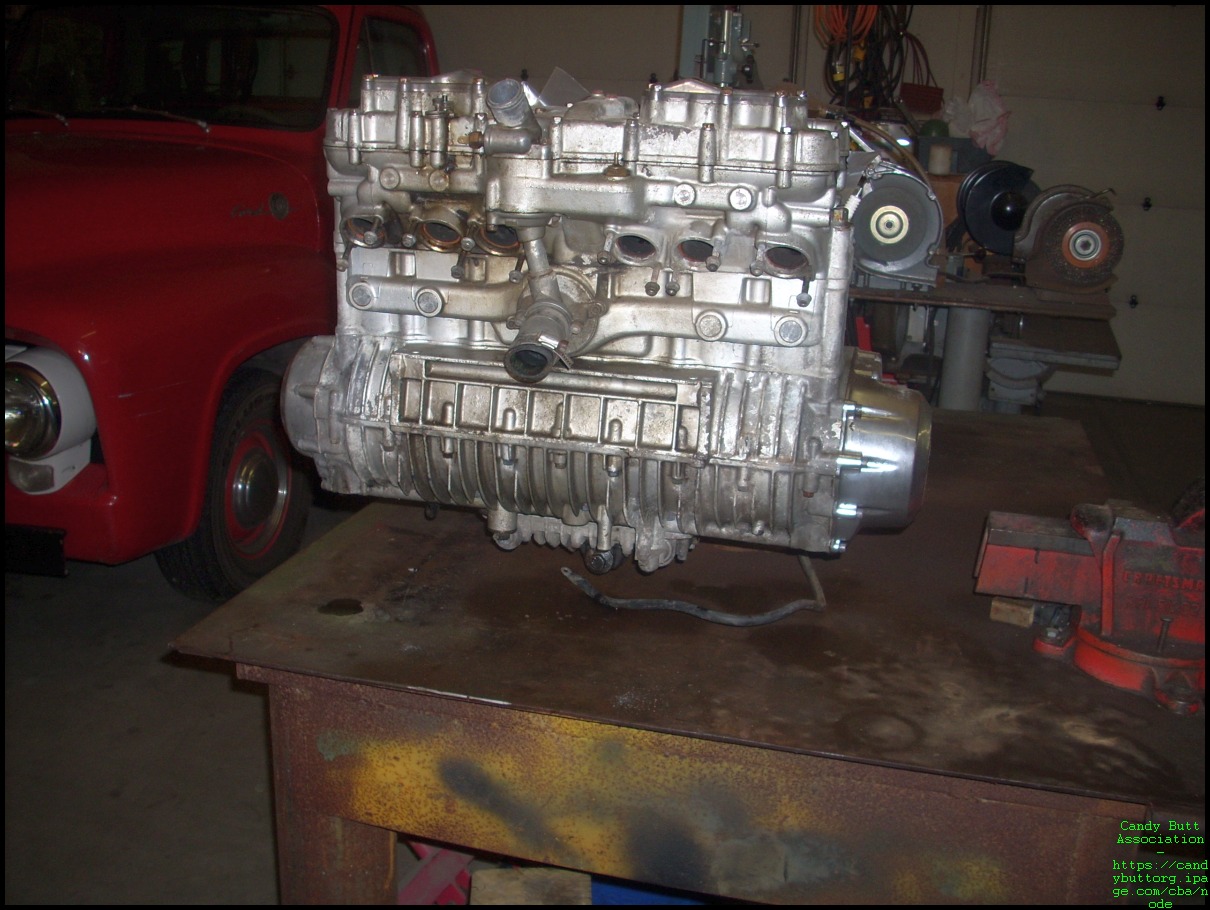
2011-11-17 Pix!
1979 KZ1300 A1
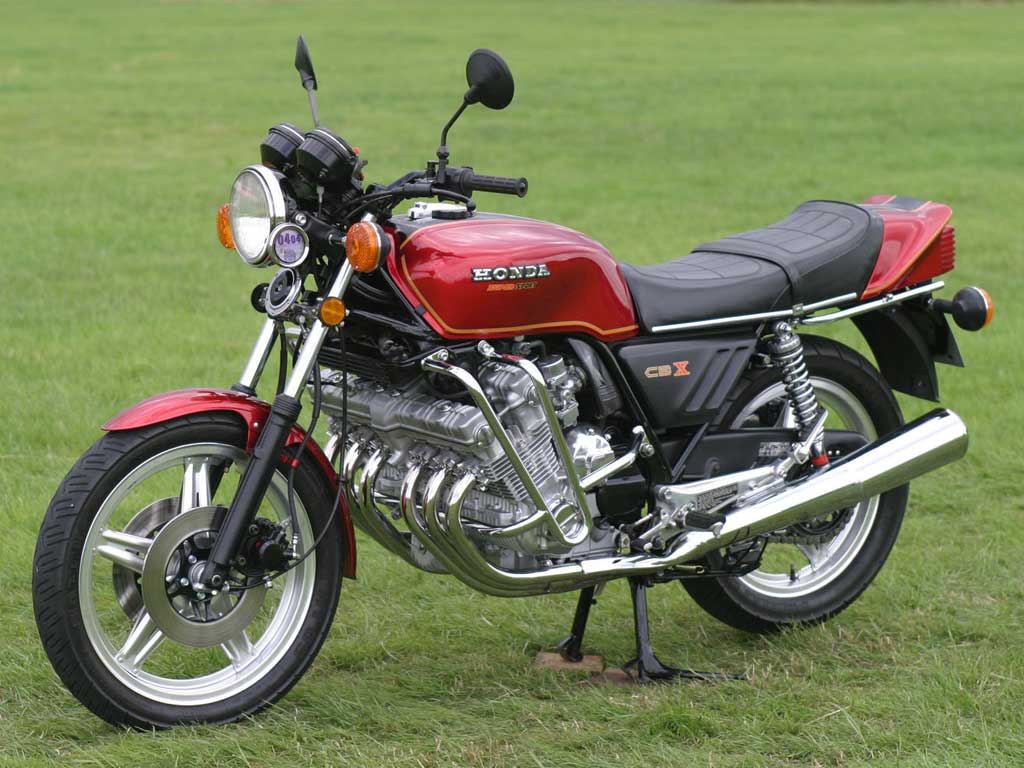
The mighty Honda CBX..
The Benelli 6

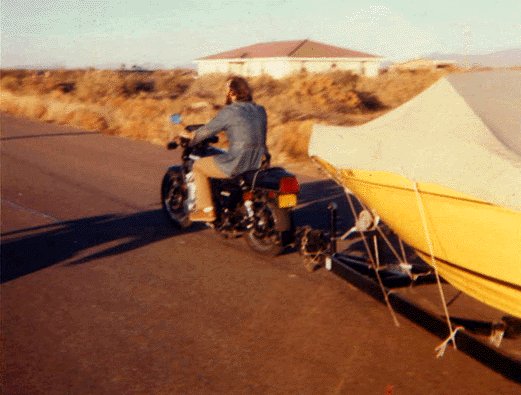
Some guy towing his boat with a KZ1300!
--
Pipes
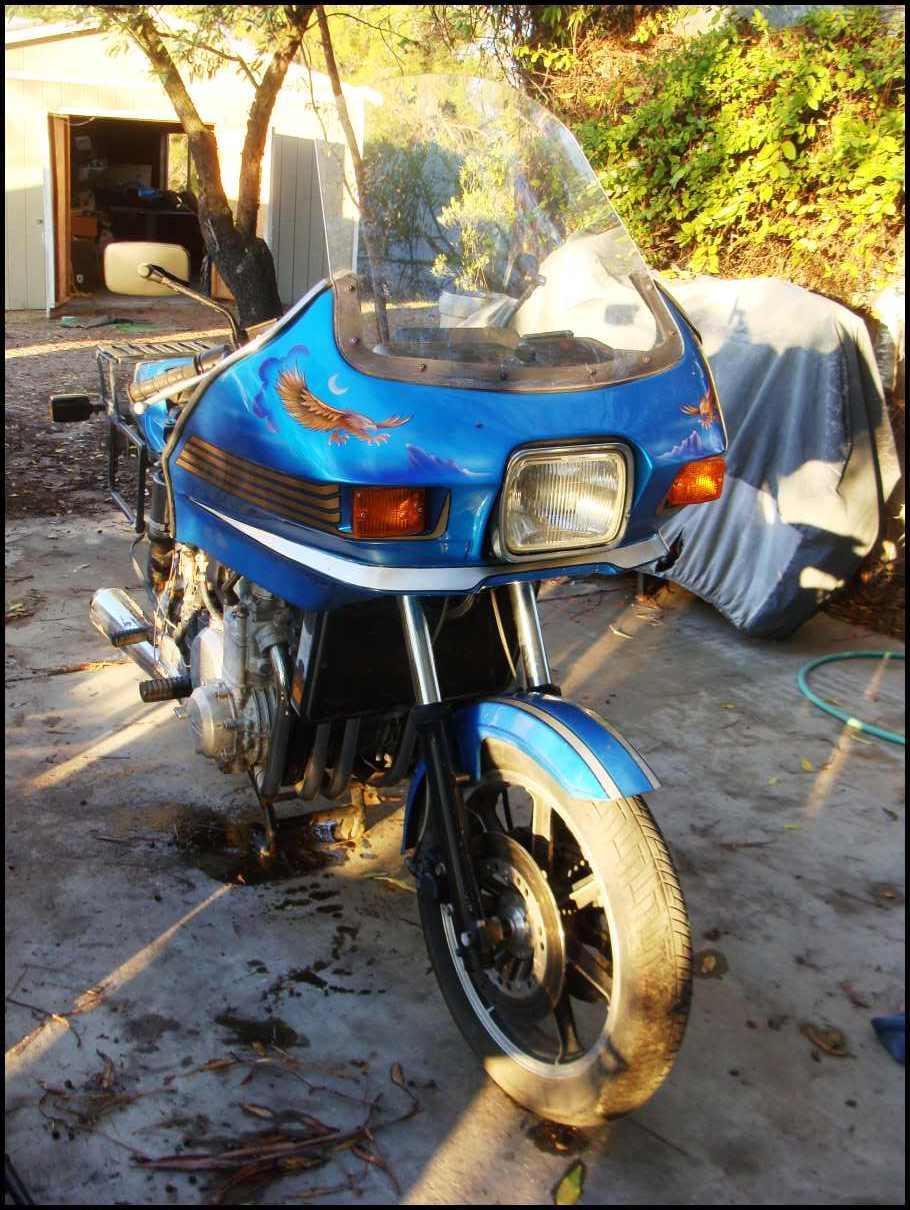
2011-11-20 Underway with pix
Tank exterios looks a lot better than tank interior.. Very gummy varnishy gas came out.
And the petcock is frozen, the petcock o-ring is toast, and my neighbor broke my *only* key in the gas cap..
At what level of restore do I want/can afford to go? Right now, this paint looks okie-dokie.
Slightly dissapointed in the mild corrosion on aluminum cases and what not.. but WTFO, it's been sitting since 1991?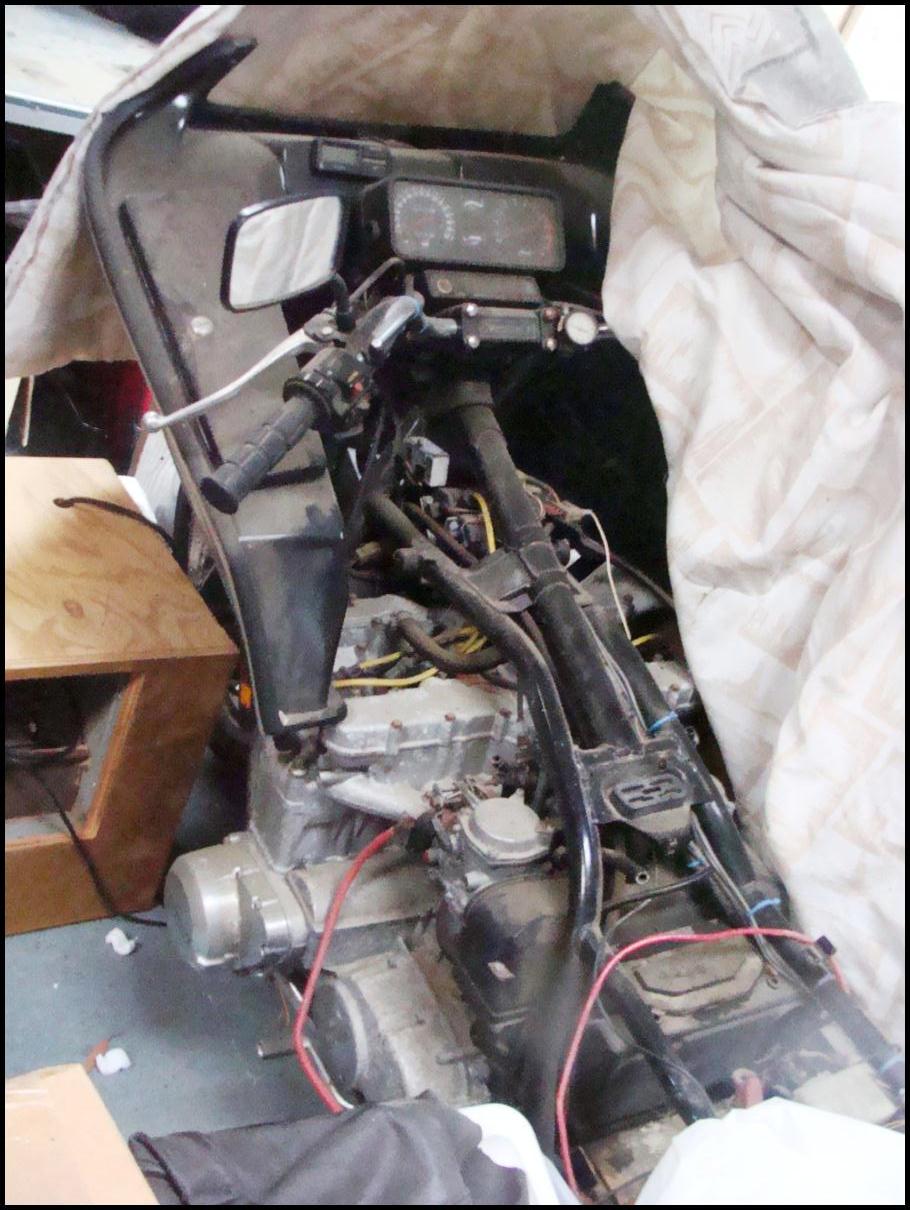
I paid over 1,000 USD for this paint job in '79...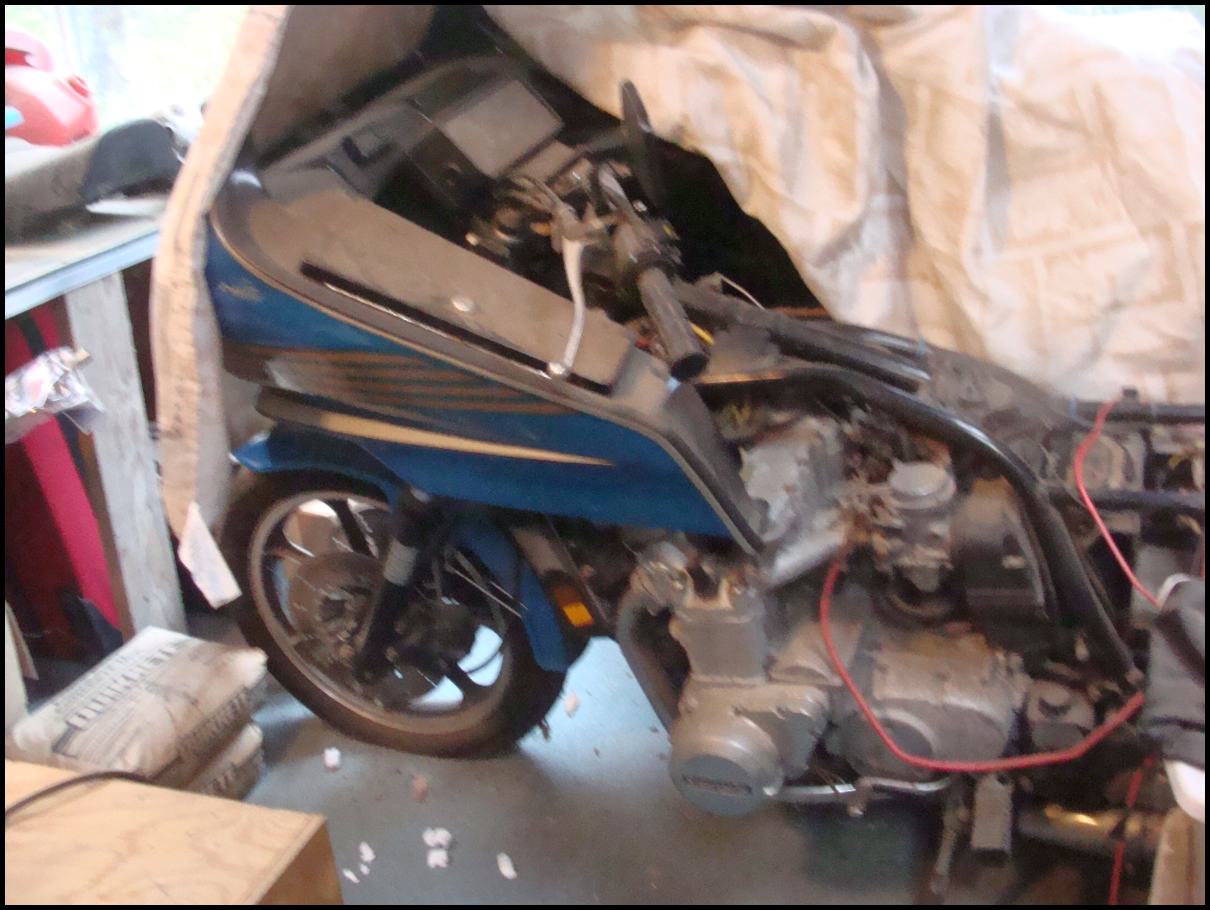
Very retro. yes?
The beast - dual overhead cam, trip-duece carbs, Accell ignition coil, and an oil burner - about a quart every 200 - 250 miles.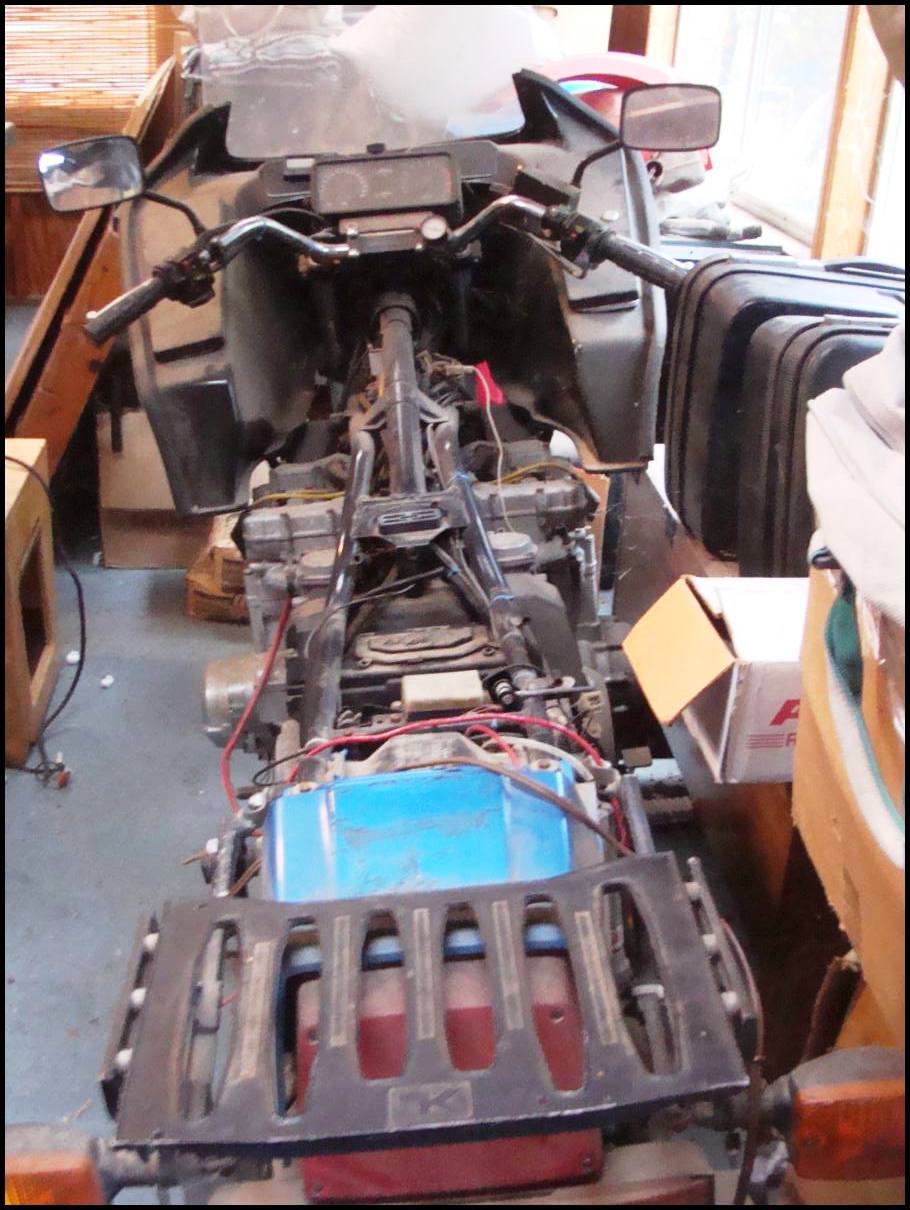
Apologies for the blurred pix - taken at sunset with a digi camera that the flash died..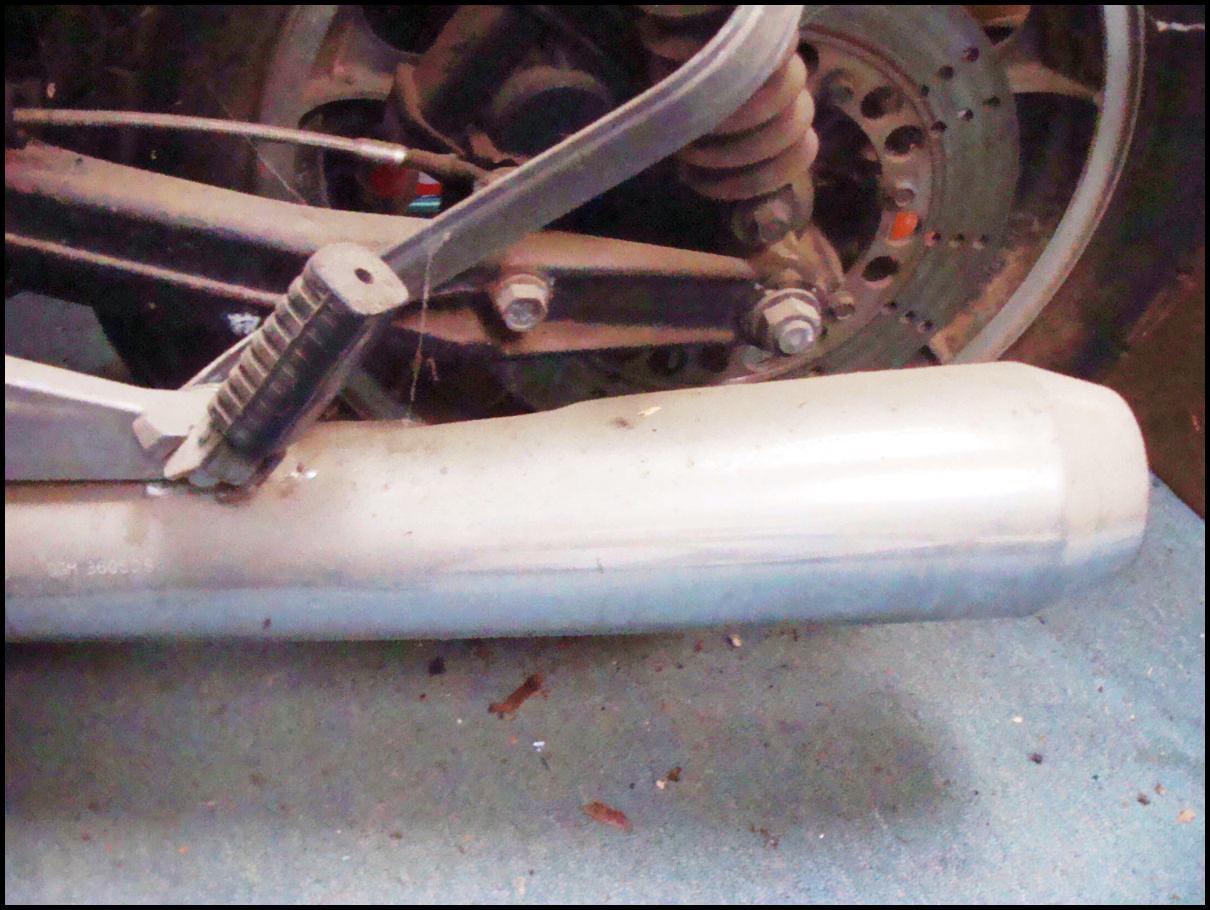
Mufflers to too bad - at least on exterio surfaces..
The 79 A1 KZ1300 had "Pair" devices like the FJR 1300 - a stupid and simple reed valve that I will cap off this time around.
Air shocks still holding air, or is the gauge frozen in place? Time will tell.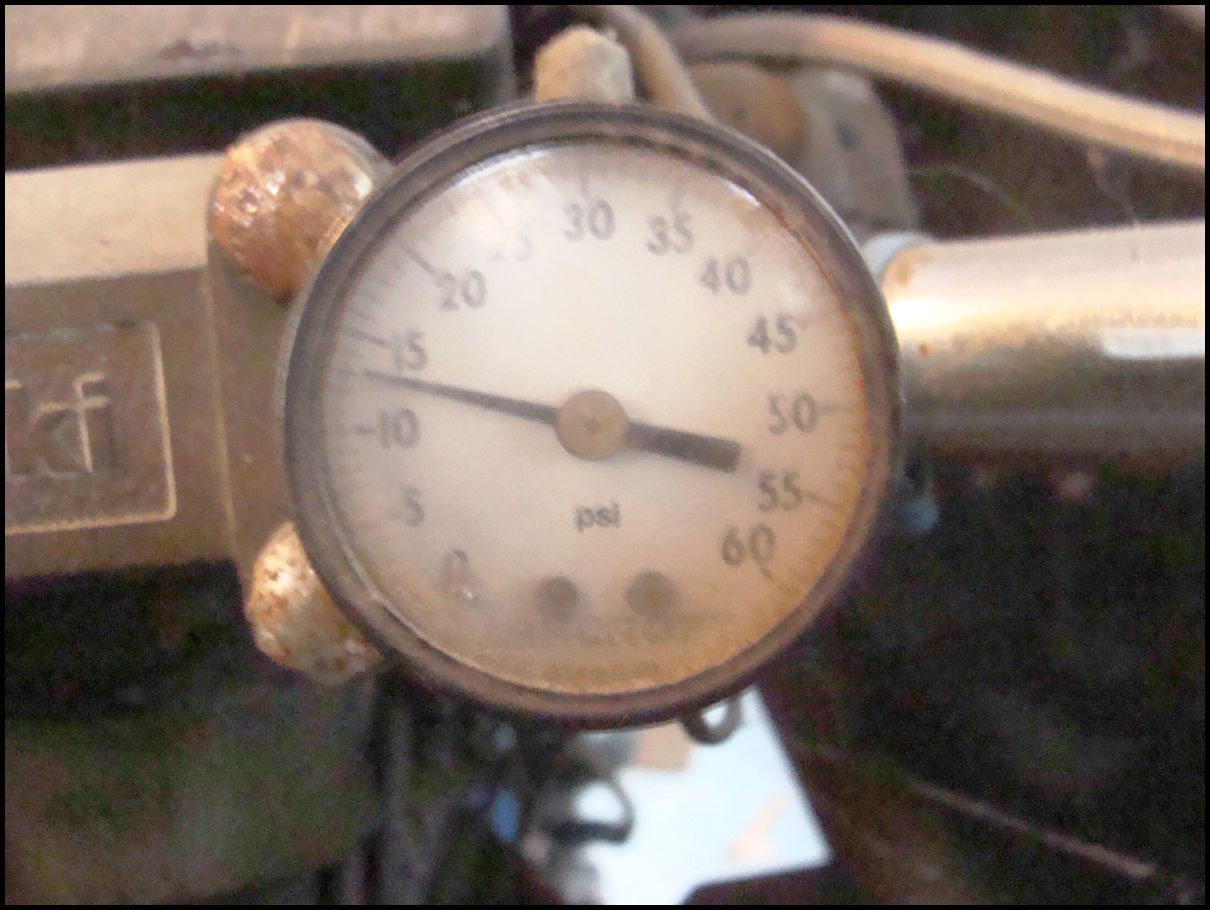
Another blurry shot.. that's ok, right now I need blurry shots - to keep the reality of the project out of focus..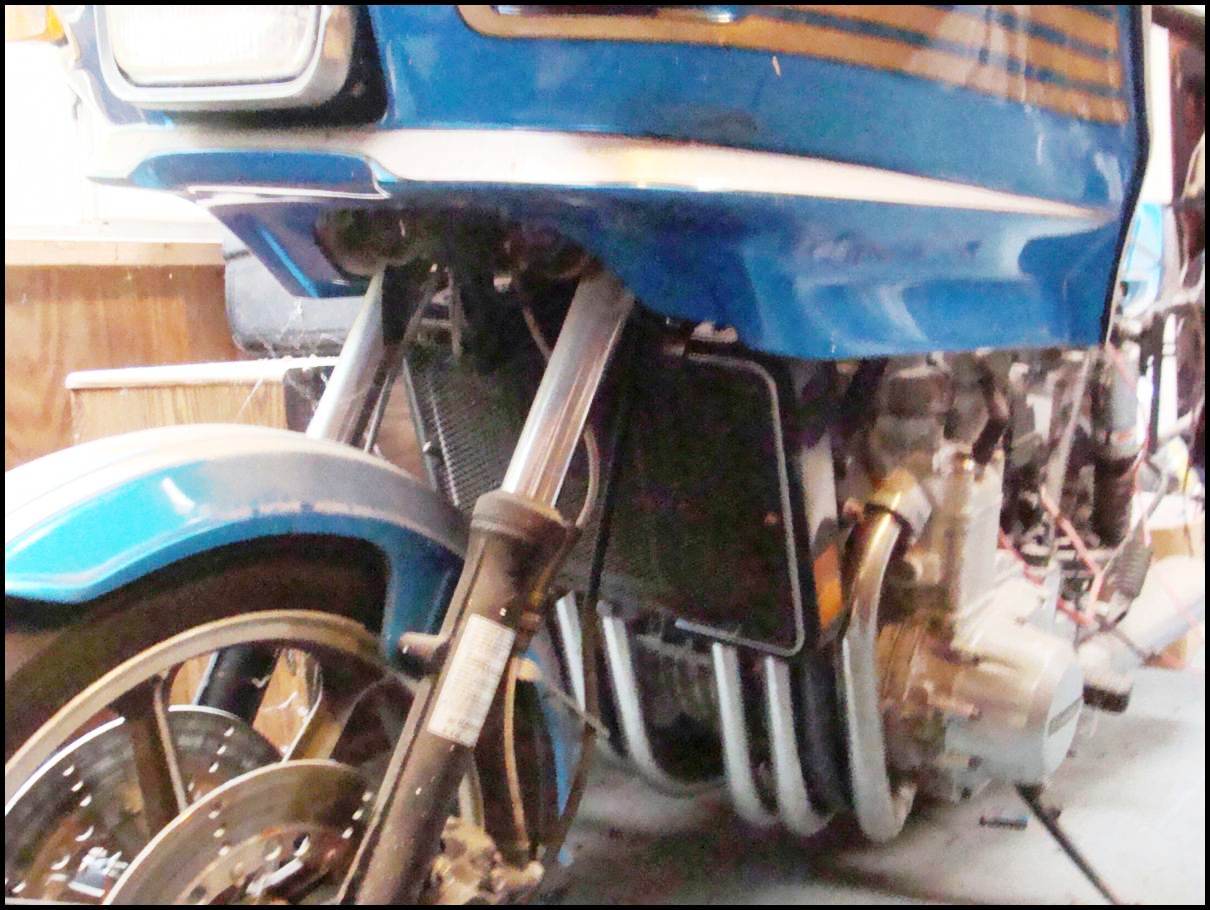
Krause 'Star' bags.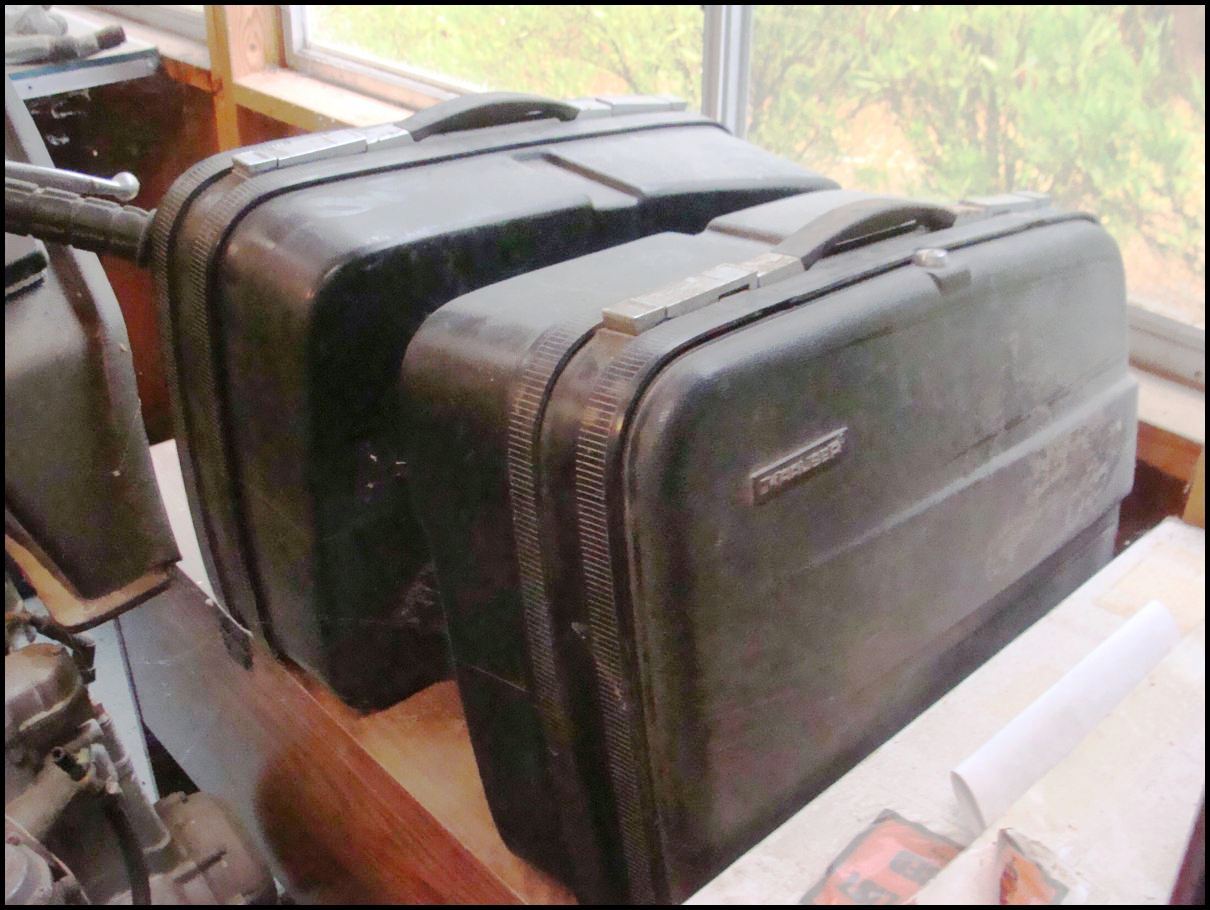
Under cover
2011-11-26 First bath and evaluation
Every project needs a deciding point. Continue or abandon? Based upon today's evaluation, this bike worthy of a resto. The oil came out clean, the plugs came out no problem, and the motor is not frozen. Better yet, she still throws a mean blue spark!
Before the bath.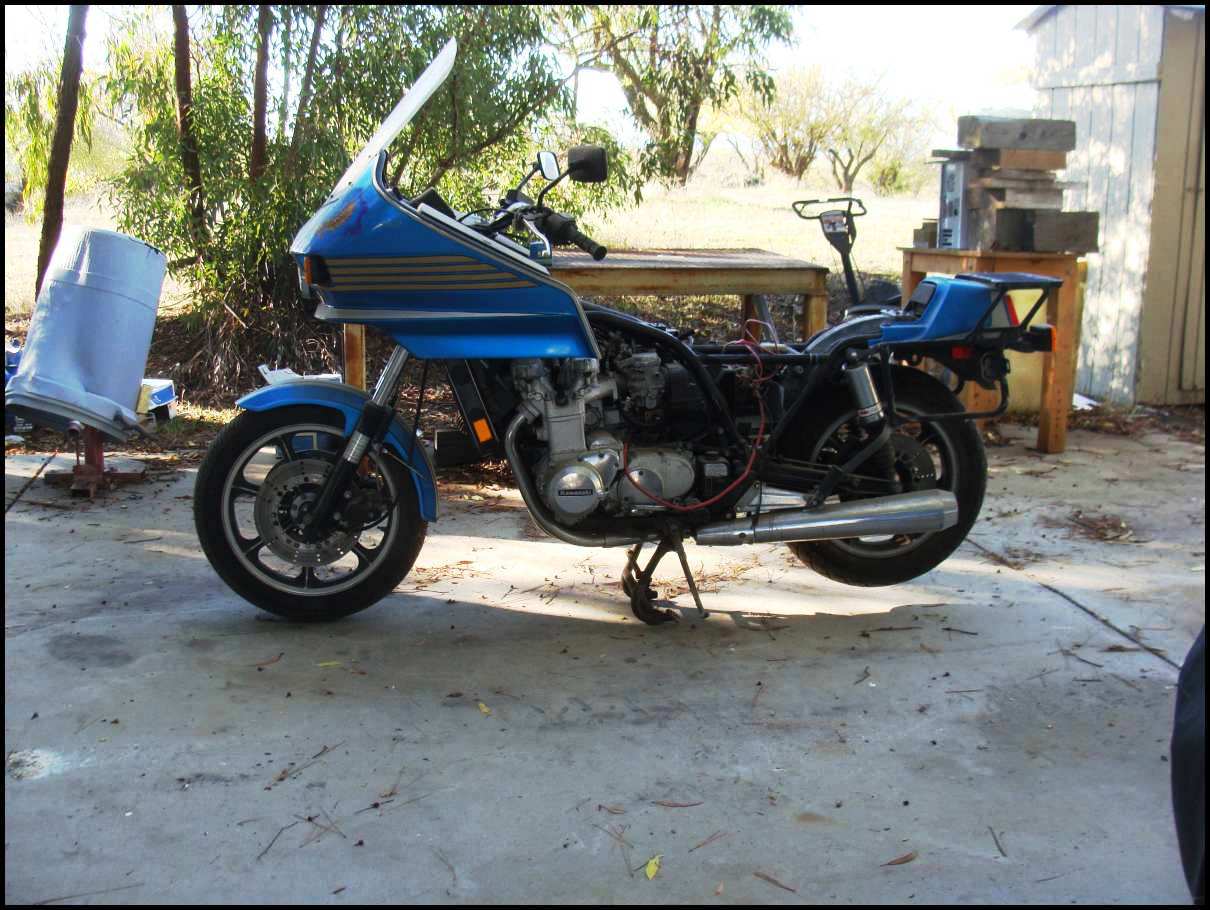
Leaky right fork seal.
I wonder where the moisture came from to rust and corrode the aluminum? I'ts been stored inside under a blankie the entire term.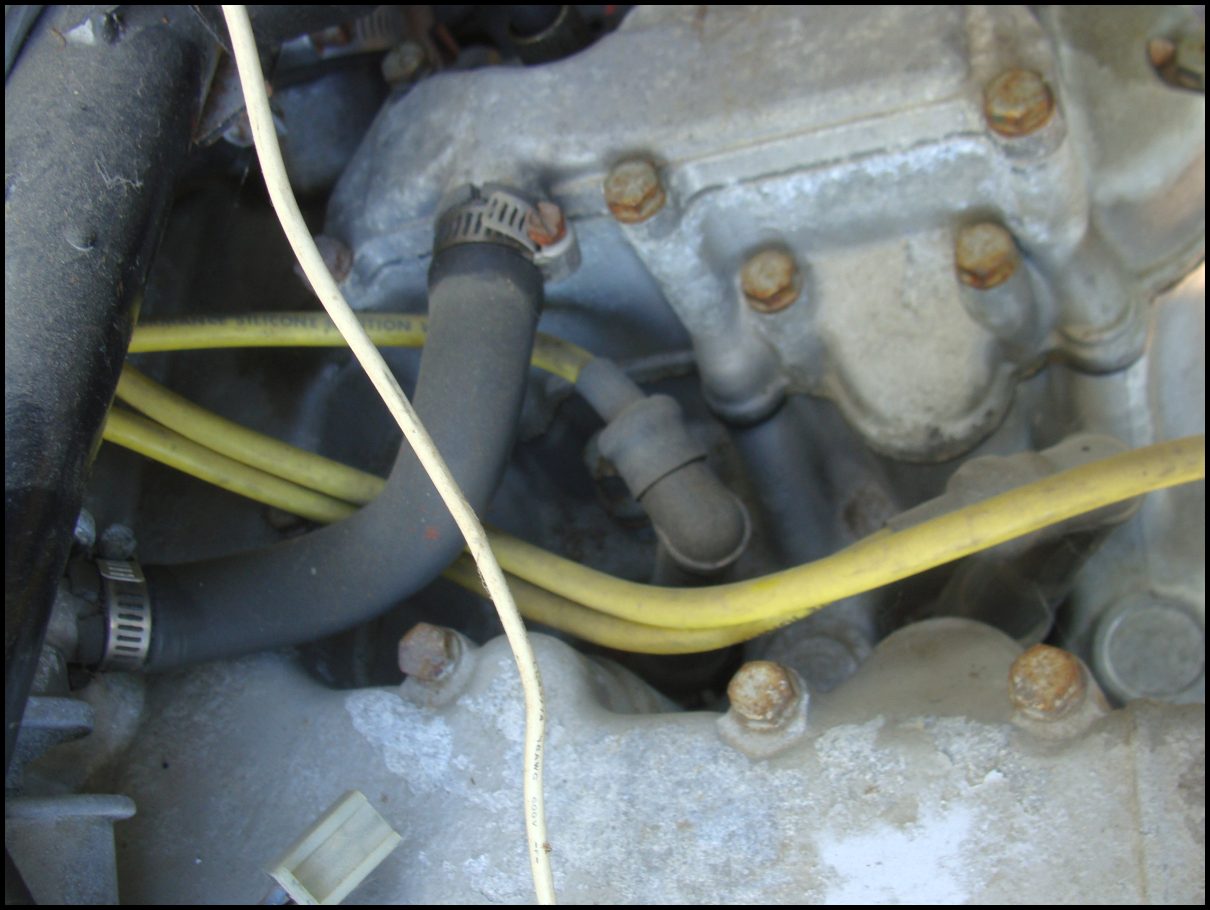
Aluminum corrosion. Argh.
Look at how huge the rear tail light is! The light below is Vodosky. It changes brillance and frequency based upon deceleraton.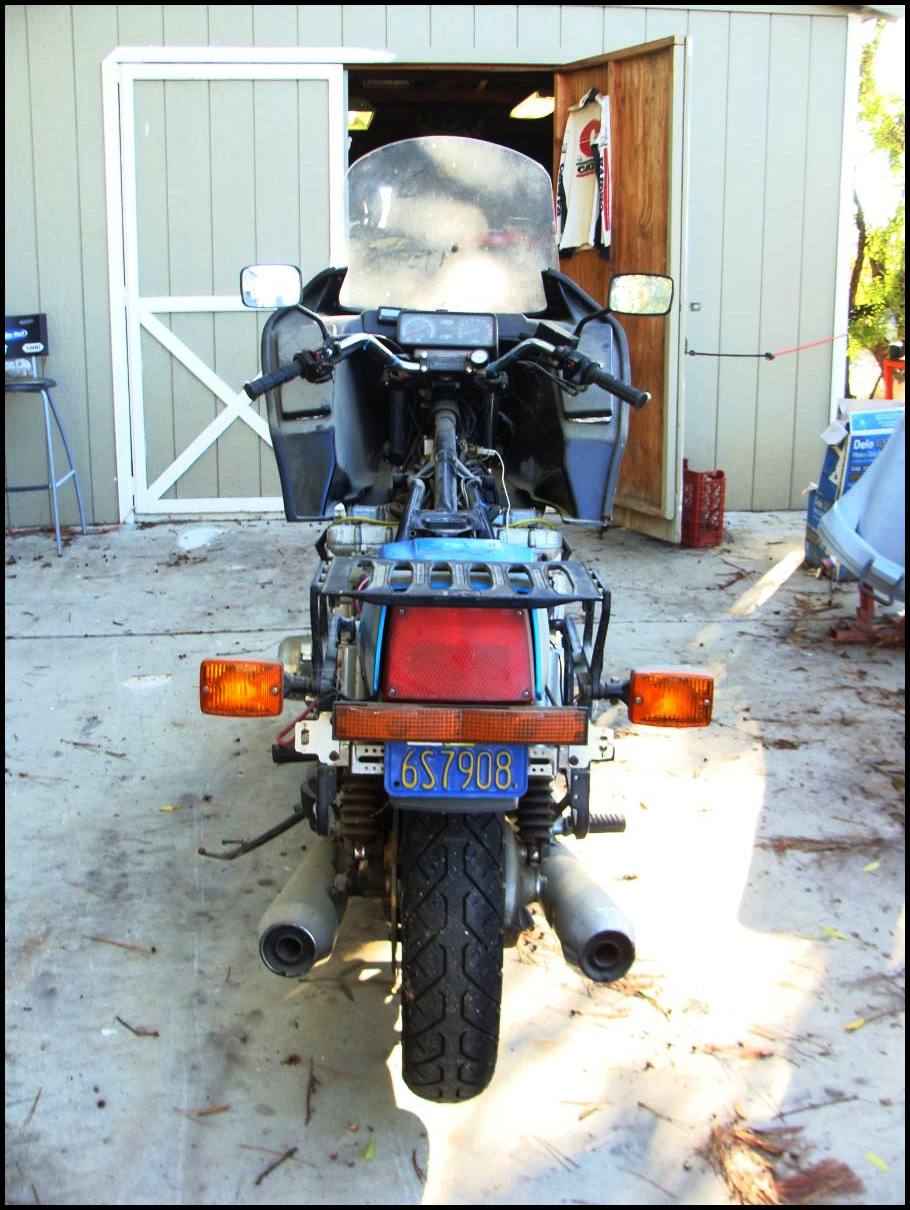
..yes, a black widow escaped from this area..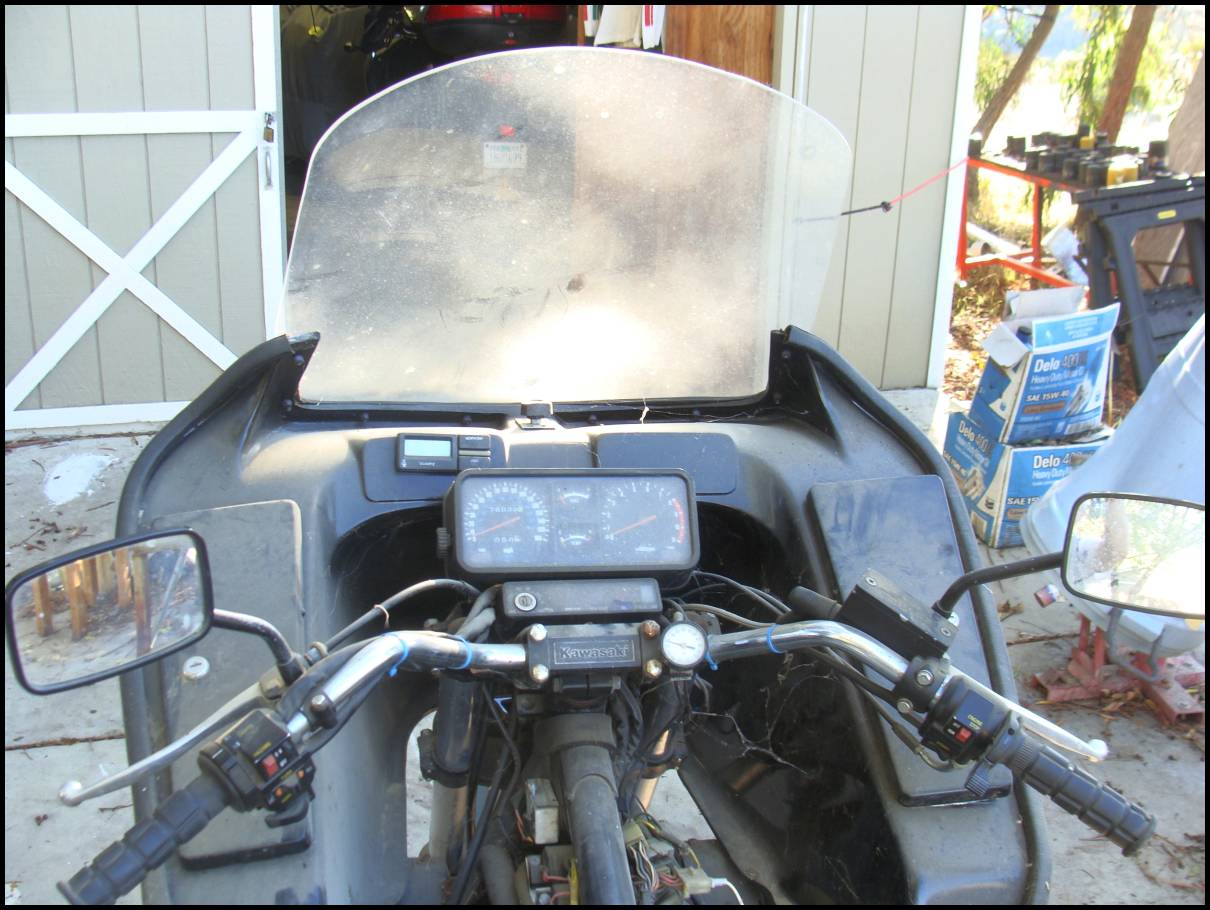
I paid $750 for the paint back in 1980 or so..
Instrument cluster still looks good.
After a quickie bath.
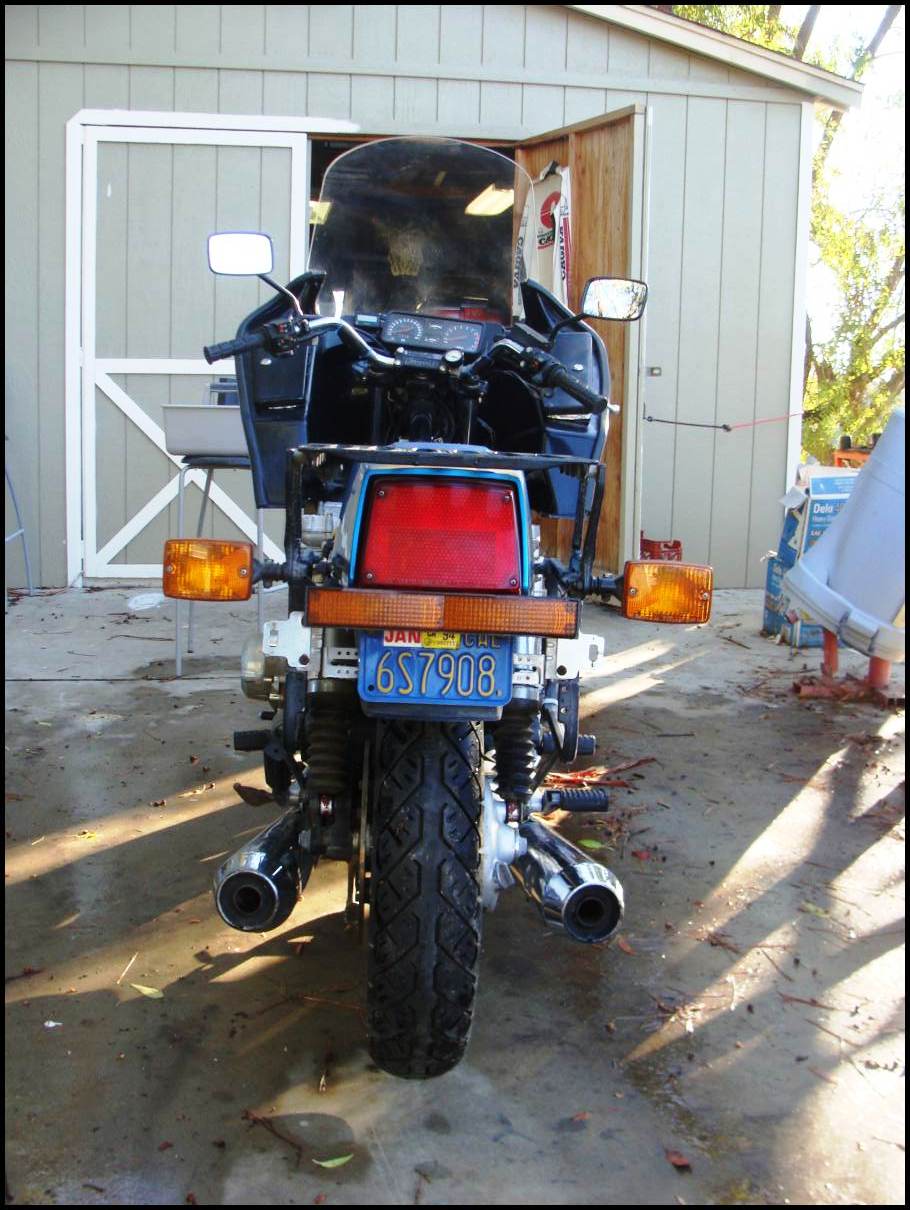
Look at the huge rear tire!
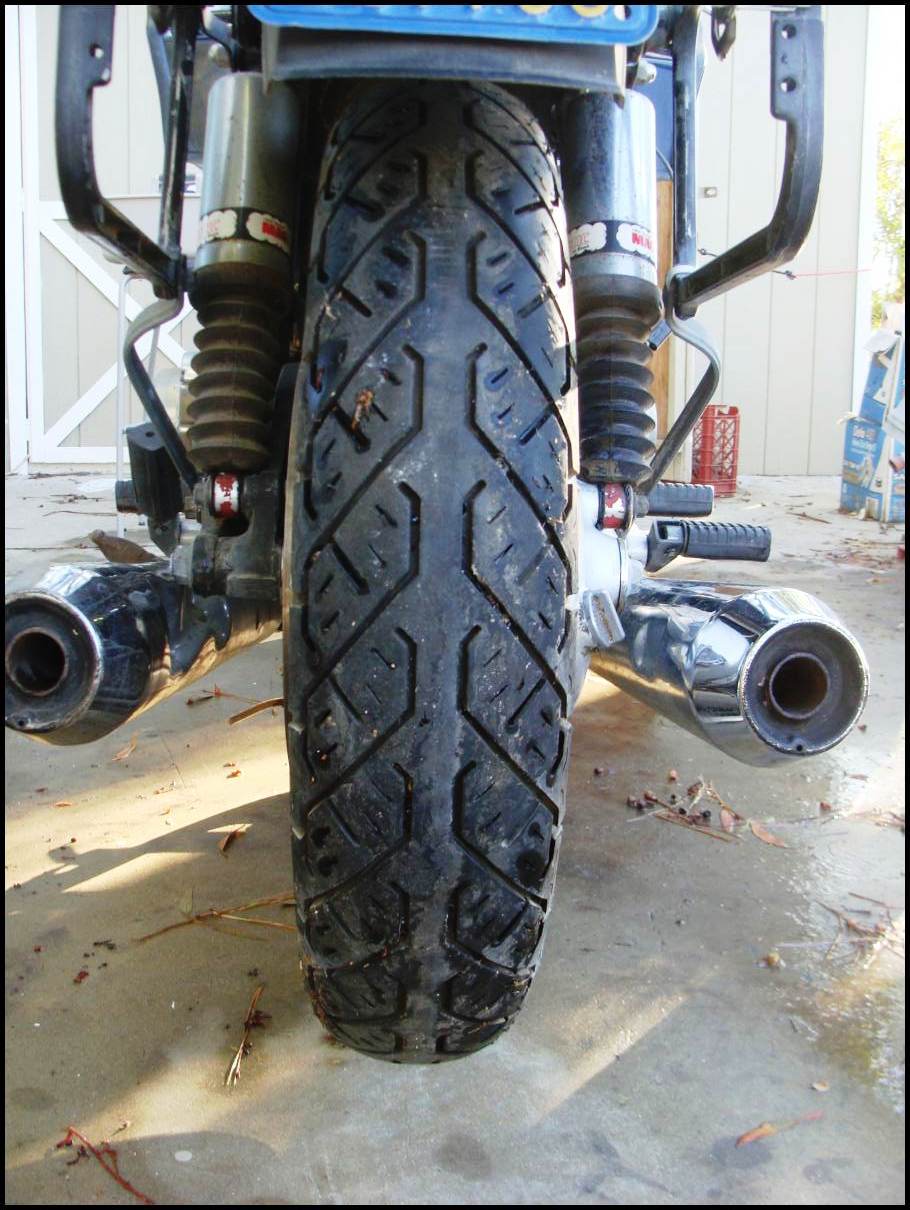
I still like the 1980 retro paint job.. and will keep it, for now..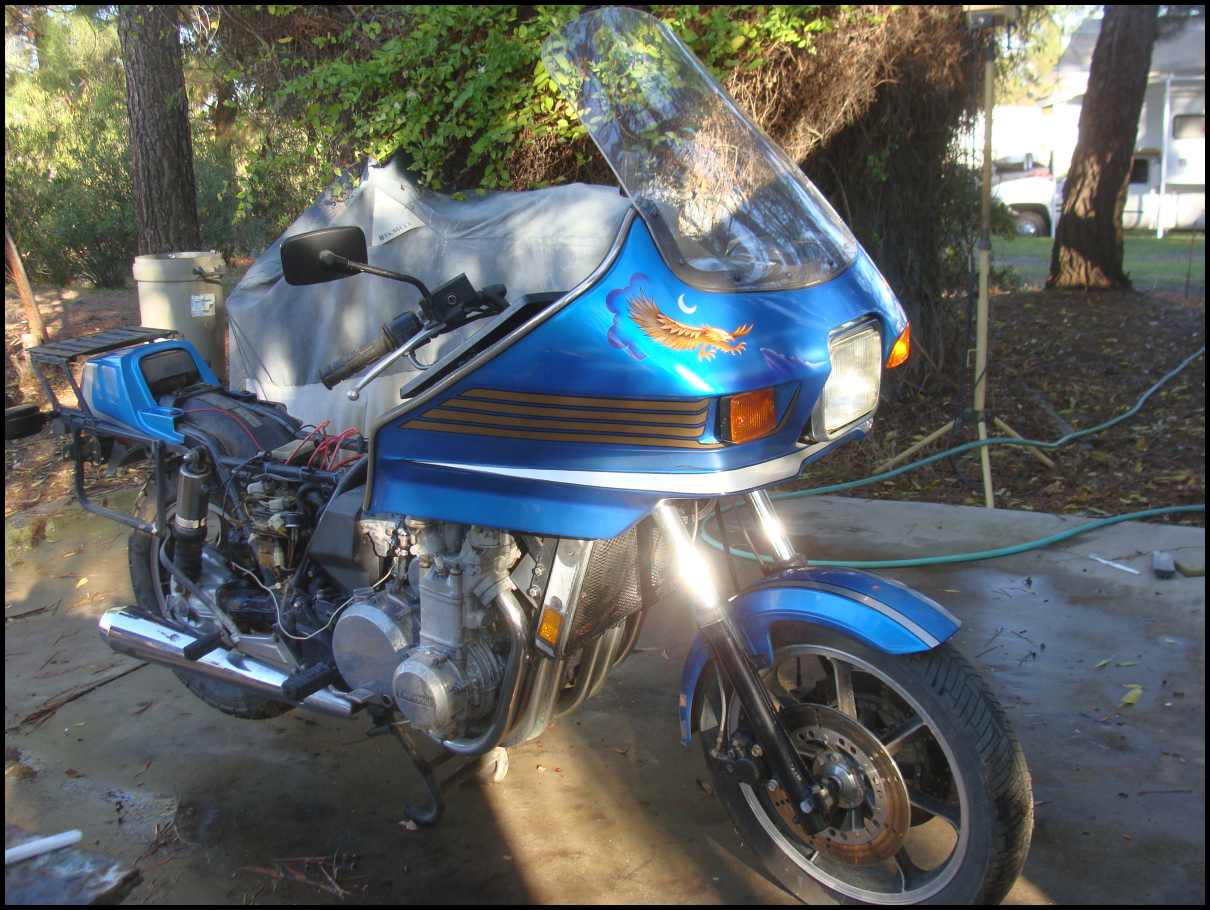
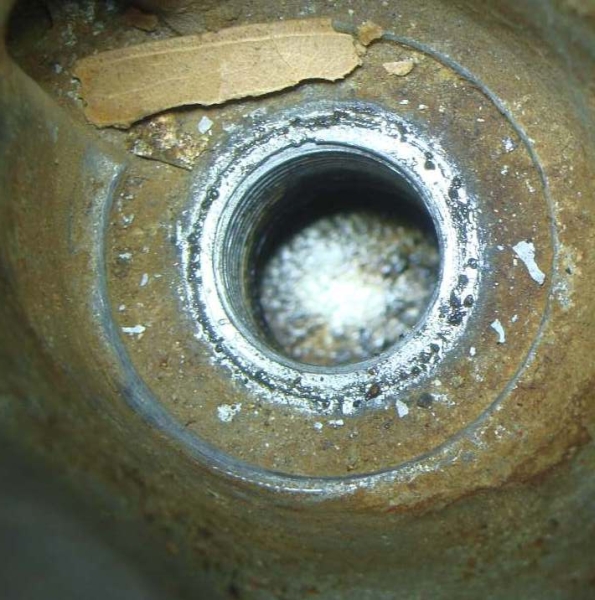
Oil filter boss.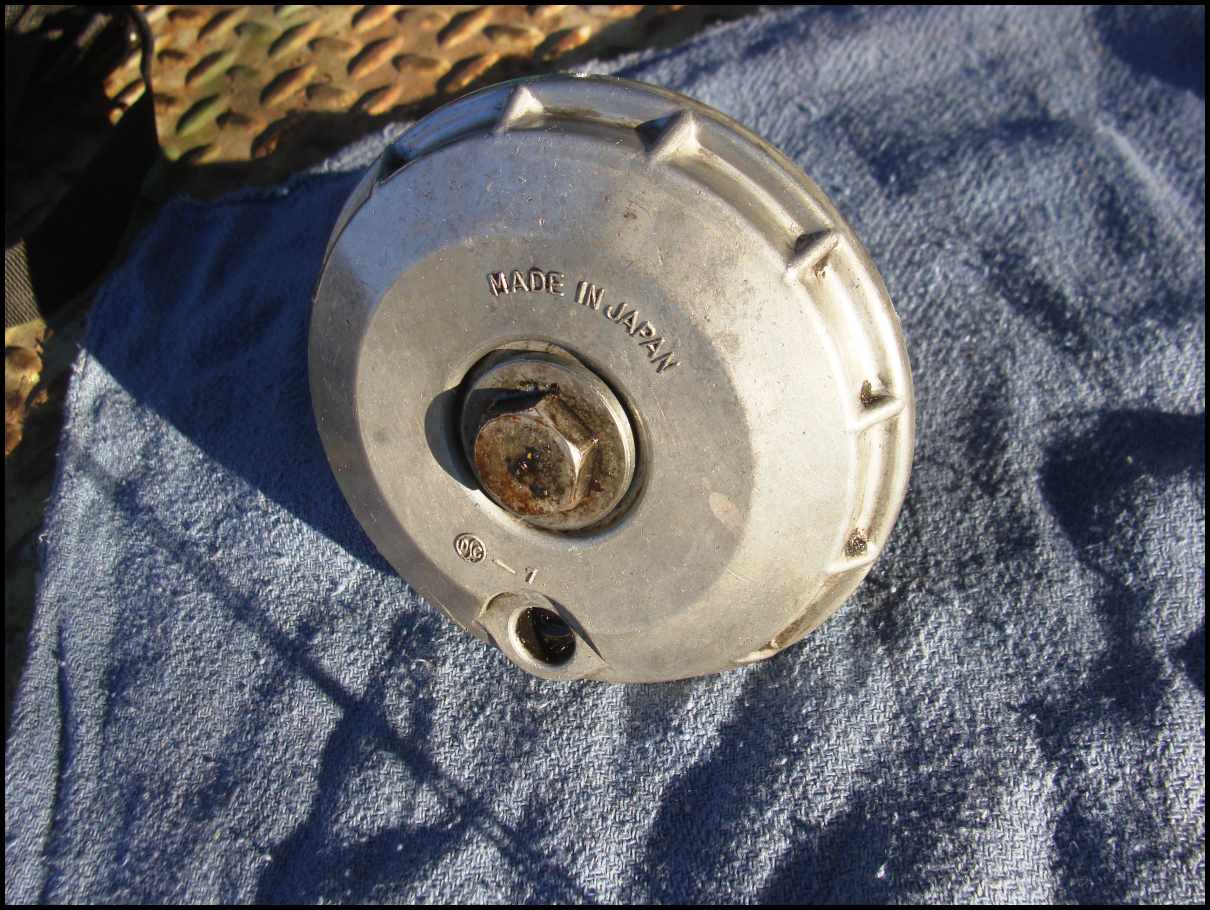
NOS
Full size spark plugs, Manly plugs!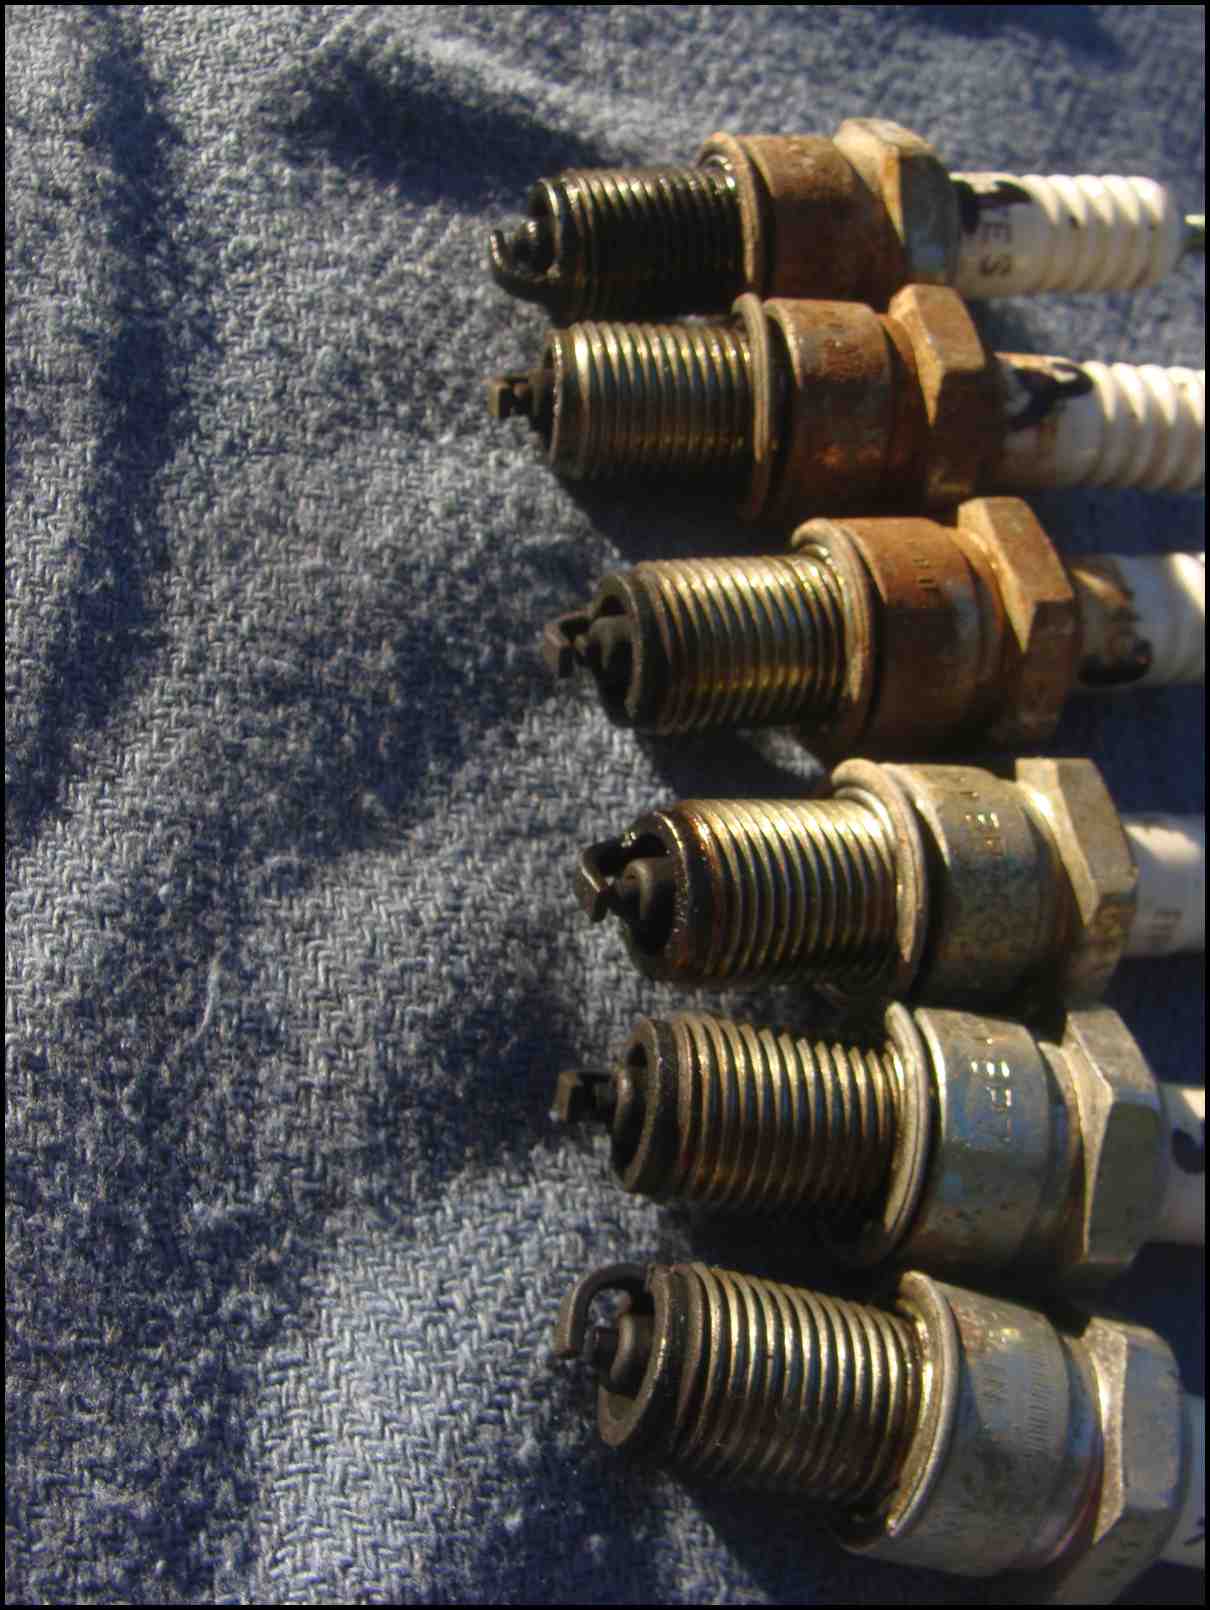
Sparking plugs. #1 was theworst, with oil fouling.
4,5 6.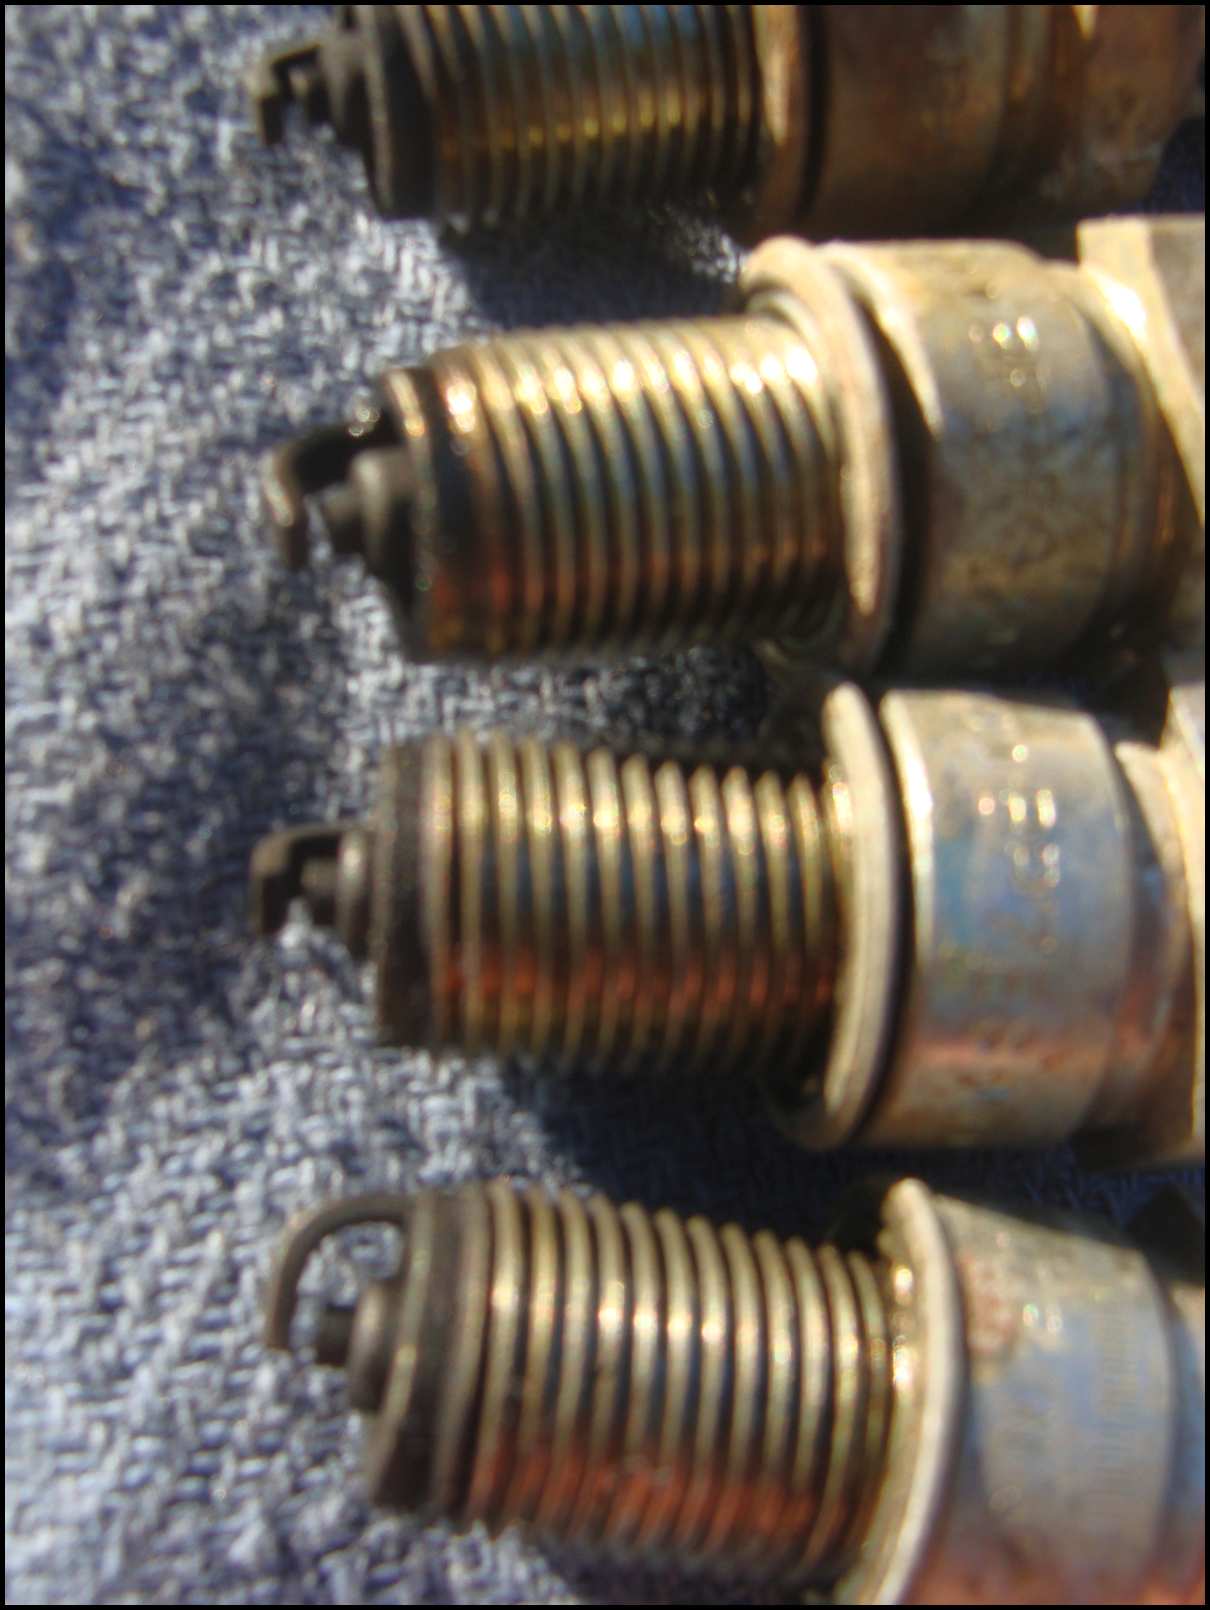
This just might work out, after all!
Yeah, I tipped her over on my bitchen paint, years ago.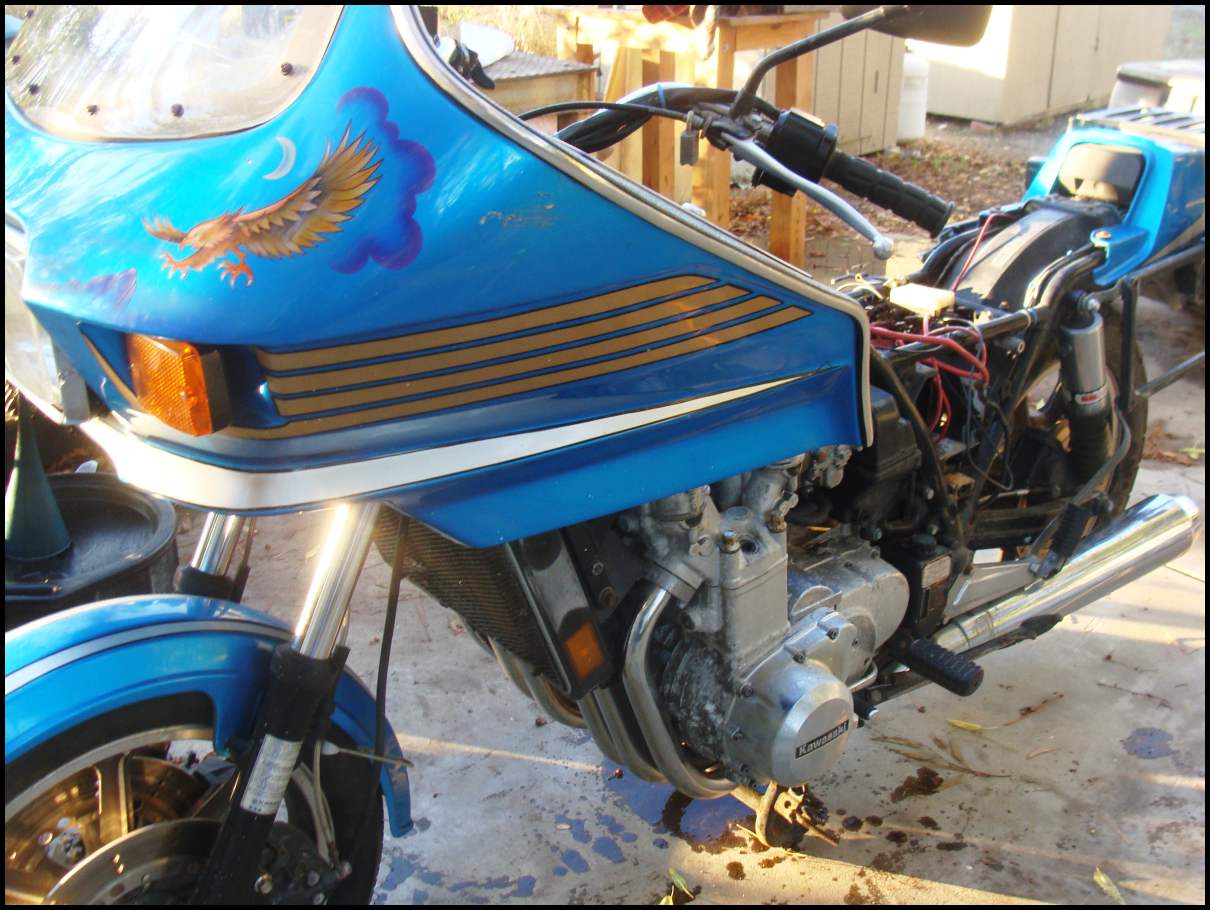
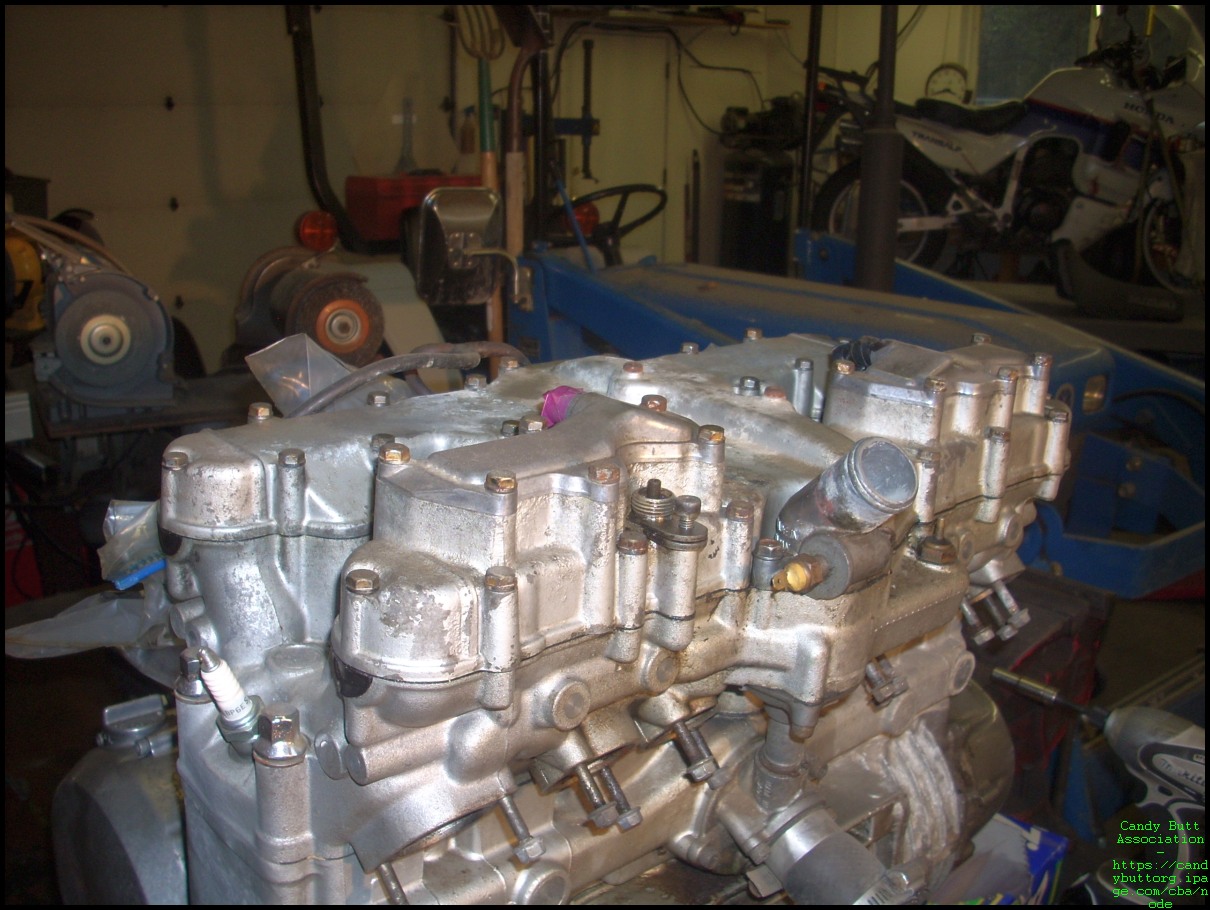
2011-11-26 Carbs
Attempted to get it running today, no luck. I have spark and some compression (lost my paper with psig/cyl) but no fire. So decided to pull the airbox and trip duece carbs. The carbs were surprisingly clean.
But not the petcock and screen. Petcock was frozen, soaked it in Liquid Wrench for several hours, worked the handle and o-ring free of the body, cleaned it all back up, added a spot of light grease and all is hopefully OK.

Yuck.
The carbs are off. I need to take pix of the airbox, it's a monster. I may not use it later, thinking of pod filters.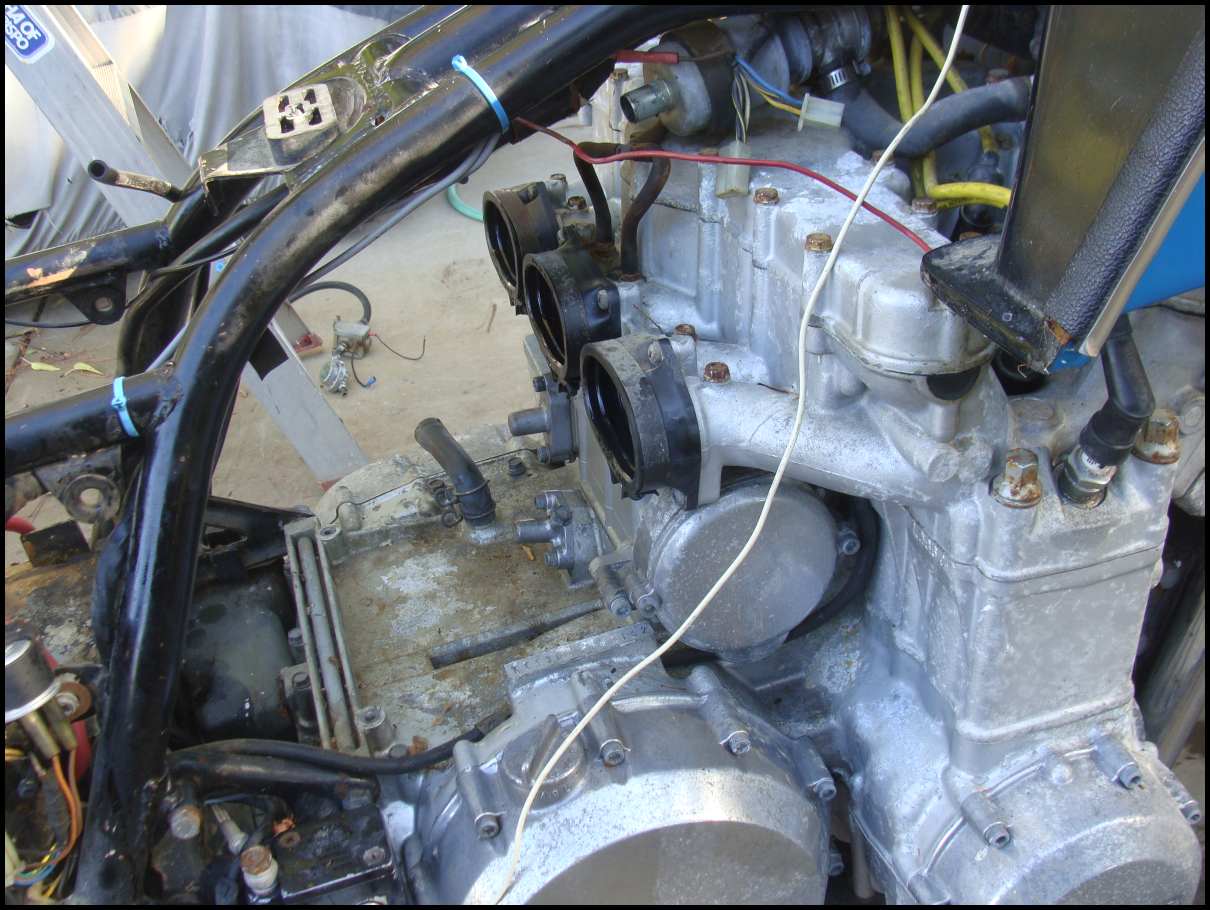
Time to clean the carbs.
The throttle mechanism still operates freely.
What a gas molecule sees.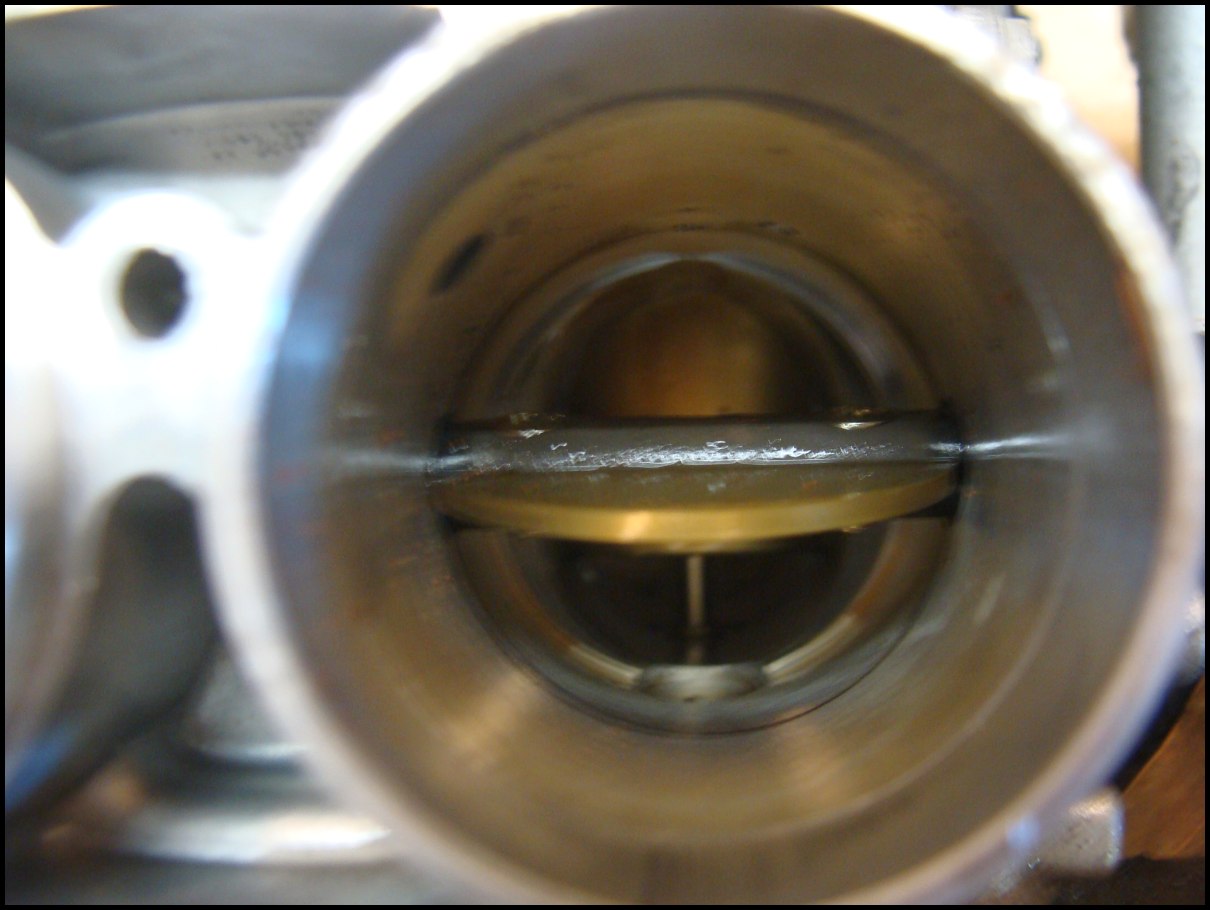
After cleaning.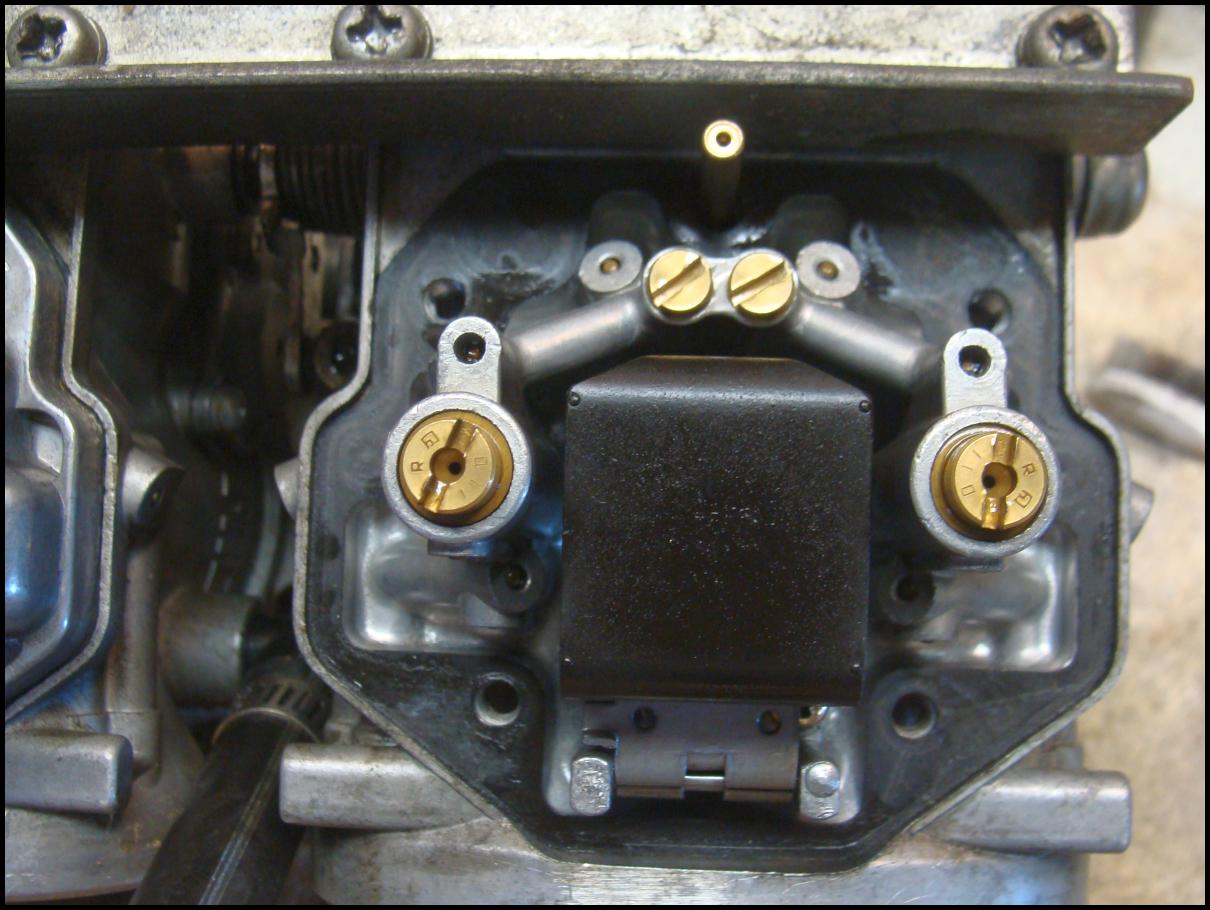
Even checked to see that the little holes were clear - this is the female side of the needle jet off the slide.
All diaphrams look ok.
Slides look good too.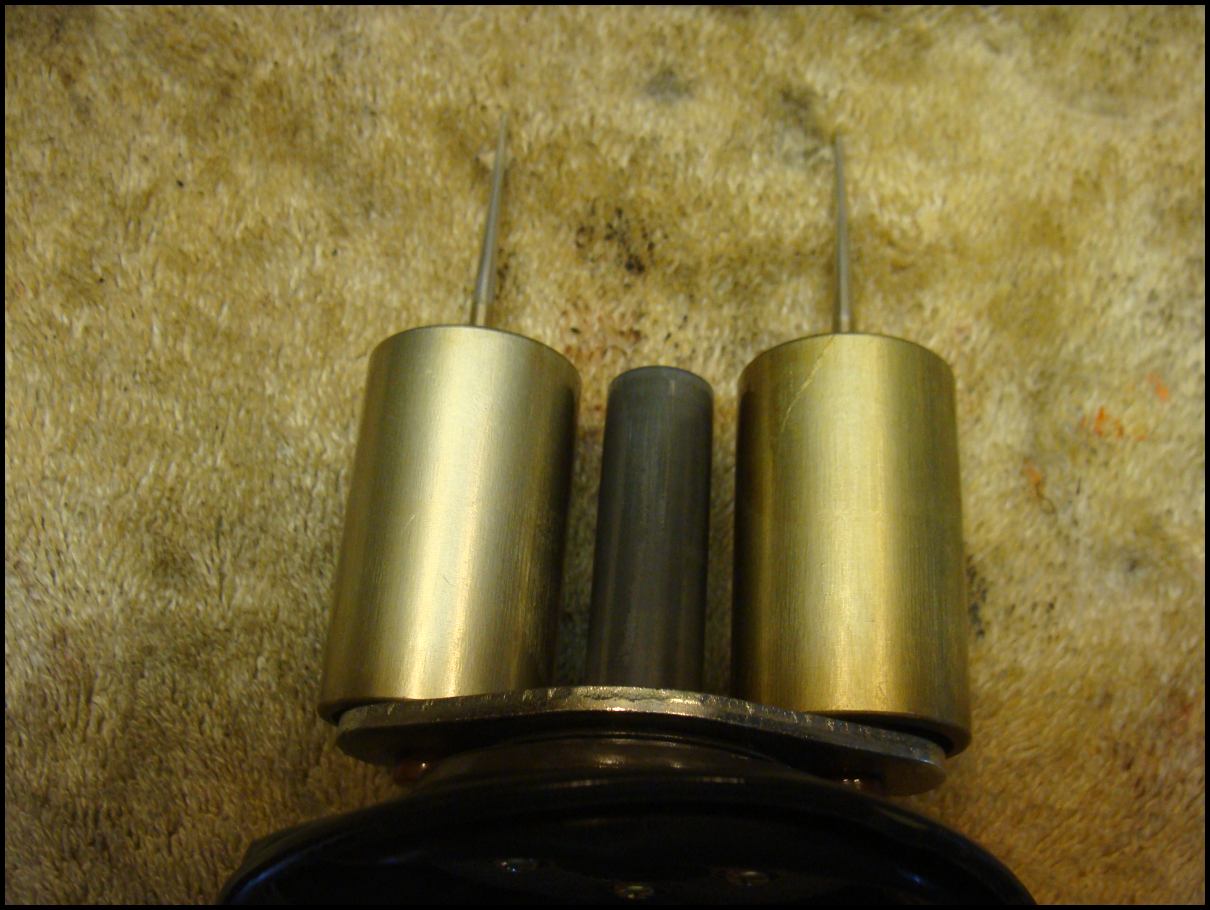
2011-11-27 She Runs!
So freaking cool, I got her running today. At first, a little help via starting fluid was needed, and she would only run on 1/2 choke. I realize the idle circuit is not working but don't know what to do.. I think the air jets are covered per EPA 1979 mandate.. Will research to find out which caps to bust free, fuck the EPA.
Quickly decided to run a fairly heavy concentration of Sea Foam in the tank in the sky, and after only 10 or so minutes of running it was much better...
..pix and video to follow
My highly sophisticated set up...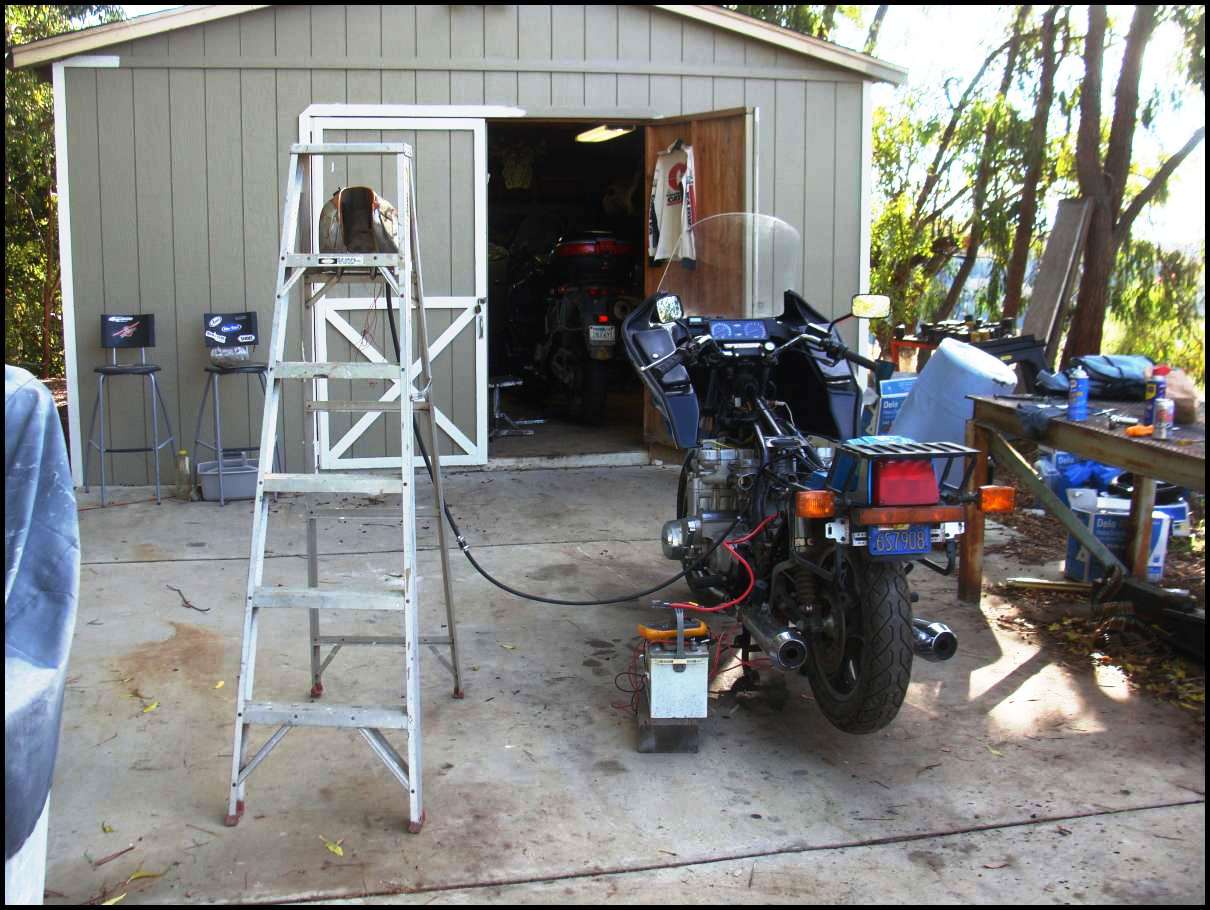
Fuel delivery from a TT500 Yamaha..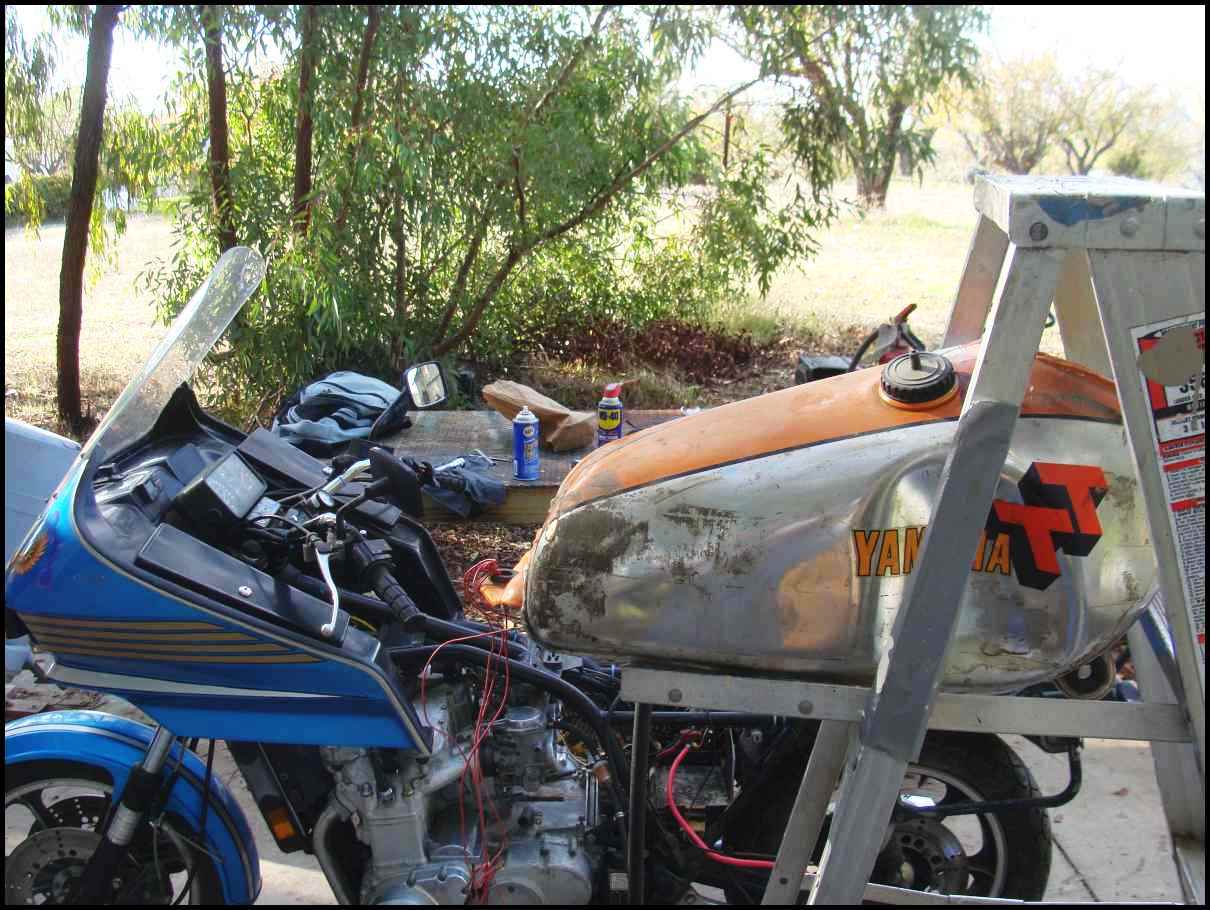
Battery voltage to start with. My only working alternator took it to 14.5 VDC.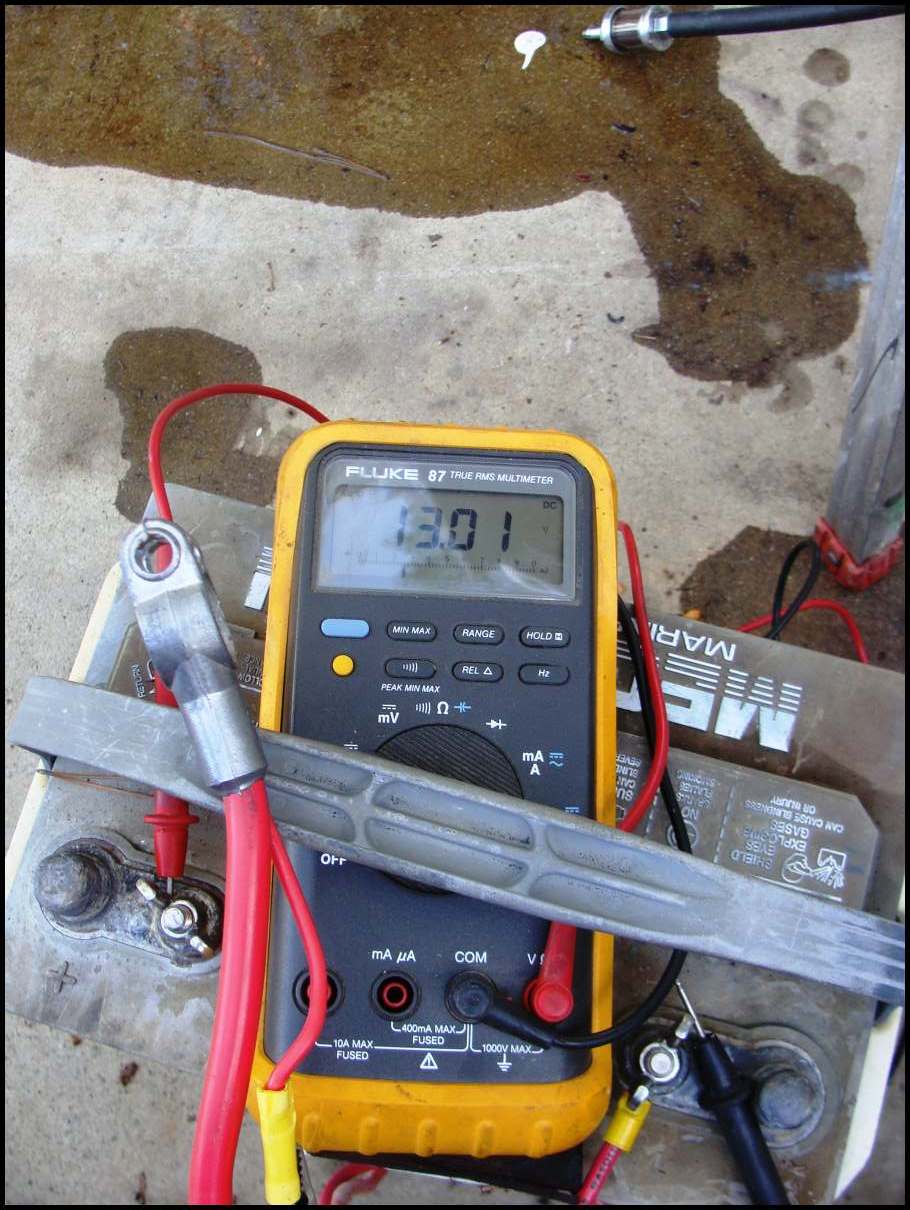
Uhoh, base cyl gasket leak.

The cumbersome and humongous airbox.
Note to self - the bottom grommet fixes the overflow radiator catch tank in place.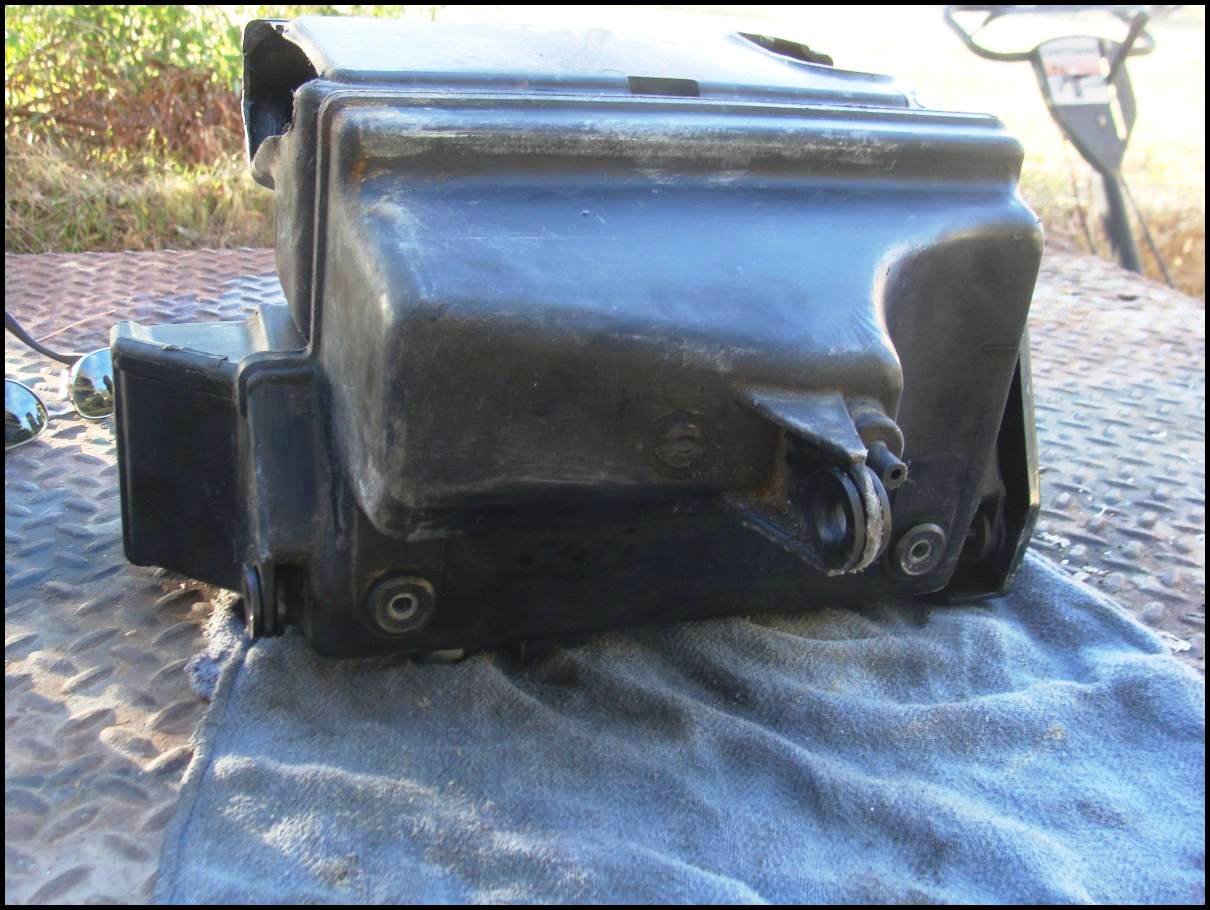
I hacked the original air box to fit a bigger battery. This removed the snorkel tube so I opened up each side. Pretty good butcher job...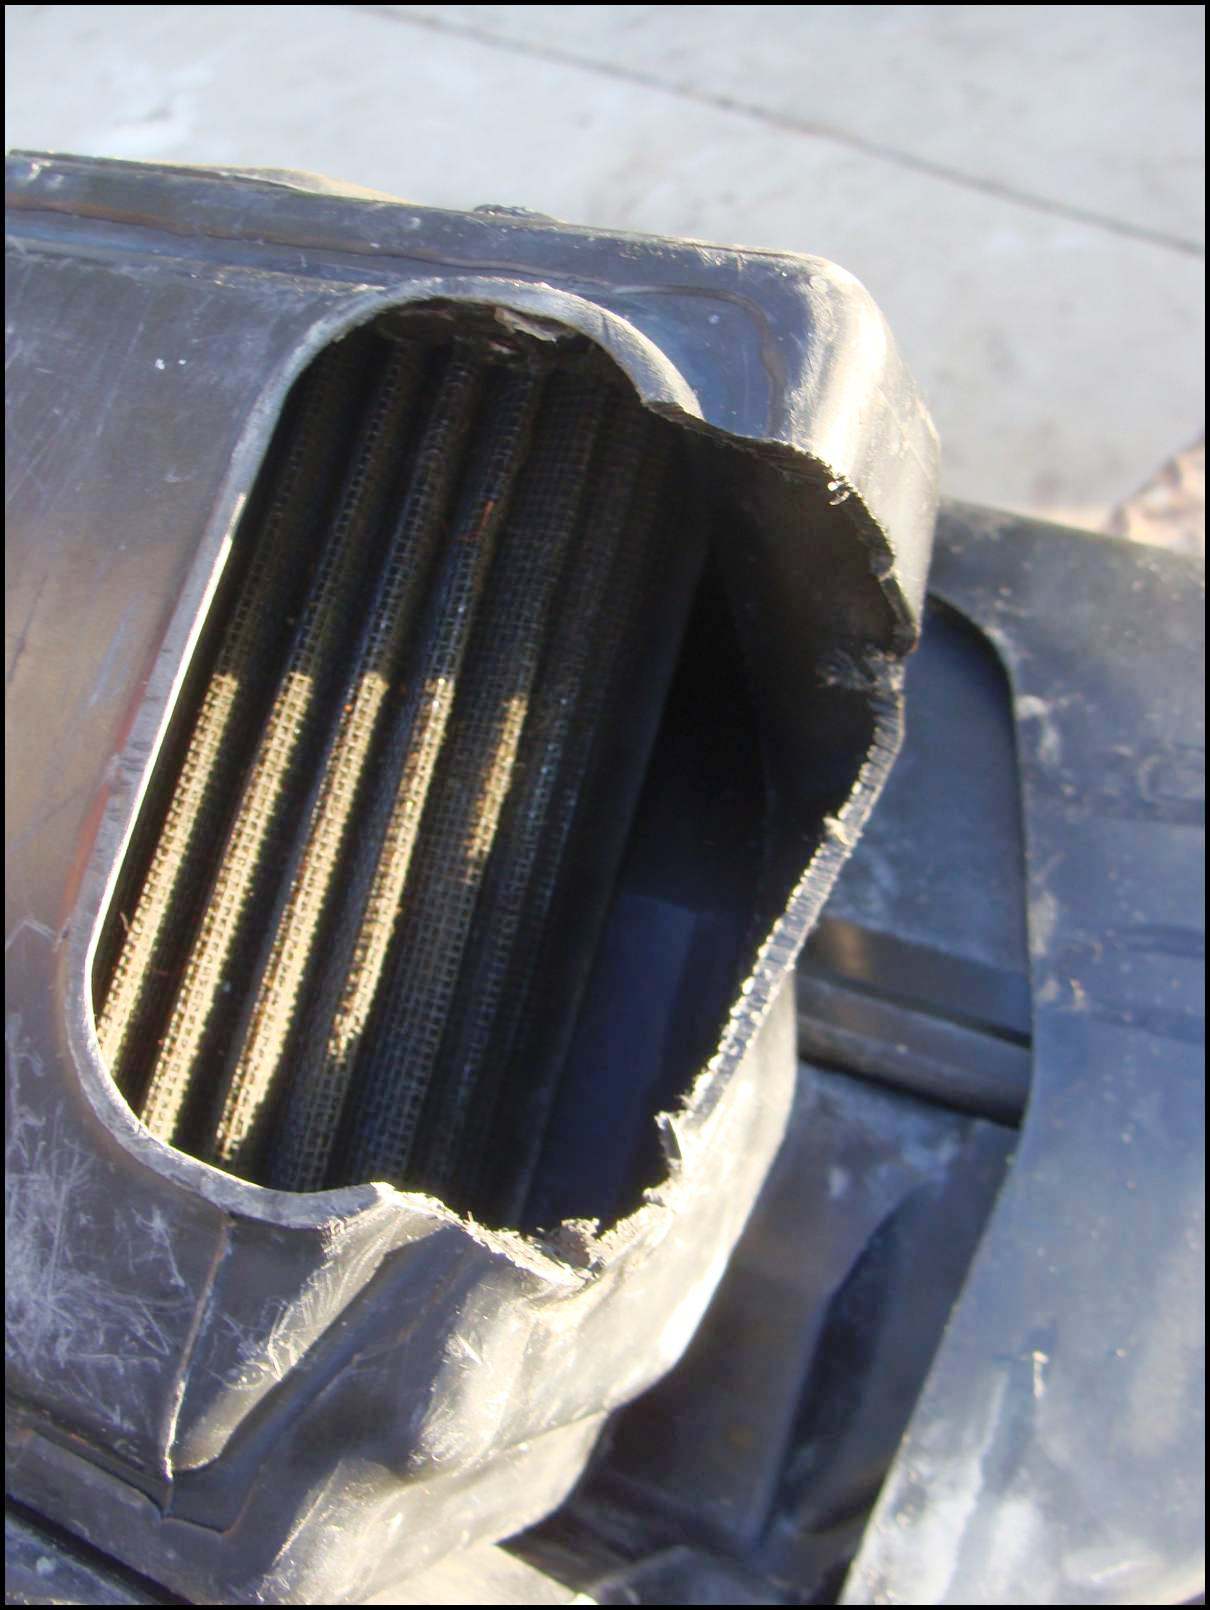
Leak down
No - I couldn't
I need to have power at the shop sufficient to run an air compressor. I was using an old propane tank,so each test was quickly run before tank depletion.
2011-12-14 Ordered parts
Tom at Wiseco, per Rob of Z1 Enterprises, can build min qty 8 pistons for 185 US each - but needs a sample piston.
My strategy then is -
2011-12-16 Parts List
Rubber final drive boot -
Hello,
Wow, what a great site you have and THANKS for making KZ1300 parts!
I am interested in this part -
MCG 490061020 Manschette Motor-SchwingeEinzelpreisGesamtpreis68.5068.50
I live in Creston, California, USA.
If you can tell me the total cost of this boot I'll use PayPal to pay you.
Here's a link to my 1979 KZ1300 restoration project - http://candybutt.org/cba/node/180#comment-273
Thanks!
Don Carver
dcarver220b@yahoo.com
A1702-C--Adapter plate
2011-12-18 Carbs and Crank Noise
Had a couple of hours free so decided to clean up the air bleed circuits, set each to 5.5 turns out, and also lower the fuel height in each bowl.
Super-sophisticated test stand.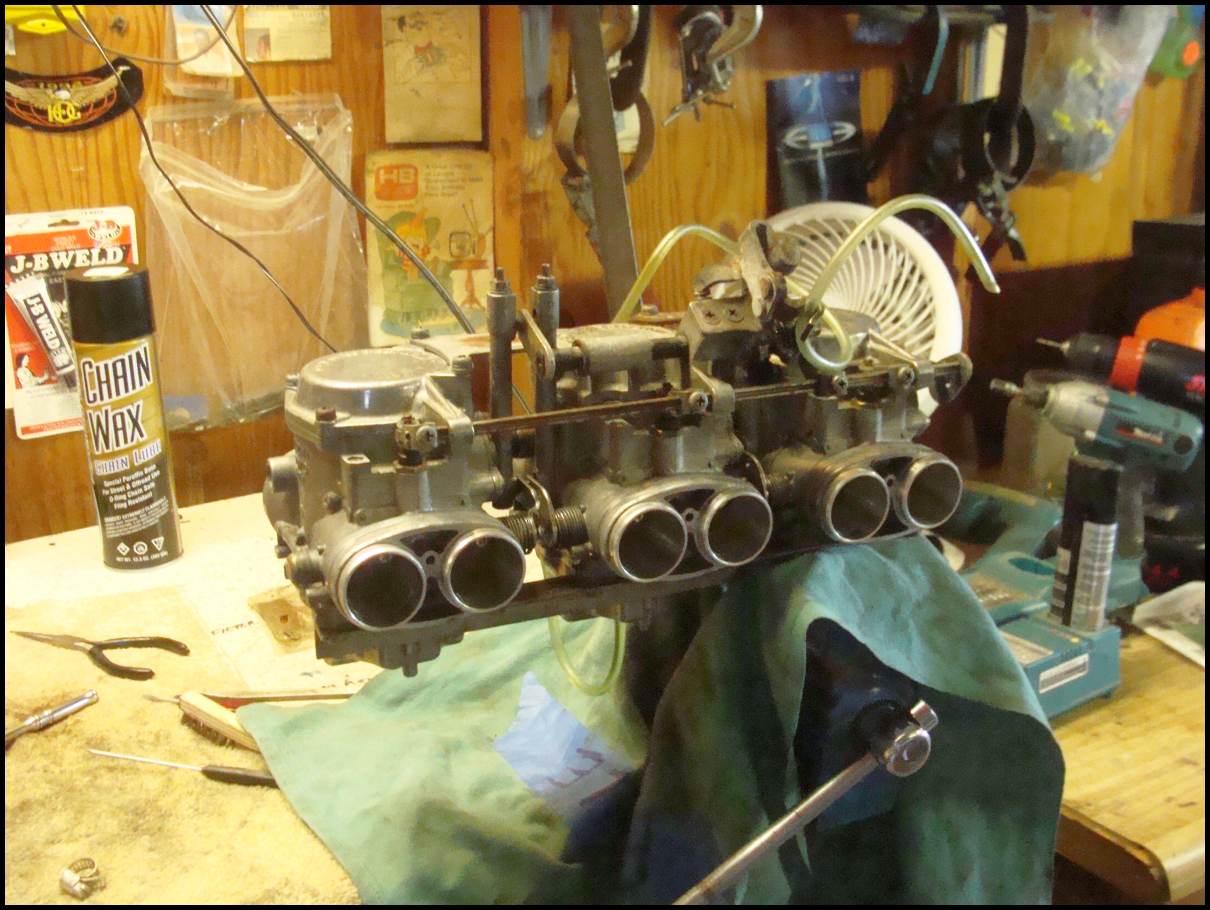
I had previously cleaned all other circuits. Here I'm going to adjust the float.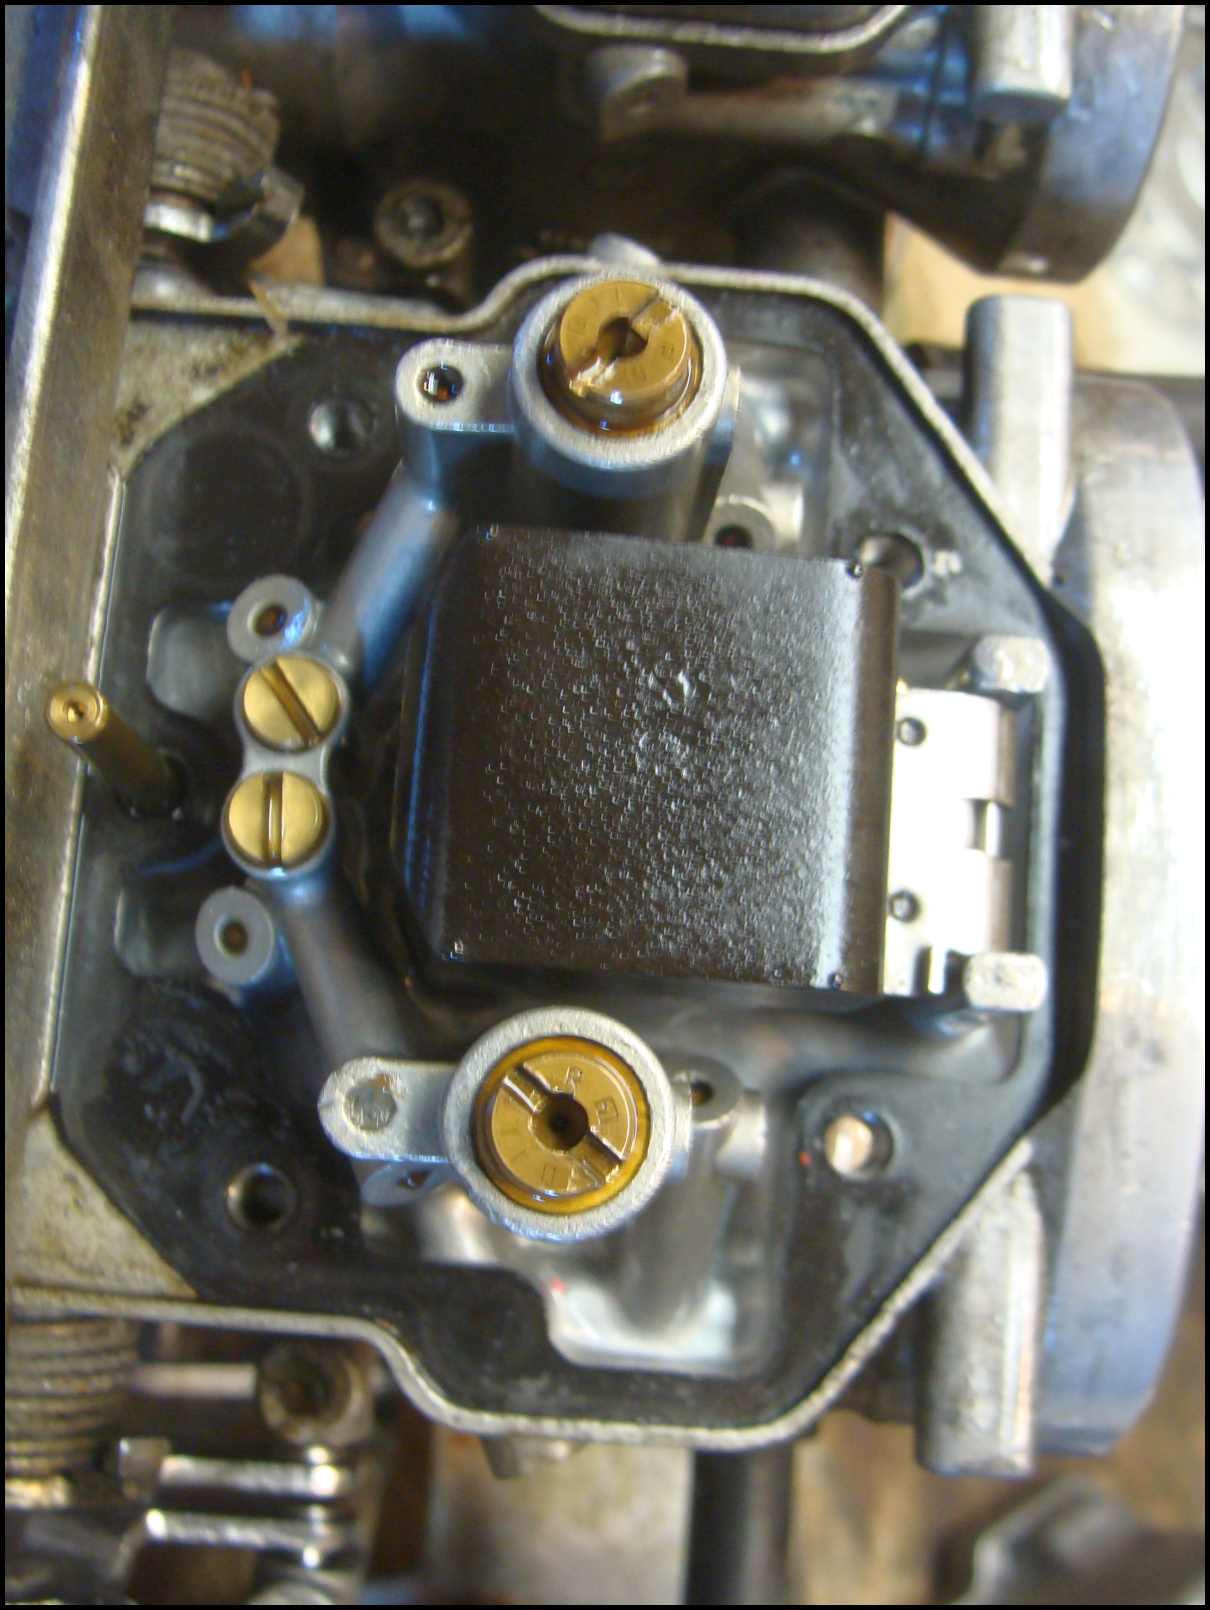
Moved it 1 mm up so that the area contacting the fuel valve is at 5 mm.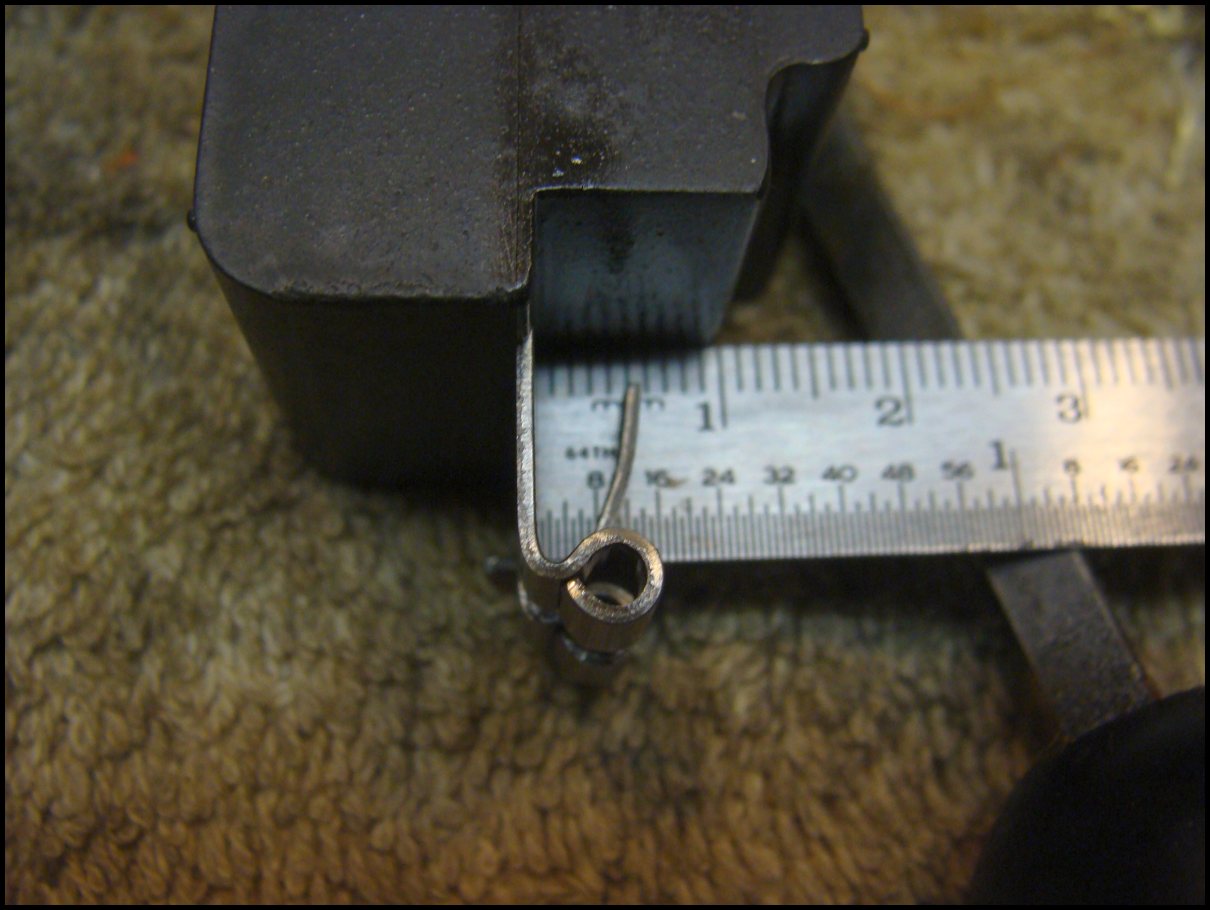
Per the FSM, this setting is well within range. When I started, the fuel level was at the mating surfaces.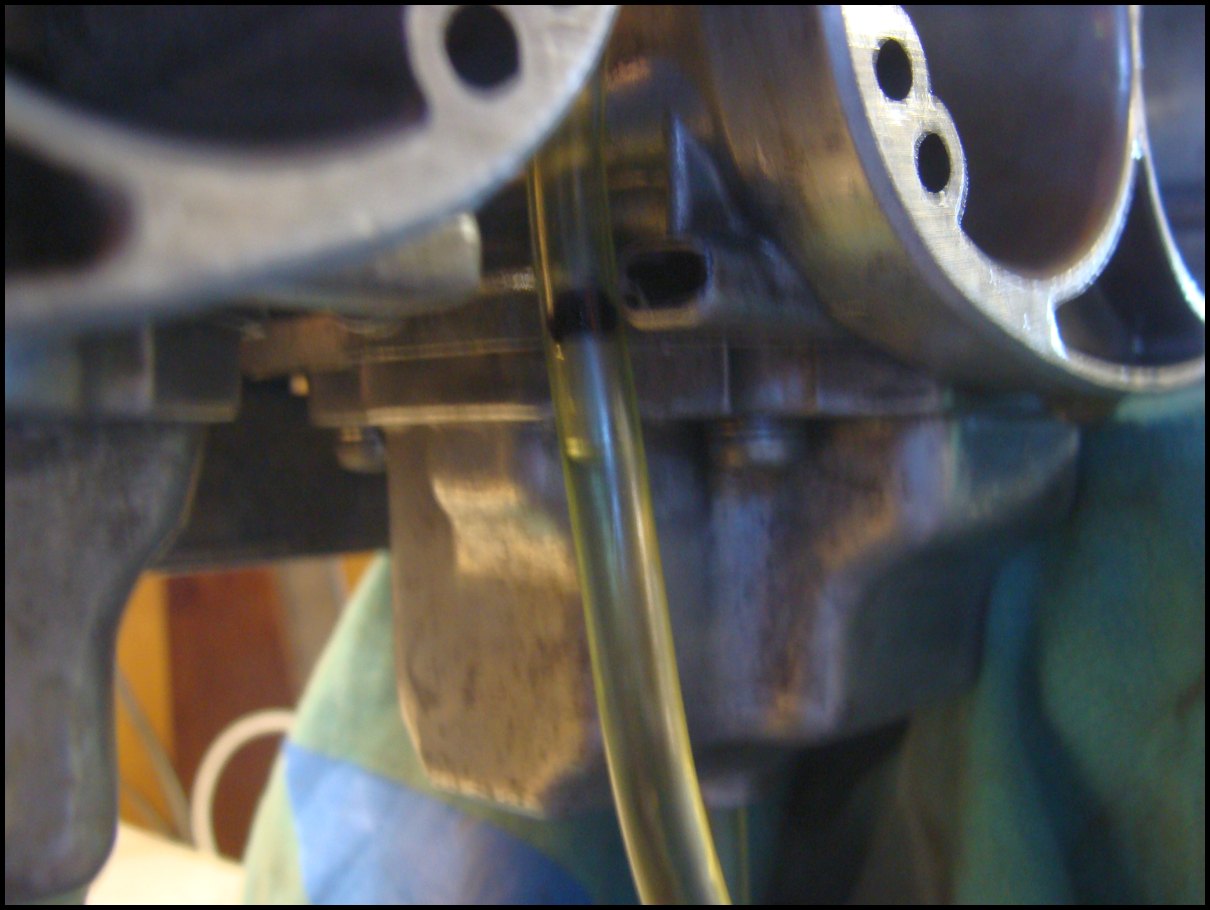
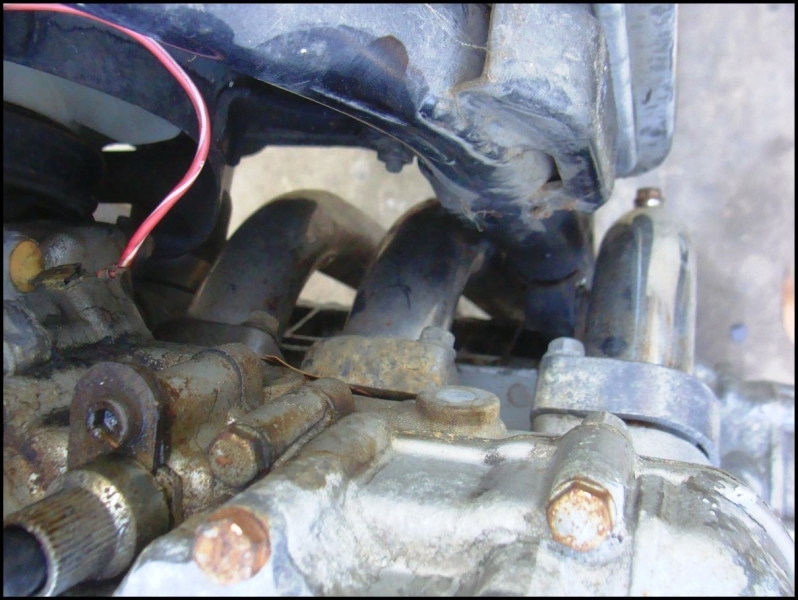
Got the carbs reinstalled,and she started and ran much better. At 1,500 though, I have a harmonic sound bzzzzzz, bzzzzzz. No other rpm, so I've been running outside of that bank. The noise and vibration positively originating from the crank. Arrgh. Pulled the alternator coverhoping to find something rubbing, but all looks good. To my surprise, from the bottom view one can see all the way across the crank - the webs, lower con rods, pretty cool.
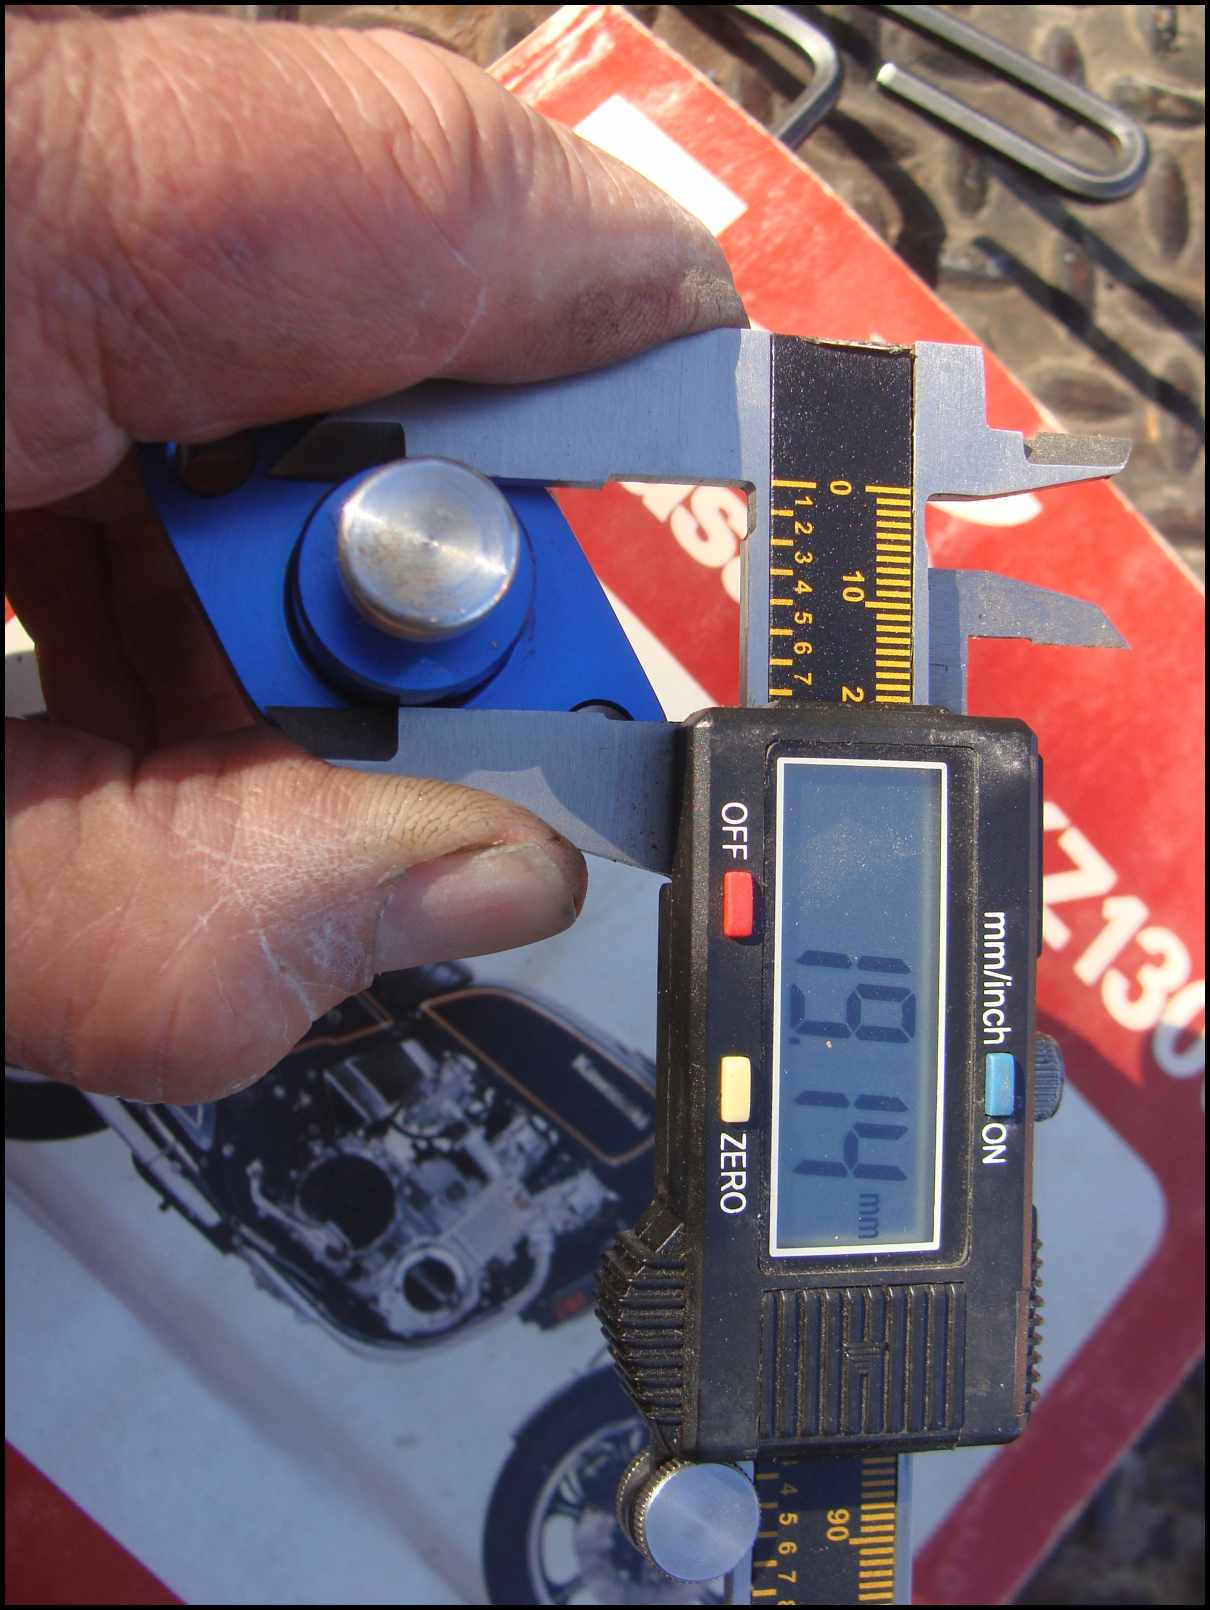
I checked crank run-out, is that a proper term? Ok, pushing the crank 'in' then pulling it 'out' yields a bit of movement and a thunk sound. The best I could measure the slop it's aprox 0.12 mm. I wonder how much is allowed? Need to check the manual. Just haven't had time.
Here is where my better idea comes in. I'll start the bike, then observe the rotor. Ok, pan to catch oil, check. Start engine, check. Just a minimal amount of oil leaking out. Good. Raise rpm to 1,500 and what the fuck, oh damn that oil is HOT and I'm taking a full body oil bath. I'm guessing I gushed about 1/2 quart in approx 3 seconds. I mean it was shooting out, hitting the spinning rotor and just flinging everywhere. Turns out there is a small circular plug, with o-ring, that popped out with oil pressure. I have no clue what it does.. but the alt cover keeps it 'in place'. My guess is there are oil galleries in the bore the plug sits in, allowing oil diversion based upon pressure pehaps? I'm kind of thinking it may be a pressure pop-off for cold starts.
Nothing loose, nothing rubbing that I see. Sure hope this noise isn't a terminal thing.
2011-12-22 Rings!
Lookie what the postman deliverd today!
Brand new OEM standard sized rings!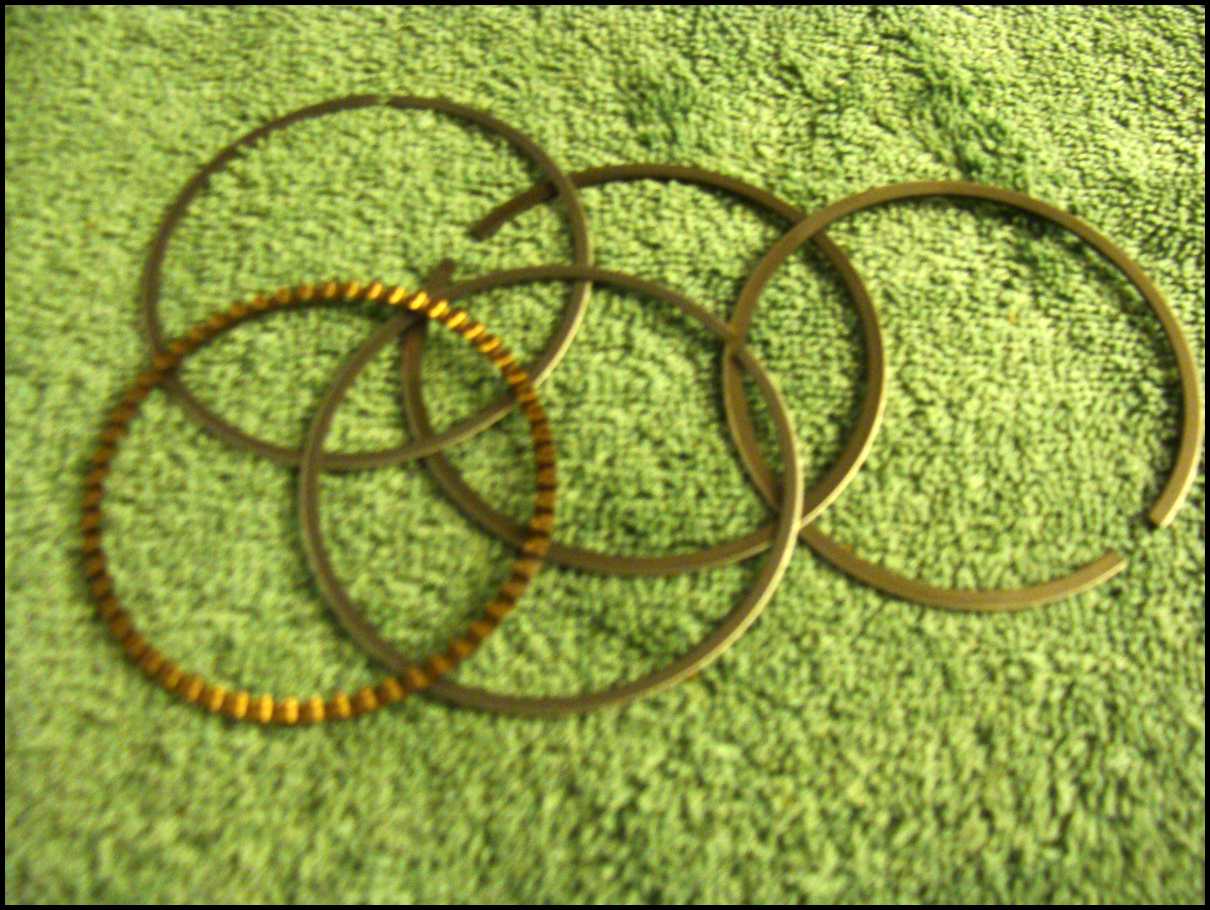
Crap. This pix is out of focus but Rob here at Z1 is my new best bud!
Parts box!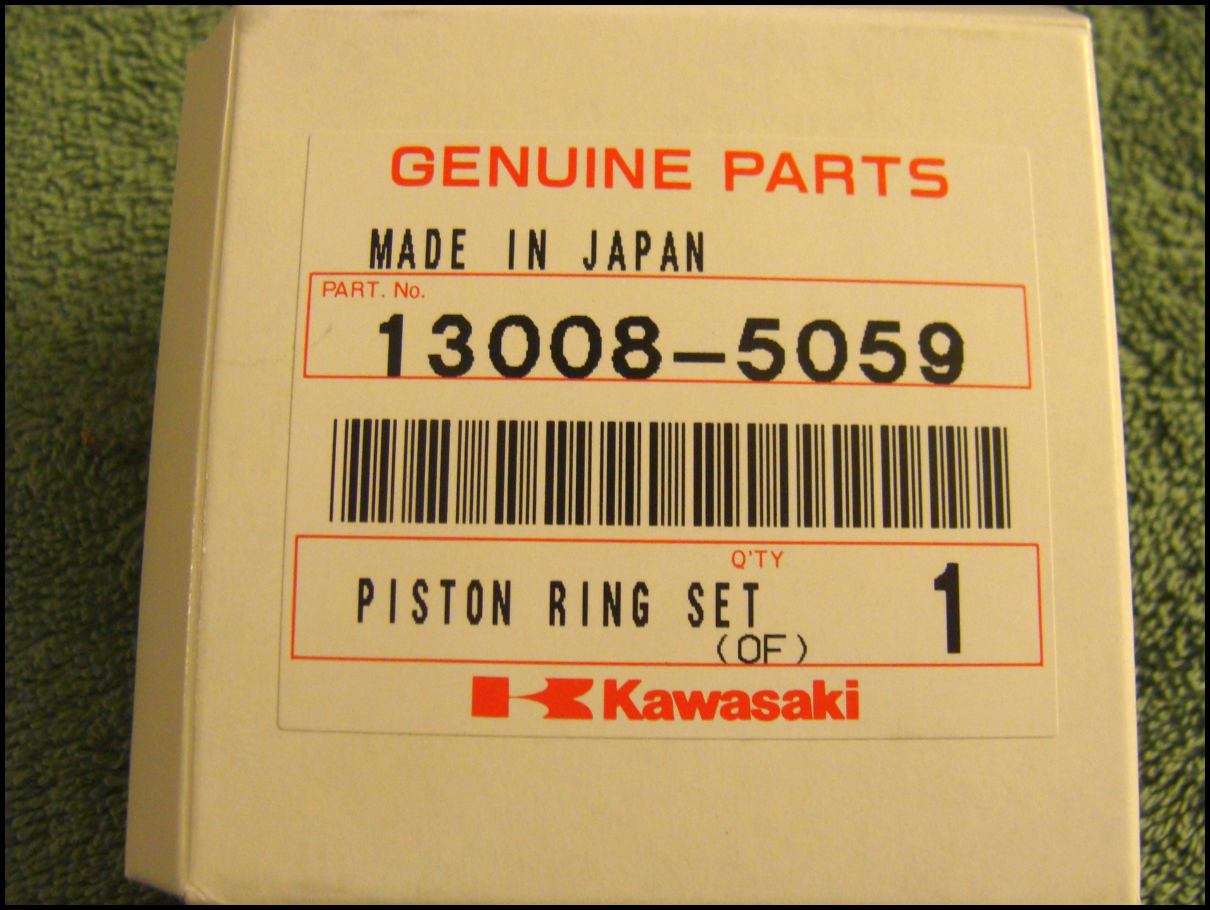
6 sets, baby!
2011-12-27 Gas tank ready for locksmith
I have the gas tank ready for the locksmith. It's in the truck and ready to for delivery. My well-intentioned neighbor broke the key inside the lock. I have a new 'replacement' lid and lock, but I'd much rather keep the original. This should be interesting..
2011-12-29 Radiator Hoses
While cruising the internets, I found a guy who posted pix of an automotive hose that has the correct shape and bend for the KZ!
2011-01-03 New CCT
Today the USPS delivered a new manual CCT! The stock one is notoriously prone to failure leading to bent valves and what not..
After reading some horror stories over on kz1300.com, I'll not start her up again until the new CCT is installed. Making progress!
2012-01-08
Today was a big day.
More later, I'm tired.
2012-01-08 Noise Found?
Spent most of yesterday working on the mighty KZ. Initial plans were to:
I've already replaced the stock wimpy coils with real sparkies, did that years ago. The bottom coil has to be removed for valve cover clearance.
These radiator shrouds were the 'hot' ticket item back in 1979 - they keep some of the engine heat off the tank and rider.
Shrouds removed.
Yes, really. It takes all these bolts to keep the valve cover in place...
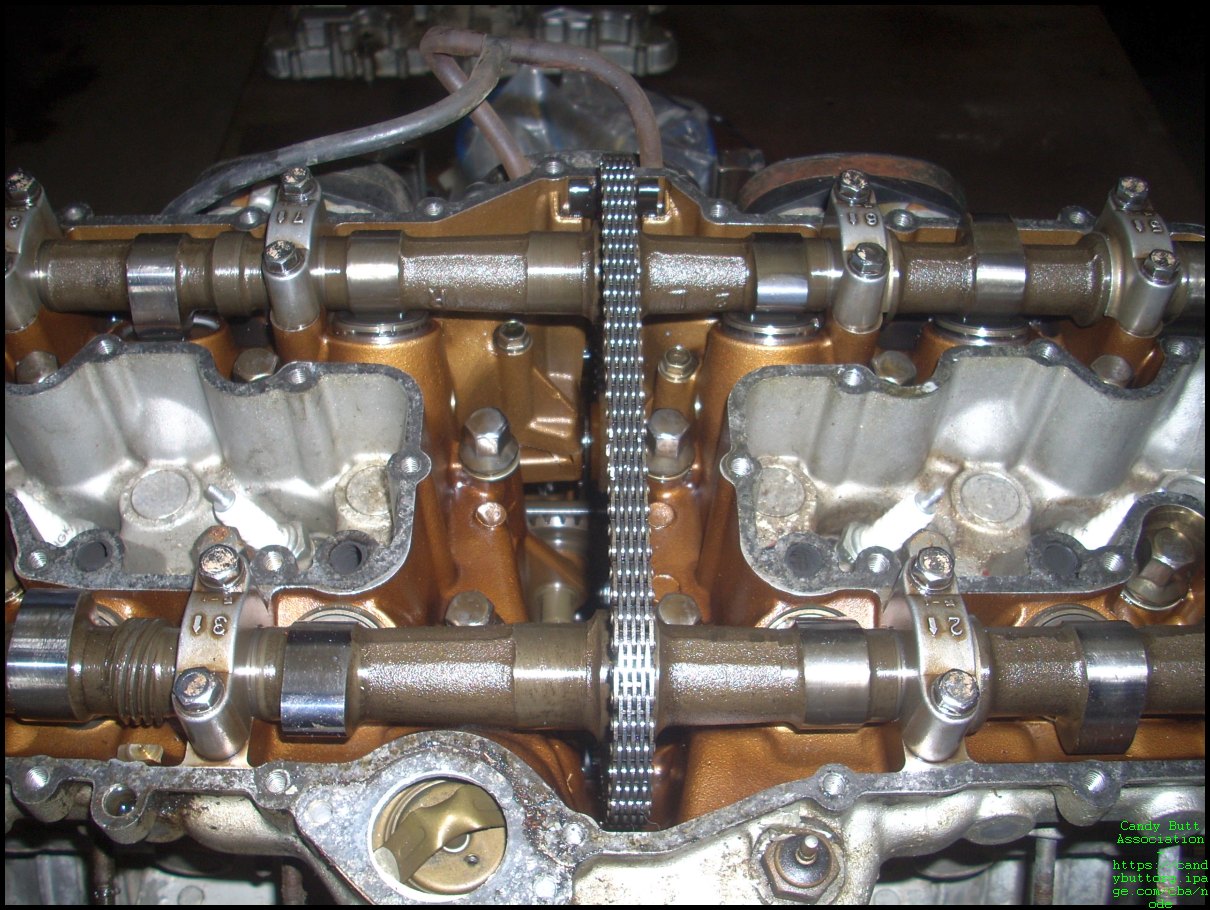
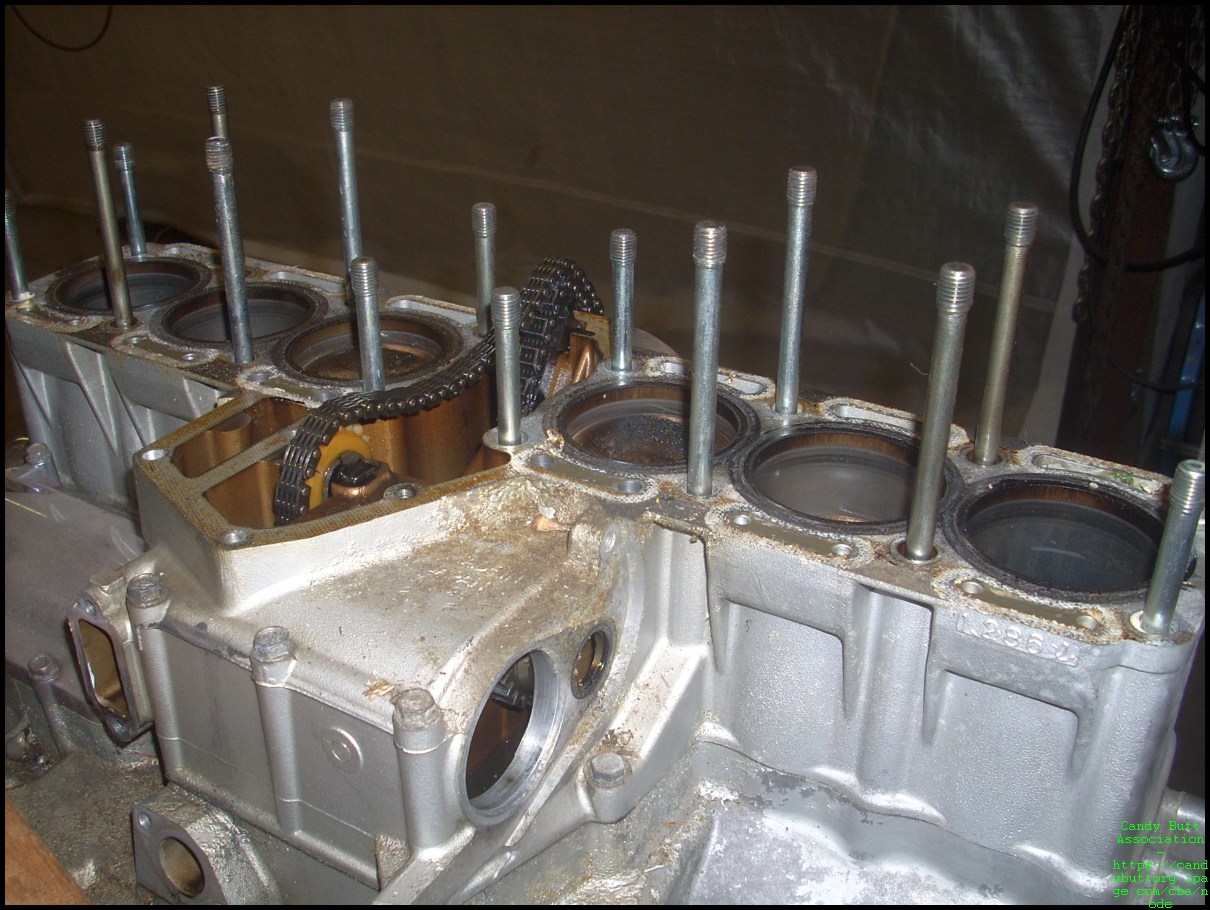
Pleasantly surprised to see the cams and interior of engine were looking clean, clean, clean!
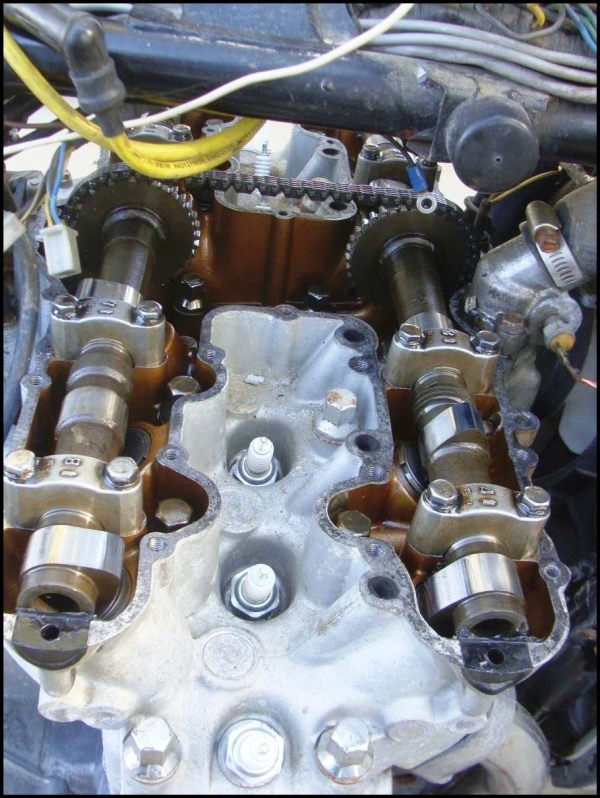
Cam lobes - no pitting or galling, whew!
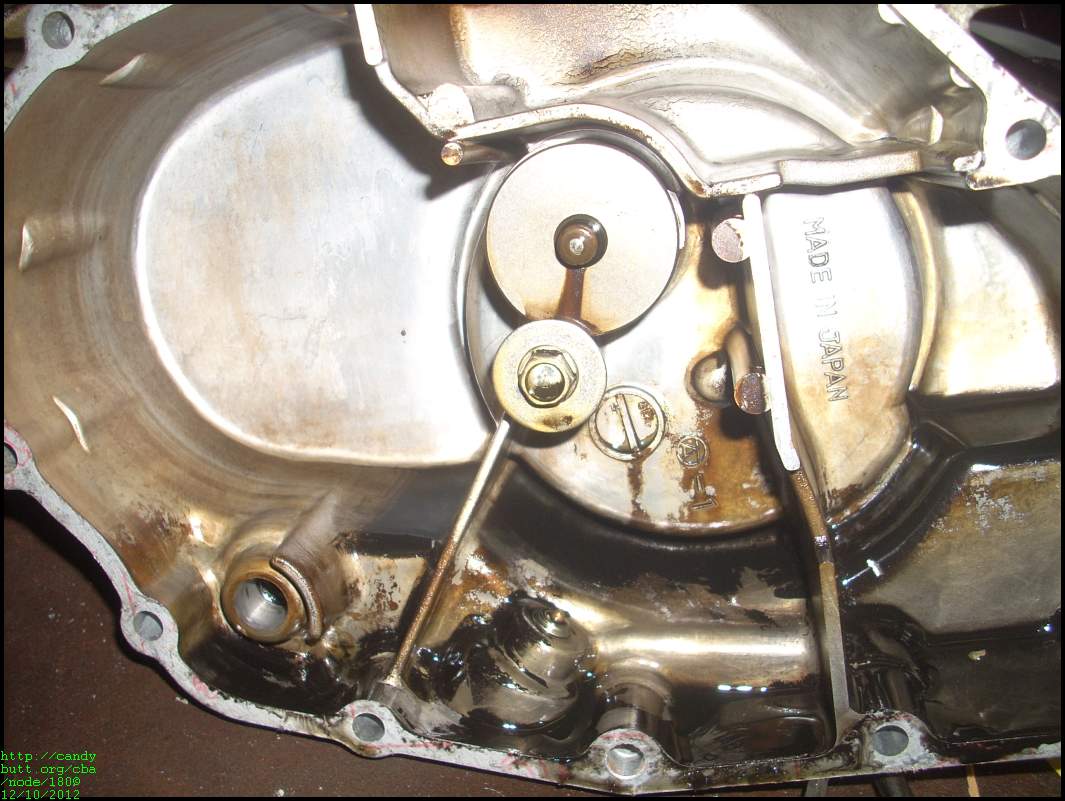
For manual crank rotation, removed the left hand side alternator cover. In a previous post, I had removed the RHS.
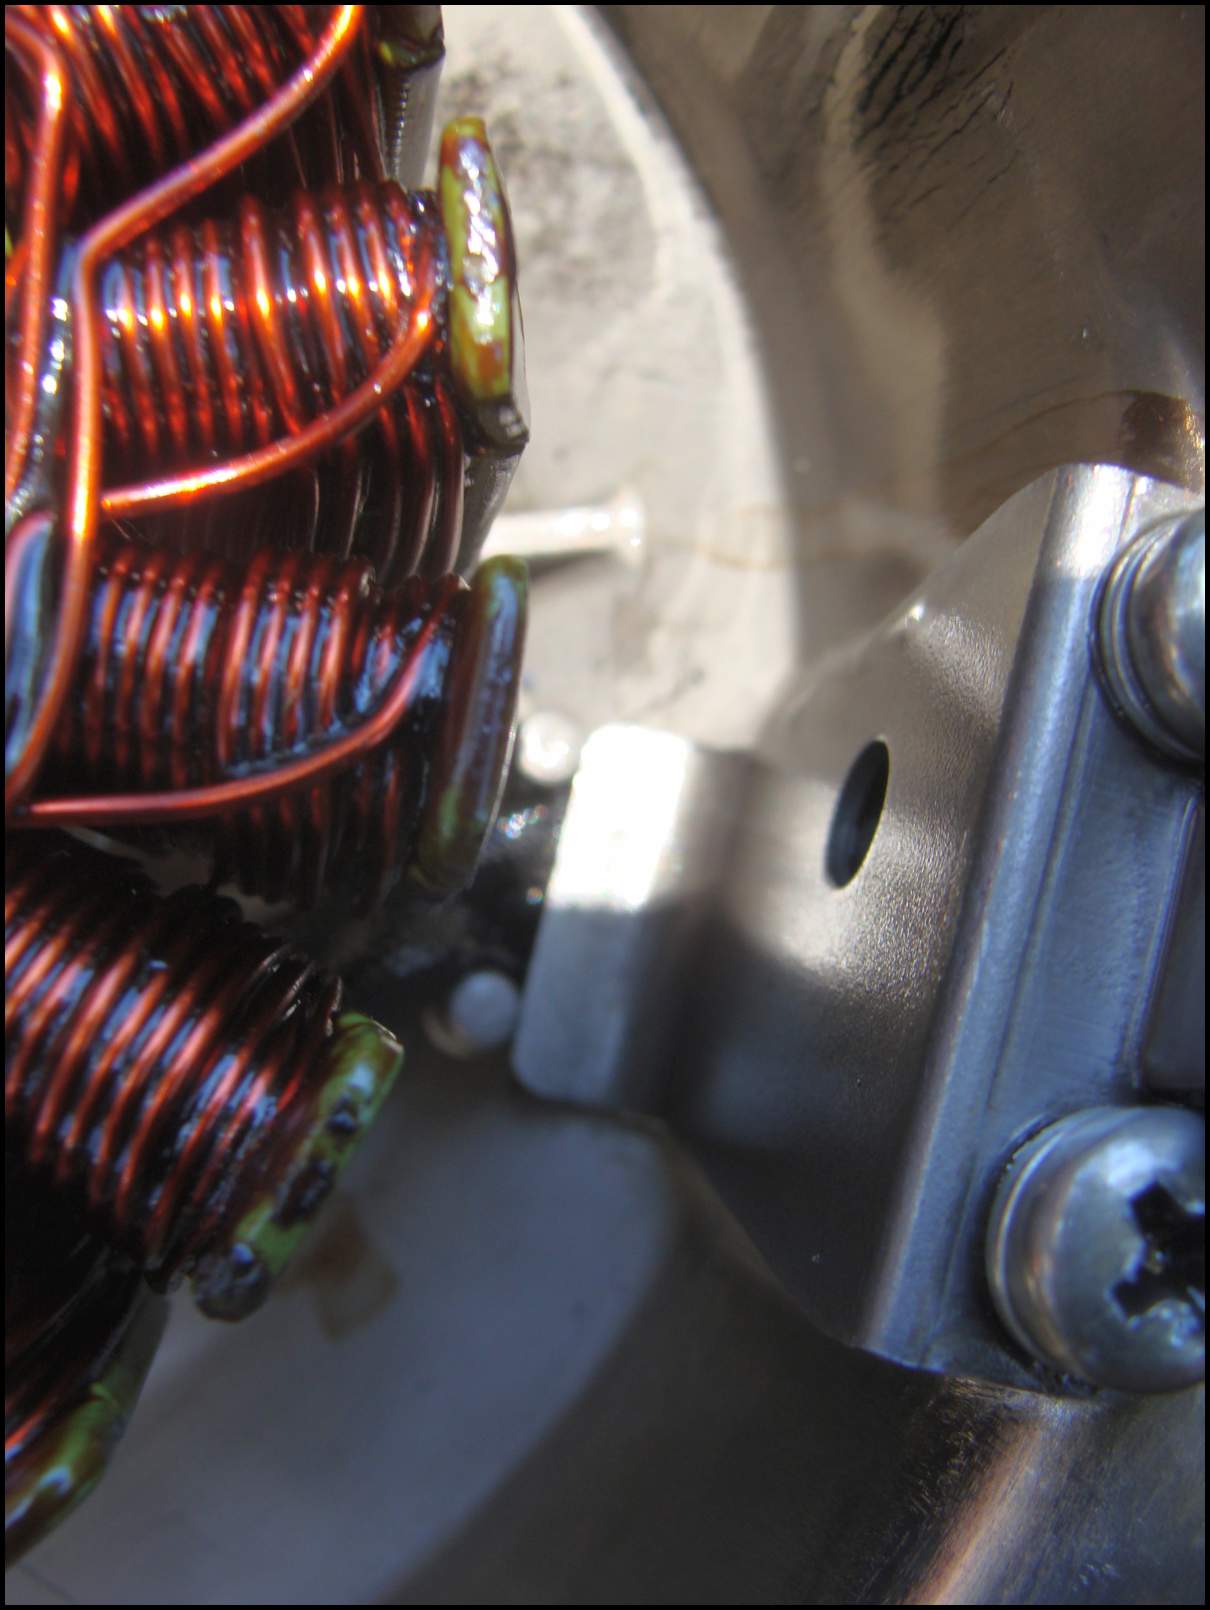
Could this be the source of my 1,500 crank buzzing? Look closely.
Ouch! What the heck?
The problem - the pix doesn't' show it well, but the bolt ends are extending to far out and contacting the stator.
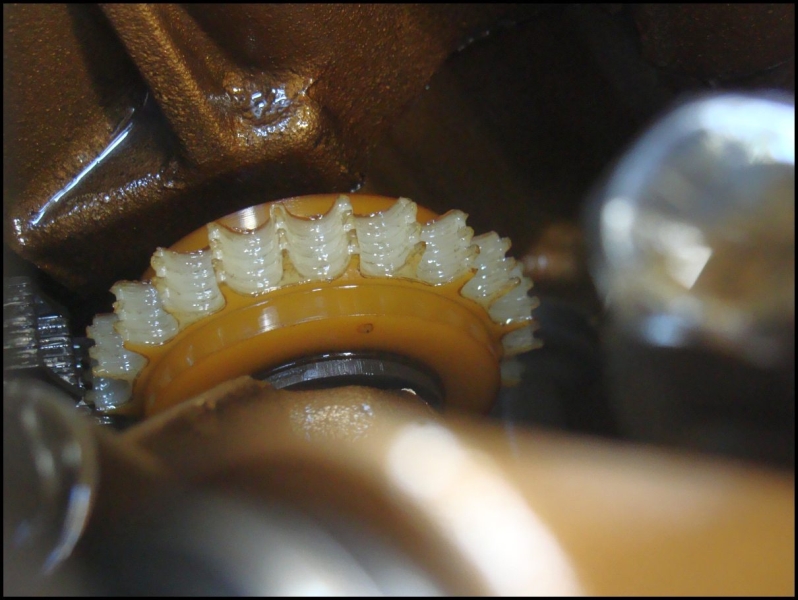
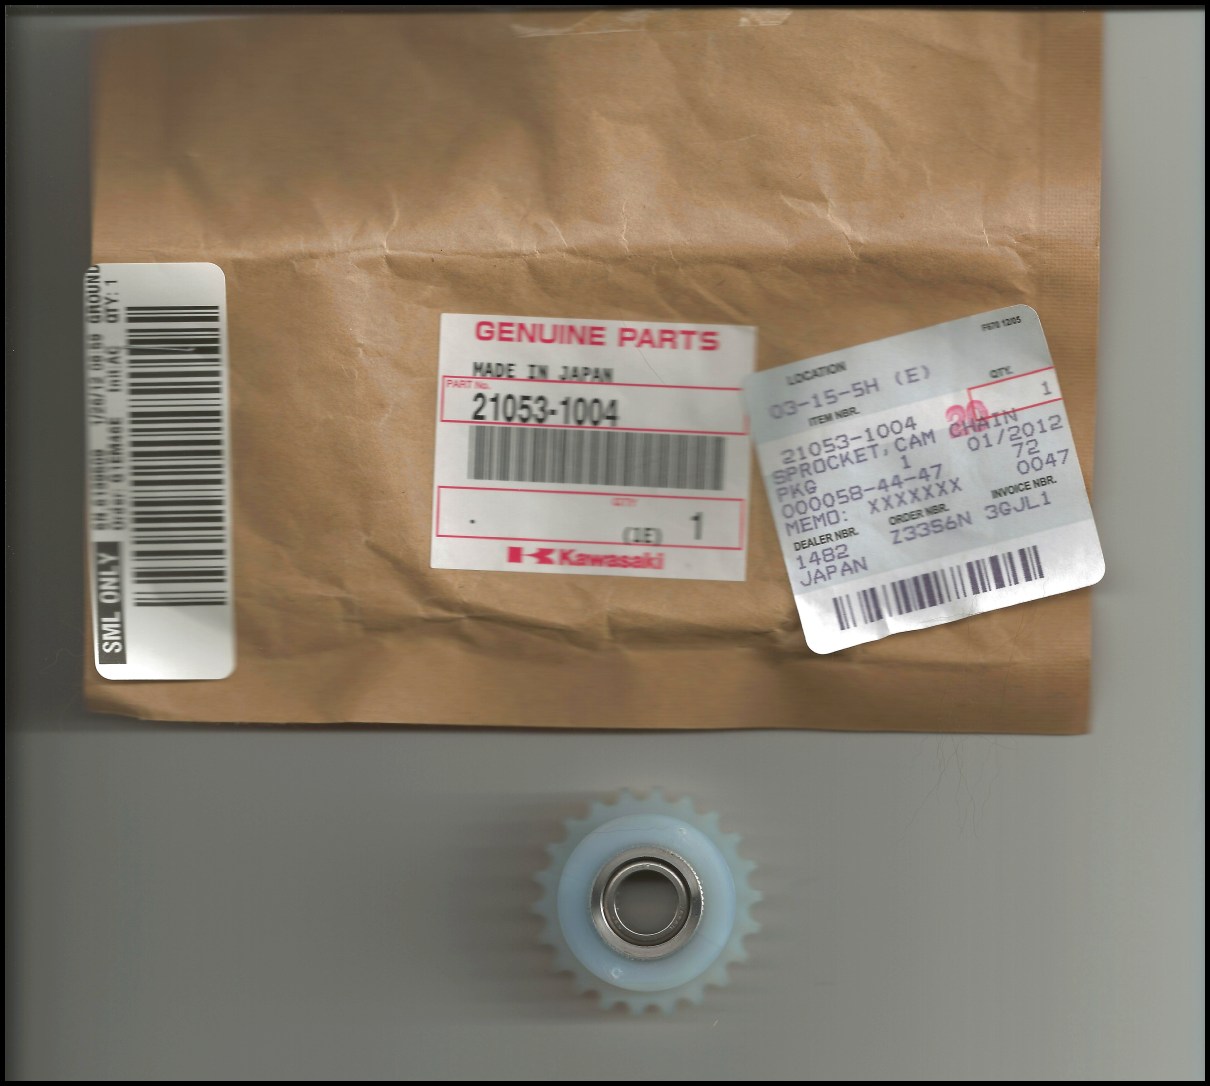
Man, am I glad I looked at this - it's the cam chain idler gear and it's about toast. Non longer available from Kawi, either.
I think they are available from aftermarket though..
Here's a video showing how loose the cam chain is............
zzzzzzzzzz
2012-01-08 Noise Found & CC Tension from dcarver220b on Vimeo.
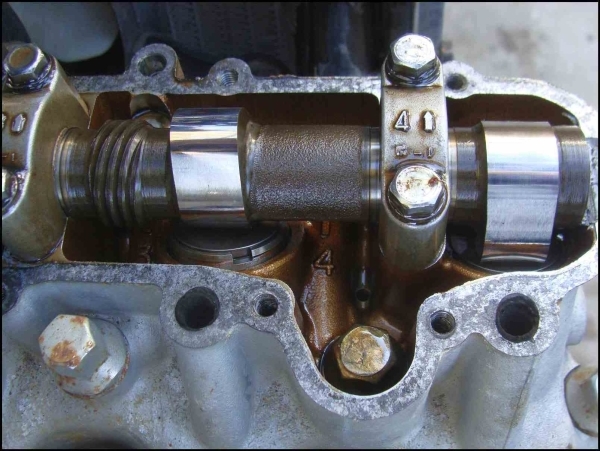
Top of piston looks OK too..
Numbers for documentation.
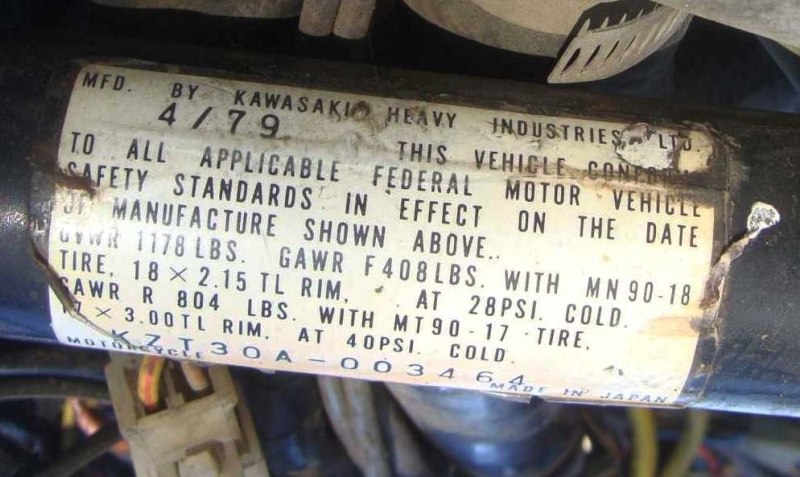
Engine numbers.

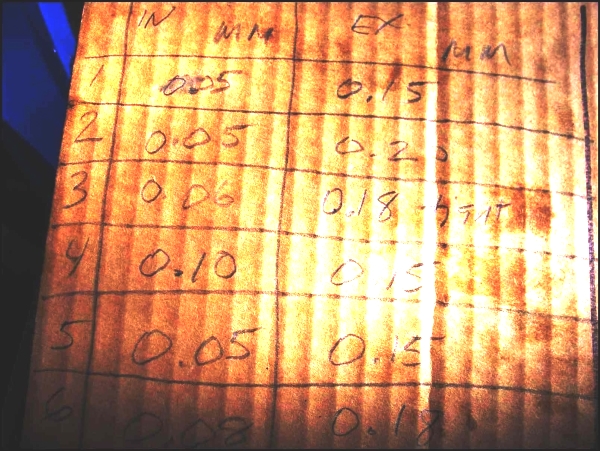
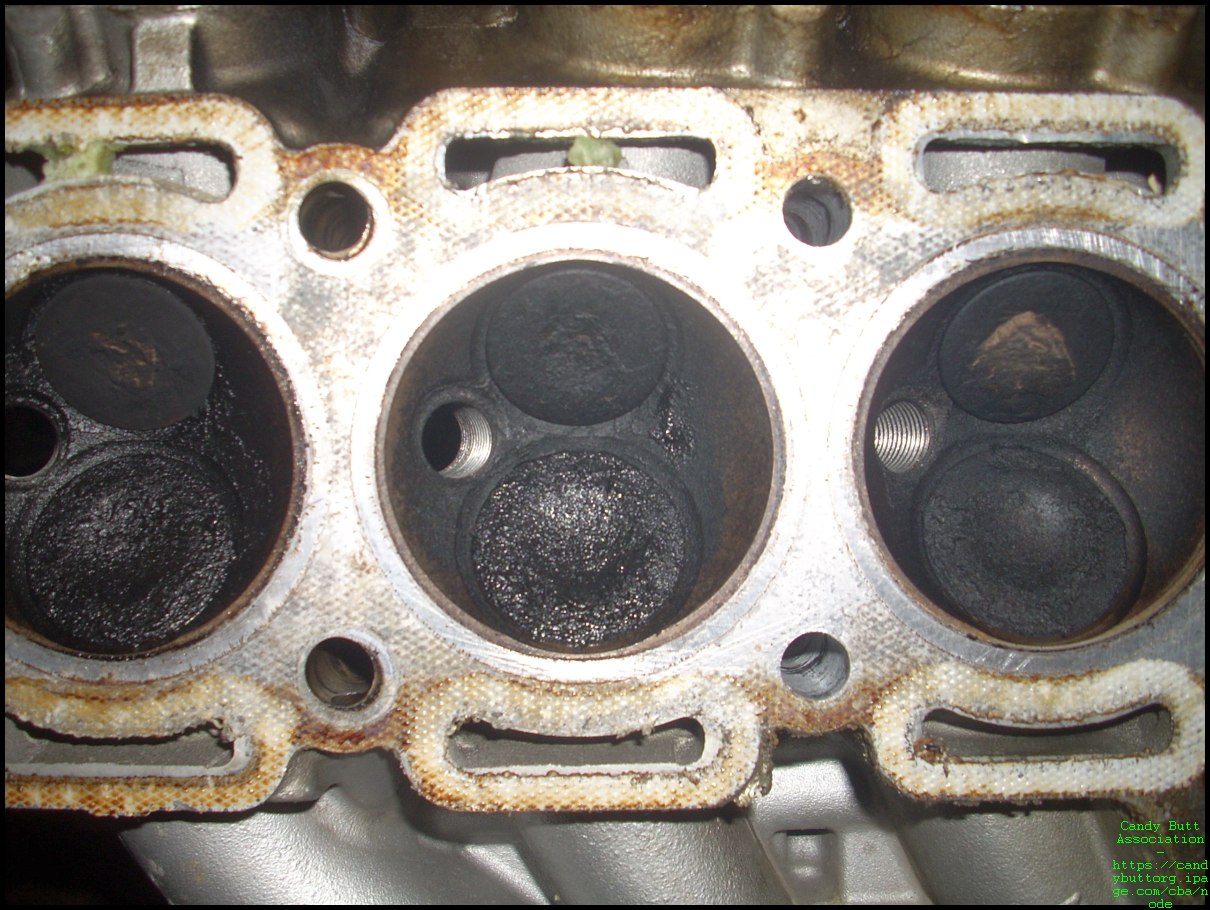
Valve clearance info. Most of the intakes are right at the tight side of clearance.
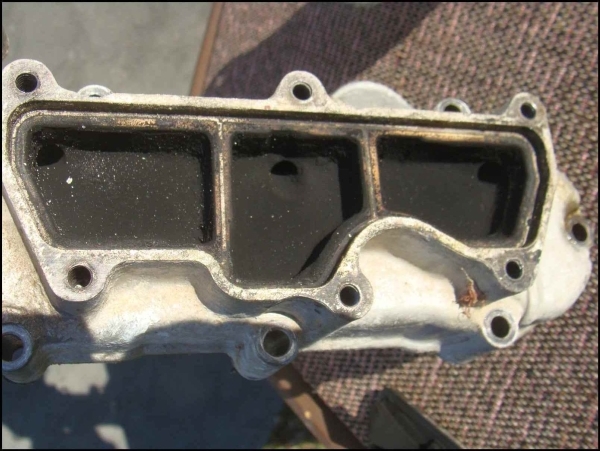
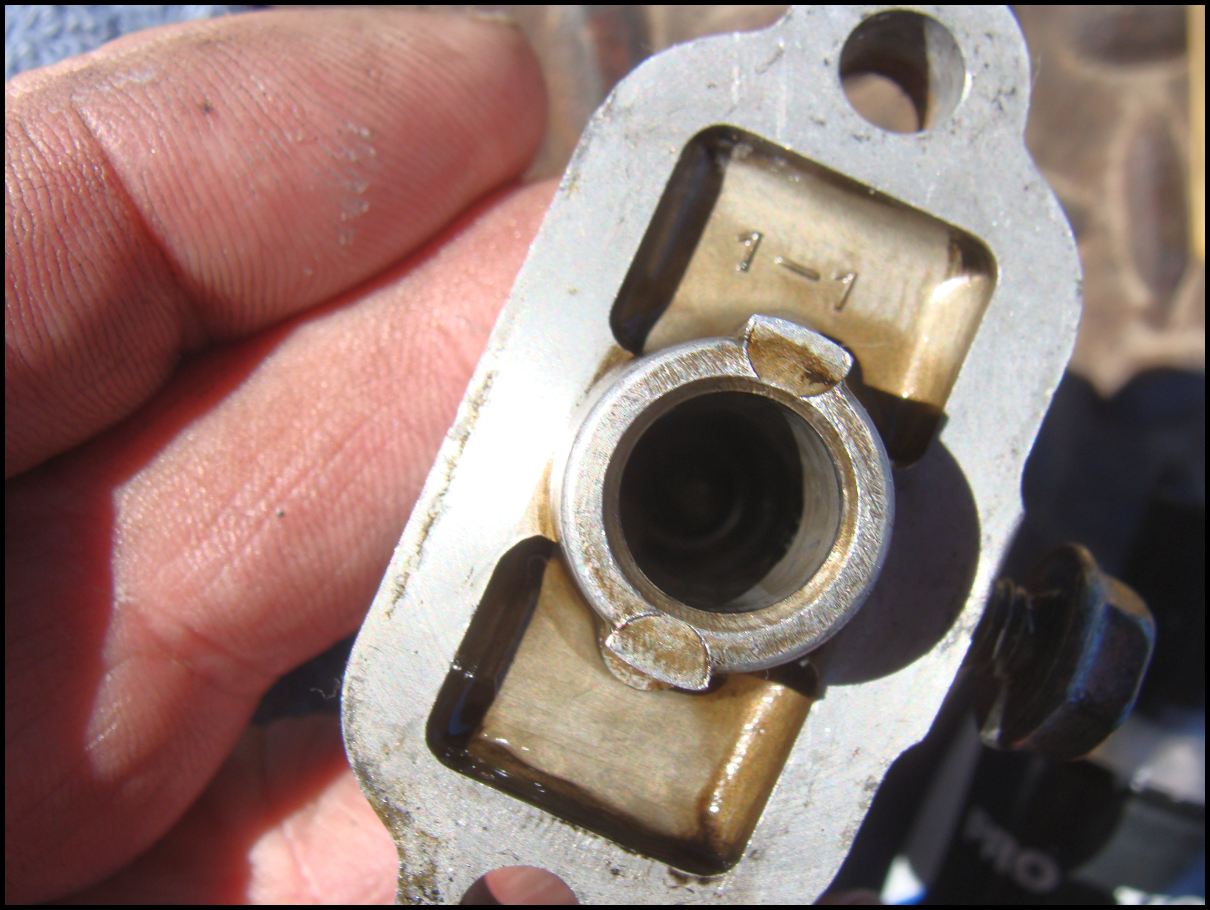
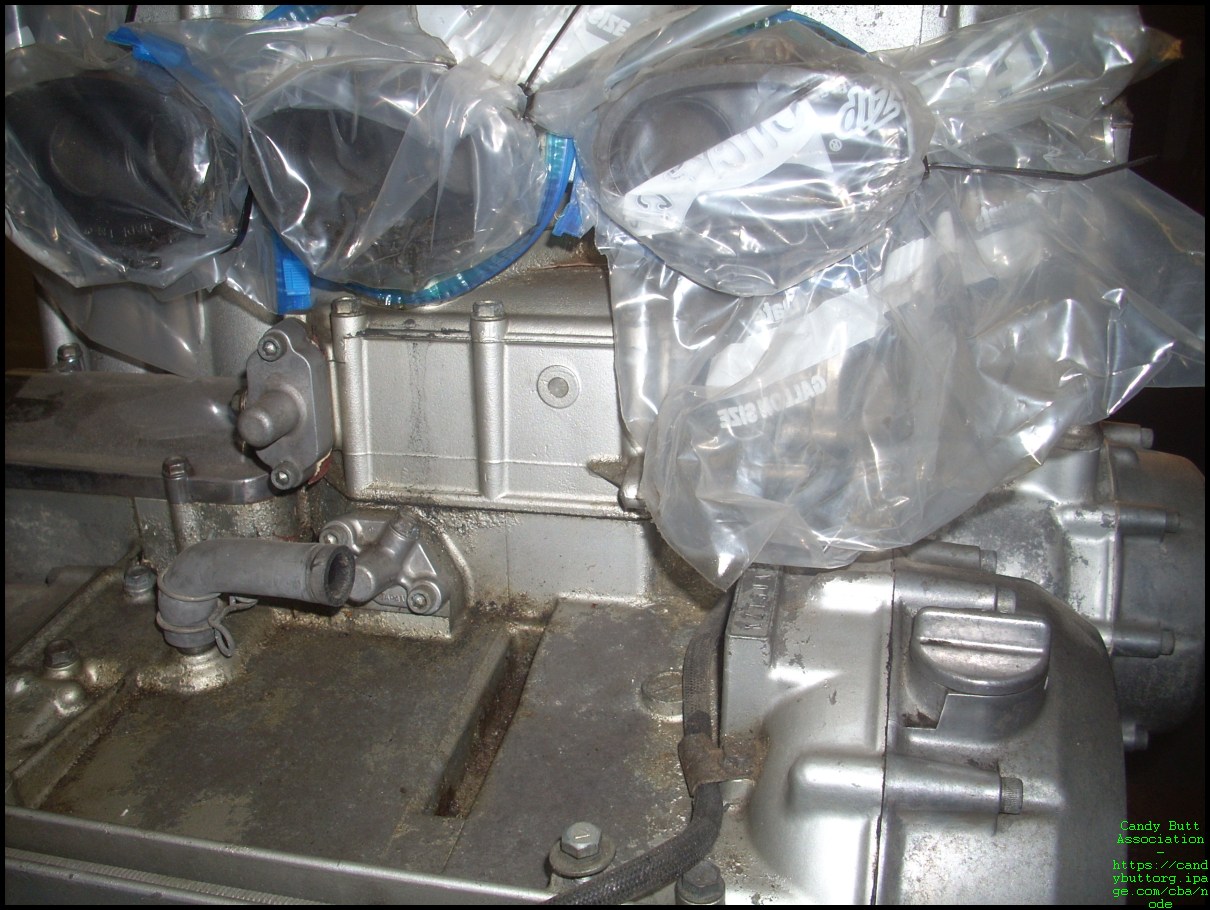
Part of the AIR induction system. Look at how rich it looks. Pure carbon..
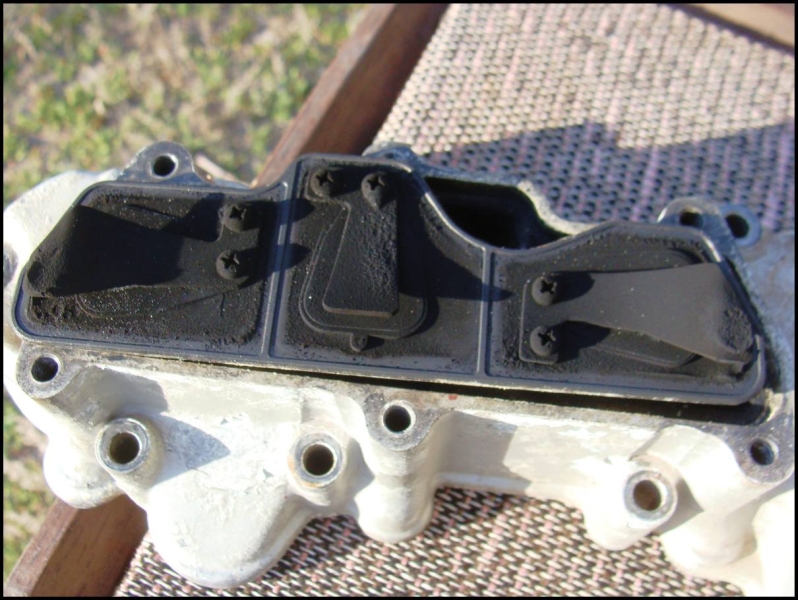
Reeds removed.
I had to to do it. Broke out the buffing wheel just to see if the aluminum would polish out. It kinda sorta did, good enough for now.

Many, many thanks to David E over at KZ1300.com - the Bible for all things KZ1300.
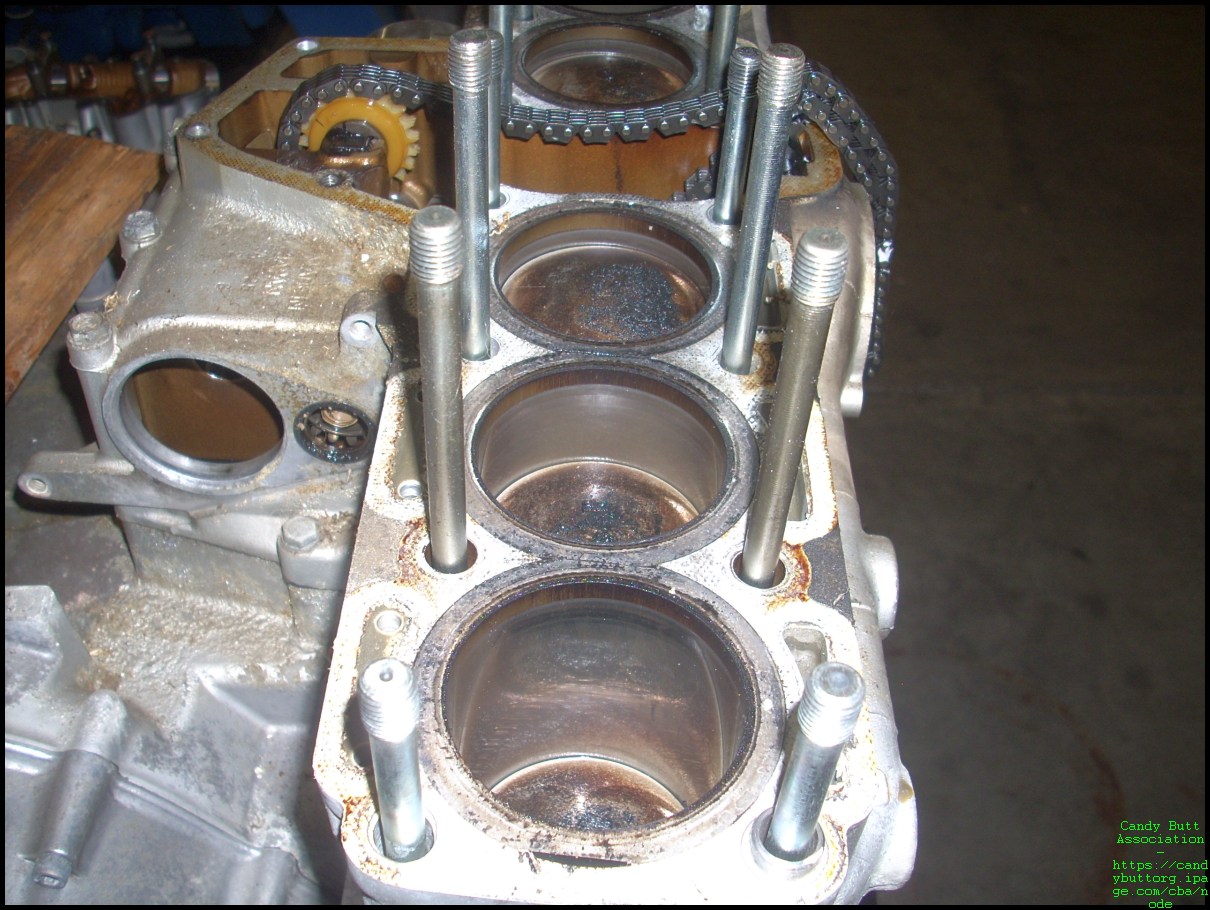
One last pix - split cases!
Nice
Looking good there Don, did you have it running at all?
R
Yes, she runs!
Here's a clip
I won't start it again though, until new CCT at minimum, is installed.
2012-01-12 Spare sub-alternator on Ebay`
A couple of days ago, I purchased a spare sub-alternator from a guy named Dave up in Oregon, a dismantler, who had a complete sub-alt available. I don't need it, but could not pass it up..
So, for 200 USD it's on it's way to the Hondarasa! EDIT - David Morgan, Cyclepsycho Motorcycle, Eugene, Or.
2012-01-12 Gas tank and Ignition key
Yesterday got the gas tank locking cap fixed. My neighbor had broken the key inside the mechanism some 5 years ago. The locksmith did a great job, got the remainder of the key out, cracked the lock, got the cap to open. I had a replacement cap, from Taiwan, that he then installed. Not as nice as having 1 key for all, but what the hell, you don't always get what you want. He also cut a new ignition key from the code on the old key, and it worked great!
WooHoo! Here's the old cap on the tank.
2012-01-16 OhCrap
The good news started with the local locksmith was able to re-create an ignition key from the code on the broken OEM key!

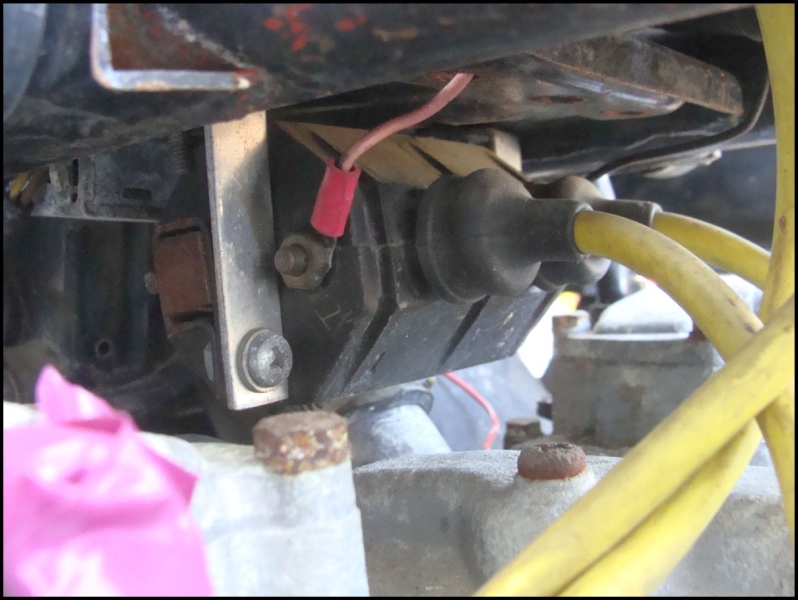
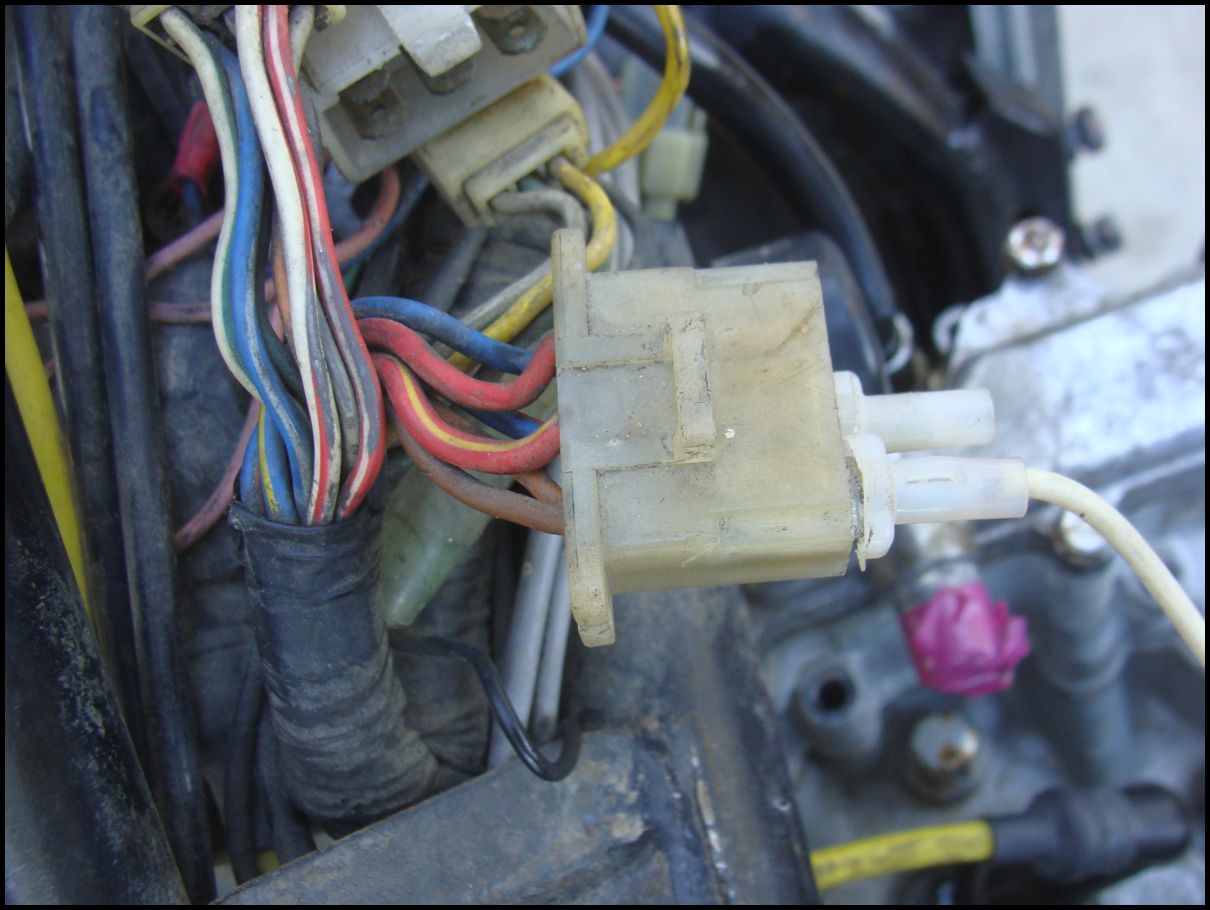
Before re-connecting all the stock harness, I decided to take pix of my hot-wire job, just in case..

This connector under the tank, RHS.
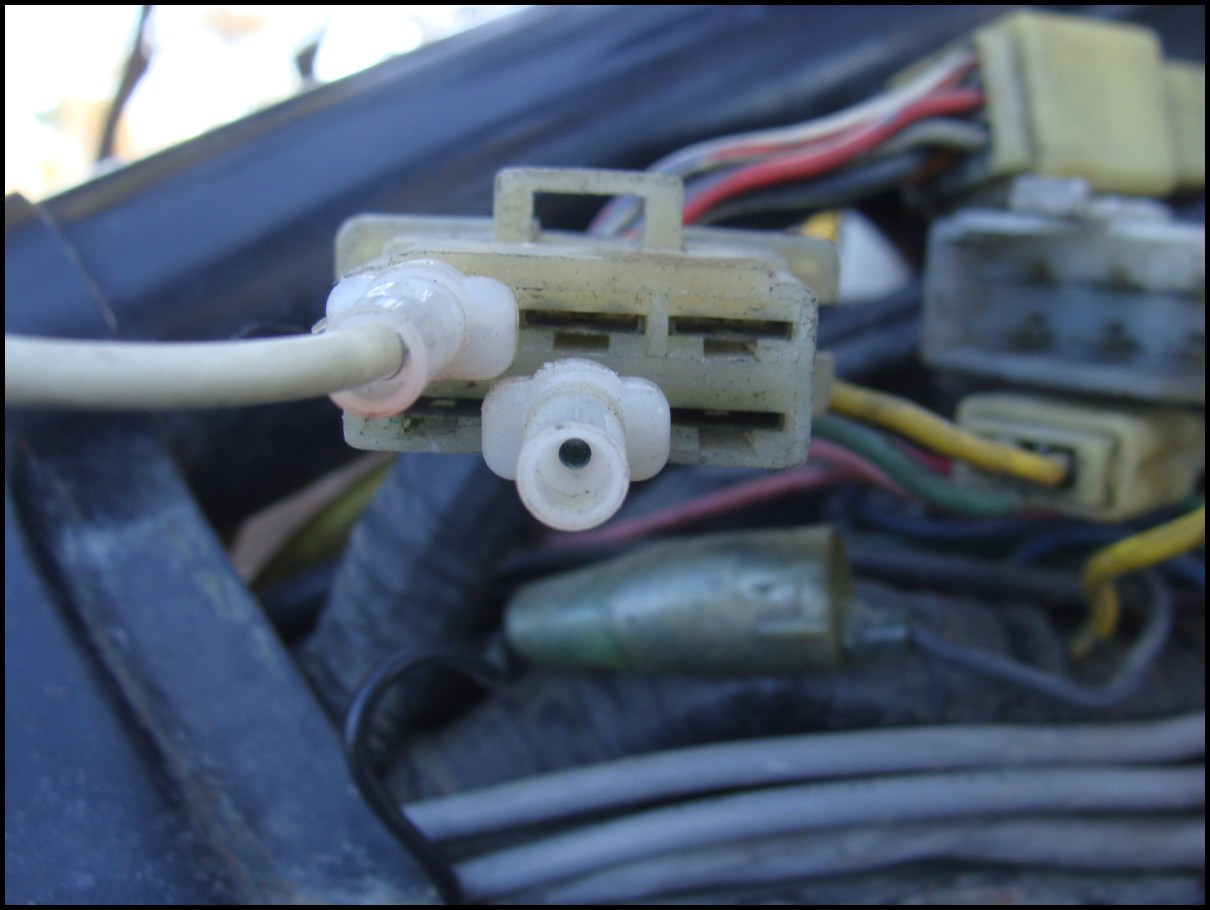
Brown wire is hot.
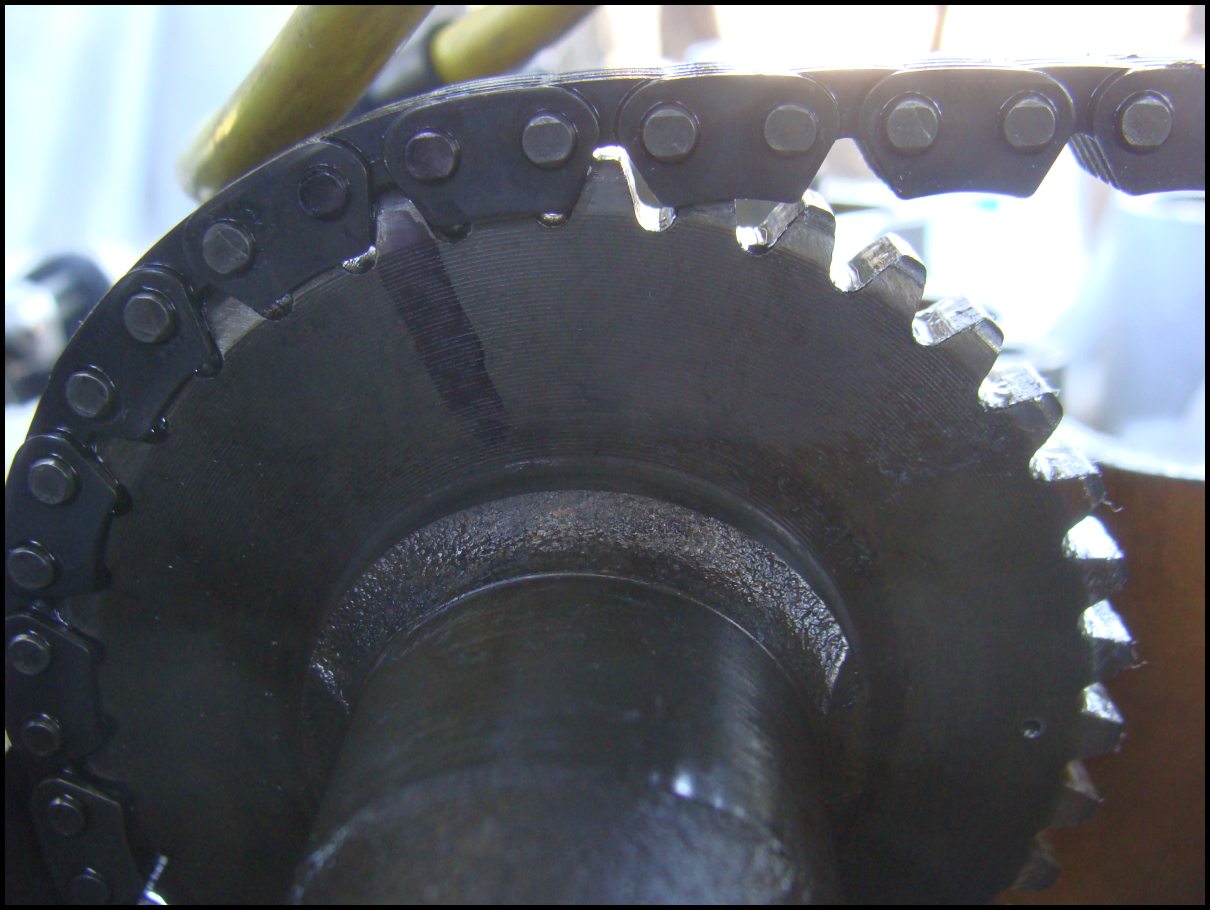
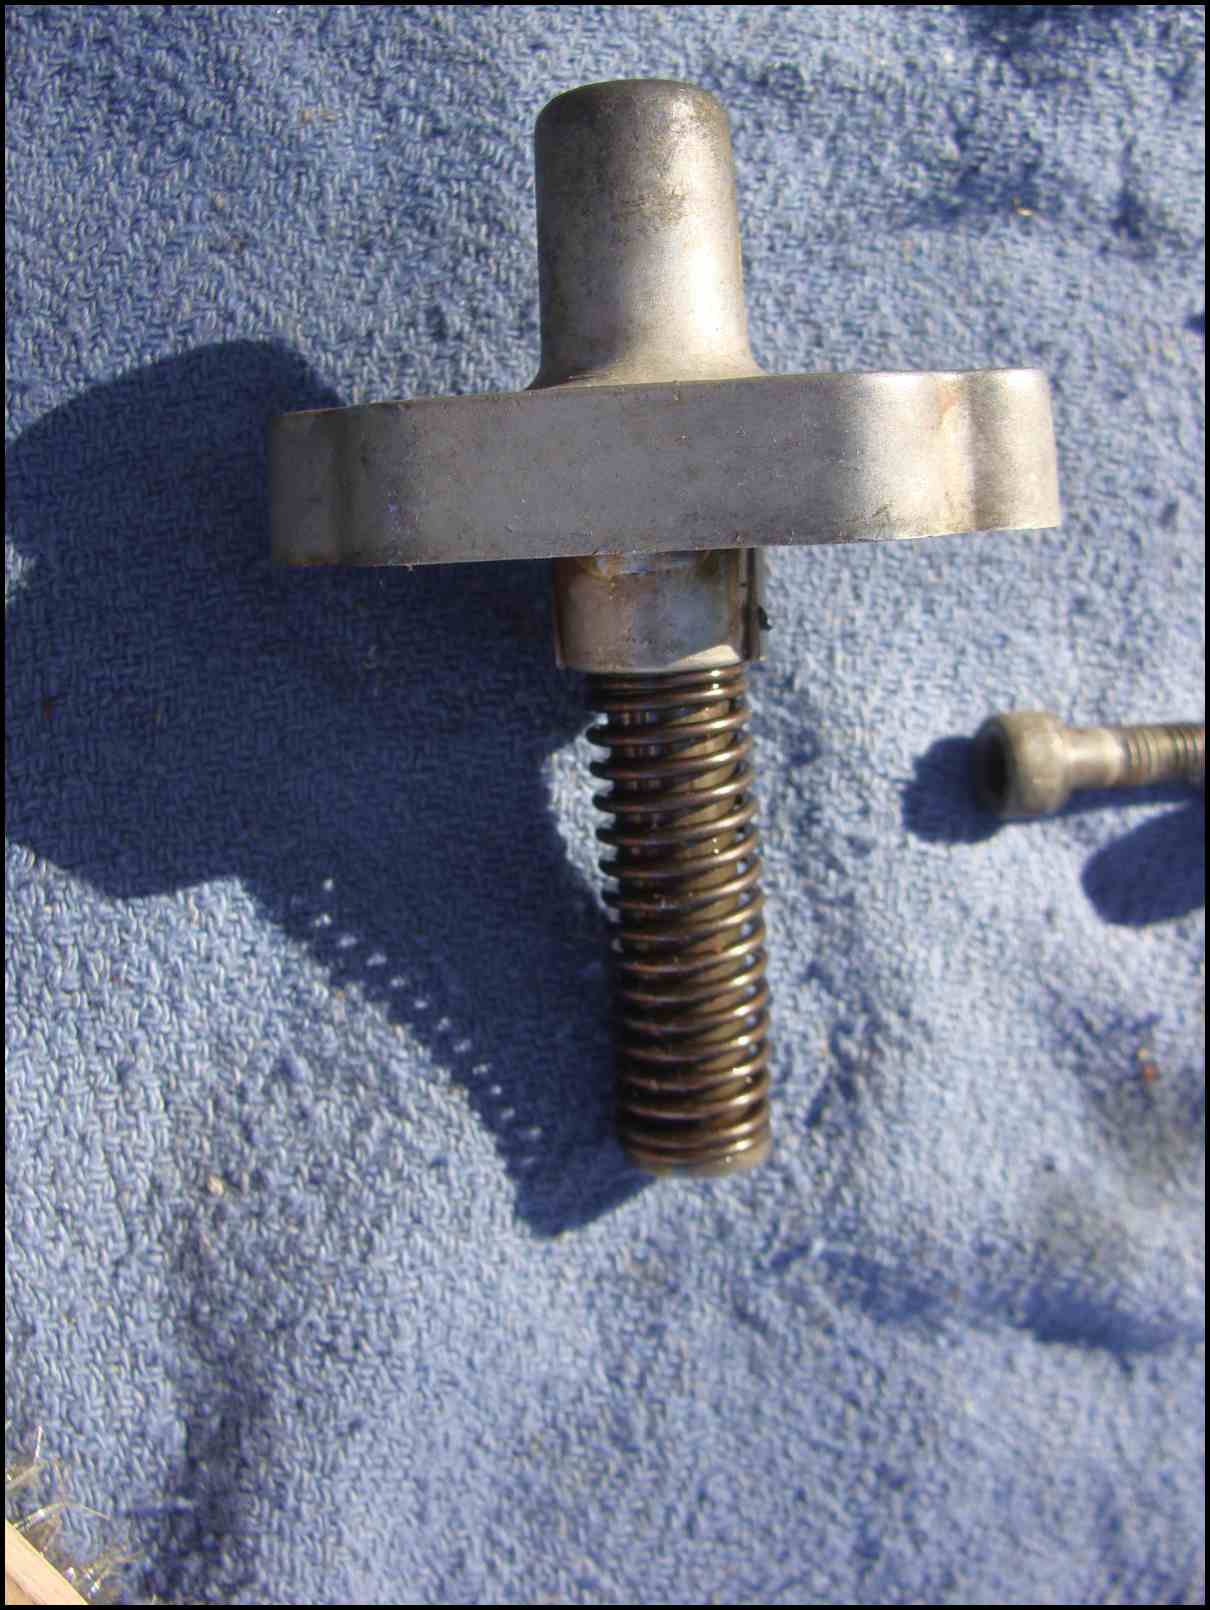
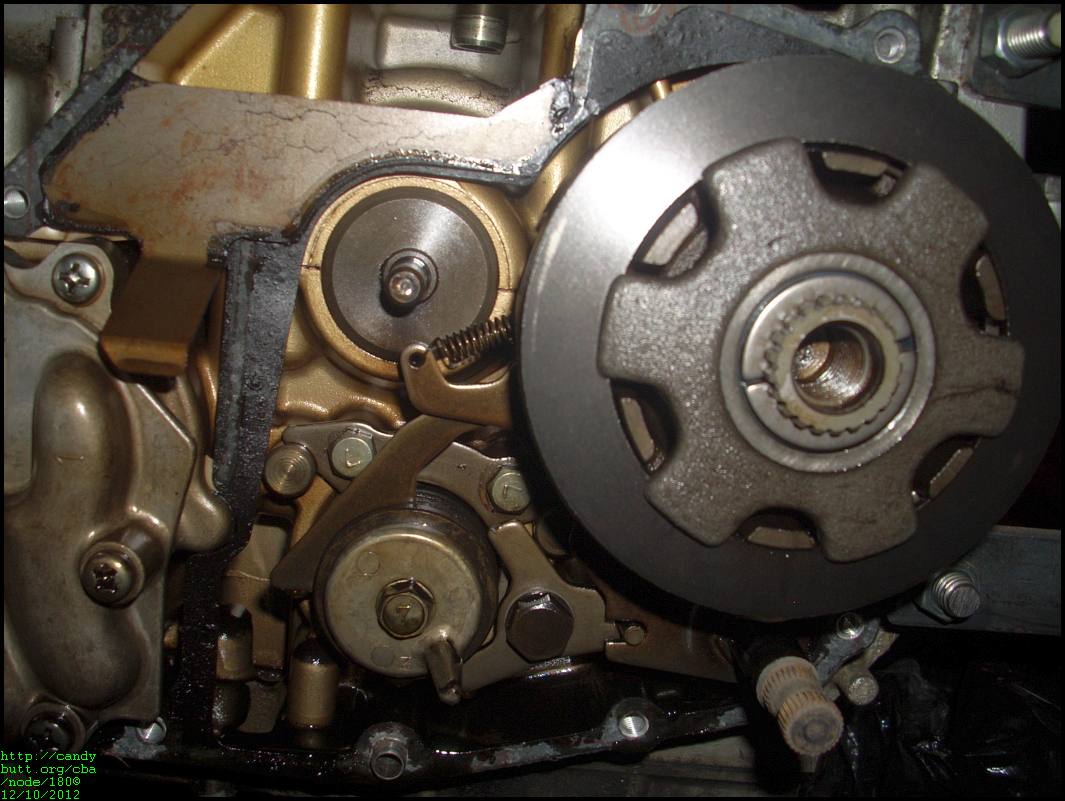
The start of a mystery to me. Conscientiously, I marked both exhaust and intake cam (exhaust here) and cam chain as I was about to replace the POS CCT with an APE manual adjuster. Sigh of dreams. Note the marks on the gear and links.
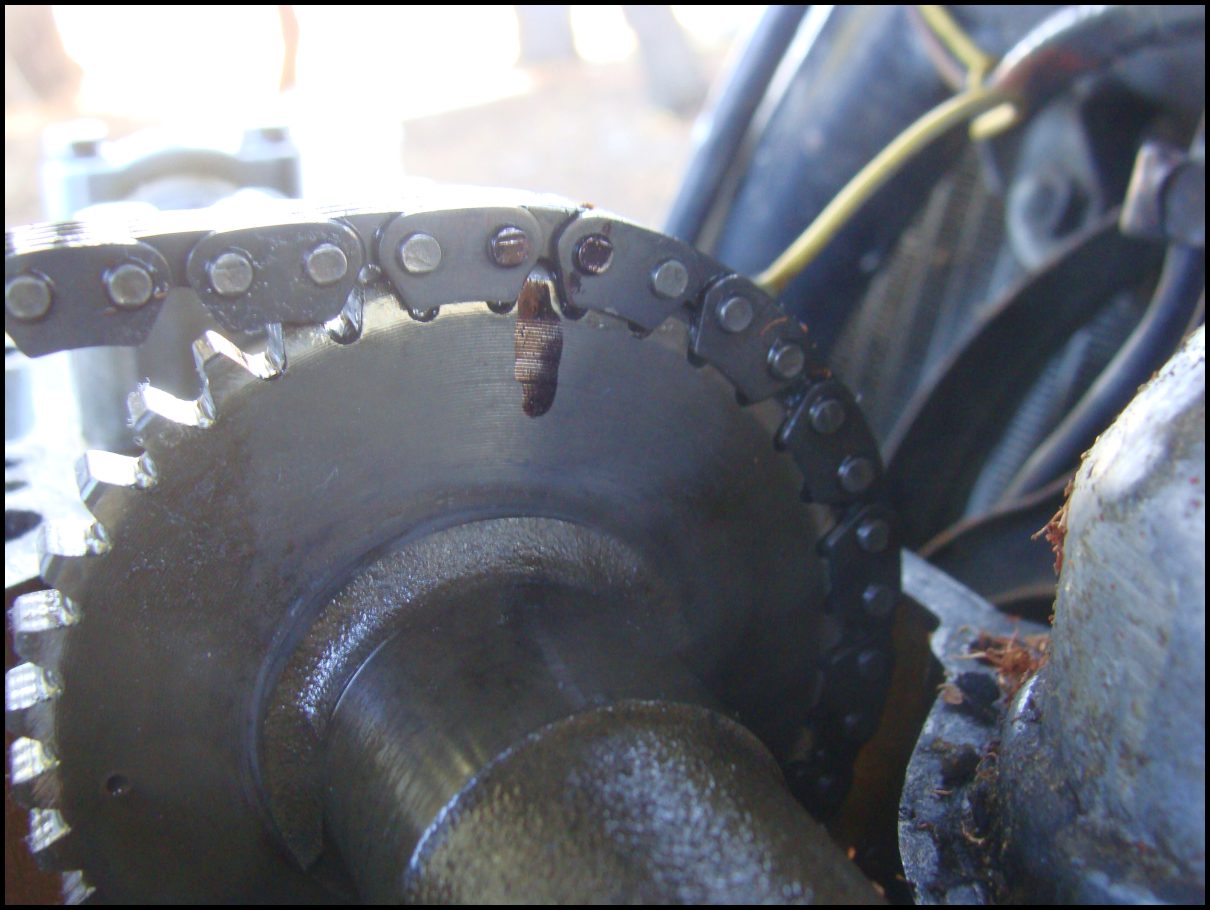
Intake.
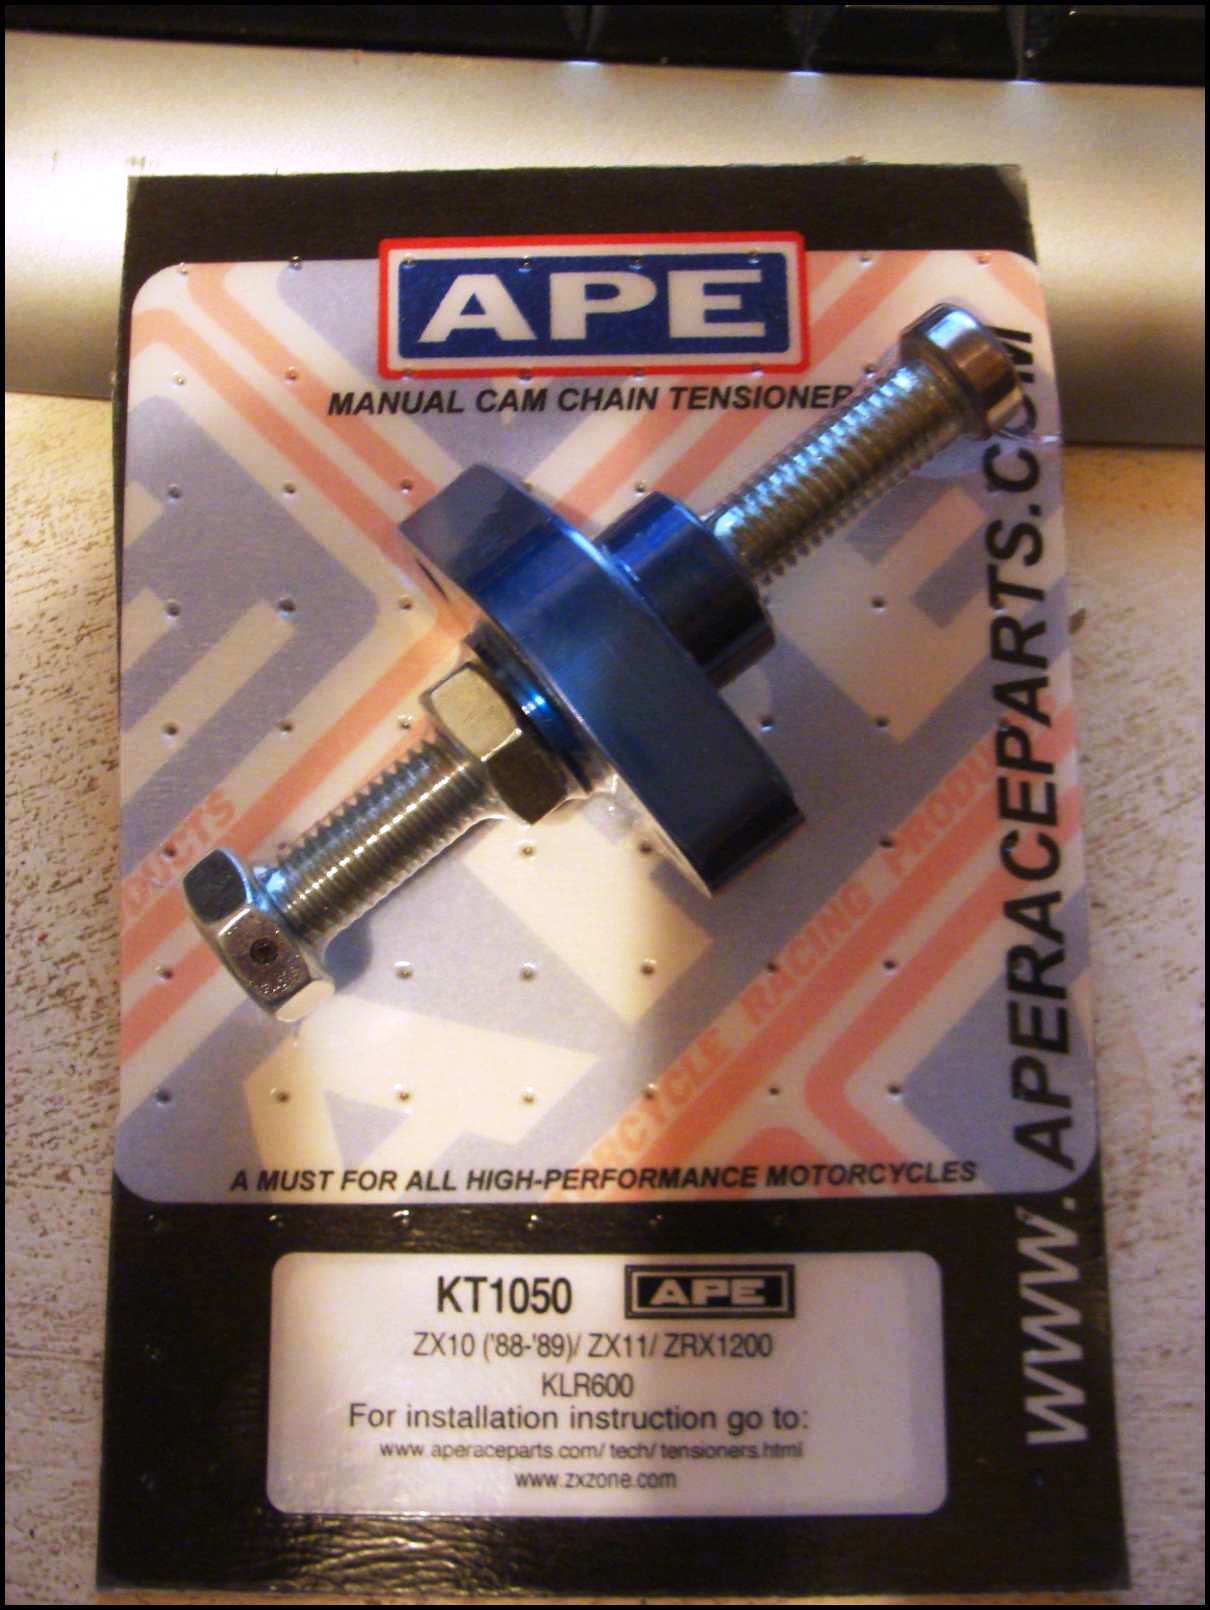
Now the freaking problems begin. The new APE manual CCT adjuster does not fit into the cylinder hole. The stock OEM CCT is 17 mm OD.
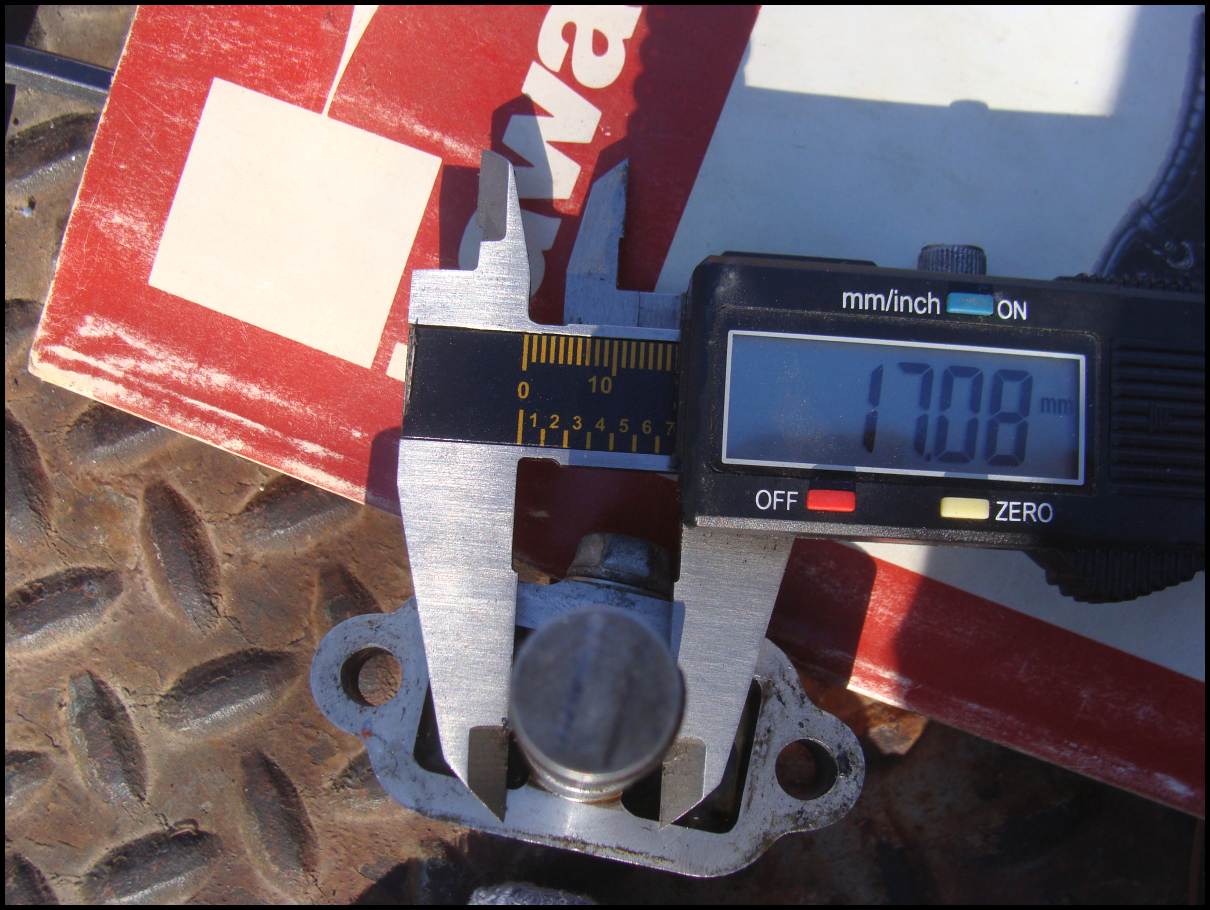
The new APE is 2mm bigger..CRAP!
Additionally, my CCT doesn't look anything like the one shown in the FSM!
What the fuck, over?
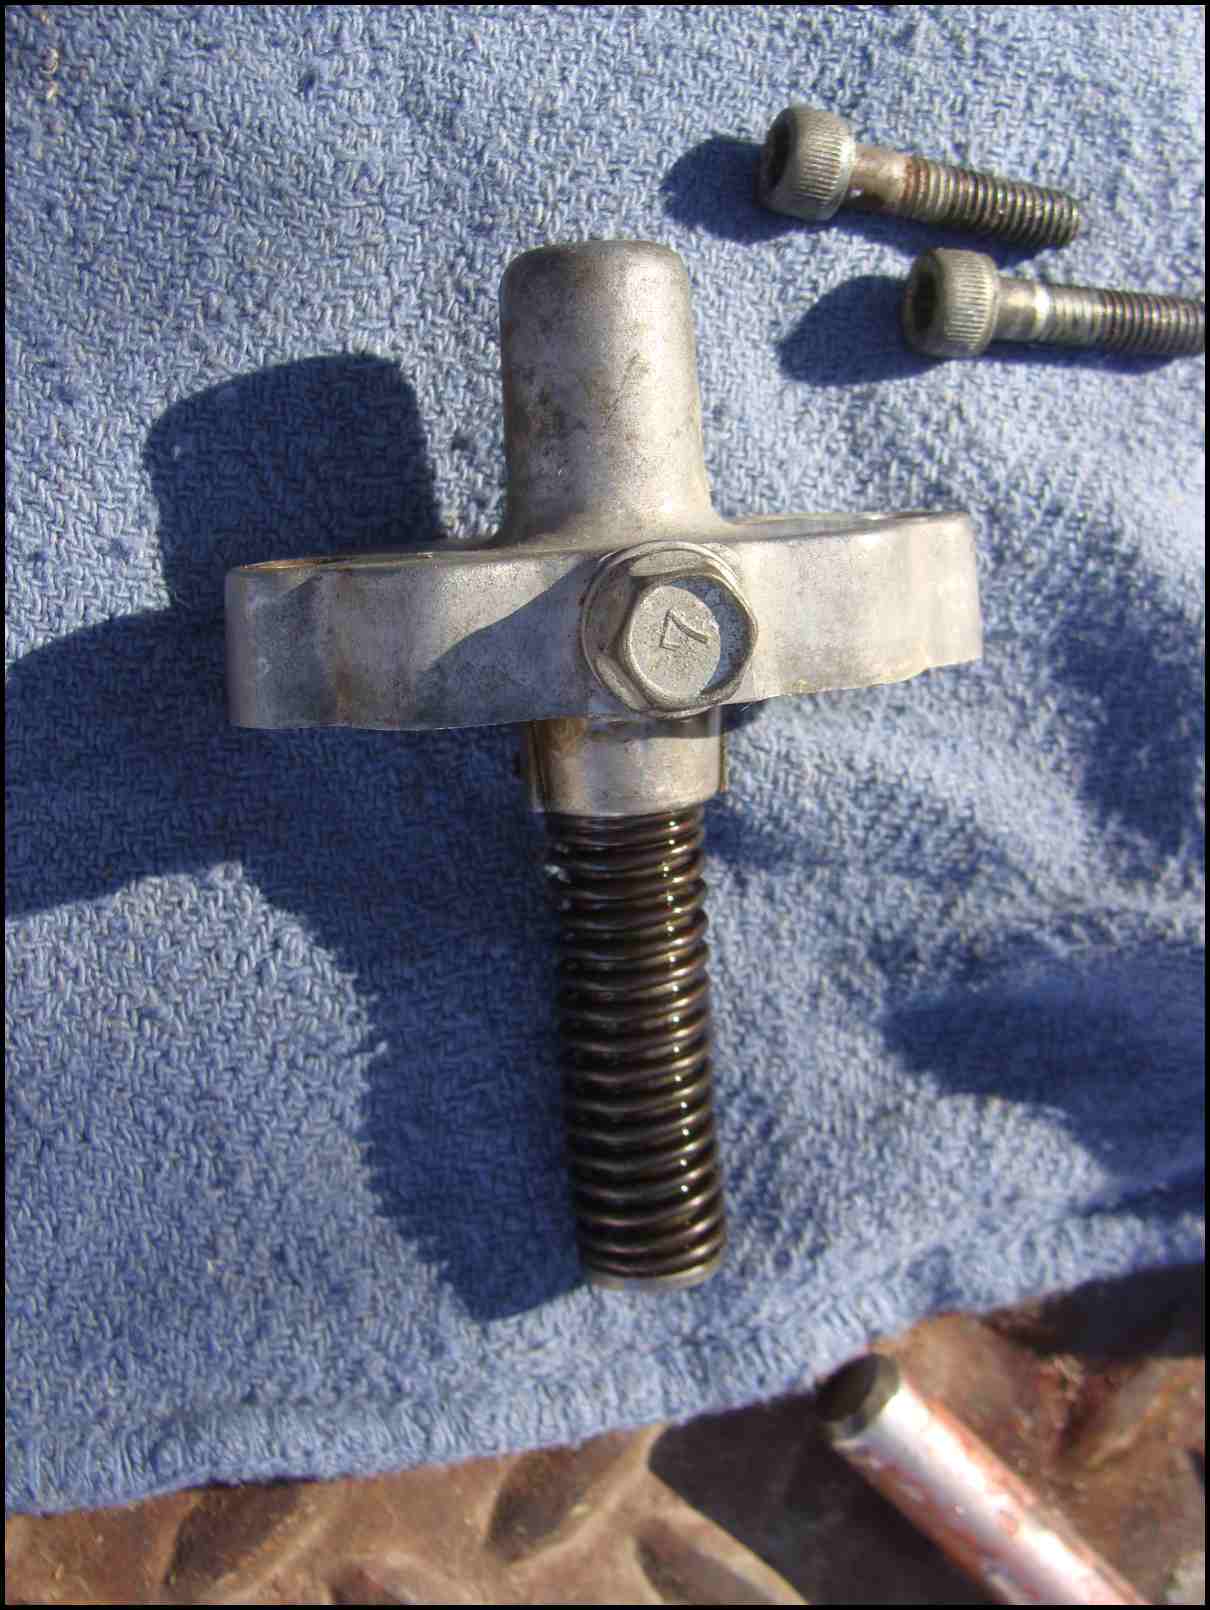
In the FSM, the CCT has ball-bearing lock device - this one has none. This one, simply a spring and a push-rod.
Another view.
The mounting holes are different too.

Now I'm not happy. I've just removed the OEM (perhaps) CCT, the new APE does not fit..

Have I messed up the cam chain timing?
The CCT in my KZ1300.. I don't get the design.. Just a simple spring pushing in? No locking device? I looked many times, nothing. I do NOT recall replacing this device earlier, years ago... Seems to me the chain could develop a harmonic and whip 'backwards' causing slop and resultant tooth slip, e.g. disaster. WTFO? I am so confused.
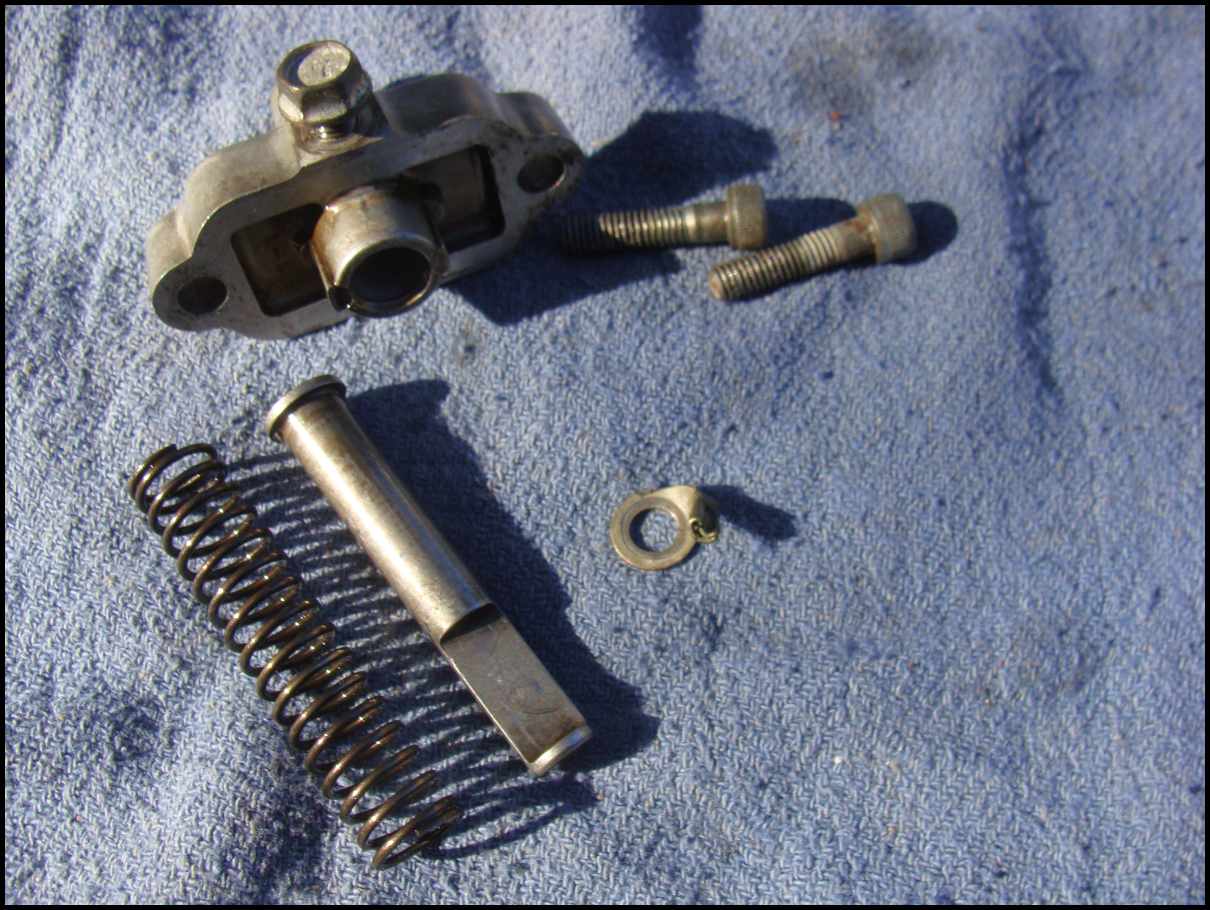
Ain't no ball bearing lock in this CCT!
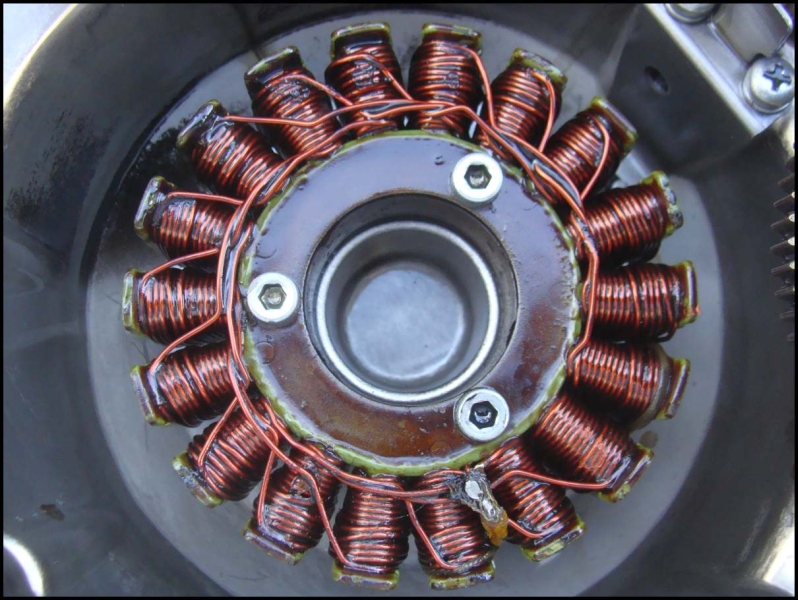
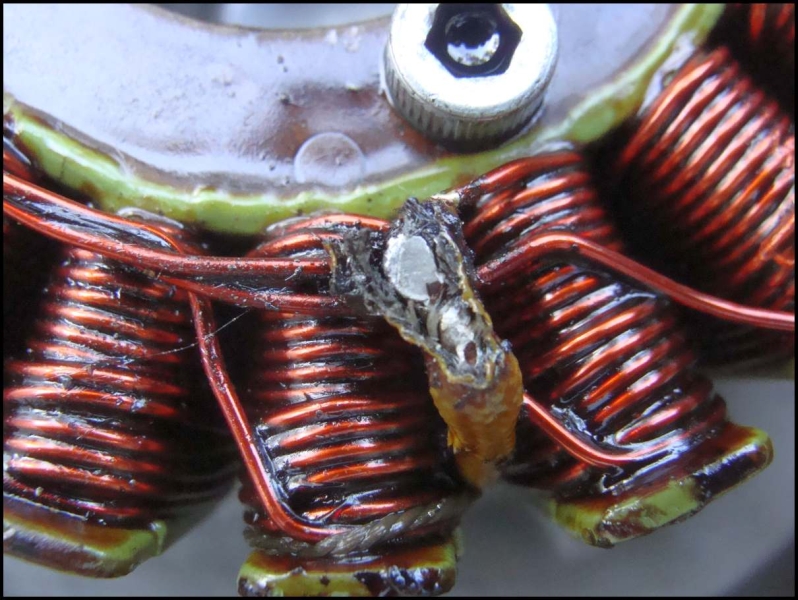
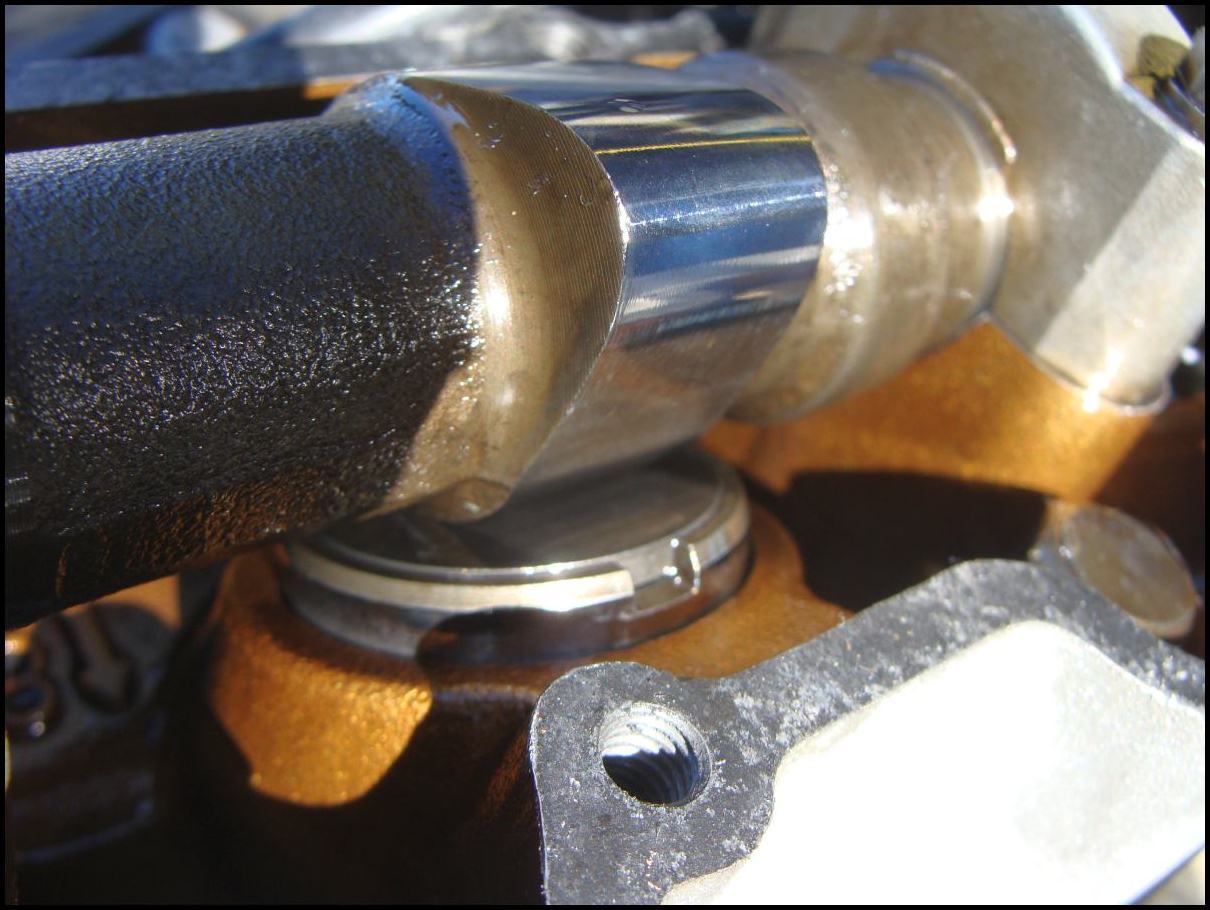
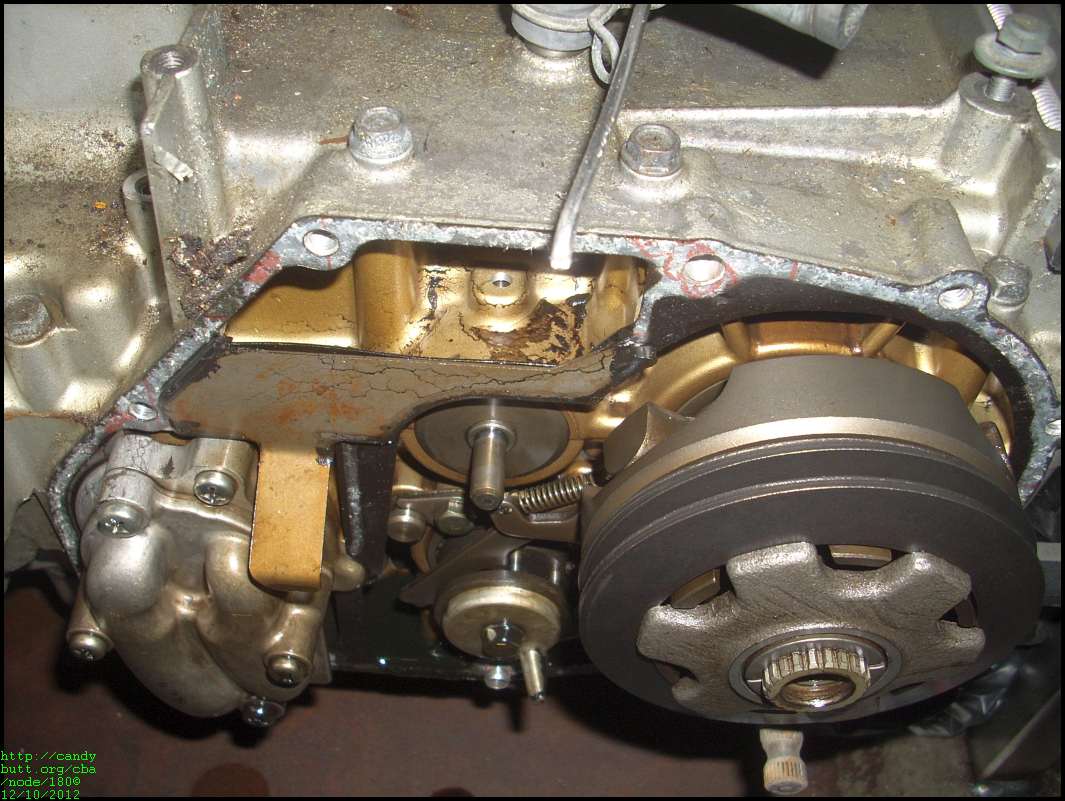
Moving on, I had previously seen wear marks on the coils from the Factory supplied aux (at a high cost) additonal alternator. This alternator resides on the left end of crank. Look earlier in my posts, and you will see where the bolt ends, protruding through the rotor and harmonic dampner, were contacting the summation point of the 3 phase wiring. I was hoping this was the source of crankshaft vibration at 1,500 RPM.
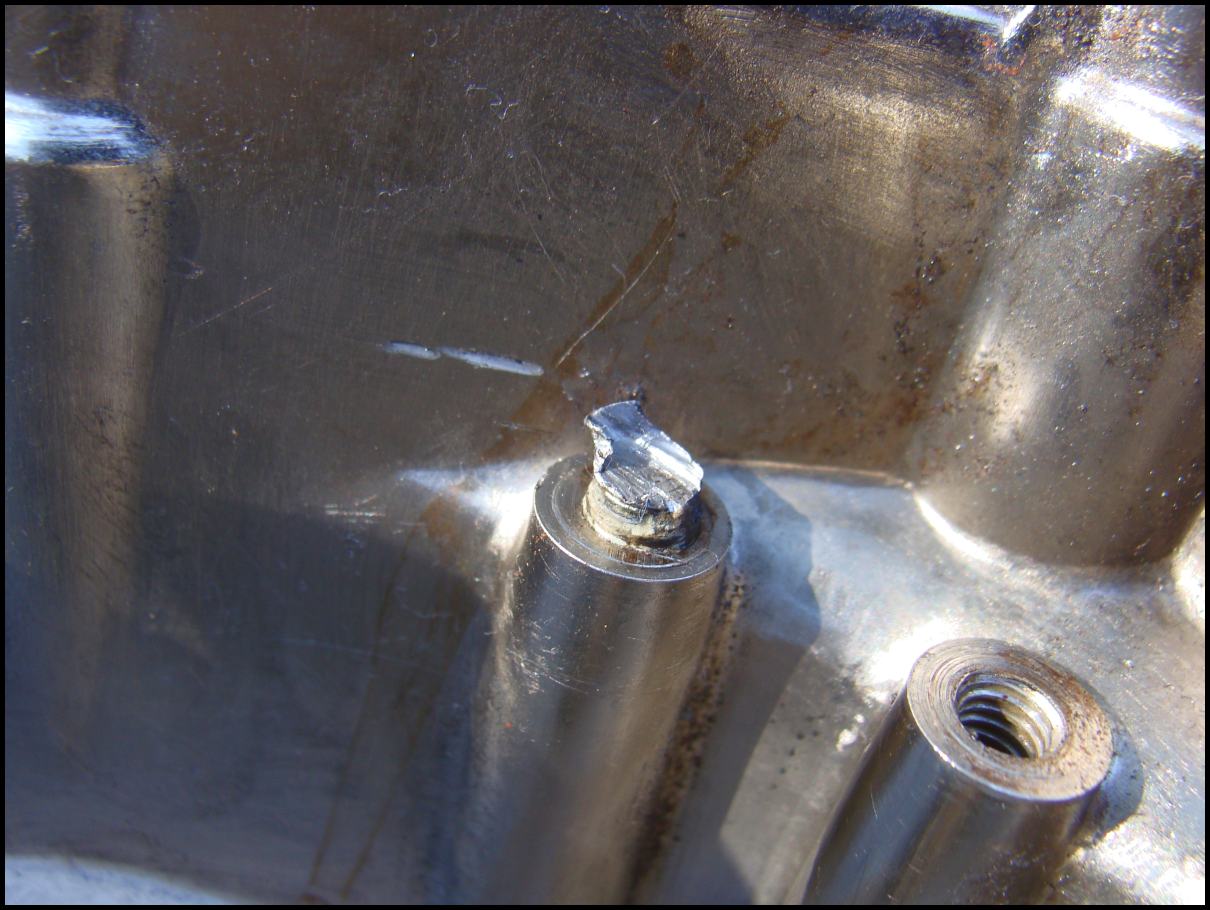
Of course, some freaking IDIOT usd LockTite RED on the wire-harness supressor, the bit of sheetmetal to keep the wiring away from the rotor. What a PITA. This took me 1.5 hours to remove. Dremel, heat, Dremel,
p a t i e n c e.
Did I say P A T I E N C E ?
Finally, I own this bitch.
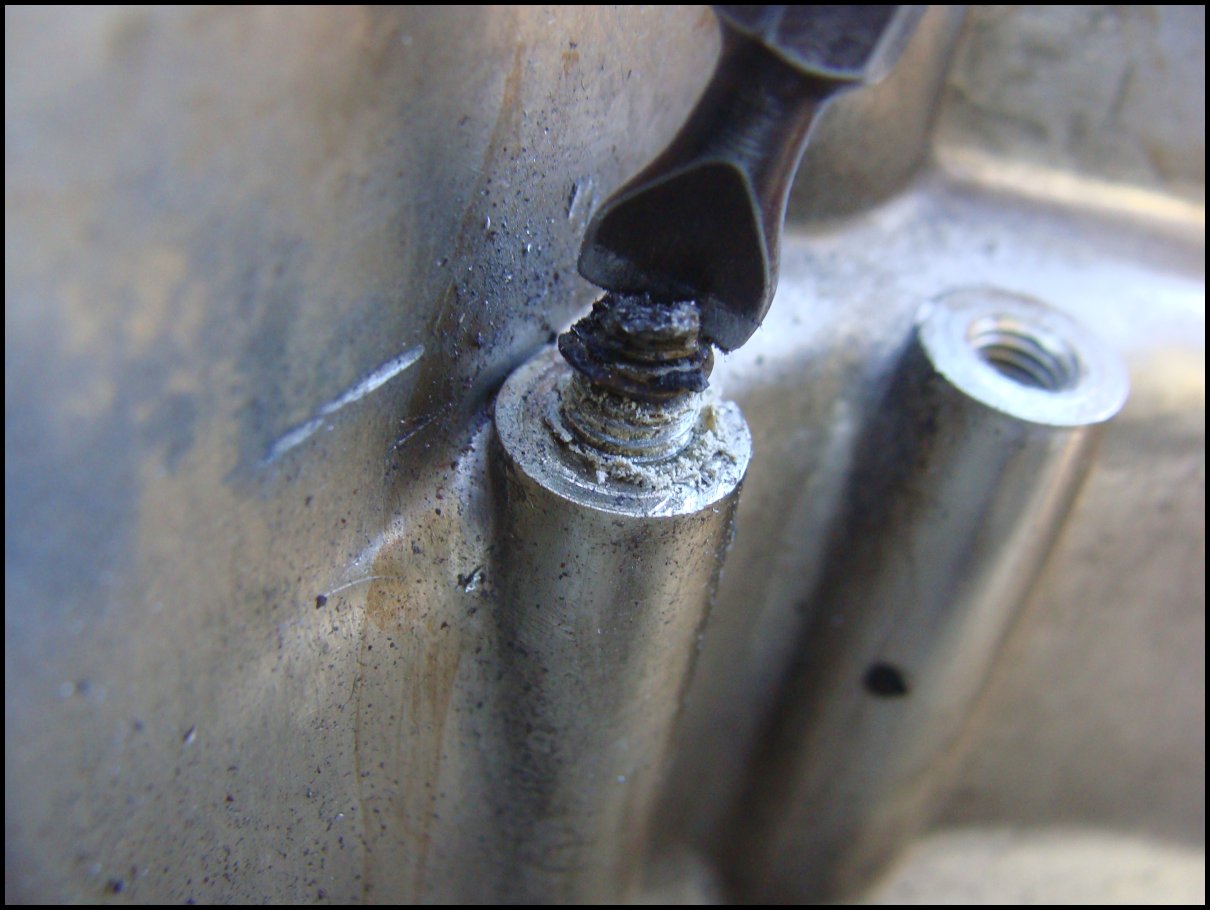
Who was the dumb fucking bastard who used locktite on this anyway? What a PITA for nothing.. You can see the LockTite boiling off the threads..
I just had to show a pix of the cam and bucket.. What a totally cool and bitchen arrangement this is, even for a 30 year old design.. No need to remove the cam, just use the special tool to lift up then carefully remove the shim.
Elegantly simple.. shim removal without camshaft removal.
A final pix from my 2006 FJR at 150k that has a blown head gasket (I think)...
I'm discouraged after today. The 1,500 rpm growl moved to 1,800, and sounds as horrible as ever. I was hoping the rubbing between the stator and rotor on the 'factory kit' side was the source. But it's not. Additionally, other shit too.
Having an ignition key, the factory wiring was connected, e.g. 'hot-wiring' eliminated. The 'start' switch is iffy. The main relay stuck. Could not shut the engine down except by shutting down fuel supply. A few good raps by a small ball-peen freed up the relay. Still, the 1, 500 to 1,800 crank growl is very troublemsome.
Damn.
2012-01-18 Silly Boy
Sent an email to David Ewing, of KZ1300.com, his reply...
2012-01-18 Great Ebay vendor garyhl2004
So, compounding my CCT issues, I first removed the incorrect tensionser AND ordered the incorrect CCT!
Gary has been great to work with,
I ordered a KT1050, should have been KT1300. Will get old part in mail tomorrow.
2012-01-18 Spare SubAlterantor!
Look what arrived today?
Only the second kit sub-alternator for a KZ1300 I've ever seen.
The price? <VERY reasonable and I will use the source again..
The kit consists of a new rotor,dampner, starting clutch/drive, stator, rectifier/regulator, and bracket.
This cover is in pretty bad shap,it used to be chrome.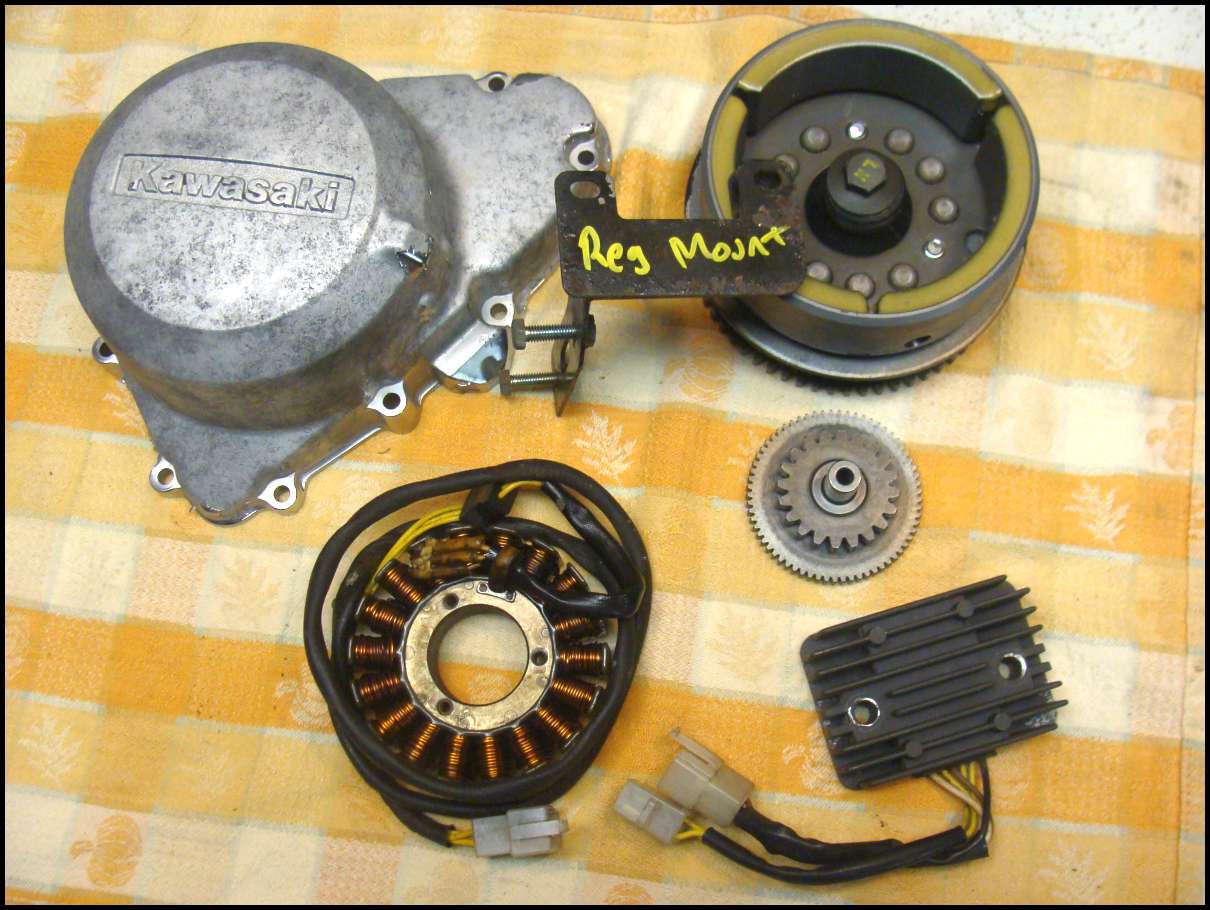
A complete instruction set! When my original sub-alt arrived, it had only the first 3 pages. It's nice to have the complete document.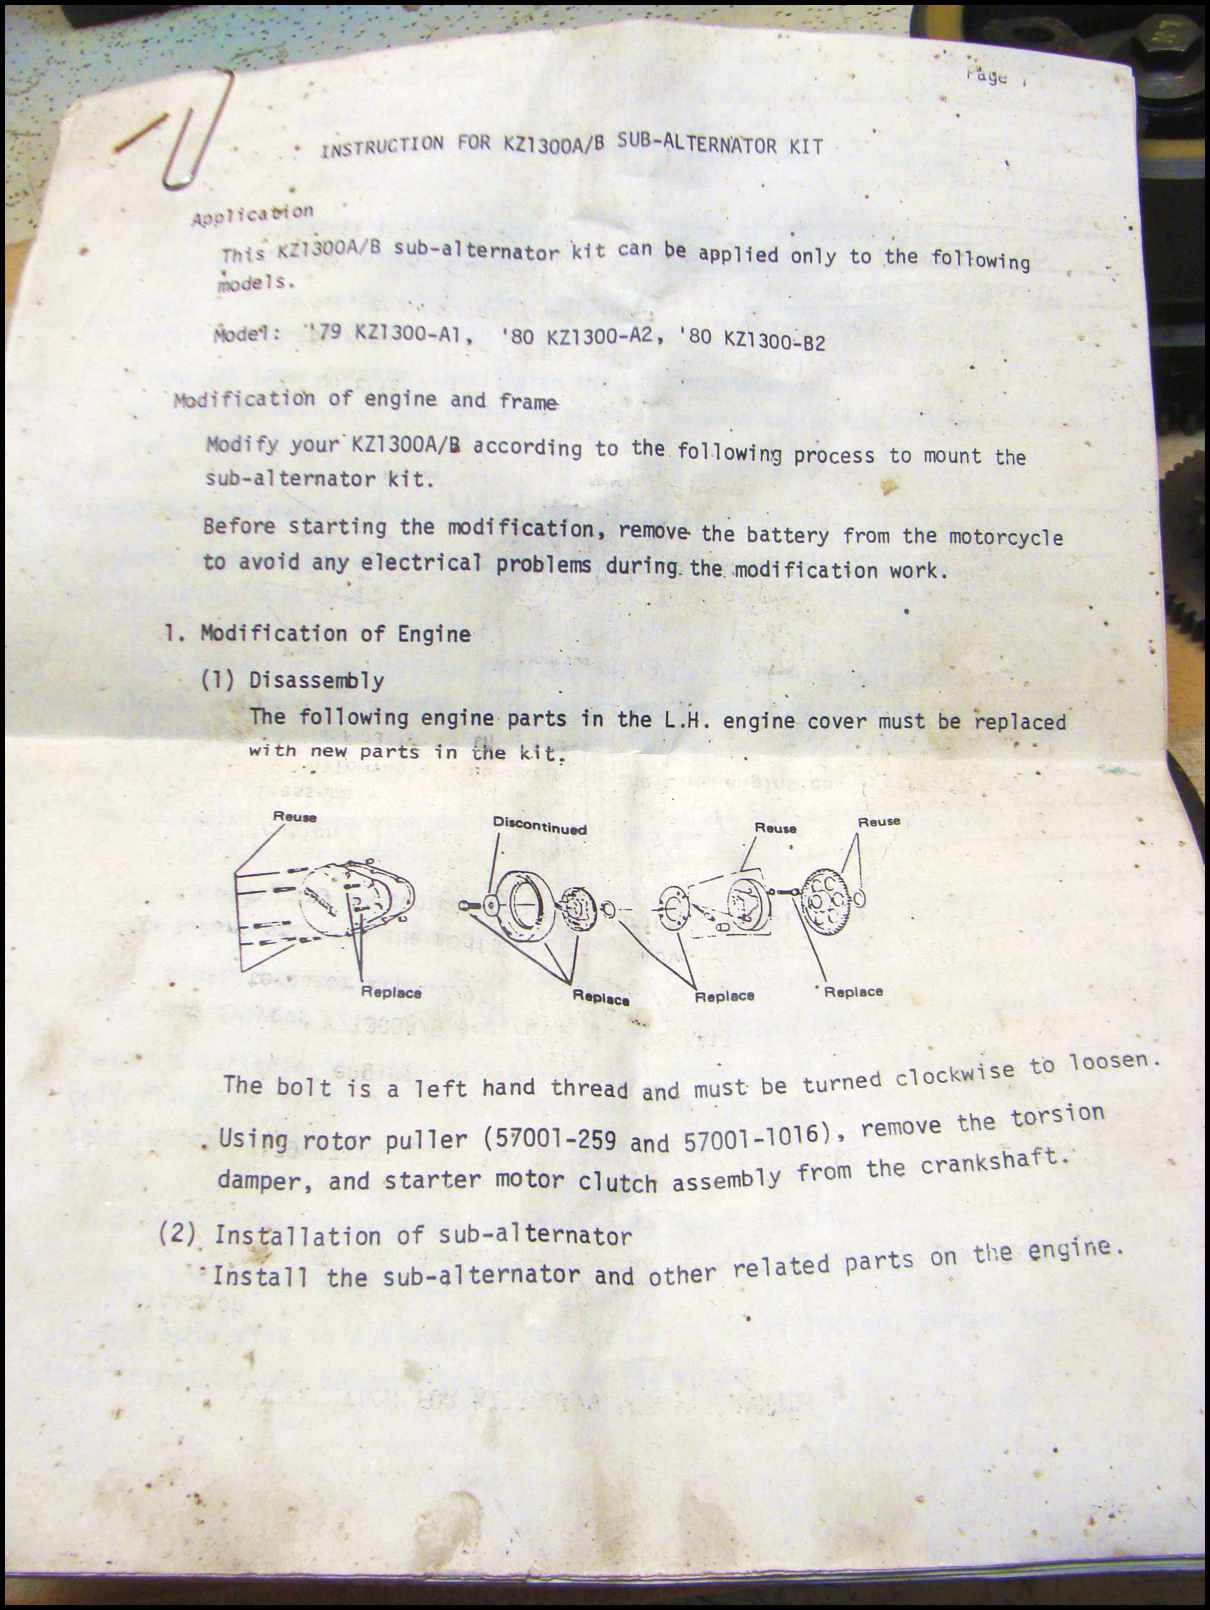
2012-01-21 Another KZ1300 to consider?
From my bud George over at fjrforum.com..
1981 KZ1300
'jes try'n to help!
--G
George, holy shit my neck snapped outta place when I saw this. And YES I am looking for a younger engine to rebuild! Who lives in Seattle? Barabus! Hmmmmm...
Thanks doode, like giving heroin to a baby, eh?
2012-01-21 I speak German to get Japanese parts
So I find this German site where they are making all kinds of repo KZ parts - stuff no longer available OEM. Here's an email I sent them..
Quote
Ich bin wirklich froh, Ihre Website gefunden haben. Ich bin der Wiederherstellung eine 1979 A1, ich lebe in Kalifornien, USA.
Es scheint, Sie haben viele Teile die ich brauche. Es ist schwierig für mich zu übersetzen Deutsch nach Englisch, aber ich bin auf einem guten Weg, dankGoogle übersetzen.
Ich habe nicht in ein KZ Motors haben, können Sie mir sagen, was dieser Teilfunktioniert? Was ist das der Zweck? Artikelnummer MCG 120531028-1. Ist es ein Bestandteil der Kettenspanner?
Ich bin sehr glücklich Sie sind die Fortsetzung der KZ1300 Teile Zuleitung, und es sieht aus wie ich verbringen werden einige schwerwiegende Dollar bald mit Ihnen.
Wenn Sie interessiert sind, hier ist meine Website dokumentiert meine wieder aufzubauen.
http://candybutt.org/cba/node/180
Ich bin auch der Wiederherstellung der beiden BMW - ein R60 und R69S.
Ja, ich habe die motobike Krankheit ..
So lange nun,
Man, was a tedious process!
...in English -
Quote
I'm really glad to have found your site. I'm restoring a 1979 A1, I live in California, USA.
It appears you have many parts I need. It's difficult for me to translate German to English but I'm making good headway, thanks to Google translate.
I've not been into a KZ engine yet, can you tell me what this part does? What is its purpose? Part number MCG 120531028-1. Is it a component of the cam chain tensioner?
I am very happy you are continuing the KZ1300 parts supply line, and it looks like I'll be spending some serious dollars with you soon.
If you are interested, here is my website documenting my rebuild.
http://candybutt.org/cba/node/180
I'm also restoring two BMW's - a R60 and R69S.
Yes, I have the motobike disease..
So long for now,
Thanks to Google for GoogleTranslate
2012-02-01 New CCT Idler gear
Lookie what arrived, a brandy-new CCT idler gear.. Suprisingly enough, available from Bike Bandit.com
This was scanned in, not a foto, so reso not as good,but the inner diameter has needle bearings, and look at how fresh the teeth are!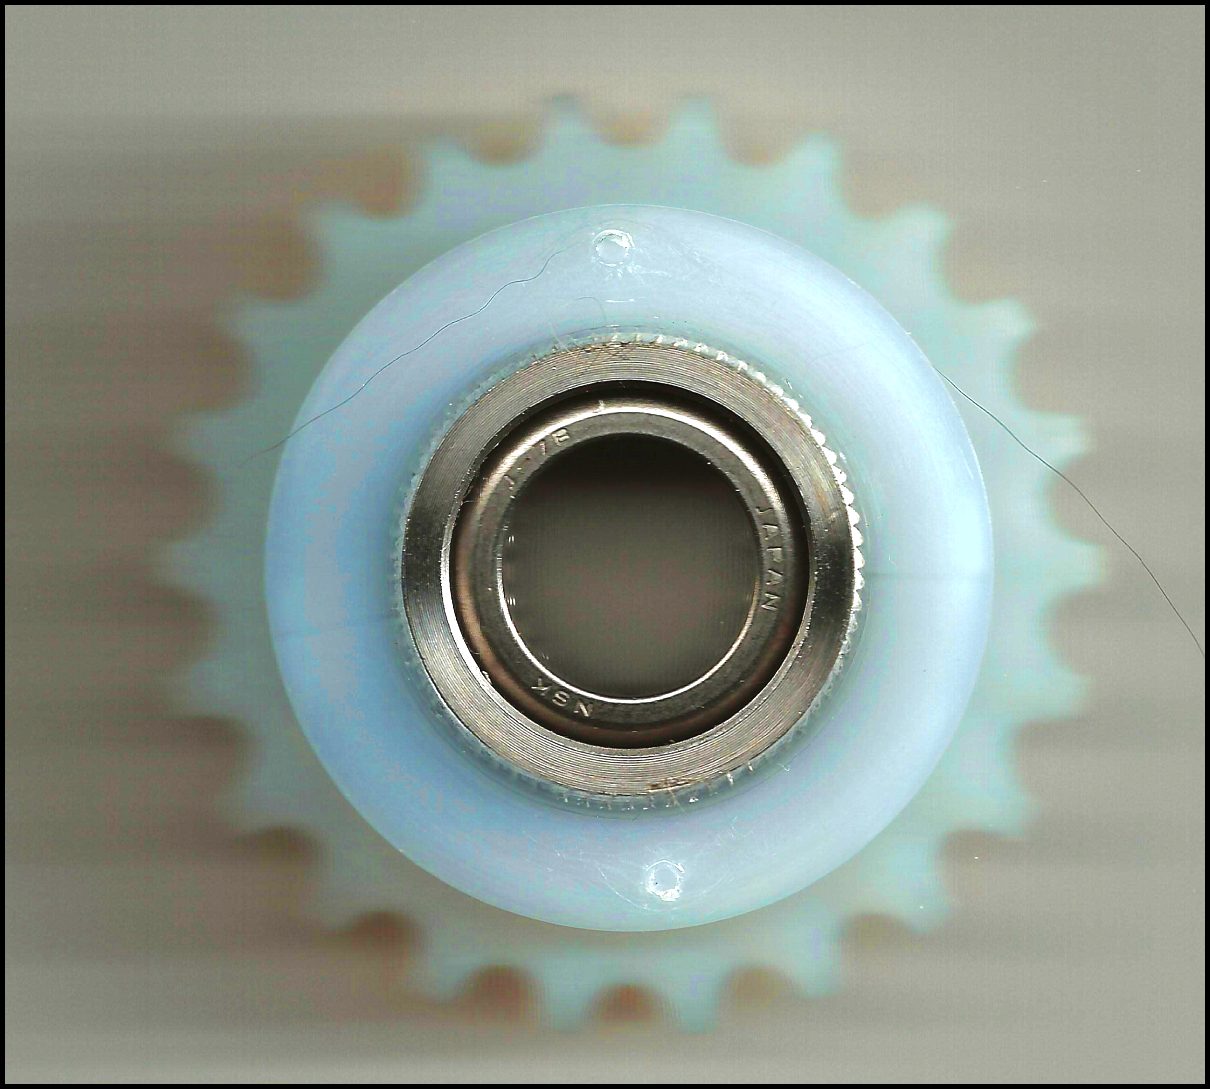
2012-06-04
1kbuck check sent to Ray to start engine work!
2012-08-10 Ordered BigBore Kit from eBay
Posted 10 August 2012 - 03:11 PM
Ordered a big bore kit for the KwackerKid today!
2012-10-12
Well, winter will soon take over the La Pine Oregon hood and FjRay will start work on the Quacker's engine. I better get going too..
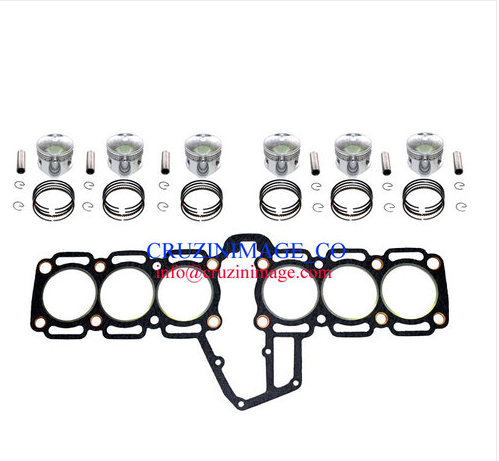
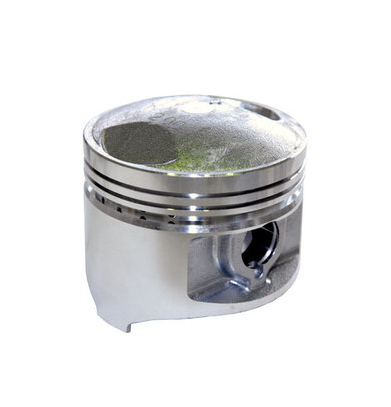
2012-12-01 Pistons and head gasket
sent to Ray via UPS!
2012-12-06 Cool V12 KZ1300
Wild File: Homebuilt Kawasaki 2300cc V-12 Motorcycle
Mad scientistic Allen Millyard keeps grafting more displacement and cylinders together. This siamesed 2300cc Kawasaki V-12 motorcycle his his latest wild ride. By Roland Brown
Allen Millyard's first attempt at a burnout doesn't work. In what we hope was an isolated incident of "mad scientist gone tame," Millyard fails to feed the rear tire enough good ol' V-12 torque. Rather than engulf the scene in smoke and sweet music, the big Kawasaki simply inches forward with its front tire squeaking in protest. But Millyard's not going to be beaten, and tries again—and this time the rear Michelin breaks traction. Suddenly, Millyard has a massive grin on his face, and is revving the hell out of his latest creation, which makes a glorious growl through its open pipes while smoke pours from the spinning rear tire.
The 41-year-old nuclear research engineer from Berkshire, west of London, has good reason to be pleased with his unique, hand-built machine. At first glance it looks almost like a standard version of the gigantic KZ1300 six that Kawasaki released in 1978/1979 in the rush toward ever larger and more powerful superbikes. But this particular machine is considerably bigger; it includes two complete KZ1300 cylinder blocks grafted together to make a 70-degree V-12.
If you know anything about Millyard and his history of building bikes—especially old-style Kawasakis—with more than their original number of cylinders, the V-12 Kawasaki won't come as a complete surprise. After starting this wacky process by creating Honda V-twins using a pair of C90 and then SS50 cylinders, he produced a string of Kawasaki two-strokes with four-, five- and even six-pot powerplants based on the old air-cooled triples. Then he built an even more ambitious special, a 1600cc V-eight compiled from two four-cylinder KZ1000 engines (which we profiled in September '02).
It was while at a classic bike show with that V-eight that Millyard hatched a plan to go a stage further with a KZ1300-based V-12. It wasn't even Millyard's idea. "I was there looking after my V-eight, and there were a couple of KZ1300 crankcases for sale nearby. Some guys saw the cases and said, 'Suppose you're going to make a V-12 next, then?' I said no, I wasn't, and they replied that it would be impossible anyway. Of course, as soon as they said that, I had to build one. I spent the next two days thinking about how I was going to do it, and by the time the show ended I'd worked it out."
Designing and building the V-12 required plenty of thought even for Millyard because this project was far more ambitious than the V-eight. The creation of the engine was similar in that he once again retained the original cylinders as the front bank and grafted on a second set at the rear using a shared crankshaft. "The original cylinders are only five degrees from vertical," Millyard says, "but I wanted to make this engine symmetrical, so I set both banks at 35 degrees from vertical to give a 70-degree V-12."
Creating the V-12 was made much more difficult by the six-cylinder engine's lack of internal symmetry. "The rear head is cut and reversed, and runs backward, but this caused a nightmare because the KZ1300 cams and sprockets aren't in the middle of the engine, as they are on the KZ1000," Millyard recalls. "The stud positions are slightly different and the cams are offset. So I had to cut away all the water passages and oil galleries, then remake them, plus the cam-chain tensioner and new cam runs. I made a cam chain from two heavy-duty Hyvo chains welded together. It's about six feet long—taller than me!"
The only thing smaller than standard is the engine's stroke, which is reduced from 71mm to 63mm using flywheel weights from Kawasaki's 750cc H2 triple. "I wanted to reduce a bit of stress in the engine and also have a roller-bearing crankshaft," he says. "The KZ1300 had some problems with its plain bearing crank and I didn't want to make it worse, so I converted it all to roller bearings so I can pump oil through even at low pressure."
Retaining the original 62mm bore gives a capacity of 2281cc. Pistons, valves and camshafts are standard, though cam timing has to be slightly out because the cams aren't quite symmetrical, and don't run backward perfectly. "I've probably lost a few horsepower, but that doesn't matter. The standard KZ1300 made 130 hp, so this engine has the potential to make 260!"
A more serious problem was that the liquid-cooled six, though huge, has a more modern and compact crankshaft design than the KZ four, so Millyard could not repeat his V-eight trick of using pairs of side-by-side con-rods. Instead he designed new rods based on radial aircraft engine practice, with the front one of each pair of cylinders using a master rod, to which is attached a smaller secondary rod for the rear cylinder.
"That was the only drawing I did on the whole bike, using cardboard templates," Millyard recalls. "The con-rods were the hardest part of the engine. Everything's so narrow and there's very little bearing area, so I had to use the strongest material I could." Finding the required grade of high-tensile chrome-moly steel proved difficult. "I had to buy five-inch-diameter round bars, then machine a 20mm thick plate out of the center, so 90 percent was wasted. I couldn't cut it with a saw, and it would have taken months on my old milling machine. But luckily my friend Chris Halliday of Pretech (who supplied the bike's brakes) offered to do the rods on his CNC machine."
Fuel injection is from a late-model KZ1300 Voyager, and is improbably close to standard, though Millyard added some volume switches from a radio, which allow the system to be fine-tuned. He built the exhaust system himself using various cheap pieces of a car exhaust. "It's a straight-through system, basically four 3-into-1s linked up. It's designed so I can fit standard silencers, but I don't want to because it'd be far too quiet."
Plenty of other standard Kawasaki bits have found their way onto the beast. The starter motor, alternator and regulator are all late-model KZ13 items. The radiator was made by taking two standard aluminum units, cutting the top off one and the bottom off the other and welding them together. The system is plumbed with a large-bore central heating pipe, and uses a rally car electric pump to keep coolant circulating whenever the ignition is switched on.
The chassis looks almost normal until you realize that even the KZ1300's notoriously huge fuel tank could not possibly extend above such a monstrous motor. Millyard cut the original in two and added a four-inch-wide strip to enlarge it, taking the opportunity to hollow out extra space underneath as an airbox for the filterless intake system. Capacity is still a generous eight gallons, which is just as well because consumption was initially around 8 mpg....
The tubular-steel frame is from the Voyager version of the KZ13, once again cut in two and enlarged, this time with four extra pieces of tubing, plus some bracing where it can't be seen. The necessarily huge 30Ah battery takes up all the space beneath the seat, so other parts had to be relocated with the aid of a homemade wiring loom.
Millyard was helped by a classic Kawasaki enthusiast who donated many old engine parts, and sold him a complete Voyager rolling chassis. A standard fork (with added preload spacers), wheels and discs are combined with extra-stiff Hagon shocks and a pair of modern six-piston Pretech front brake calipers to combat the bike's weight of approximately 770 pounds. Numerous dry runs using an electric motor meant Millyard wasn't surprised when the V-12 started up on the first press of the button, and ran well after minimal injection fine-tuning. But after a few weeks he had a setback when a big-end bearing seized, fortunately without causing further damage. After that he fitted phosphor-bronze bushings to the con-rods, and upgraded the lubrication system with a high-pressure feed to the small end (which had relied on oil mist). While the engine was apart he took the opportunity to increase the final drive ratio; the KZ1300's overengineered shaft-drive system is otherwise untouched.
All was working well when I arrived for a brief ride. From the fairly tall seat the Kawasaki seemed huge but curiously near-normal, though I soon became conscious of the hot rear cam cover between my shins, as well as the bike's sheer size and weight. The standard angular instrument panel is coupled with a swept-back KZ900 handlebar whose shape allows a typically upright riding position despite the extra tank length. Such was the V-12's low-rev torque that all it required was a hint of throttle to cruise along with the motor barely breaking a sweat.
Having ridden a couple of Millyard's previous Kawasaki creations, I expected the V-12 to be well-behaved and oil-tight, and it was. It was also massively torquey, responding cleanly when I wound the throttle from below 2000 rpm in top gear, which thanks to its recent gearing change was approximately 45 mph. The seductive low-rev burble changed to a snarl, and the Kawasaki surged smoothly forward like the world's most tuneful magic carpet.
Throttle response in the lower gears was slightly snatchy, but remarkably good considering the engine's complexity. I was keeping revs below 4000 rpm, yet the V-12 still had enough grunt to seem fast as well as relaxing. That rev limit gives a cruising speed of approximately 90 mph, which suited the big naked bike with its wide handlebars just fine. "I got it up to just under 100 mph the other day and it was effortless," Millyard says. "But I'm not really interested in opening it right up. I want it to sound good, be reliable and not leak oil."
Back in the late 1970s, even those who criticized the original KZ1300's size had to admit that it handled well. So I wasn't surprised that even this far more excessive Kawasaki felt stable and comfortable, especially as I took things pretty easy in the bends. At slow speeds there was no forgetting the bike's length, as well as all that weight. But the V-12 didn't wobble or weave despite a fairly worn rear Michelin. And the powerful six-pot front brakes slowed it with reassuring efficiency.
Millyard didn't mind trashing the rear tire with a few more burnouts after my ride, as he was planning to fit a new one before putting in some serious mileage over the next few months. He finished the bike too late for this year's Isle of Man TT, but is planning a trip there next June. "I could ride over the Mountain at 100 mph on it now. And since I've changed the gearing it gets over 15 mpg, which isn't bad because the original KZ1300 was very thirsty."
One thing he isn't planning to do is sell the V-12. "All my two-strokes are gone now. I've had a few inquiries about the V-eight, too, and might be tempted. But it would take a really silly offer before I'd sell the V-12. It took me so long to make—almost every evening for nine months. Now I just want to have some fun on it." Looks like he already is.
For more information on Allen Millyard and his wacked-out collection of bikes, e-mail him at Akawafives@tinyworld.co.uk.
2012-12-06 Engine for 700 USD Vista, Ca
http://motorcycles.yakaz.com/used-kawasaki-kz1300-engines#lo=4&docid=000...
http://orangecounty.craigslist.org/mcy/3395583025.html
KZ1300 Kawasaki 6 cylinder engine, frame, title, with swingarm, carbs and all the electrics. Good for parts or project. Engine ran good when parked but it has been sitting for a long time, $700 as is - please don't text - please call 760-536-3650
2012-12-06 Engine Teardown Starts
Ray is tearing her down!
Ray built this coolio engine stand.

I wonder what we'll find inside...
Slight corrosion on aluminum.

Messed up paint on valve cover.
Guess this is what happens when you don't properly store an engine...

Years of leaky carbs have made a mess.
One of many chains in this engine...
This nylon gear is notorious for failing... I think I have a new one already.

Ignition pickup coils.

Looks like a slight water leak down here...

Two tensioners in KZ1300 engine. Cam and timing chain.

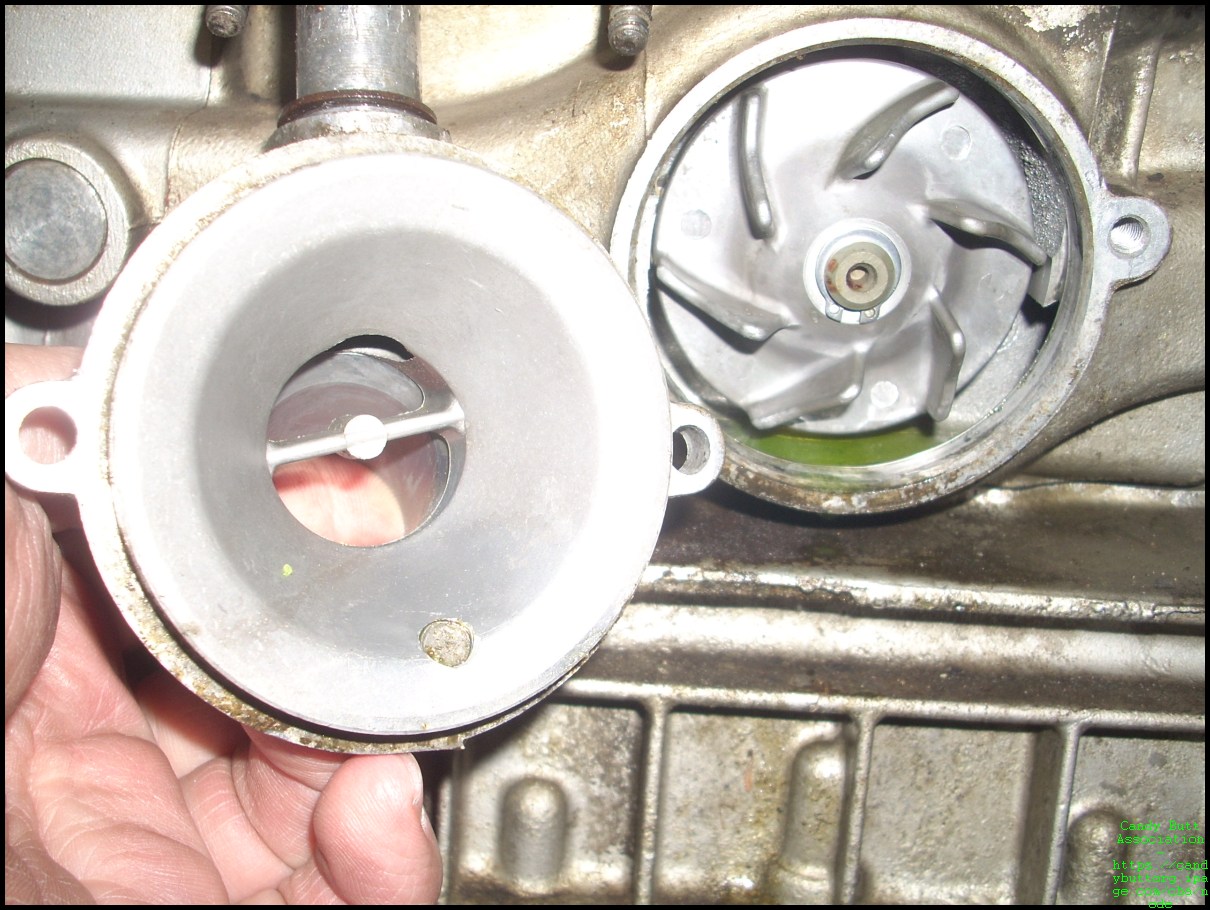
Water pump impeller.
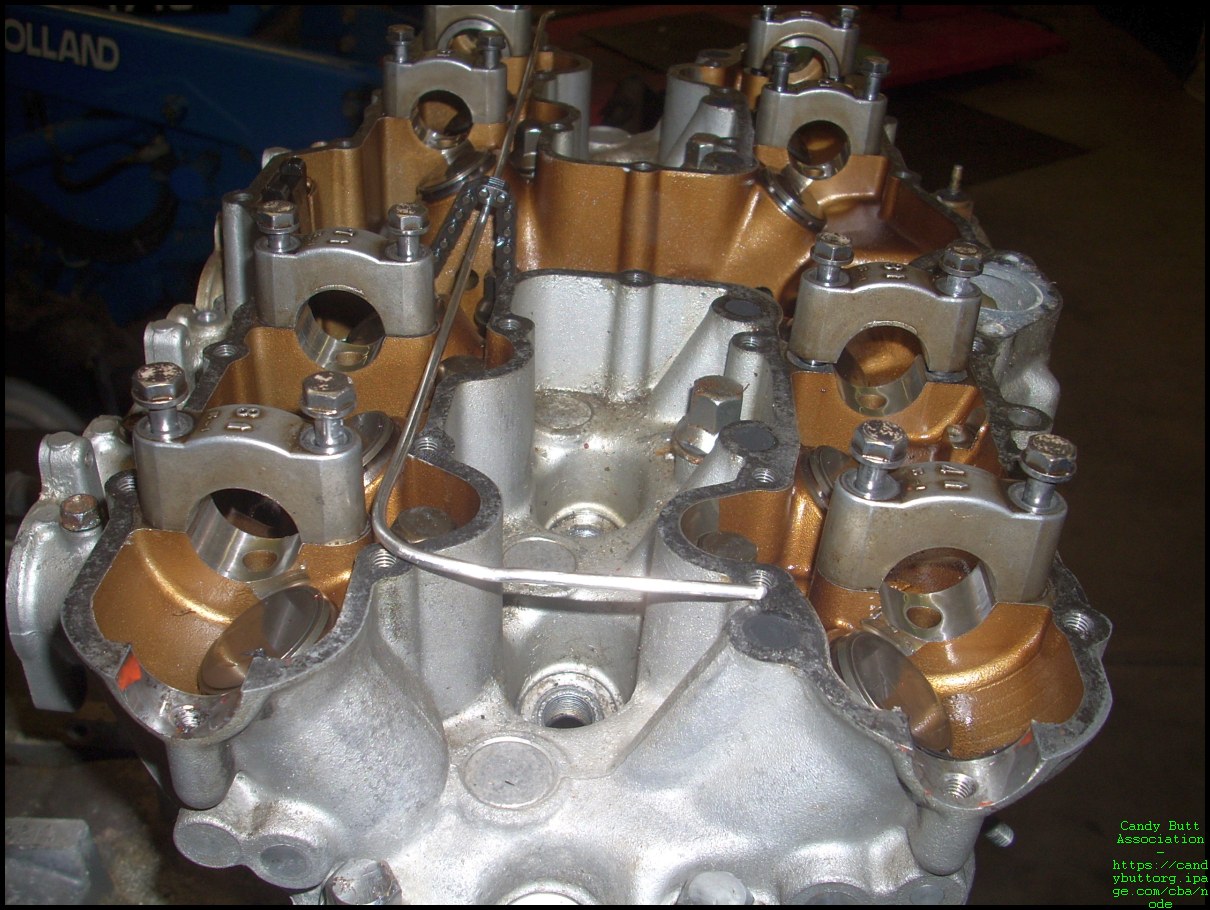
Getting close to getting some head. :)
Interior engine color looks good.. Then again, with the amount of oil that's gone through this motor, it *should* look clean...
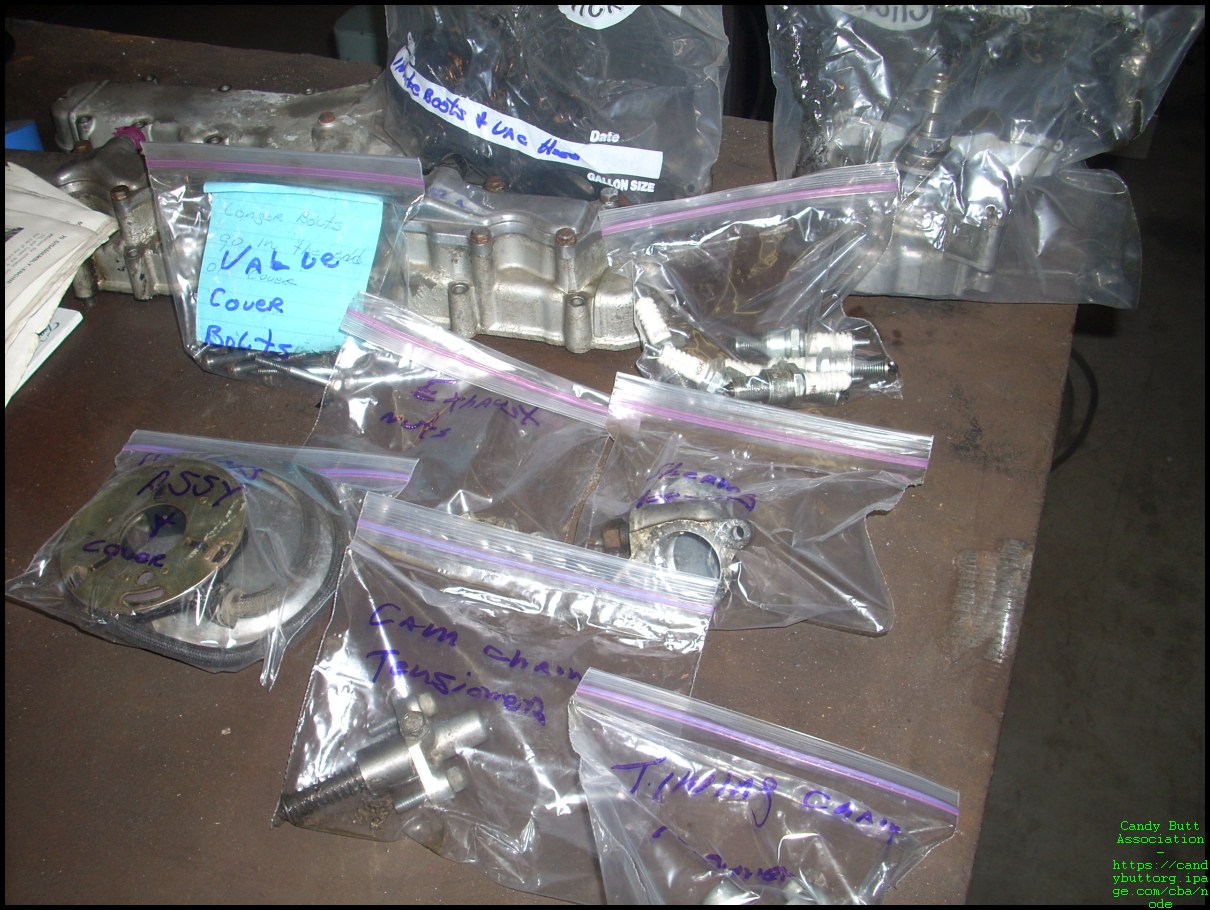
I like the way Ray bags n' tags all the parts.
No need for new cams. These look good and spec out OK.

Oh my... no wonder theose sparking plugs were getting oil fouled..
The bores look ok, although Ray mentioned they are lipped at the top. The new pistons are 1 over, so this block gets the boring bar anyway.
This engine has NEVER been apart.. Ray has himself a virgin!
A pretty cool casting. Can't wait to see it all fixed up.

Lots of oil fouling.
2012-12-10 BlockOff
This, my friends, is true sex-cylinder porn...
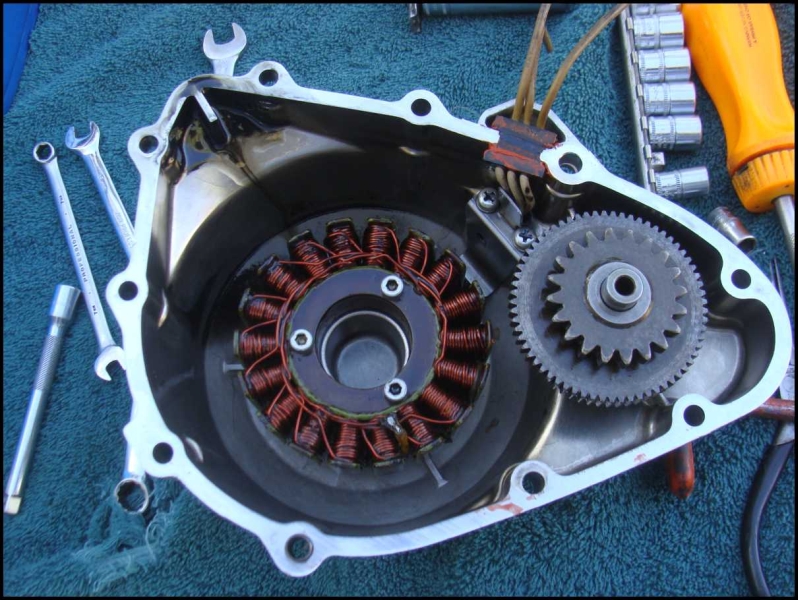
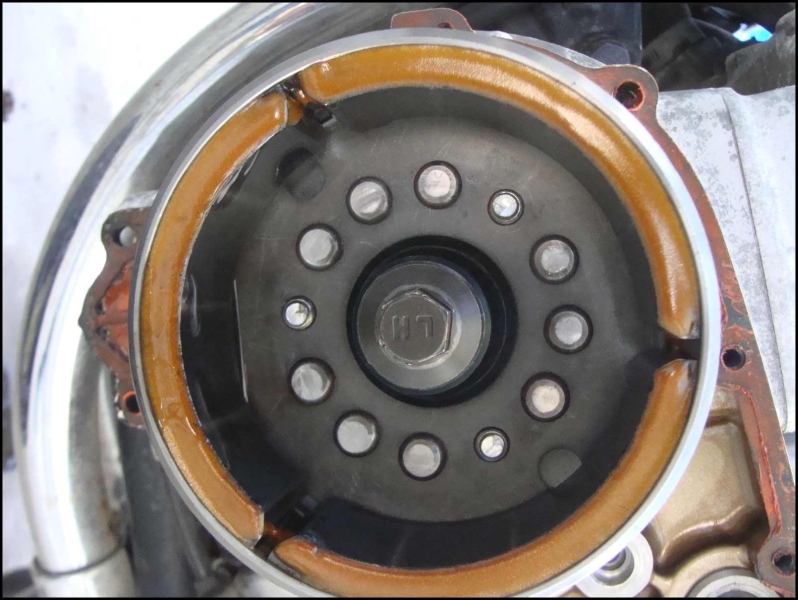
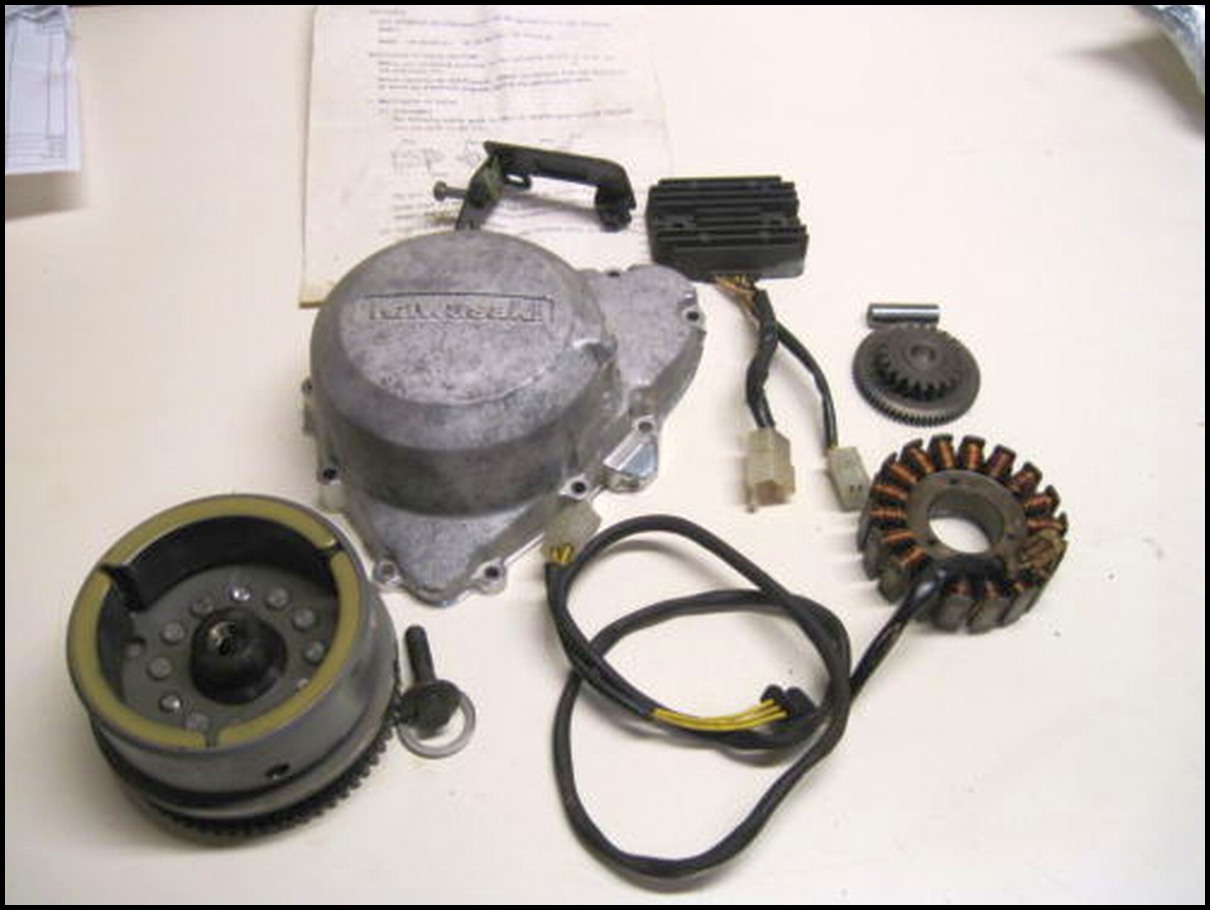
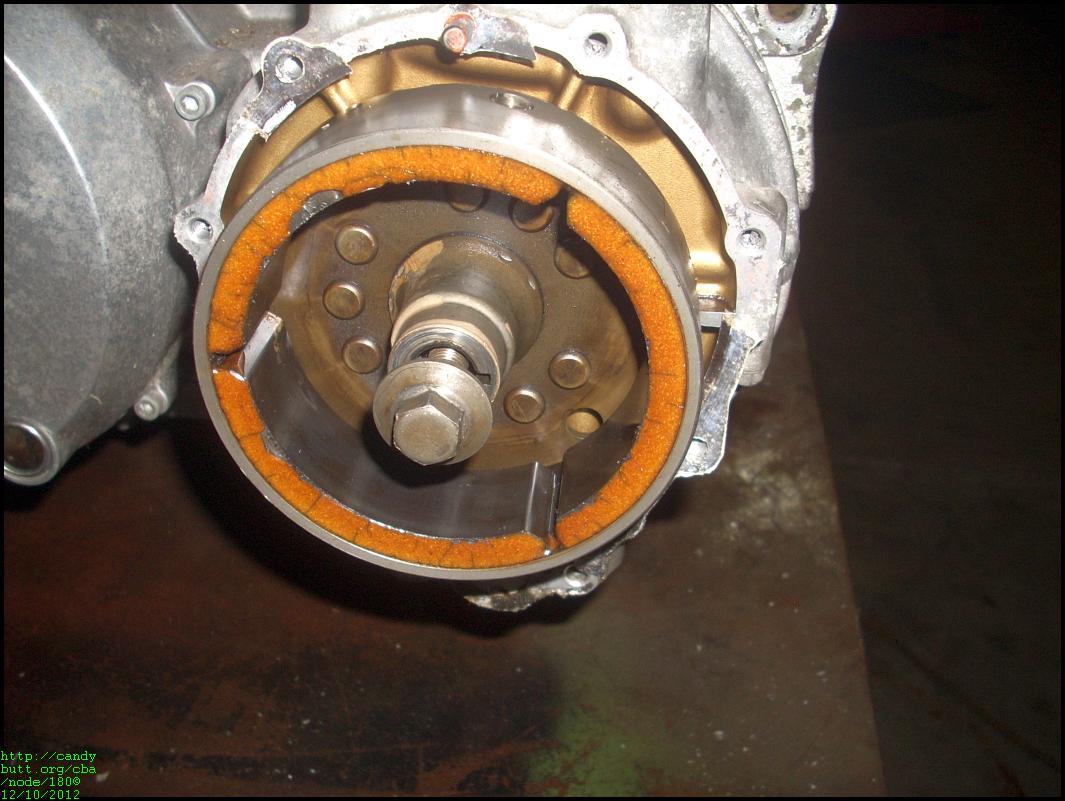
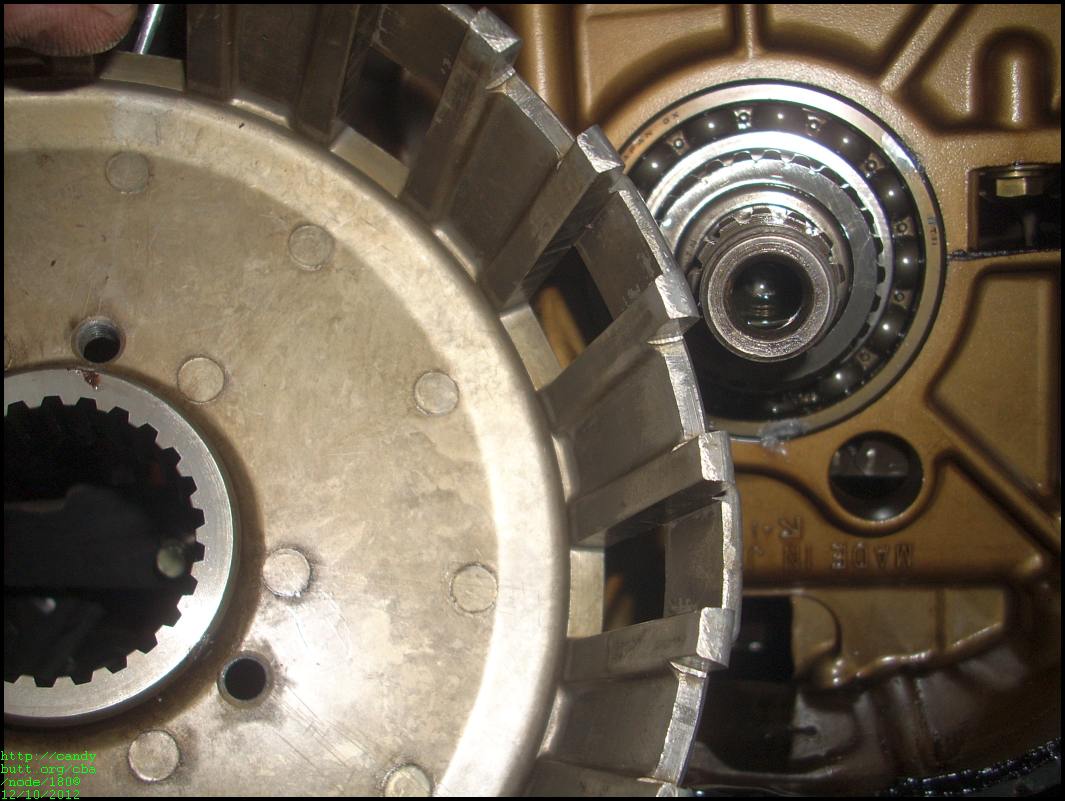
This KZ has two alternators.. one each stator on each end of crankshaft. It was available from Kawi for a limited time, I scooped one up in 1980 and another just a couple of months ago from a dis-mantler by the name of Dave Morgan and PsychoCycle. Great guy. It's interesting to note that this stator cover has none of the honey glow covering of engine oil as does the rest of the engine internals. IIRC, the RHS was the orginal stator installation. The LHS was the rare and optional stator.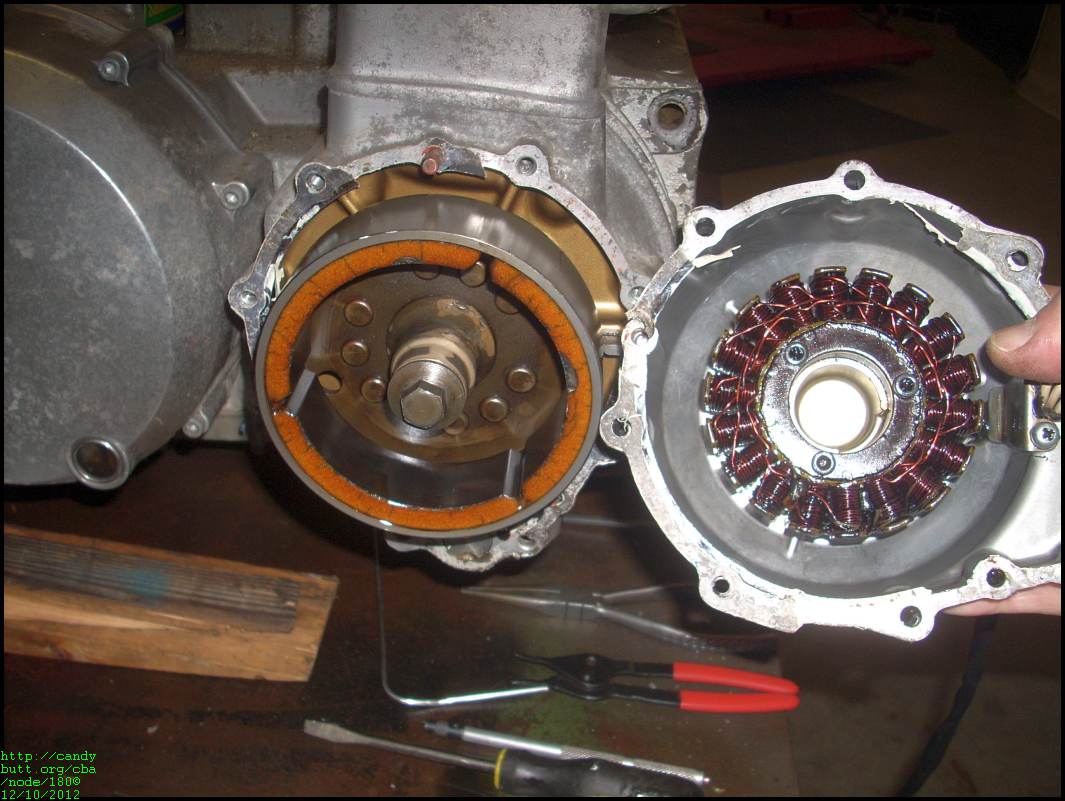
Crankcase cover, left-hand side. This is the optional stator assembly from the factory and required a new cover and what not.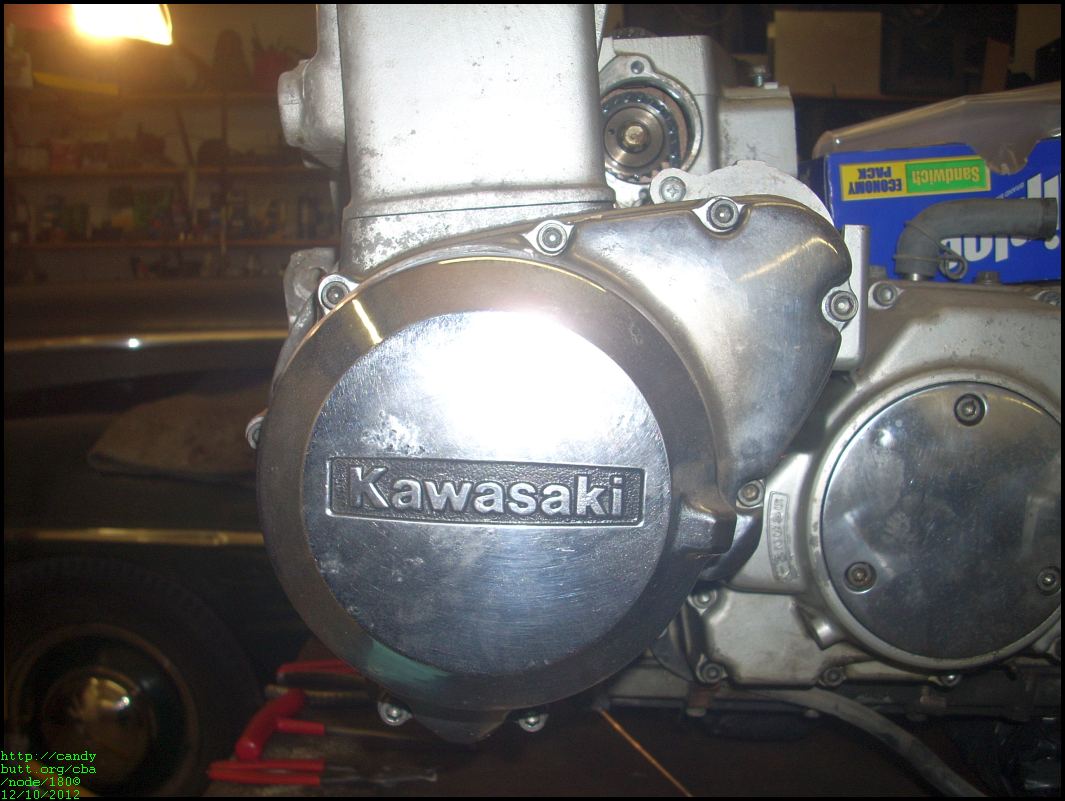
This side, the optional stator side, has troubles. See the wear marks on the rivets? IIRC, these marks contacted the junction point connecting all 3 phases to the RR. On the stator, the wear point is shiny and obvious.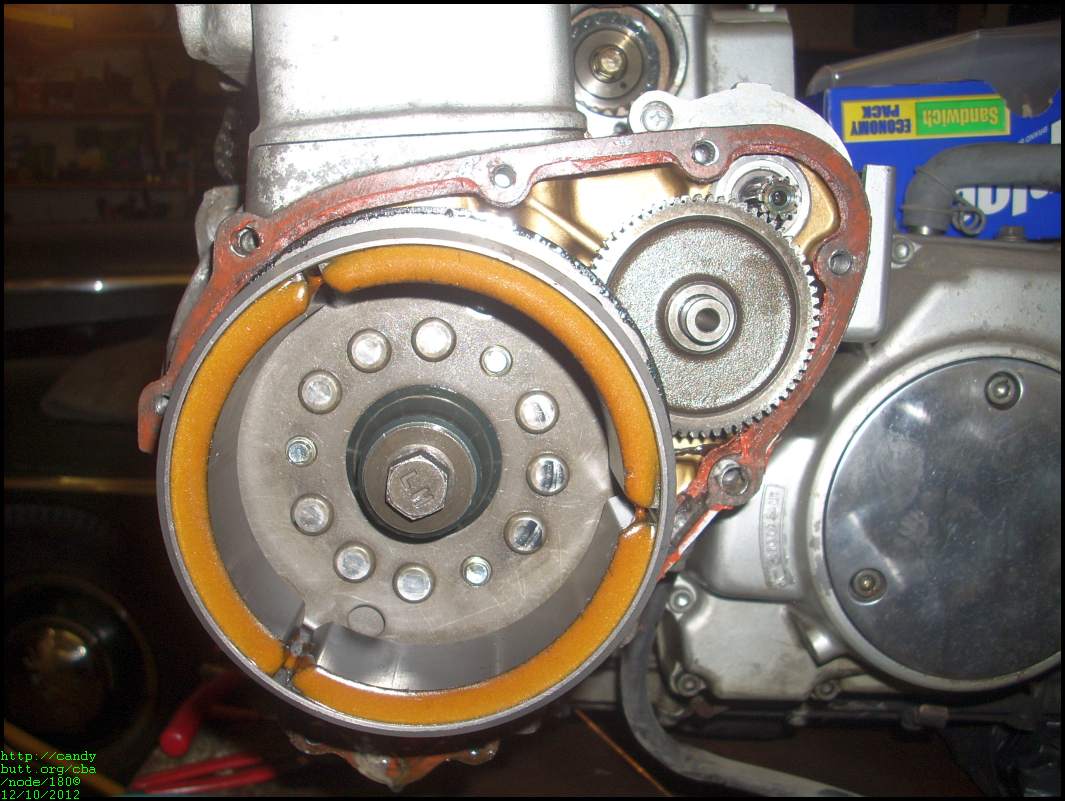
Starter motor drive gear mechanism.
One very worn (timing) gear? Check out the hooked teeth in that baby. I'm hoping somebody is making a gear out of better material than OEM these days..
Screw the Kawi, anyone else spot the nice Transalp in the background?
I have now clue what this is... .
Count 'em' baby. 1 - 2 - 3 - 4 - 5 - 6... Ooooh!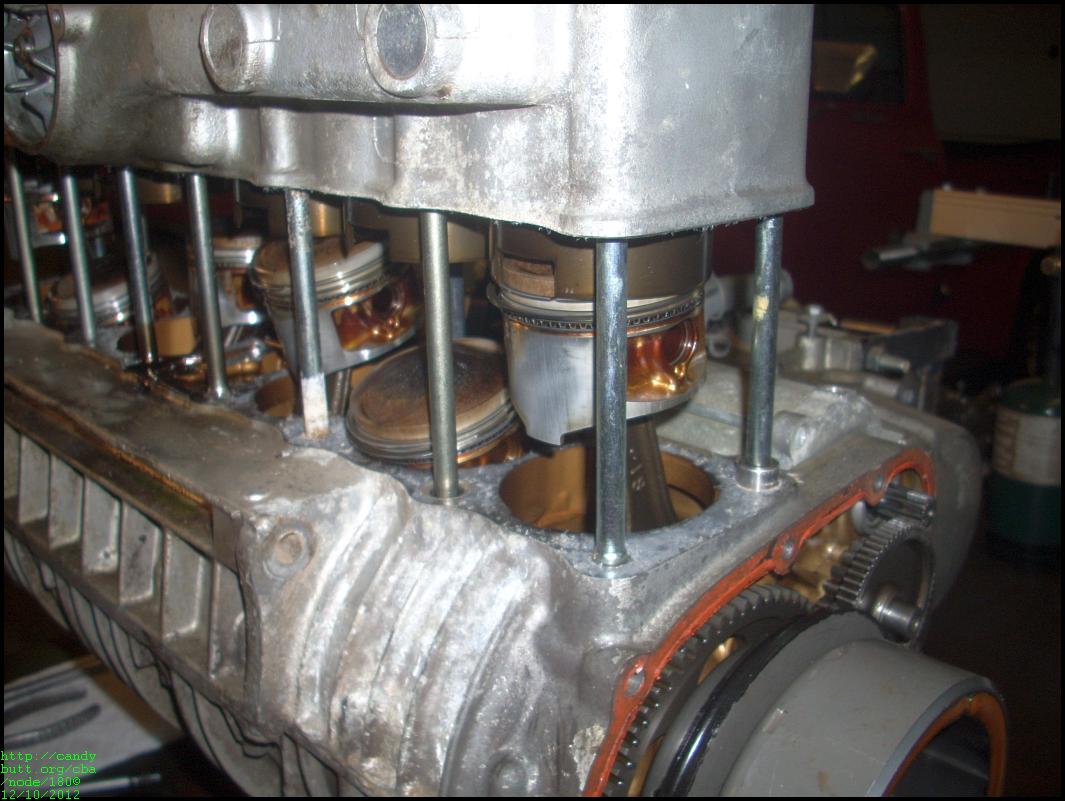
I am not smart enough to know where the 1 quart every 200+ miles was going.. but looking at piston 2 from left...
Frankly, I'm suprised at the <lack> of oil carbon buildup on the piston tops. This bike was an oil-eater from day one.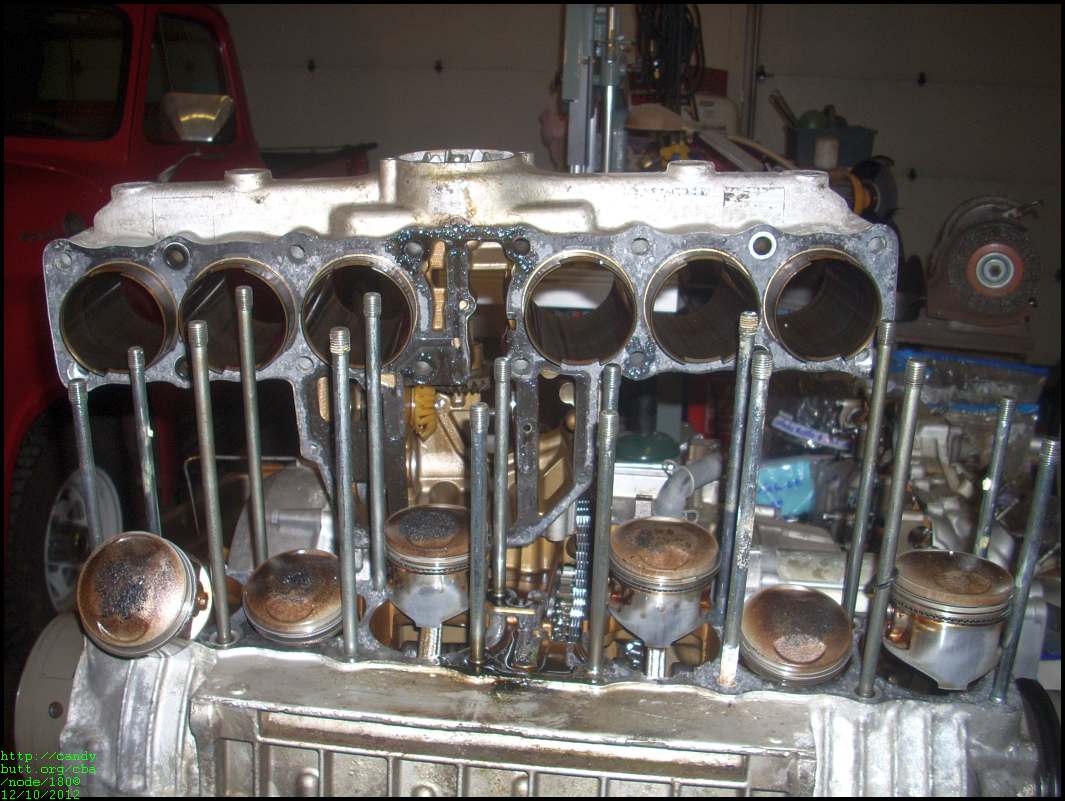
Ray - what is the view here.. bottom to top? and what's at the top? Gouging at TDC?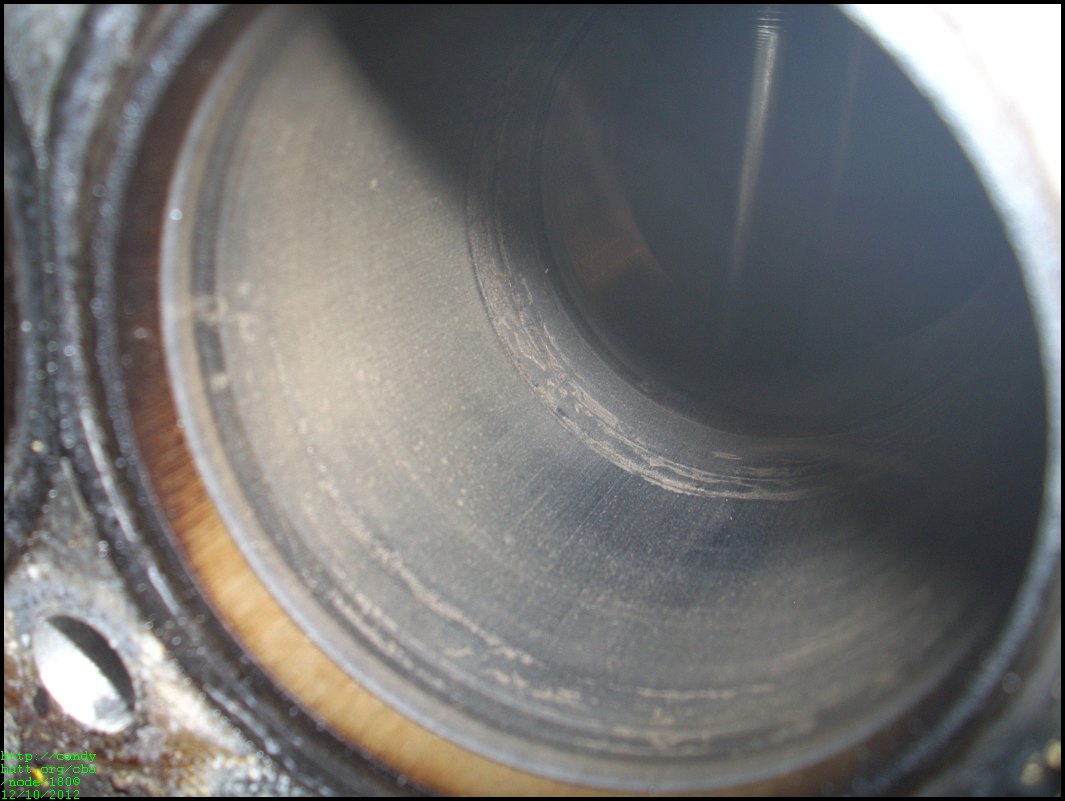
My favorite pix of this entire sequence. The DEVIL needs be unleashed from gates of hell!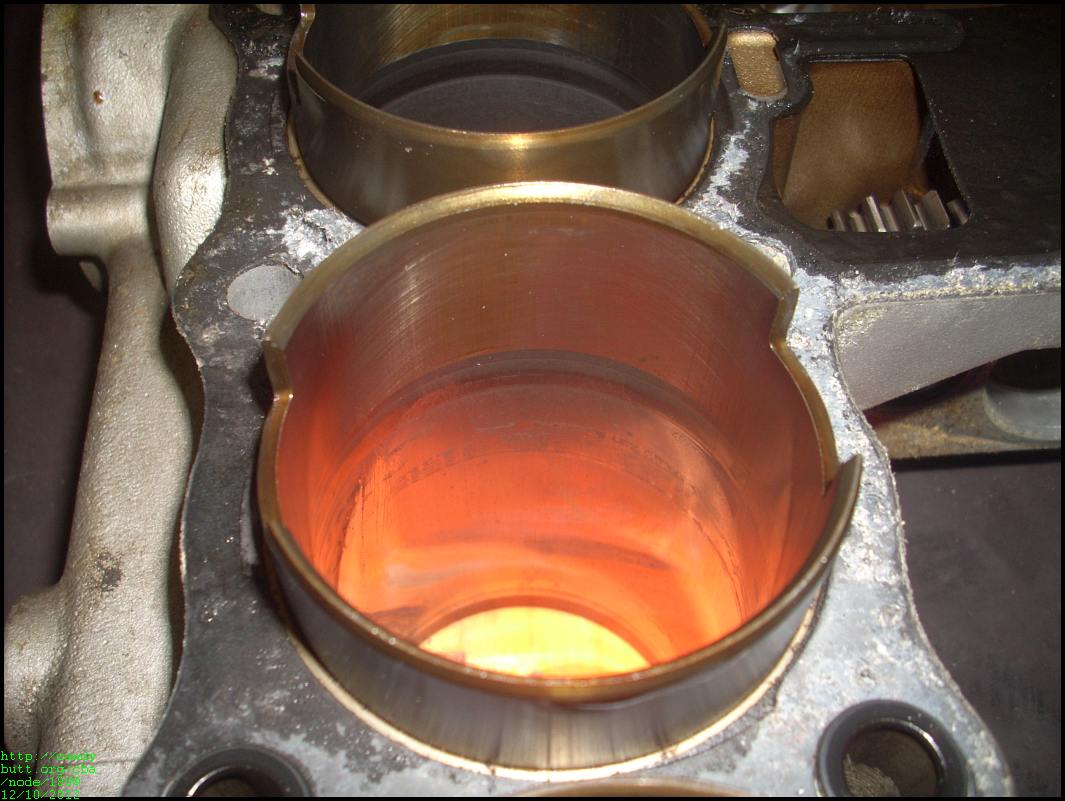
I love the patina of these internals parts. Castrol 20w50, for better or worse, was this engines diet. Of course, I had to run that heavy viscosity due to oil consumption.

Looking at the rotor magnet cracks, I wonder if they need be replaced or will they grenade later, taking a newly refreshed engine with it?
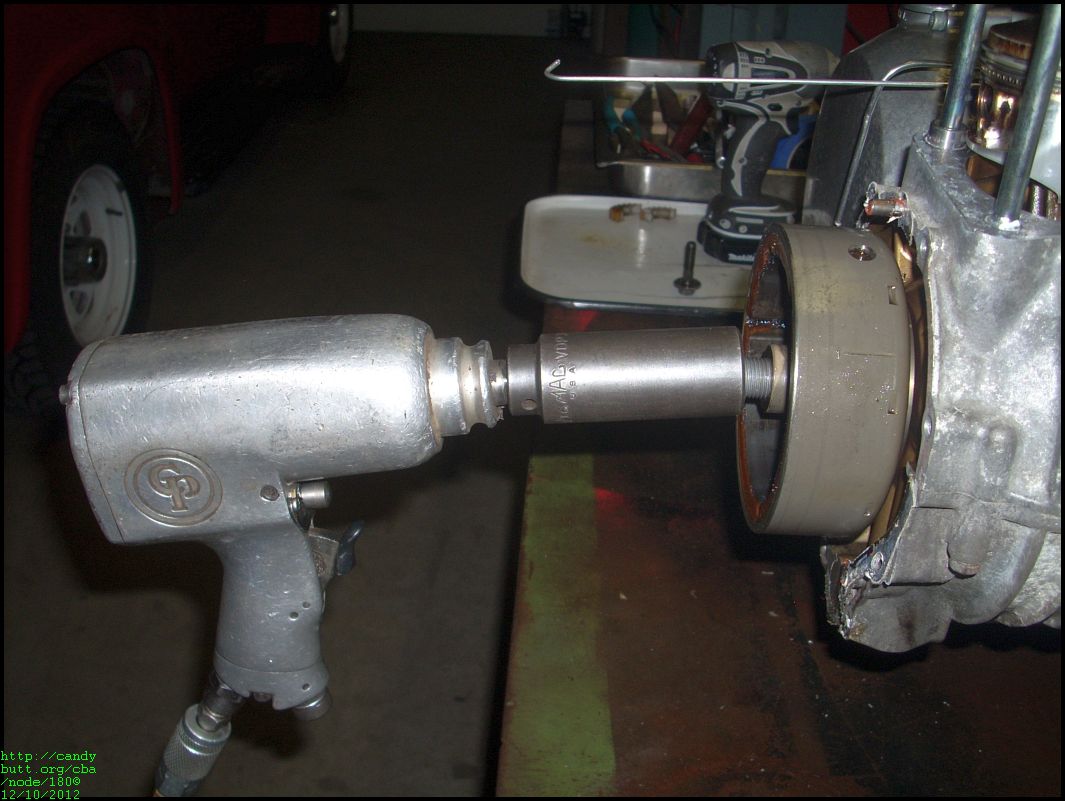
When all else fails, get a bigger air impact wrench...
How cool is this?! For me, this is way cool! I've wanted to have this enigne run right since I was making payments on it back in 79.

Looks like Ray is getting parts ready for shipment to the machine shop...

Yep, and now the secret is out!
Off the clutch side of things...

Uueww, gucky.
I never 'hot-rodded' the kz, as too techs told me it was a 'fragile' engine as compared to the kz1000 or Suzooks that were dominating the drag strips at the time. This is not the clutch though.. I think it's a harmonic dampner. Ray? Help me out bud..
HOLY CRAP, Batman, I'm glad Ray is working this, not me!
Got to love Ray's attention to detail...

The clutch on the Kz never gave any trouble at all. Then again, I was sedate.
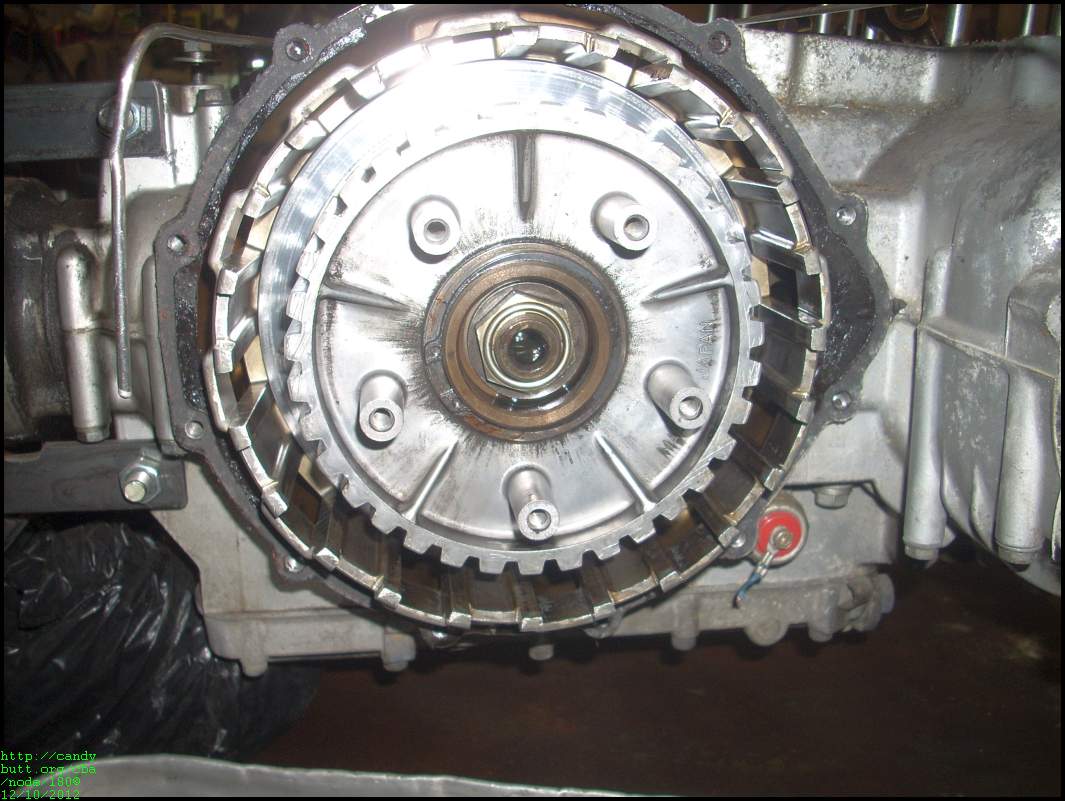
I have no clue, clutch inner-hub? A Dampening mechanism to reduce drive line shock?
I'll say one thing, if Ray can ever get this engine back together, I'm fullly impressed....
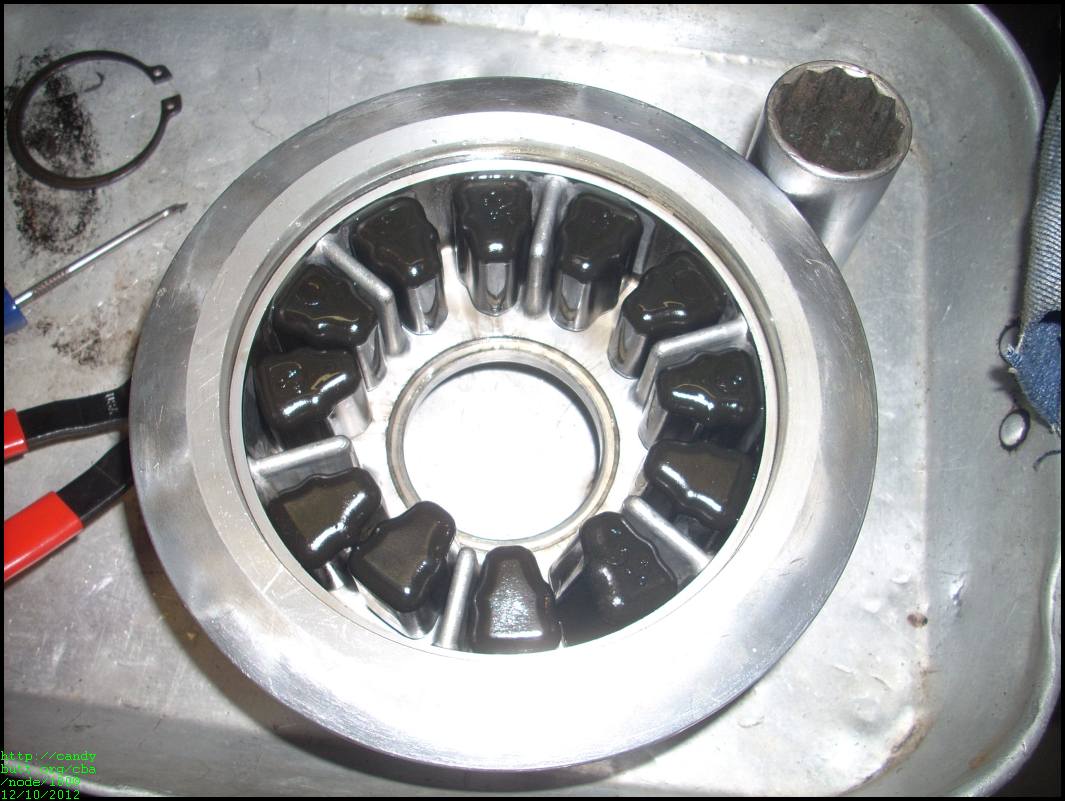
Ray responds with what the parts are...
I have now clue what this is... .
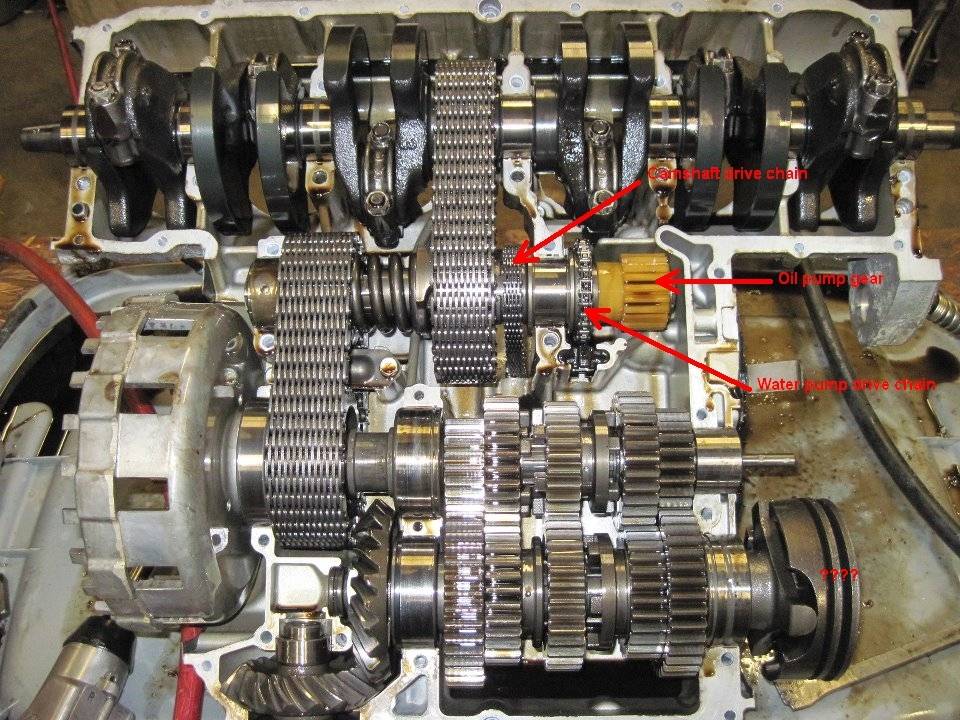
That is the timing chain drive from the crankshaft. It drives a seperate shaft in the block for the ignition timing and a goofy plastic bevel drive for the water pump. When I get the cases split you will see at least two or three more chains in the bottom end. The othe strange looking device is the oil pump also chain driven from inside.
2012-12-13 More Disassembly
All Righty Then
Ray has moved the KZ1300 to the 'indoor' and heated section of his spacious shop.
After talking with Ray today, I think, in some kind of masochistic way, he's enjoying this project!
Ray mentioned this is the rev 3 of the engine stand.
Ray asked me my thoughts regarding replacing various gaskets, seals, bearings and what not. Instantly I recalled a previous engine rebuild I did, where, due to lack of finances, I had to use used seals and what not - and I ended up rebuilding that engine twice.

Oil pump. From the pix, wear looks minimal.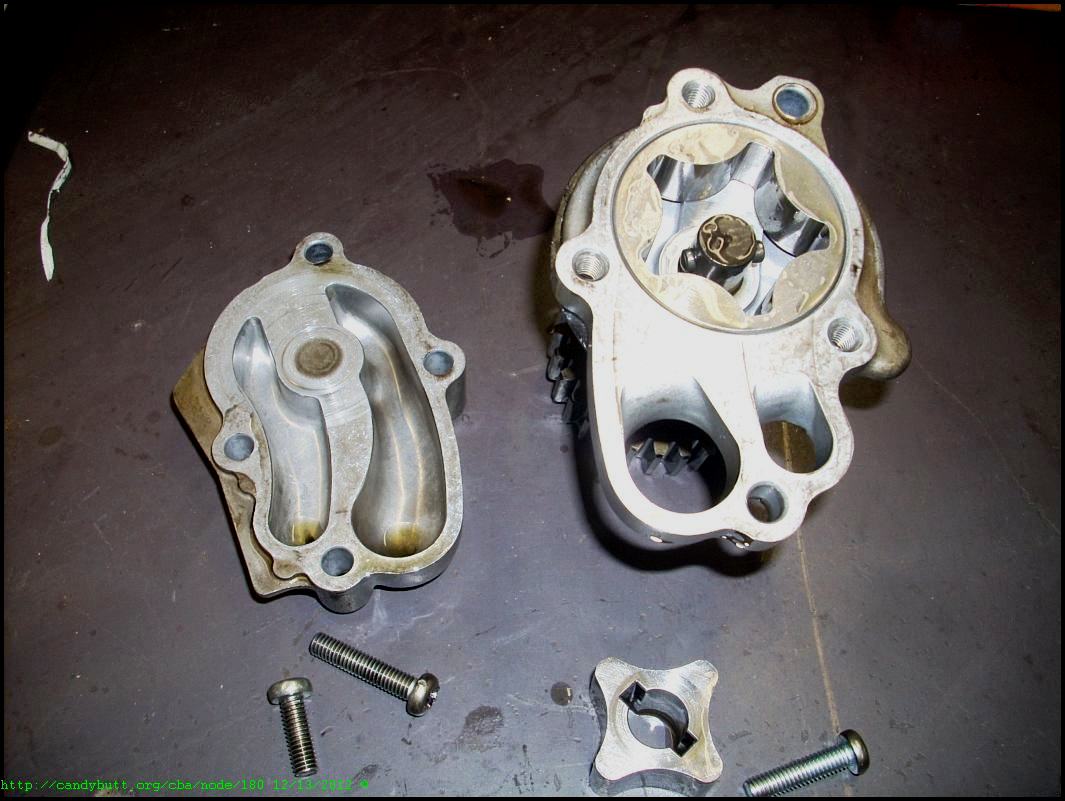
Ray, correct me if I'm wrong, but the big hole at left - is for ignition coils, pick up plate and what not?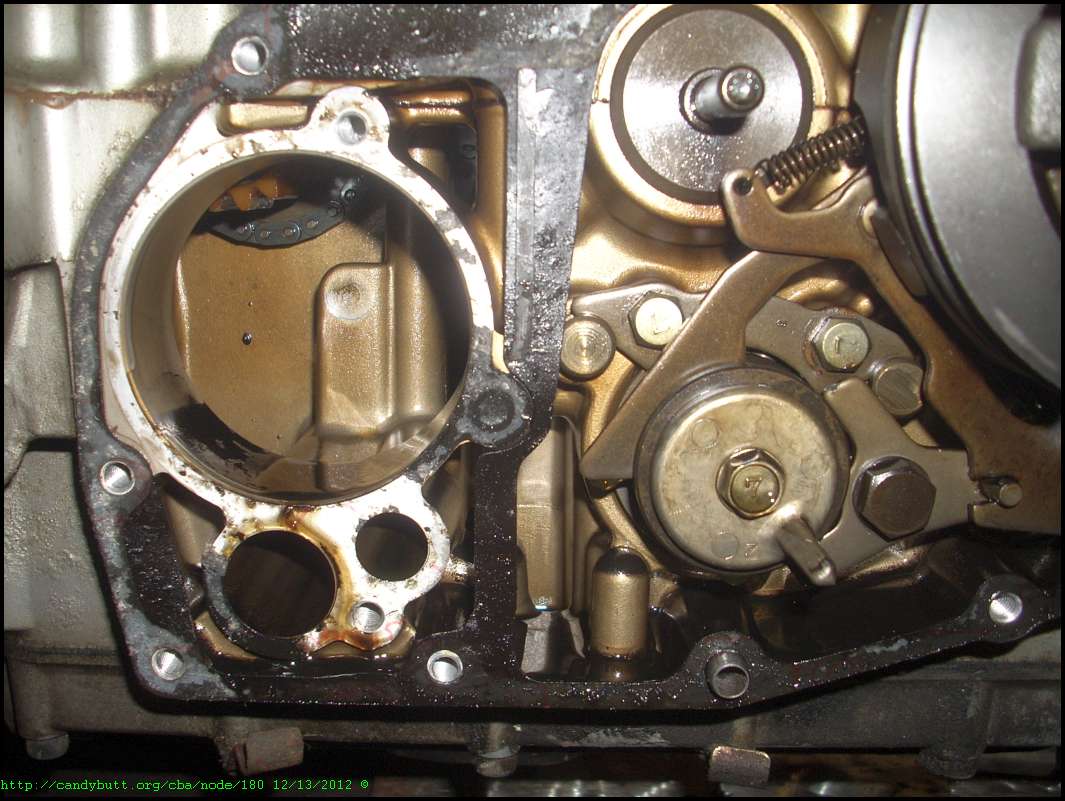
Oil pan.. not too bad considering the miles...
One issue with the 79 A1 and 80A2's was oil depravation due to the shallow pan. Many replaced the pan with a later model's pan that was deeper. If I can find one, I will too.
The only real Uckkk found in this engine.. bottom of the pan.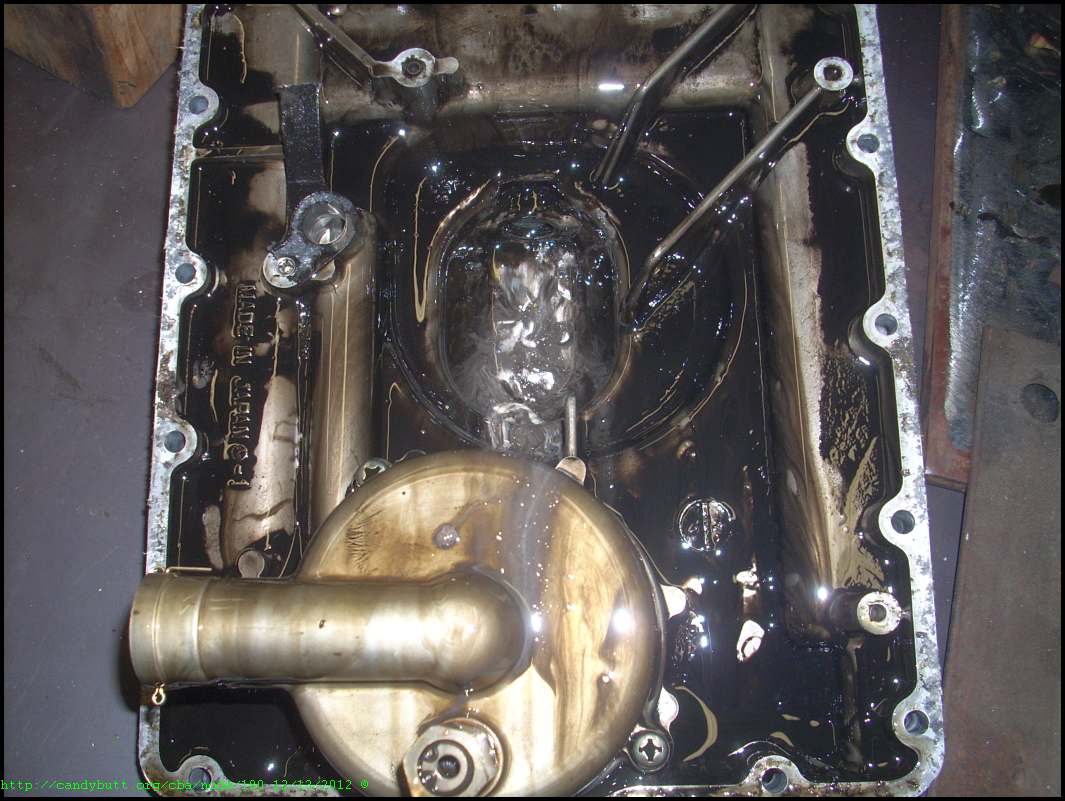
Gearbox, shift dogs, shift drum all look ok.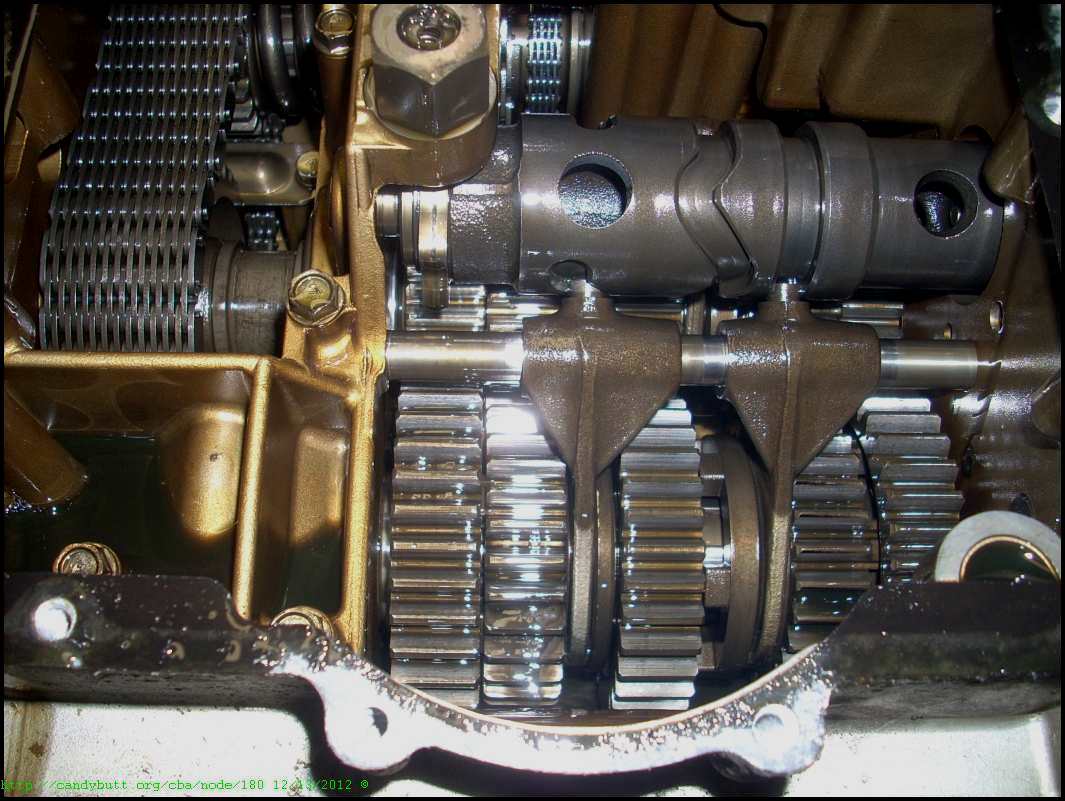
Another shot of the pan gook. Actually, thinking that this engine sat for over 8 years... and has over 100k on it.. Not too bad.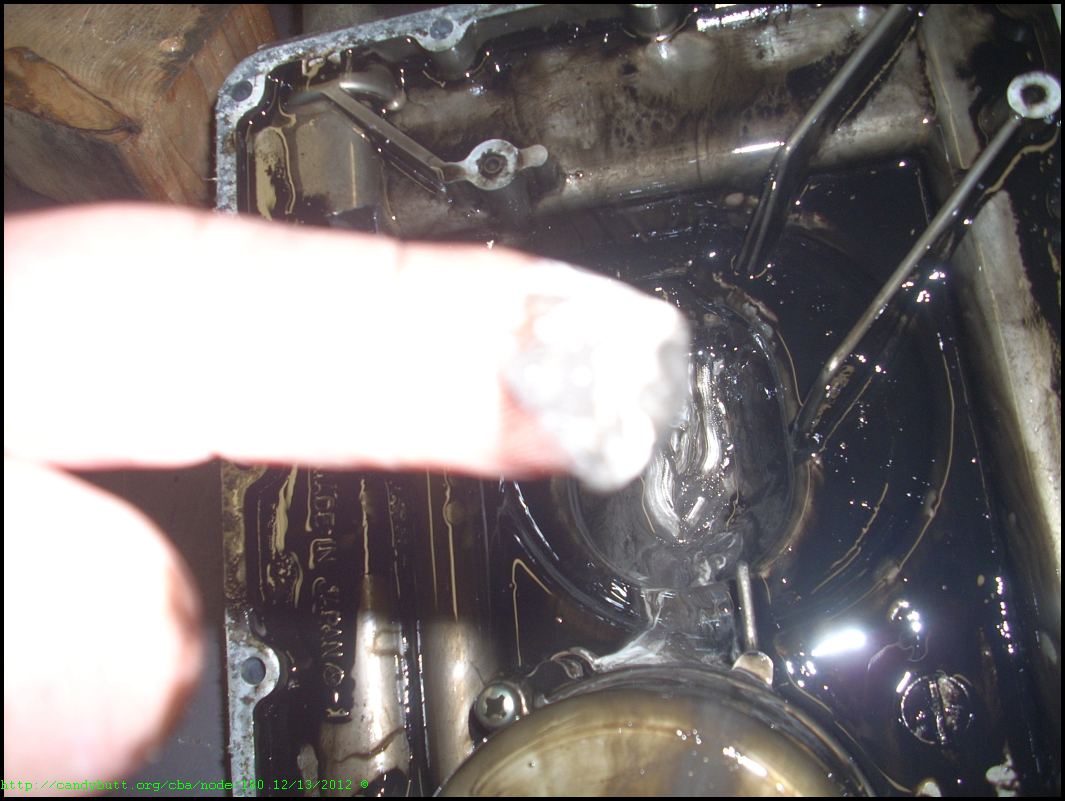
The oil pan screen has some fibrous gook on it. Not sure what it might be.. But with all the fibrous/plastic gears, perhaps something from there?
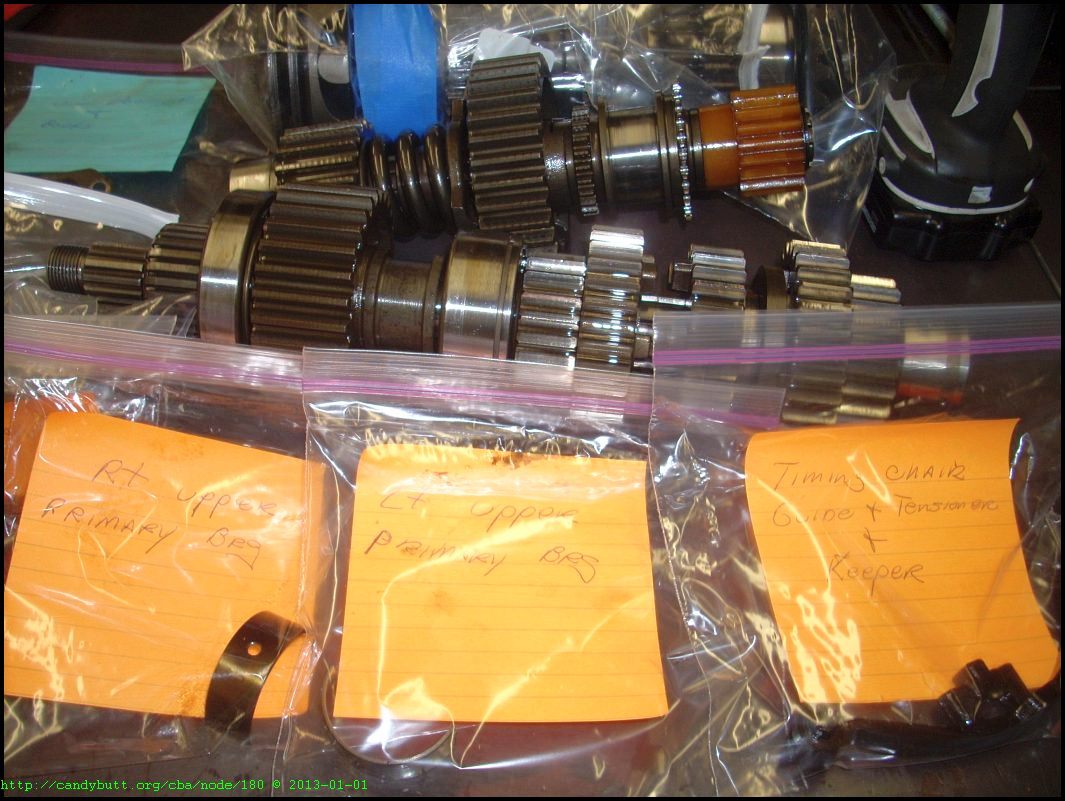
Parts baggies are us...
Ray, what's that metal spiral winding of steel pix bottom?
Shift forks look good.. the tranny was shifitng fine up to point of not being ridden. Never hot-rodded, or shifted w/o clutch.
Main bearings look good too. Ray reports back that lower end rod bolts are 9 bucks each.. Do I want to spend $$ and look to see how rod bearings look? Fuck Yes! We are waay too deep not to look at everything to be sure all is well...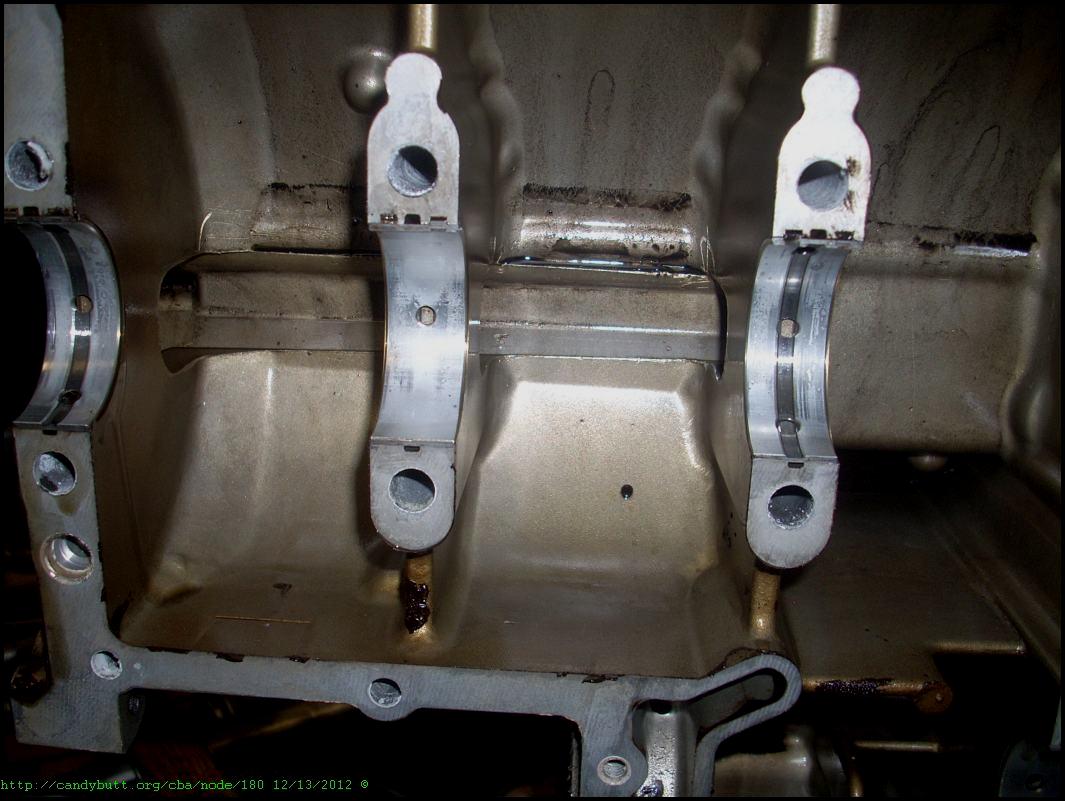
Whoever desinged this engine must have been on crack. I mean really.. too many chains, too many plastic gears, too much of too much. No wonder I love it!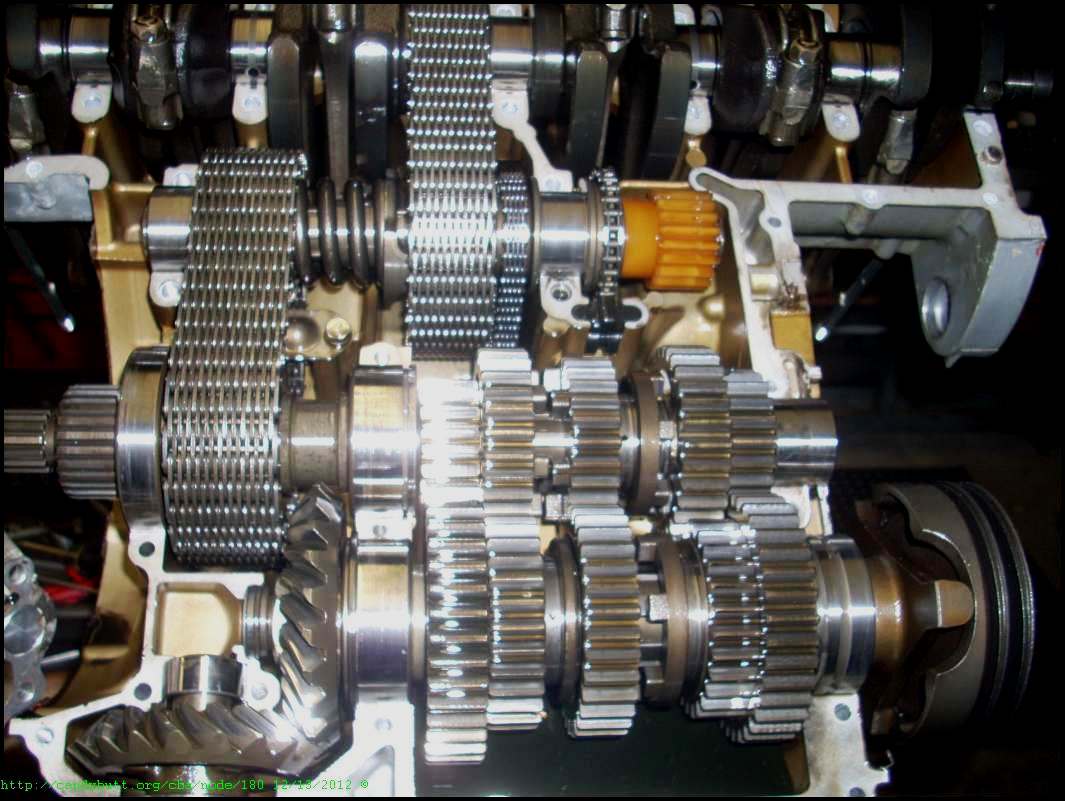
I like this pix.. A certain beauty in the elegance of a spiral cut gear spinning next to a crude-ass hyvo chain...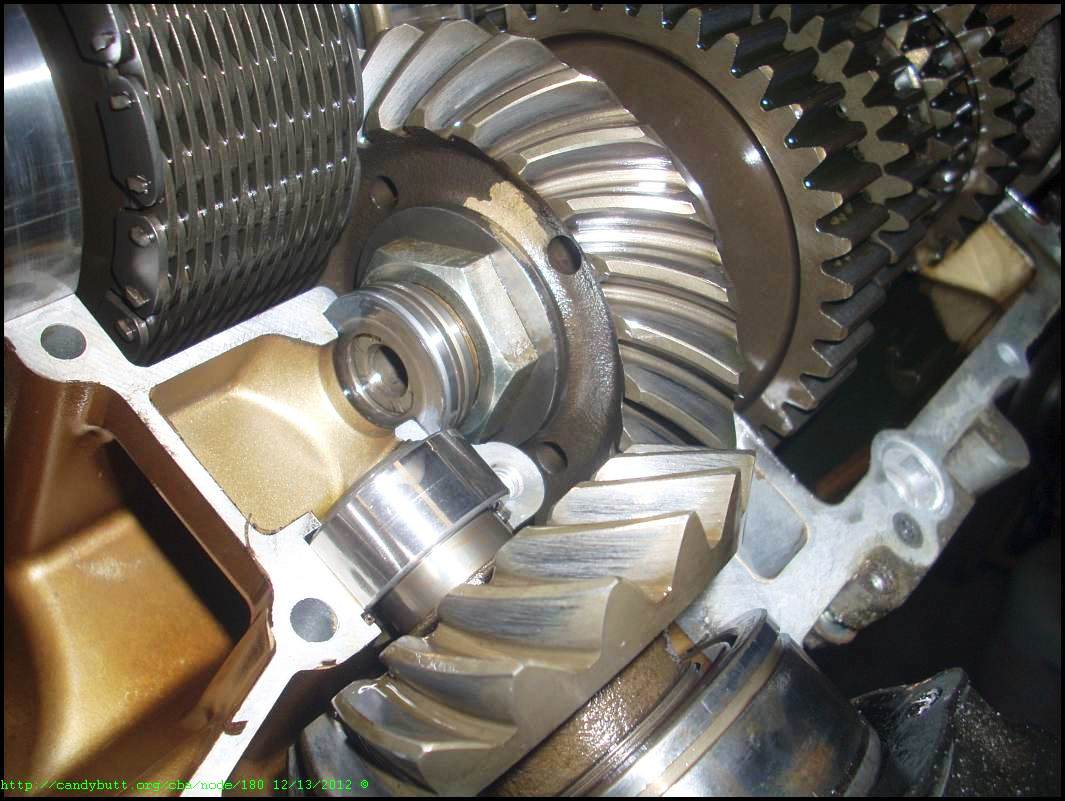
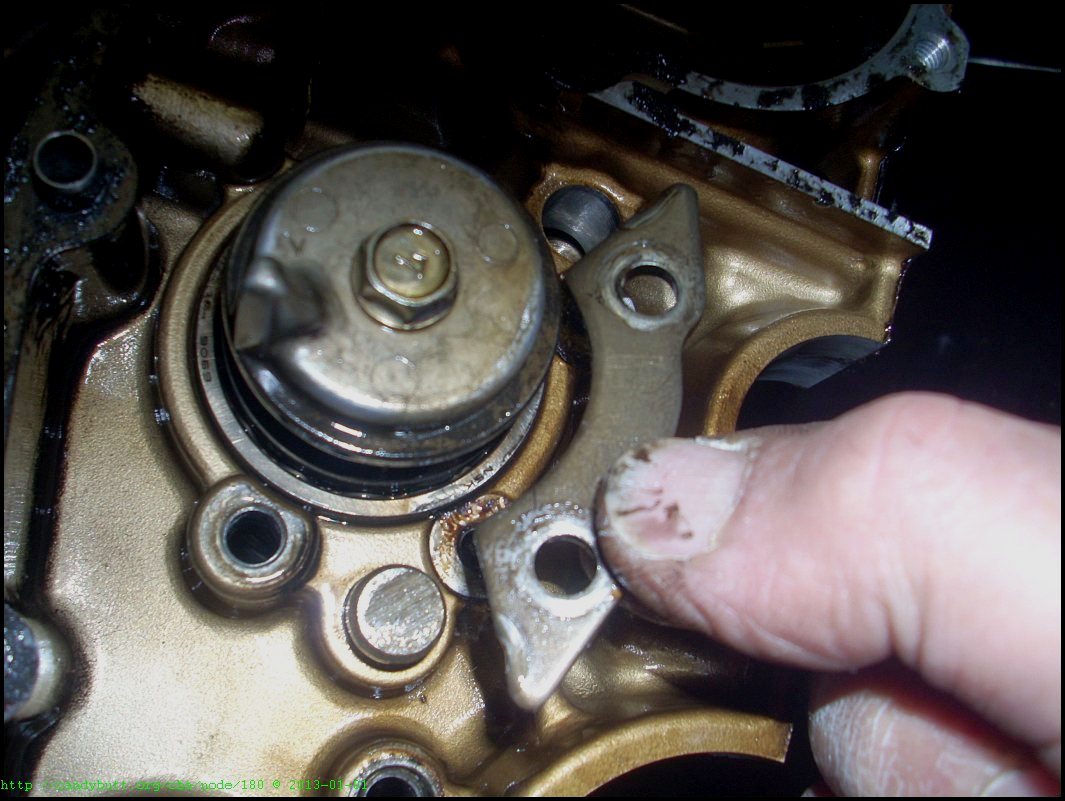
.008" of crankshaft lateral play. Interesting,as this engine had a horrible growl at 1,800 rpm when I got running a year ago, about 10 years after it last ran. The stator on the LHS has wear marks from the rotor hitting the 3-phase coils to output wire connection.. and I really thought the crank was the issue.
Now I'm not sure what we have here...
Last pix - man, there are alot of parts laying around...
2012-01-01 Rods off Crank
Ray called, good news, all looking good down under.
Shift drum and cam.

Again.

Carefully documenting where all the little pieces go...
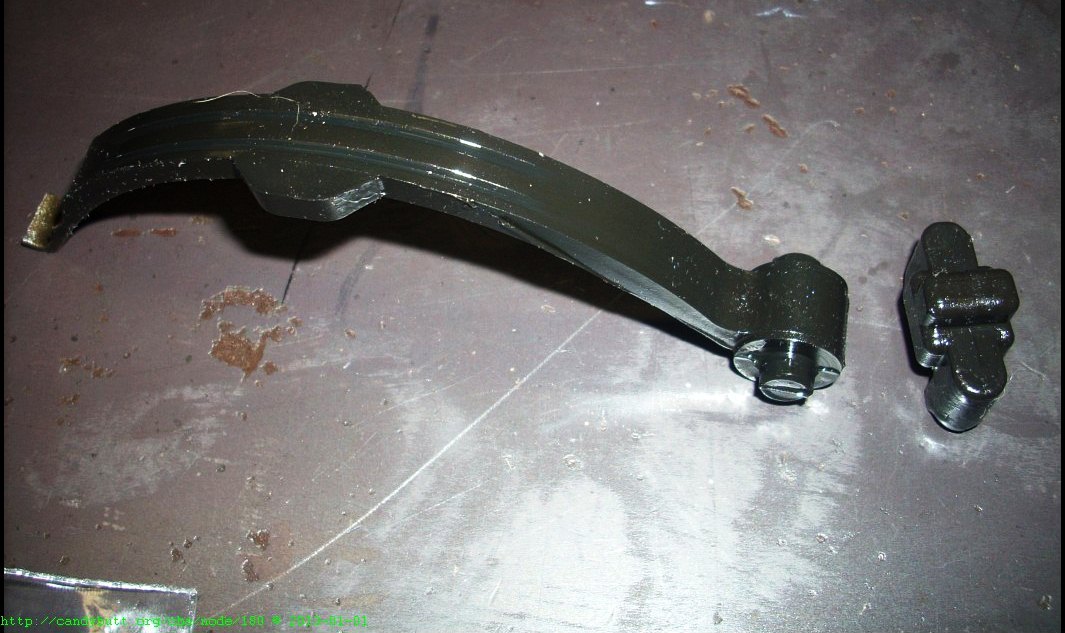
Shift forks.

Main and lay shaft transmission gears.

Transmission final output gear.
Final output assembly.
No clue.
Ditto again on the no clue.

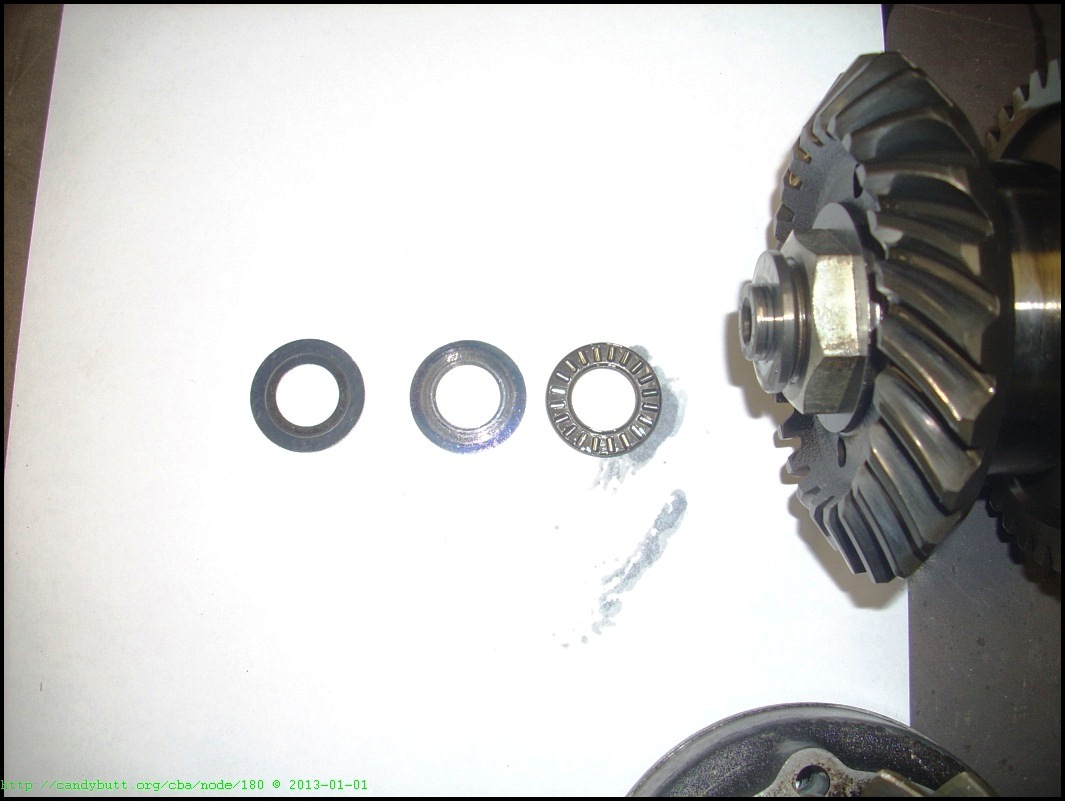
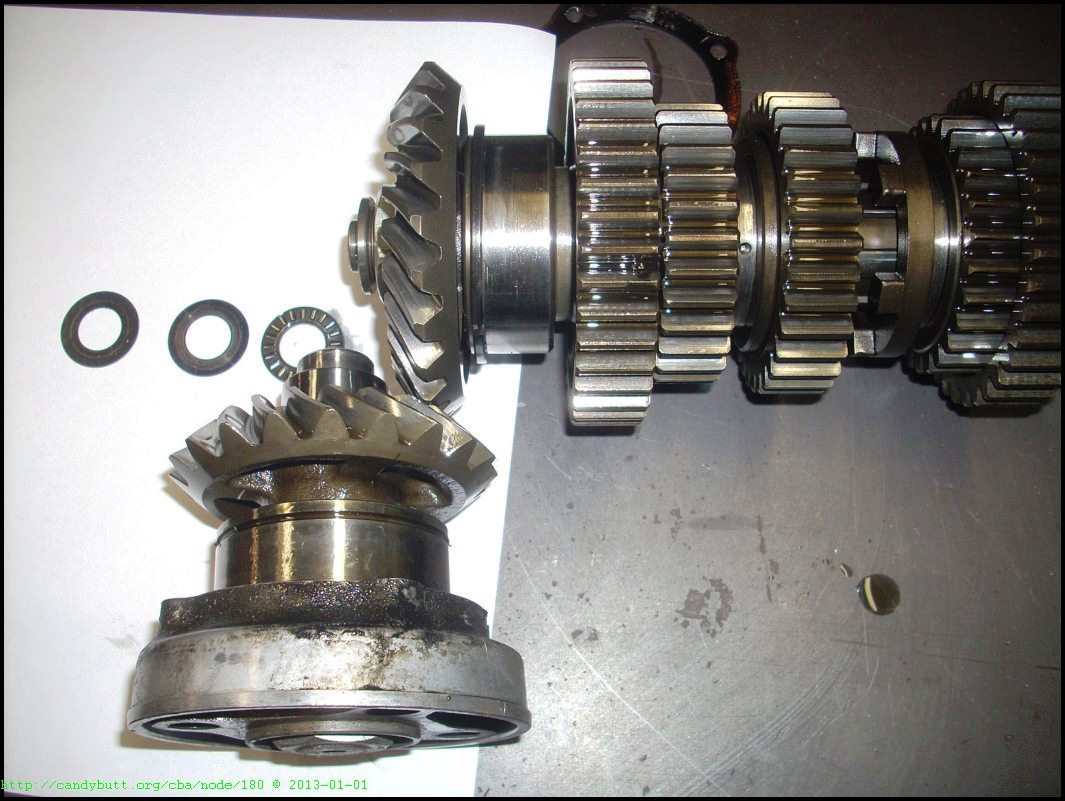
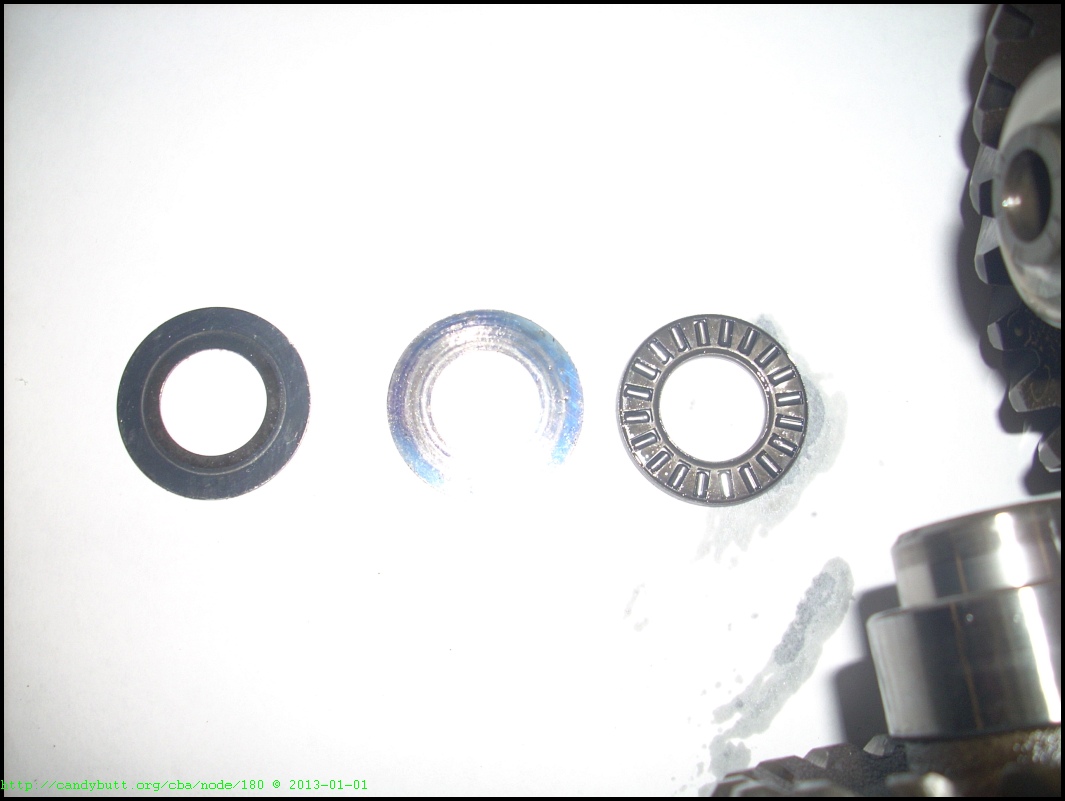
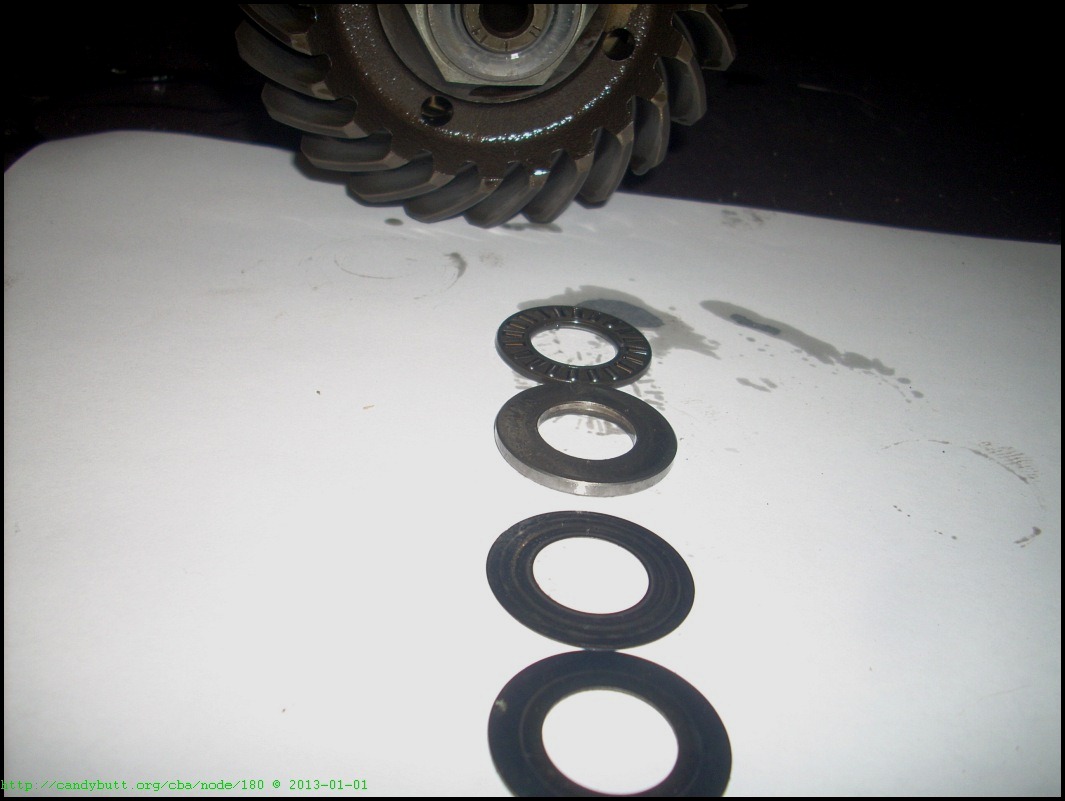
Thrust washers and what not.
Part needing replacing.. Ray - ignition timing chain tensioner?
Let the games begin...
Crank halves.

Journals nice and clean.
Modern art, KZ1300 style.
To steal from Peter, Paul and Mary, "Where do all the pieces go?"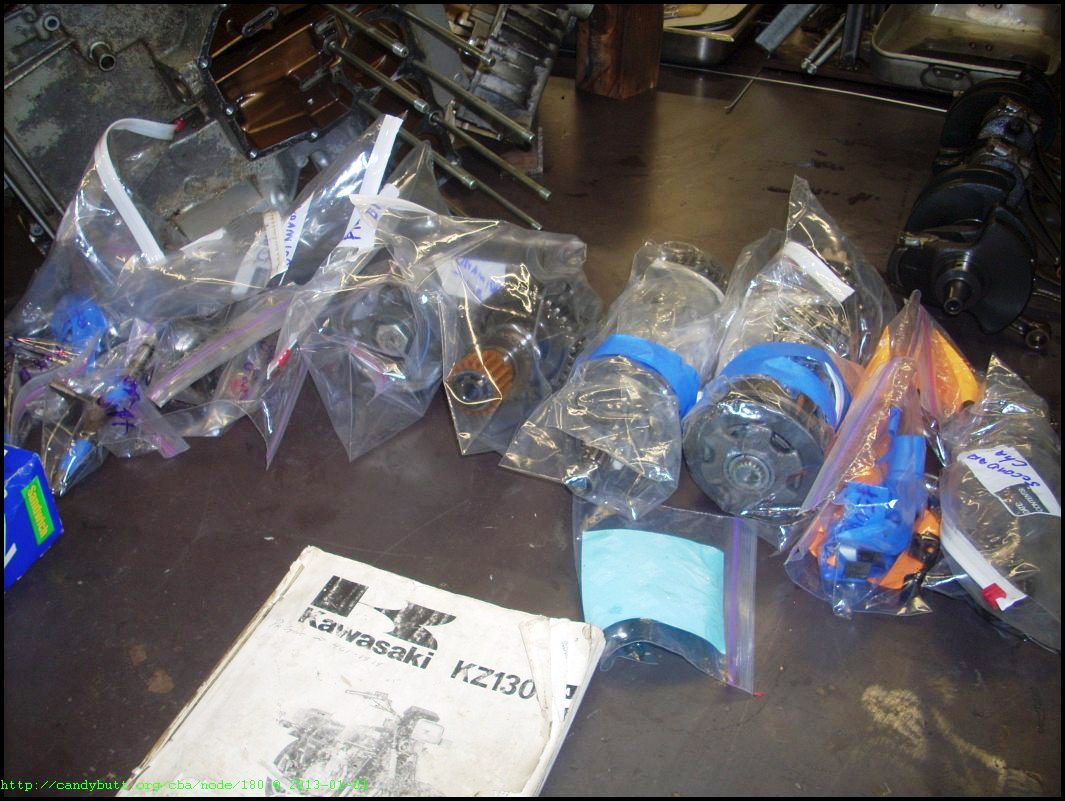
She's a thing of beauty..

2013-01-09
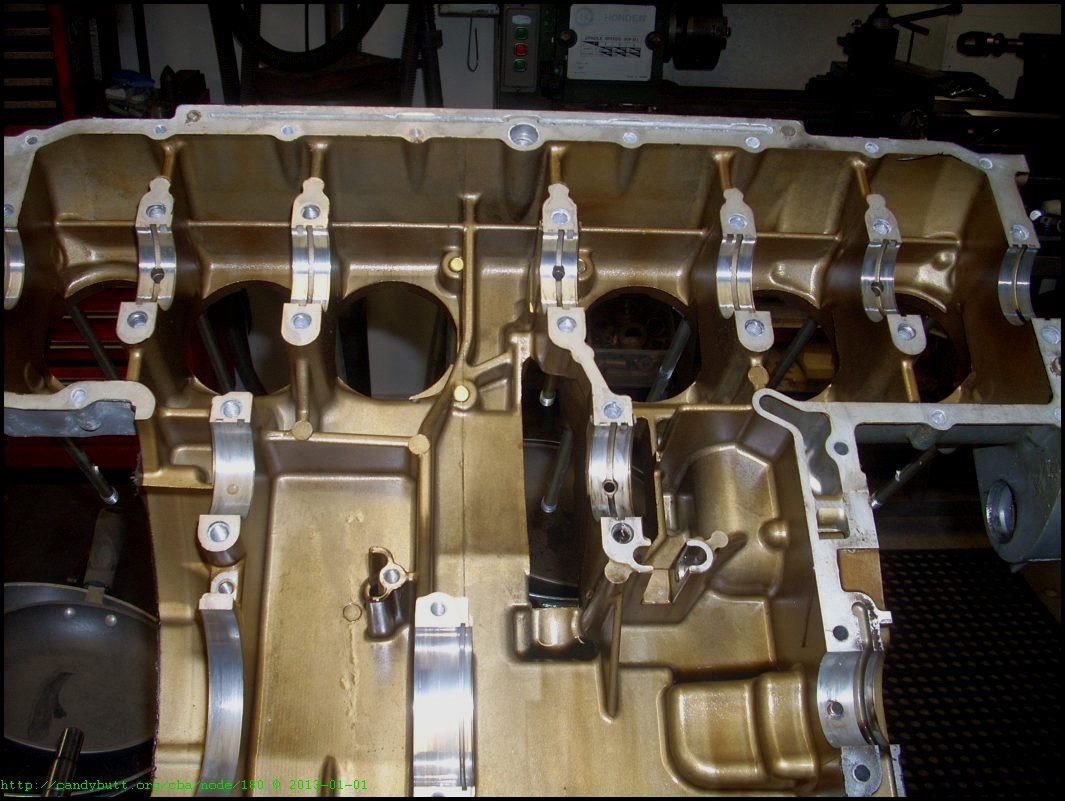
Quick update - after consulting with Ray, we've decided to powder coat all cases previously painted. It cost a bit more, but will last longer and look better too. Ray's going to tape all up to make sure abrasive doesn't get where it shouldn't be. The head is being shipped back empty for prep and powder coat. After coating, will be sent back for work.
Ray found specs for crankshaft end play, .020, we measured .008 so all is good. He also found chain(s) spec and is looking to see where we are!
Onward and upward!
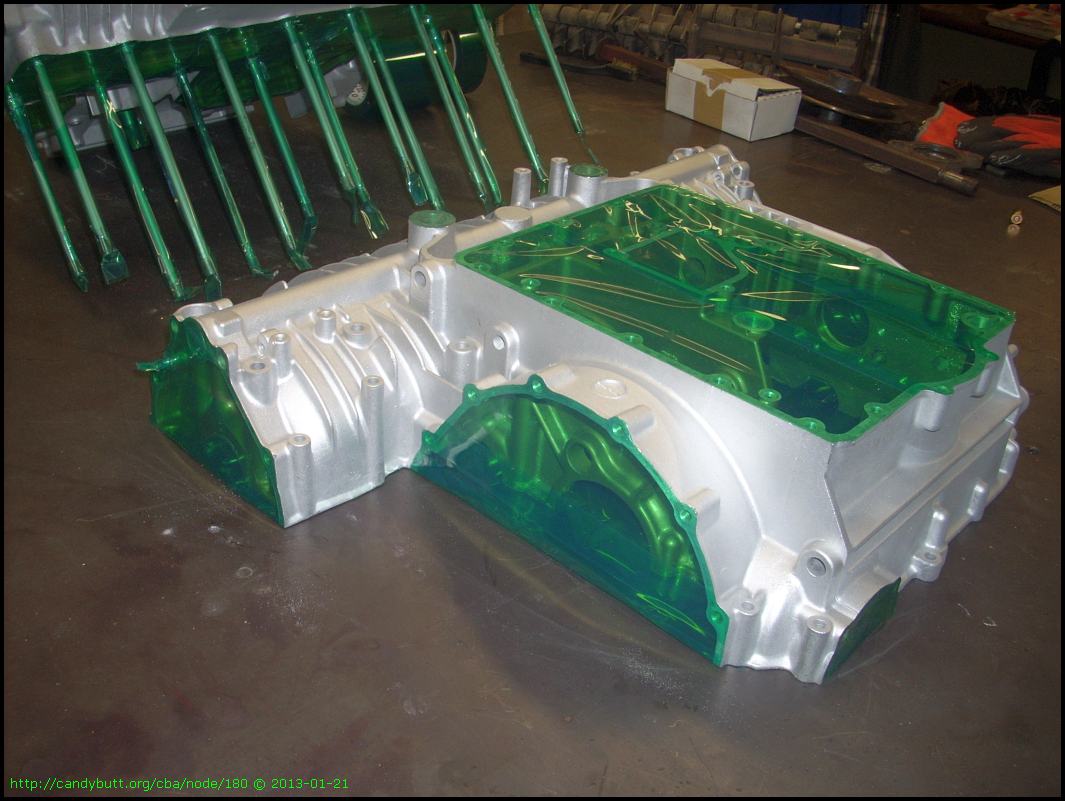
2013-01-21 Taped for Powder Coat
Ray's been busy and has everything taped for powder coat.
It's a special high heat tape, Ray said it's a pain in the ass to work with.
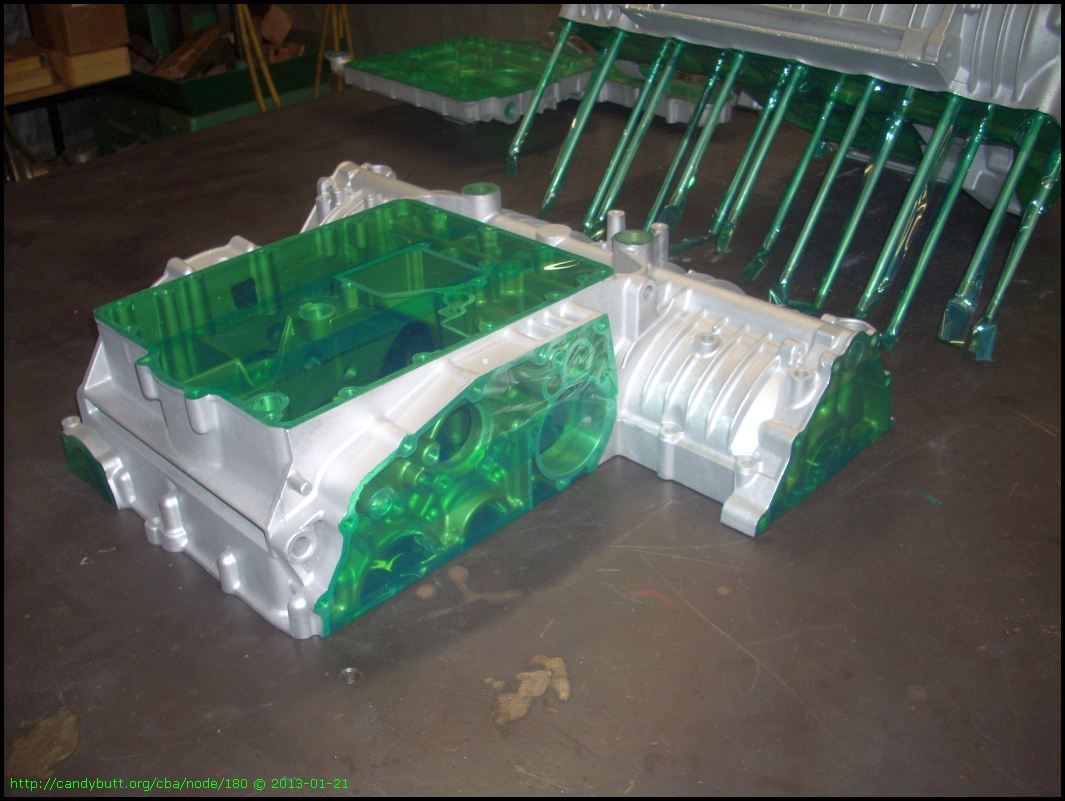
Me thinks this is going to turn out most excellent!
Pages