


7/6/2015 - It has been reported that reading all of the comments and discussion in the replies to this thread can be a bit confusing. All of the information required to perform the RDCUA TBS procedure is contained in this first post, or at the procedure linked to immediately below. This post has been updated to reflect the best working procedure for first and second gen FJRs.
(note that the RDCUA TBS cannot be performed on 3rd Gen FJRs)
3/2013 - I have captured and compiled a complete html version of this procedure and am hosting t at my fjr.nerds web space for posterity here: The Really, Definitely, Completely Un-Authorized Throttle Body Sync (TBS)
Re-edited 10/2012
This version of the UnAuthorized TBS procedure is based on a premise; that the ideal throttle synchronization is when the throttle plates are aligned with each other and parallel.
After a large number of uses, this procedure has been found to be very effective. Nobody who has used this procedure has ever said that it made their bike run worse. Most people say that their bike ran smoother (less vibration at ~4k-5k rpm ranges.
You will see some discussion in other posts about alternate ways to adjust the throttle plates. Some folks believe that you need to rev the engine. Some think that you need to load the engine and rev it. None of these other methods have been shown to be any more effective than doing it the way detailed here. And this way is a lot easier to do.
~~~~~~~~~~~~~~~~~~~~~~~~~~~~~~~~~~~~~~~~~~~~~~~~~~~~~~~~~~~~~~~~~~~~~~~~
The Really Definitely Completely UnAuthorized Throttle Body Sync
I decided to start a new thread to document this procedure. Not because it is so much different than any of the other UA TBS procedures, but because there are so many Throttle Body Sync threads. I'm hoping that this procedure becomes the new standard non-standard. The concept for this TBS procedure came from a thread / discussion I had with a short duration forum member from Maine, Alekso last year. The idea was to make a procedure that wasn't so convoluted and difficult to follow and understand as the original Unauthorized sync procedure.
For those just tuning in, what's going on here is that the "official" throttle body sync procedure, the one called out in the Factory Service Manual (FSM) and specified as a "required" procedure at 4k mi. intervals (what?) is simply an adjustment of the air bypass screws at idle speed. These bypass screws have their primary effect on vacuum at idle speed, and have very little to do with how smoothly the engine runs at anything other than at idle or just above. As the throttle butterfly plates open, the tiny amount of air contributed to the total intake by the bypass circuit becomes increasingly less significant so that by the time you are at 3-4k rpm these screws are pretty insignificant. What is significant at larger throttle openings would be the relative angles of the throttle plates.
The problem is that the FSM doesn't specify a procedure for properly aligning the throttle plates. They just say that the plates are set at the factory and to leave em the hell alone...  Being gearhead dweebs, we know that to achieve the smoothest possible running engine it is our goal for each of the 4 cylinders to contribute the identical amount of power per stroke. With Electronic Fuel Injection and Electronic Ignitions, the likelihood of balanced fueling a nd perfect ignition timing is much better than in the days of carburetors and points of the past. So our best tuning opportunity is to try to balance the air intakes, which can be best measured by the intake vacuums.
Prior "Unauthorised" TBS procedures suggested that you just open the throttle while observing the vacuum gauges and make the mechanical adjustments to the throttle linkage quickly. Surely that will work, but at what rpm do we need to go before the air from those bypass screws is nullified? And how sadistic is it to continually rev your engine while making these fine adjustments? (hint - they aren't all that quick)
Enter the RDC (Really Definitely Completely) Un-Authorized TBS.
The concept here is pretty simple. To align the throttle plates and eliminate the air contribution from the air by-pass screws, we just close them all the way before starting. Yep... it's just that simple.
So, to prove the concept I documented my most recent RDC UA TBS using a new (to me) Gunson Carb-tune vacuum gauge that I picked up over the winter:
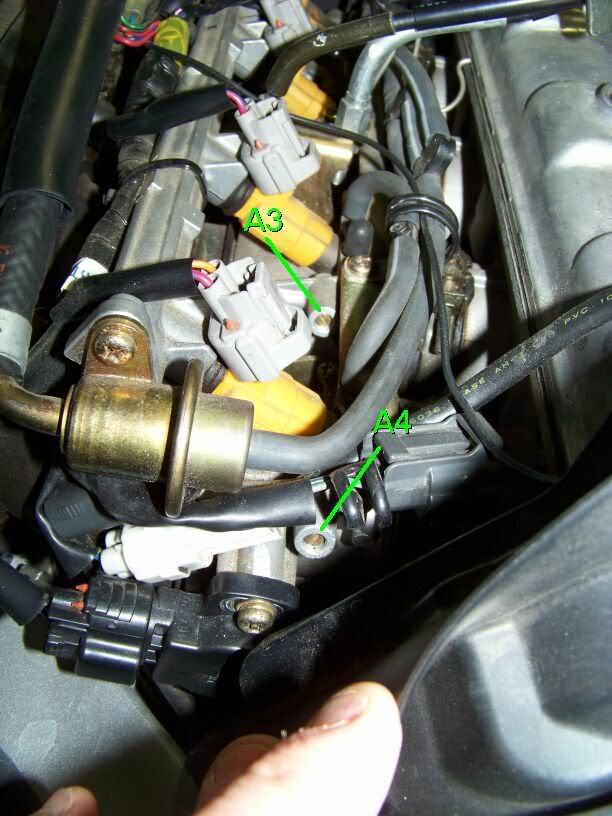
After propping the tank up out of the way, here are the important adjustment points
(note - your under tank could look this uncluttered after installing the WynPro PAIR Block-Off plates and removing all the PAIR crap):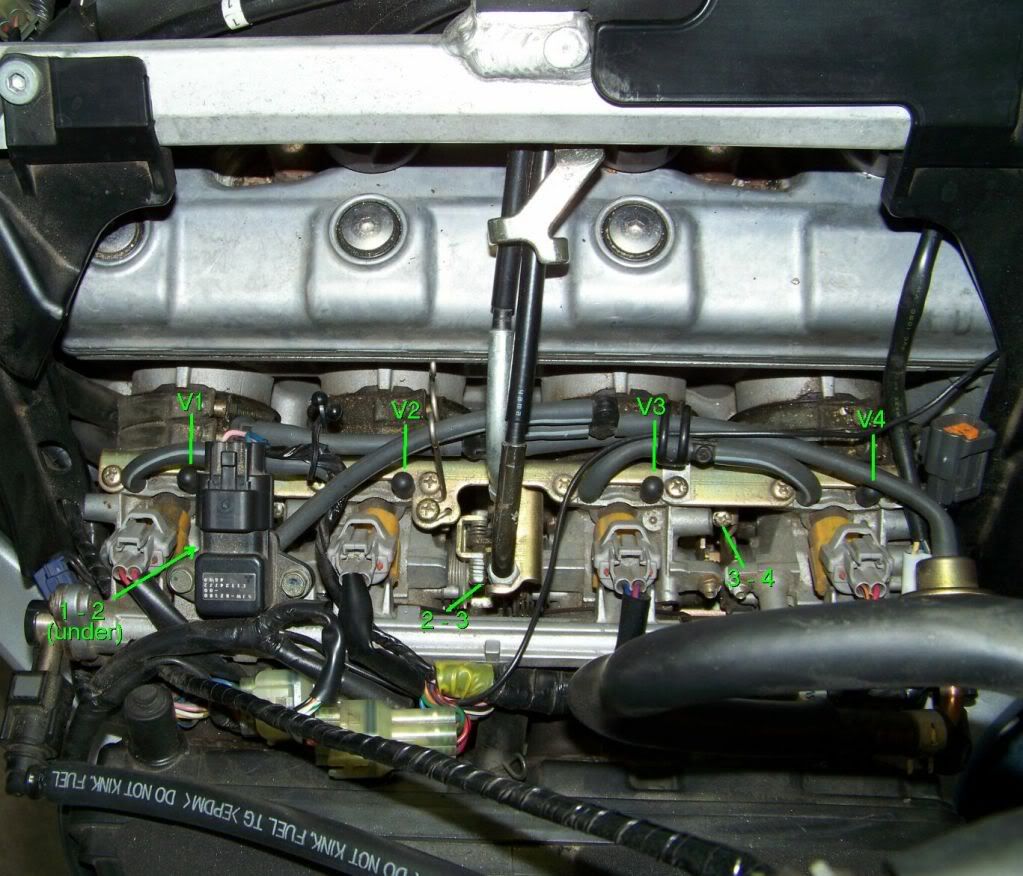
V1 thru V4 are the 4 standard vacuum take-off points for hooking your vacuum gauge of choice to.
1-2, 2-3, and 3-4 are the mechanical linkage adjustment screws to adjust the relative angles of each cylinder's throttle butterfly plate.
Before I began, I documented what I had for vacuum at idle: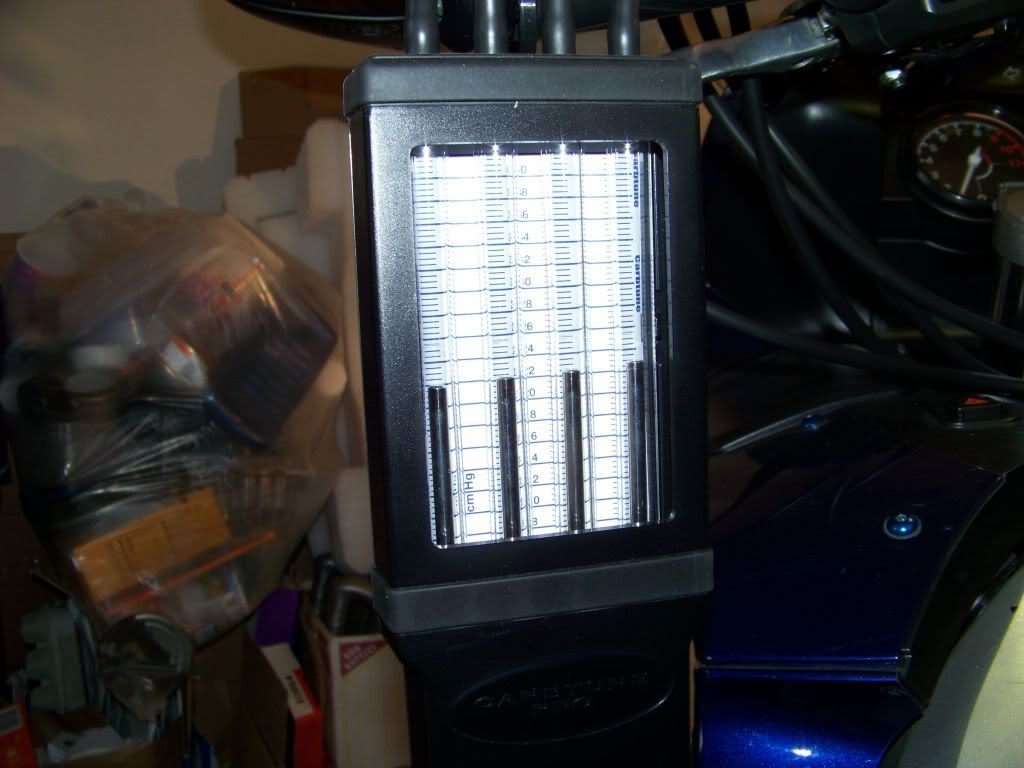
Not bad. Notice that #1 is a bit low and #4 is a bit high. Now, without making any adjustment I then revved the engine to ~3-4k rpm and used my Vista Cruise to hold it long enough to snap a picture: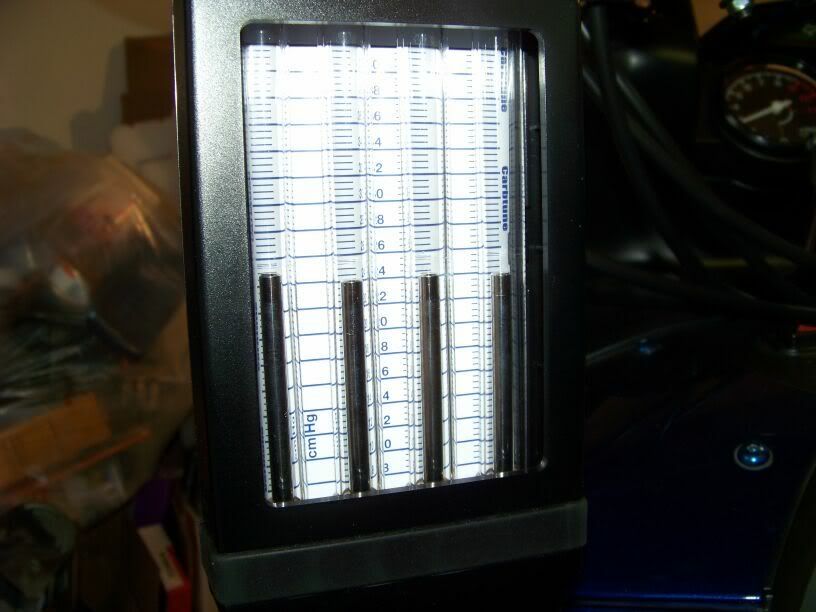
Hello! What's that? Now cyl #1 is high and #4 is low!! This is not good. No, not good at all...
(well really these aren't all that bad, but you get the idea...)
Procedure:
Close down (lightly) all 4 of the Air Bypass screws:
Depending on how open they were before, your engine may not want to idle. You can either crank the idle adjustment (under the right side of the tank) or use your Vista Cruise to hold a reasonable idle, like I did.
Now that the air screws are out of the picture, you can adjust the throttle plate linkage screws (at idle, not while winding the piss out of your poor engine) and balance the vacuums with the throttle plates angles.
Important: Start by balancing cyl 2-3 since 1 and 4 are effected by that adjustment. The only tricky part is if 2-3 needs adjustment you can't get a screwdriver on the adjustment screw. So, take a guess, shut the engine off, and open the throttle enough to get at the screw head. Adjust it one way and then restart the bike to see if you guessed right.
Once 2-3 is good, the 1-2 and 3-4 adjustments can easily be made invivo. If you want to rev the engine to various RPMs to see how much things vary (or don't), knock yourself out (I did). In fact I was a bit nervous of running the engine in the garage for so long, even with water cooling.
When you are completely happy with the balance, I suggest shutting the engine down, and then dialing in ~ 1 turn CCW (open) into each air bypass screw. Restart the engine and adjust your idle to ~1100rpm.
Now recheck your vacuum gauge. Since the throttle plates are now aligned, if there is any mis-balance simply adjust the bypass screws until it is balanced at idle.
When I completed this procedure I had dead nutz balance at idle, and it varied very, very little at any throttle opening. I have not ridden the bike yet after adjusting. It may not amount to a hill of beans, but at least I now know that, unequivocally the throttle has been fully balanced and any vibration that remains is not being caused by an intake mis-balance.


..continued
jsd
FNG
Posted 31 May 2010 - 01:22 PM
#62 serhan
Training Pilot
Posted 01 June 2010 - 04:18 PM
I tried normal TBS and it seems to smoothen it out, until 3300 rpm. Then I did the UTBS, and buzzing is now beyond 4K.
One question I have is, do you use loctite on the bypass screws after you set them to their optimal positions?
Thanks,
S.
2008 FJR1300A2007 Boulevard M50#63 03HiYoSilver
FJR Commander
Posted 01 June 2010 - 05:05 PM
Instead of using LocTite, I use just a small dot of Colored Nail Polish at the edge of 1/4 of the Screw.
#64 Fred W
1 Wheel Drive
Posted 02 June 2010 - 04:35 AM
To view my "broken" Photobucket images: Firefox fix Chrome fix
#65 HawkWing
Training Pilot
Posted 27 September 2011 - 05:27 PM
#66 canadianfjrowner
Training Pilot
Posted 03 July 2012 - 12:24 PM
There was talk about calibrating the throttle plates at 4ooo rpm and the engine running away at that rpm. Somebody said it would be great to do this on a dyno as it would create real world torque on the motor.
Now I thought, If you put the bike on the centre stand, put in 5th. gear and rev. the bike to, let's say 60 mph, and load it up by applying the rear brake, it would be just like being on a dyno. At this time, as you apply more brake pressure, you give more gas. This would be the most accurate way to set the butterflies. Of course, you have to dis-engage the ABS system by unplugging on of the speed sensors. This wouldn't hurt the brakes, as long as you don't do this all day long. In normal operation, hauling the bike down from 70 to 0 in a panic stop will put more strain on the brakes than this method for sure.
I'm going to try this, but I need to buy a vacuum set for 4 carbs since I don't know anyone that has one.
Any feedback on my theory would be appreciated.
#67 mcatrophy
Privaliged to ride a 2018 FJR1300AS
Posted 03 July 2012 - 02:46 PM
Just watch out for overheating that rear brake.
mcatrophy
2018 FJR1300AS - YCC-S Rules!
2014 FJR1300AS 2010 FJR1300AS 2006 FJR1300AS '02 Trophy 1200 '01 Bonneville '55 Tiger Cub
Some FJRForum contributions.
My web site
#68 Blind Squirrel
I'm your huckleberry.
Posted 03 July 2012 - 03:07 PM
I can see it now... You lean on the back of the bike enough to make the rear tire touch the pavement and ZOOOOOOM!!! Off it will go without you!
Please make sure to video it so I can laugh my ass off at you!
- Scott (Chesapeake Va.)
#69 Fred W
1 Wheel Drive
Posted 03 July 2012 - 03:48 PM
But if you do try it, do be sure to capture the event on video.
To view my "broken" Photobucket images: Firefox fix Chrome fix
#70 canadianfjrowner
Training Pilot
Posted 03 July 2012 - 05:42 PM
I would take the measurement, then shut it down, then adjust and re-try. As long as no-one has done it, I don't mind being first. As for safety, than is easy to overcome with some common sense. Just proper secure the front tire down so it won't lift and be prepared for centrifical forces. I'll let you know the results. If it goes bad, trust me there will be no pictures.
#71 Blind Squirrel
I'm your huckleberry.
Posted 04 July 2012 - 03:40 AM
- Scott (Chesapeake Va.)
#72 SCB
SCB
Training Pilot
Posted 06 July 2012 - 05:31 AM
#73 stevet
FJR Pilot
Posted 08 July 2012 - 07:09 PM
I witnessed this procedure. 4th gear was used, modest brake pedal used to apply drag/load on the rear wheel. I don't recall speed/RPM used, but I'm thinking somewhere up in the mid-high 3000 range. Reports after the fact from the bike owner were of noticeable reduction of vibration and possibly other seat-of-the-pant performance improvements. Just be careful- doing this isn't any different from riding your brakes down long hills, you can overheat the system just as easily.
#74 Fred W
1 Wheel Drive
Posted 09 July 2012 - 04:08 AM
Questions for those who've tried this:
Did you try adjusting the throttle plates using my "close all 4 air screws at idle" technique first?
And if so, how much difference (need for further adjustment) was there when you tried the dynamic loaded method using the rear brake?
To view my "broken" Photobucket images: Firefox fix Chrome fix
#75 canadianfjrowner
Training Pilot
Posted 09 July 2012 - 05:33 AM
Thanks Fred W
That's exactly what I wanted to try. If after doing this sequence, there is no difference between idle and load, then in the future, the load calibration won't be needed. I'm still waiting for the tool to set it up. I plan to do it at the same time as installing the cruise control, as I will be there anyway.
#76 Bungie
FrostBack #2 - IBA # 44620
Posted 24 July 2012 - 01:39 PM
The plan is to do a regular TBS then check it with the air screws closed as per this technique. If it's out, I'll give it a go, if not, I'll just restore them.
My bike has always felt rough over 4500 rpm. But its got a REAL sweet spot between 3000-3500. Which is just a hair to low for the speed I like to cruise at. I would absolutely love to be able to either make the bike always feel like that sweet spot, or, just shift it up the RPM range a bit.
I'll keep ya informed.
#77 Fred W
1 Wheel Drive
Posted 24 July 2012 - 03:28 PM
Very cool, Bungie! That's a data point that has been (to this point) uncollected.
My gut instinct is that you'll find it unbalanced, but I am anxious to her your real observations. Especially if you go through the next step of adjustment and it makes a difference.
To view my "broken" Photobucket images: Firefox fix Chrome fix
#78 Bungie
FrostBack #2 - IBA # 44620
Posted 24 July 2012 - 06:56 PM
Darkness fell before I could try the technique.
Just for reference, my cylinders 2-4 were all relatively close and entirely acceptable, my number 1 cylinder was down quite a bit (this on a Morgan CarbTune). No amount of dicking with the hose on the fitting made any difference at all.
The only way I could get it to rise to even close to the other levels was to completely close the air screw. Obviously, something is haywire. Could be a couple of things I want to check first. I backed it back out 3/4's of a turn to put it back where it was and then buttoned it up for the night (and went for a short ride). Bike feels the same. Go figger
Now it could be that the number 1 cylinder throttle plate is out of sync. But I want to eliminate the possibility of any vacuum leaks on that cylinder between the throttle body and the head first, simply because I don't want to be correcting the a vacuum leak with the throttle plate adjustment. I'll get that done tomorrow night and report back.
#79 Fred W
1 Wheel Drive
Posted 25 July 2012 - 04:48 AM
There is also a possibility that the #1 air screw is the only normal one and the other 3 are all plugged up (or closed down). Make sure that adjusting each screw open and closed has the expected effect (opening drops vacuum in that cylinder).
Also, it's really easy to get them back to wherever they are now just by counting turns to fully closed and writing them down.
To view my "broken" Photobucket images: Firefox fix Chrome fix
#80 canadianfjrowner
Training Pilot
Posted 25 July 2012 - 05:38 AM
There are a number of things you need to check. If you are concerned about a vacuum leak between the throttle body and the head, you will need to use a smoke machine. You may need to ask a reputable repair garage (automotive) and see if they can help you. I own a repair facility and have all tools available. I've worked on many toys (snowmobilees etc.) and continue to be surprised by how poorly these machines are put together. Nothing sounds better than a high revving engine all ballanced out.
Good luck
Bungie
FrostBack #2 - IBA # 44620
Posted 25 July 2012 - 07:23 AM
After I picked up the Morgan I did my first TBS with it. 2 of the 4 screws were closed, 1 was backed out about 2.5 turns. This is from a 5 Star Yammie dealer. I baselined them all at one turn out and reset the sync. None required more than half a turn either way to balance them to number 3. The bike smoothed out considerably after that one.
Given that the last sync was entirely normal, I'm going to switch to a different tube on the Morgan. Just to eliminate the gauge being the cause. If that checks out fine, I'll do a Quick-Start test on that manifold boot (Spritz some Quick Start around the joints to see if the vacuum jumps). The bike had a valve check last year and maybe something got a little cocked up.
I'll keep you guys in the loop.
#82 BlackStar
Training Pilot
Posted 25 July 2012 - 07:37 PM
2010 FJR1300A
2007 FZ1
2005 Roadstar Warrior
1978 Suzuki GS1000
#83 canadianfjrowner
Training Pilot
Posted 02 August 2012 - 04:41 AM
I would love to see someone do this TBS on a dyno. I hope someone else will try the same procedure in order to confirm or negate my findings.
#84 Fred W
1 Wheel Drive
Posted 02 August 2012 - 04:54 AM
Good report.
And I agree... I do not place much credence in the balance you see when just freely revving the engine to 4k rpm. Any time I have done this after balancing using my adjustment at idle method I always see disparity between cylinders.
Question: After making the throttle plate adjustments at 4k rpm loaded using the rear brake, what did the vacuum balance then look like at idle (with the air screws still all closed)?
You mentioned that they were off initially, what about after making the dynamic loaded adjust?
To view my "broken" Photobucket images: Firefox fix Chrome fix
#85 canadianfjrowner
Training Pilot
Posted 02 August 2012 - 05:02 AM
They were way off. BTW, it sounds sooo good when you dial in the idle as you get closer to the ballance point, you can just hear that engine starting to purr. Almost the same when you ballance out a Ferrari v12 with the stupid bosch fuel injection.
#86 Fred W
1 Wheel Drive
Posted 02 August 2012 - 05:11 AM
OK, just to clarify... You are saying that after adjusting it loaded at 4k the vacuum was still way off at idle, right?
But then you opened up the 4 air screws the same amount and balanced them at idle and that's when you got the great Ferrari sound, right?
I guess the real proof of the pudding will be in the road test. The times that I have got it it "just right" the difference in vibration is quite remarkable. I'm keeping my fingers crossed that you've found a better method.
BTW - No experience with Ferrari V-12's here, but not for a lack of desire...
To view my "broken" Photobucket images: Firefox fix Chrome fix
#87 canadianfjrowner
Training Pilot
Posted 02 August 2012 - 06:58 PM
Yes, the idle with the air bypass screws closed was off. Quick adjustment was all that was needed. Took it for a spin and wow. No vibration at 65 to 75 mph. Also when you labour the engine at low rpm it seems to pull better without as much complaining. I will do my friend's bike next and see the before and after on that one.
#88 Fred W
1 Wheel Drive
Posted 03 August 2012 - 03:03 AM
Well, that is except for the wear and tear to the rear brake
Now, we may want to dream up a way to make a poor man's dyno type load.
PS - what rpm does 65-75 equate to on a 2nd gen. I know that would be 3800-4200 rpm on my 1st gen.
To view my "broken" Photobucket images: Firefox fix Chrome fix
#89 ionbeam
2 FUN
Posted 03 August 2012 - 03:29 AM
#90 mcatrophy
Privaliged to ride a 2018 FJR1300AS
Posted 03 August 2012 - 04:14 AM
Or, just the graph:
(Click on image for larger view)
mcatrophy
2018 FJR1300AS - YCC-S Rules!
2014 FJR1300AS 2010 FJR1300AS 2006 FJR1300AS '02 Trophy 1200 '01 Bonneville '55 Tiger Cub
Some FJRForum contributions.
My web site
#91 canadianfjrowner
Training Pilot
Posted 05 August 2012 - 06:23 AM
I don't think the speed of the rear tire has as much to do with the set-up as the ability to put a descend load on the engine at 4000rpm and the ability to control it at that rpm as you increase load. I found it easy to raise the rpm to 4000 and then increase load and increase throttle at the same time. BTW. The bike on the centre stand was very stable. I was a bit worried about centrifical forces playing a role in the stability but all was good.
On another note the ability of controlling the rear brake temp. before it gets hot with a water spray shouldn't affect the warpage of the rear rotor. just don't cool it when it is already super hot. Some years ago I had an automotive dyno that I could have used but I sold it 5 years ago. There will be tons of dynos for sale in Ontario by January of next year for basically the price if the steel. There are over 2000 dynos that will be de-commisioned for emisions testing.
#92 Yamifz1
Training Pilot
Posted 06 August 2012 - 12:12 PM
So I finally got a little time to do some work on my bike today. I had planned on doing the throttle spring release, sync the TBs and changing the plugs all at once, unfortunately the plugs were ordered but they did not come in yet. So this morning I released the spring one turn ( definitely a big improvement) and did you Un-authorized TBS minus the engine under load portion as I figured just lining up the plates and then syncing everything would be an improvement. Here is how things lined up at idle with nothing done ti the bike so as to get a baseline.
I then followed the procedure as outlined, which by the way was quite simple except for reaching the screws for the plate adjustments. That required a bit of work lining things up and holding the throttle shut at the same time, none the less I got it done. Here is how things looked when I was finished.
I went out for a very short ride afterwards just to ensure that everything was in working order and right away I saw improvements. The throttle was far smoother and it did not jerk forward in the turns as you accelerated. I also had a fairly noticeable vibration that could be felt in my hands and butt from 4000-4500 RPM. Now I can barely even notice it. I am looking forward to going out for a few hours and seeing what a difference these changes have made. My bike may now be rideable and may only require a change in the handlebar position.
Thanks for the write up and pictures, they made this job far easier.
2001 FZ1
2006 FJR
#93 Fred W
1 Wheel Drive
Posted 09 August 2012 - 09:06 AM
Well, today was oil change day. So I propped the tank up and checked the TBS (it's on my regular 5k maintenance list anyway) and checked the balance 5k miles after my last TBS. As is usual, it was off a little bit.
I then closed down all four air bypass screws and boosted the idle up to 1100 rpm. There was some vacuum misbalance there too. Mostly it was in the most difficult adjustment between #2 and #3. I adjusted that out using my normal procedure (at idle). This still requires stopping and starting the engine to get at that middle linkage adjustment screw, then adjust the two outboard cylinders last with the engine running (much easier).
When I was satisfied all was good I straddled the bike standing up on the pegs (no seat and the tank up) put it into 2nd gear and modulating the rear brake, released the clutch and ran the engine speed up to ~4k rpm. I saw no discernable difference in vacuum there on my bike as compared to at idle. Since I saw nothing that could be improved on by adjustment I didn't do any. Also, FWIW, my vacuums were pretty close as I just revved the engine freely (not under any brake load).
I then opened each air screw 1 turn, readjusted the idle back down to 1100 rpm, and then balanced them at idle again using the air bypass screws. Not much adjustment was required. This last part seems a bit redundant since everything was already balanced at idle before opening up the 4 screws. Some day I may try closing them all down and leaving them there to see what happens.
Now remember, I am dealing with a 1st gen bike. 1st Gen idle adjust is a screw that adjusts the mechanical stop for the throttle shaft bell crank. My understanding is that 2nd gens use something else related to an air bypass, so that may be the big difference in our results.
To view my "broken" Photobucket images: Firefox fix Chrome fix
#94 canadianfjrowner
Training Pilot
Posted 10 August 2012 - 05:32 AM
Did you load up the engine by roughly the same amount as if you were riding?
#95 canadianfjrowner
Training Pilot
Posted 10 August 2012 - 05:37 AM
#96 Fred W
1 Wheel Drive
Posted 10 August 2012 - 05:48 AM
Yep, I sure did. After two short runs or maybe 10-15 seconds each (I repeated my first attempt to be sure) my rear brakes were good and hot.
The vacuum level at 65 mph cruise will be somewhat lower than it is at idle because the throttle butterflies are open.
The original premise of balancing the vacuums under load was that the engine would be pumping more air, so more flow through the intakes at that rpm. I guess now I am second guessing whether the air flow is that much different when loaded vs unloaded? Yes, the airflow will be greater, but the throttle plates will be somewhat more open when loaded, which means any variation in angle of those plates would be of less significance. What may be of more significance would be variation in the intake tracts, valve lift and duration, etc.
To view my "broken" Photobucket images: Firefox fix Chrome fix
#97 canadianfjrowner
Training Pilot
Posted 10 August 2012 - 06:32 AM
#98 Chuck35
FJR Commander
Posted 10 August 2012 - 10:56 AM
Having been an automotive tech fr over 3 decades, I feel I am qualified to point out an oversight I discovered.
The little rubber plugs go back on BEFORE the gas tank.
Mine weren't off as far as I had hoped, but they are spot on now!
On my test drive I was preoccupied with my speedo and gps (new speedodrd) but as I neared home with a saddlebag reeking of fried chicken and mashed taters, I realized I hadn't been locking the throttle and shaking my wrist.
FJR Darksider #72
#99 VanHarlan
FJR Squadron Leader
Posted 04 October 2012 - 06:37 PM
I installed 4 new NGK Iridiums . . . and started the engine, letting her warm up to normal operating temperature. I did all the preliminary non-sense like shutting down the air screws, etc.
Oddly . . my engine ran fine without adjusting the idle after the air screws were shut down. My 1 & 4 were wildly out of balance from 2 & 3 not to mention 2&3 were a little whack. After trial and error, checking, rechecking, I was happy with the initial results and moved on to "authorized" sync. Also interesting to note is that once I open all the air screws one complete turn CCW my idle went from about 1100 to 1400-1500 (remember I did not have to adjust the idle speed to compensate for the shut down air screws). I adjusted the idle and proceeded with a normal sync.
I took the bike on a 400 mile jaunt today through the mountains & forest of northern PA and I'll say I don't think she's ever run so well.
Then throttle response was reliable and predictable . . . and much smoother than it has been in the recent past.
After today's run I plan on going back in and re-doing it since it's obvious that my throttle blades were way out of alignment.
Thank you to Fred and everyone who has discussed this topic and added their input . . . it's amazingly simple and the results are well worth the effort. Well done gentlemen.
#100 Auron
Auron
FJRForums' Red-headed stepchild
Posted 04 October 2012 - 07:20 PM
Fred W
1 Wheel Drive
Posted 05 October 2012 - 04:45 AM
Ride on!!
To view my "broken" Photobucket images: Firefox fix Chrome fix
#102 NBB
NBB
FJR Pilot
Posted 05 October 2012 - 06:22 AM
I did the TBS earlier this year using this method of loading @4k RPM in 4th gear, and noticed the same initial readings of cylinders 1 & 4 being higher in vacuum than 2 & 3 with a Morgan carb tune. We noticed nearly the same readings on another members FJR at the MN tech day this spring ans his ride had nearly 98k miles when the TBS sync was performed. A couple of weeks ago we rechecked his bike (now with almost 120K) and only cylinder 1 had changed ( at 4k rpm) and that was not much more than 1 bar difference. However the idle vacuums were off a bit more.
-K
2015 FJR1300A,
'06 FJR, '75 250 CZ, '82 Honda 110 Trail, '65 C105T(55cc Trail), 76 CB360, 56 Jawa 150.#103 Fred W
1 Wheel Drive
Posted 29 October 2012 - 12:19 PM
POPULAR
I went back and edited a couple of my earlier posts where I was doing some thinking out loud about how effective this RDCUA TBS procedure was going to be, and reading it now may have cast doubt as to the effectiveness of the procedure. As noted now in post #1, I really am convinced that this results in the best case TBS throttle plate alignment and is the easiest way to perform it.
To view my "broken" Photobucket images: Firefox fix Chrome fix
#104 TomInPA
FJR Commander
Posted 29 October 2012 - 12:29 PM
Fred, I undid about 5-negative votes for ya. You must have attracted a rep-assassin somewhere. Anyway, I appreciate the work you did on developing the procedure, and it's what I've been using on my bike and other friends I helped to tune their bikes. Illegitimi non carborundum.
#105 mavrik
FJR Pilot
Posted 29 October 2012 - 12:30 PM
if there were not individual pioneers and thinking outside the box...we would never be able to grow as a forum and/or even as a society...nay sayers will always be around, but very few actually put the efforts in to help others
Current: 2005 blue FJR, braided lines, full holeshot exhaust, pcIII, yamaha trunk, yamaha side bags with liners, steering stem universal mount, electrical junction block, heated gear wired, valentine 1 wired, bar risers, 12 volt outlet, updadted forks with 1.1 straight rate springs, Penske 8983 in the rear, Audiovox CC, Oxford premium touring heated grips...few other goodies
#106 Fred W
1 Wheel Drive
Posted 29 October 2012 - 01:05 PM
I wasn't really fishing for compliments or + votes, just really am surprised at some people's reactions to other people's posts. Not just in this thread either.
By the way... I wonder if people would do that if they knew that the admins can see who placed the votes?(and no, I'm not an admin)
To view my "broken" Photobucket images: Firefox fix Chrome fix
#107 Bugman
FJR Pilot
Posted 29 October 2012 - 05:32 PM
Ya got me wondering about the negative votes. I think you get only one a day. I would think the technical stuff would get voted up while the never ending pointless stuff would be voted down. Go figure...
Fuelinjectiti non carburetor
Edited by Bugman, 29 October 2012 - 05:35 PM.
#108 ABQFJR
FJR Pilot
Posted 09 November 2012 - 01:04 PM
Probably my single biggest complaint with the FJR has been the buzziness of the motor. I did the authorized TBS back in the spring and didn't notice any difference... now I know why.
I can't wait to get home and try this.... OhBoyOhBoyOhBoyOhBoyOhBoyOhBoyOhBoyOhBoy....
#109 wheatonFJR
...
Posted 09 November 2012 - 01:33 PM
Remember...this TBS is really, definitely, completely Unauthorized. If you're motor blows up good...it's on you.
#110 ABQFJR
FJR Pilot
Posted 09 November 2012 - 01:40 PM
Indeed, the "unauthorizedness" of this procedure is what makes me think it's really worth trying. Additionally, I'd be interested in learning how dorking this procedure could blow up the motor.
It WOULD be an easy way to convince the wife to let me go get a 2013, though. "Baby, the really smrt guys on the forum said the 2nd-gen was garbage and look, they were right!" Hmmmmm....
#111 ABQFJR
FJR Pilot
Posted 12 November 2012 - 04:39 PM
After about 1/2 hour, I was able to get the readings much closer. Yes, it took awhile, because I'm a perfectionist, but I had to settle for "close enough" this time:
It's too early to tell how big of an improvement this has made, but on a quick trip around the block after the synchronization, I'd say it DID seem pretty smooth. Smoother than before? Like I said, it's hard to tell. I'll report back once I get out on a decent ride.
Also took the time to put the charcoal canister back on the bike while I had the tank up. I know, I know, the usual mod is to take it off (which I did, previously), but I was getting tired of the garage filling up with fuel vapors after every ride.
#112 Constant Mesh
FJR Commander
Posted 15 November 2012 - 06:48 AM
I closed the air screws and then adjusted the idle knob for a 1100 rpm idle. Then I synced the throttle valves. Everything's fine.
Then I raised the idle to 1500 rpm (open the throttle valves a bit) with the knob. TB4 didn't change but TB1 and TB2 were no longer synced. I didn't continue but I'd guess if I had raised the idle another few hundred rpm the sync profile would have changed again.
I can only assume that syncing the throttle valves at one position doesn't really guarantee they'll be synced at another position. I've noticed that before indirectly. If I sync the air screws, ride a bit, and then change the idle a bit with the knob, the air screws sync is scrambled. A small movement of the throttle valves changes the air screw sync.
The butterfly throttle valves don't offer very precise flow control. When they're almost closed a small movement can yield very different flows.
#113 Fred W
1 Wheel Drive
Posted 15 November 2012 - 06:16 PM
What you have noticed is what I expect the minor pitfall of this adjustment method is (or has been all along) and that is...
When the throttles valves are nearly closed at idle (1100 rpm) any even small amount of crud built up on the faces of those butterflies will have a rather significant impact on the flow, and therefore vacuum , at that minor opening. As you open up all four butterflies (mechanically tied together) that crud will become progressively less significant, and the actual angle of the butterflies will be prevalent.
The premisses of the adjustment is that by adjusting the tiny crack of an opening at a very low throttle setting (assumption of clean or identically dirty throttle plates) will set the throttle plates perfectly parallel to each other, but that wouldn't be true if there was a buildup of spooge on the leading edges of some plates and not others.
What I'd suggest, as both an experiment and a corrective action, would be exactly what I intend to do in the next week or so on my bike; To clean the throttle bodies with a spray type intake cleaner (I'll be using the spray SeaFoam product) and then recheck your results. I have a good feeling that you'll see that the variability with throttle opening becomes lessened if not eliminated.
FWIW, I also intend on also going through a full seafoam combustion chamber de-carbonization, as my poor old '05 is coming up on 75k miles, and I want an accurate measurement of the valve clearances when I go in to measure them. So that may contaminate my vacuum results when I get around to actually measuring them afterwards.
Good Luck!
To view my "broken" Photobucket images: Firefox fix Chrome fix
#114 ABQFJR
FJR Pilot
Posted 04 January 2013 - 11:28 AM
Fred,
Happy New Year! I was just wondering if you had had the chance to perform your cleaning experiment, and if so, if it affected your sync values at all. I haven't really had my bike out for a good ride since I did the sync (I know, I know, I'm an unworthy owner), but I'd be very interested to hear what your findings were.
-Dustin
#115 Fred W
1 Wheel Drive
Posted 04 January 2013 - 12:21 PM
Yes, I did do the full seafoam treatment, but it was right before I adjusted my valves, so I'm not sure if any changes to the sync were from the cleaning or the intake valves now being open less (larger cam clearance). The intakes all required adjustment, but the exhausts were all still the same as the prior two measurements. When I got done with it all the engine is now running smoother than it ever has, at least that I can remember.
I haven't had my bike out much either since those adjustments, but that is more because of the frigid New England temps and the nasty white stuff on the ground than anything. I typically will subject the V-strom to the winter salt rather than the FJR.
To view my "broken" Photobucket images: Firefox fix Chrome fix
#116 odot
odot
CC member # 17,----- DUP member # 7, mensa club member #80, DD#
Posted 04 January 2013 - 01:11 PM
Man, no wonder my tbs went from bad to worse.............Now yer really gonna get some negative votes!
Just kidding.....I've only had a tbs done once on me skoot. I can't find it in myself to give a shit about a small variation in carb suction.
infuriatingly unhelpful bunch of twats.
#117 Chiefblueman
FJR Pilot
Posted 04 January 2013 - 02:27 PM
Odot, it's not your tbs that will give you trouble. It's your battery.
I'm an analog man in a digital world.
#118 odot
odot
CC member # 17,----- DUP member # 7, mensa club member #80, DD#
Posted 04 January 2013 - 03:11 PM
You have no idea how right you are.
infuriatingly unhelpful bunch of twats.
#119 ABQFJR
FJR Pilot
Posted 21 January 2013 - 01:12 PM
Well, I finally got a chance to get the bike out for a decent-length ride yesterday, and was disappointed in the lack of improvement in my buzziness situation. I spent some time re-torquing engine mounts with a similar lack of success. I went back and read through this entire thread again very carefully, and I believe I may understand now why the procedure didn't work so well for me. In short... I screwed it up by not adapting it for the 2nd gen nature of my bike.
I did the procedure without checking the balance a higher-than-idle RPM, load or no load. I think that is where I messed up.
Pretty much all of the discussion here has revolved around the 1st gen bike, which has a different way of setting idle speed, correct? When you close down your idle air screws, you're basically choking off all your air bypass (except for what is allowed by the throttle plates), right? IIRC, on the 2nd gen, the idle adjustment controls another air bypass that functions even when the idle air screws are all turned completely in. On the 2nd gen, adjusting the idle back up to 1000 doesn't actually open up the throttle butterflies at all, as it does on the 1st gen, right? I suppose what I'm trying to say (or rather, ask) is: On your 1st gen bike, with the air bypass screws closed, and your idle adjusted up to 1000 RPM, your throttle plates are open more a bit more than on my 2nd gen bike under the same circumstances, correct? Or am I way off base here?
There is, of course, the likelihood that my intake balance is fine and the buzziness is being caused (perceived) by something else... perhaps that mushy thing between my ears.
#120 odot
odot
CC member # 17,----- DUP member # 7, mensa club member #80, DD#
Posted 21 January 2013 - 01:33 PM
You probably need a new battery.
infuriatingly unhelpful bunch of twats.
..continued
Fred W
1 Wheel Drive
Posted 21 January 2013 - 01:40 PM
Yes. Everything that you've said is correct.
Here's what I would do on a 2nd gen:
Adjust your idle speed first, before closing down the air screws, then don't touch it (until the very end).
Next, close down all 4 air screws and use the throttle itself, possible with a throttle locking device of some kind to hold it, maintain a decent idle speed while adjusting the throttle plates. The idle speed for the throttle plate adjustment isn't critical.
After you are happy with that vacuum balance, open each of the 4 air screws an equal amount. Try 1 turn first.
If the idle is too high, close each of the 4 air screws an equal (small) amount. Conversely, if the idle is too low open the 4 an equal amount. Either way, don't worry about the balance until you get your speed to ~1100 rpm.
Finally make adjustments to the individual air screws to balance them. They should be very close already.
Note, that even after adjustment, there will be some amount of engine vibration present, so your last observation about the cause being the thing between your ears is entirely possible.
To view my "broken" Photobucket images: Firefox fix Chrome fix
#122 ABQFJR
FJR Pilot
Posted 21 January 2013 - 07:07 PM
Hi Fred,
I'm glad to hear that, as I just got back from the garage doing almost this exact procedure, based on my suppositions in the previous post. The only difference is that I backed out the idle adjust screw as far as I could to eliminate its bypass effects, then I closed down the cylinders' idle air screws. This, of course, made the bike not want to run, but I used a combination of a GoCruise and a zip-tie to keep the idle at 1000 throughout the procedure. Needless to say, there was syncing to be done. It sure is a PITA chasing the sync from cylinder to cylinder using the throttle plate screws, but I finally got it. Tried the whole revving thing but it seemed to look different each time I revved the engine. I think you're right when you say that that particular method does not really accomplish much.
Anyway, I think I had actually taken my bike further out of balance during the previous sync due to not having backed out the main idle adjuster screw (without it dropping out, assuming it even CAN drop out on the Gen 2 bike). It would seem that the crux of this procedure (either on a Gen 1 or Gen 2 bike) is to remove (or at least minimize) the effects of air bypass from the idle adjust screw and the idle air screws. Only THEN can one know if the throttle plates are truly synchronized.
On a side note, here's an interesting story: The FJR is my first inline-4 motorcycle. My previous bikes consisted of two parallel twins, a 90-degree V-twin, and a thumper. Those bikes all vibrated, though at a lower frequency. Last week Thursday, out of curiosity, I went by the BMW dealership and test rode an R1200RT. It was the first boxer twin I've ridden, and damn, that thing vibrates. All the RT veterans are gushing about how smooth the 1200's are... I can't imagine how bad the older bikes shook. Anyway, when the test ride was over, and I got back on my bike, it felt so smoooooooth. Methinks a lot of the buzziness/vibration in the FJR is a matter of perception. It would make sense since a lot of people (including me) seem to feel the vibes are stronger some days than others. Every inline-4 engined car I've driven buzzed to a certain extent, but those engines are always rubber-mounted, and there is a lot more mass to dissipate the vibrations that DO make it through the rubber mounts. In the end, the fact is, the engine on the FJR is rigidly mounted to a frame which is rigidly mounted to the handlebars, footpegs, and seat. We're lucky these bikes are as smooth as they are.
In any case, I'm done worrying about it. It's time to ride!
#123 Fred W
1 Wheel Drive
Posted 22 January 2013 - 06:21 AM
I don't think that backing the idle speed adjust all the way out is the right thing either. You'd ideally want it to be providing the exact same air leak that it will when running normally, so that you are balancing the cylinders around that leak. The way to do that is to not adjust it at all for the closed down air screws, just leave it in the normal position. At least that is the way I have done several 2nd gens successfully.
But if your results are OK, the 2nd gen idle adjust may not matter all that much.
To view my "broken" Photobucket images: Firefox fix Chrome fix
#124 ABQFJR
FJR Pilot
Posted 22 January 2013 - 08:23 AM
Hi Fred,
I see your point, and that's actually pretty much how I did it last time. But what inspired me to try it with the idle screw backed out is that on the Gen 2, the idle screw basically acts like a master air leak for idle, while the air screws on the throttle bodies are used to create four separate, secondary air leaks which can be balanced against the main idle adjuster's air leak. At least, that's the way the system seems to work. I noticed that, even with all the air screws closed, the bike would still idle, just at a lower RPM. That told me that the idle adjust screw was acting independently of the TB air screws. It was only after I backed out the idle screw that the bike wouldn't run. In that case, I theorized that backing out the idle screw all the way would maximize the effects of throttle plate sync on the balance at idle (or 1200, or 2000, or wherever you choose to lock the throttle). If there is no air leak allowed, you know the only air getting through is past the throttle plates, and you can balance them more accurately. This thread has some interesting discussion on the 2nd gen idle circuit and its various screws. I believe constant mesh's post (#3) has the correct explanation.
Ah, hell, I feel like I'm splitting hairs at this point. In all honesty, I really don't think all the time I've spent in the garage messing with balancing the throttle bodies has made much of a difference, one way or the other. If it has made a difference, it's an intangible one. The first sync I did back when I first got the bike - the "authorized" sync - did smooth out my bike's idle, but that's it.
In any case, thanks for your willingness to discuss this ad nauseum!")
#125 Fred W
1 Wheel Drive
Posted 22 January 2013 - 08:59 AM
No problem. I've got the time... Unlike last year, true winter has set in on New England. Temps in the teens accompanied by regular doses of the white stuff is making it hard to a get a day ride in. I did manage to quell my PMS on Sunday afternoon with a short ride on the V-strom (with heated gear buzzing) but my next one looks to be a while away.
To view my "broken" Photobucket images: Firefox fix Chrome fix
#126 ULEWZ
ULEWZ
FJR Pilot
Posted 02 November 2013 - 08:42 AM
Great procedure Fred, but I have a few questions that I did not see in your first writeup:
1. Is it recommended to have a baseline rpm of 1,100 first?
2. Should the plugs be changed before starting this procedure?
3. Should the engine be warmed up before starting the procedure?
Thanks for a great writeup.
Cee Bailey Windscreen, autoretract deactivated, PCV, Recall ECU, Recall grounds, Recall key ignition, Frame sliders. Highway pegs in frame sliders, Penske 8983, Race Tech Gold valves, Sonic springs, Sargeant seat, Rear trunk, Trooper Exhaust mod, Shorter Jester racing bog bones (removed), Progrip 714 grips, Throttle Rocker, Vario adjustable foot pegs, Ram mount for GPS, Garauld highway peg mounts with Rivco pegs , All balls steering stem bearings, Audiovox CCS-100 cruise control, Delkevic hex pipes, Baldwin leather seats, EBC HH padsSold!#127 Fred W
1 Wheel Drive
Posted 02 November 2013 - 11:11 AM
Yes!
Should not matter.
Yes, for sure. I've started with a cold engine and the gauge hooked up and watched the vacuums as the bike warmed up fully, and it does seem to matter. So since you usually ride it warmed up, that is where you'll want to adjust it.
You're welcome.
To view my "broken" Photobucket images: Firefox fix Chrome fix
#128 Gbjbany
FJR Pilot
Posted 02 November 2013 - 04:46 PM
Fred
also wanted to say thanks for the great writeup - did it today and im not 100% happy with MY adjustments but im happy, pleased with myself, I was able to do it and save a few bucks in the process
BTW getting to the 2-3 adjustment screw (I have kept all the pair stuff as its still under warranty) looked close to impossible - throttle open or not ! - but my 2-3 were close enough for me for my first attempt - I did post some pictures in neprt "what I did to my FJR today " thread,
http://www.fjrforum....24#entry1104477
Also As ABQFJR pointed out closing all the Air screws the bike still idled at 1100 - which threw me a bit ! - but I kept going.
Jeff
BMW 2016 S1000 XR
#129 Fred W
1 Wheel Drive
Posted 03 November 2013 - 05:45 AM
I'm glad folks are using this procedure successfully. I still believe that the premise of the adjustment (aligning the throttle plates at idle) is valid, but I've recently determined that it only works for relatively clean / new, low mileage throttle plates.
My old 1st gen ('05 w/ 85k miles) for which this procedure had worked so nicely on in the past was no longer delivering the smooth results I had come to expect in the past couple of go 'rounds. I began to theorize that maybe the throttle plates have non-uniformly built up some crud which may be impacting the vacuum levels at idle but not so much when they are open. This could result in their angles not being aligned correctly to each other when set at idle.
So what I did this time was to close all 4 air screws down and then pay attention to the vacuums while revving the engine to ~4k rpm. I found that #1 vacuum was much higher than the others and #4 a little lower, while 2 and 3 were pretty close to each other. I adjusted the linkages to make them all closer together at 4k, which made the vacuums at 1100 rpm idle way off.
I then opened all 4 air screws 3/4 turn and re-balanced their vacuums at idle using those screws and the idle adjuster to keep it at 1100 rpm. The trick here is to open the ones with high vacuum and close down the ones with low vacuum, regardless of which cylinder it happens to be (don't use #3 as a reference)
The result was a balanced vacuum at idle and also a fairly closely balanced vacuum at 4k rpm as compared to how it was previously. The net result was reduced vibration FELT at 4-5k rpm, which was exactly what I was looking for. I think I could have been more meticulous with the adjustments at 4k. I just wanted to see if this was going to make things at all better or worse. It did seem a bit better to me.
So, if you've done the RDCUA TBS as per the prior procedure and not got the smooth results you expected, and if your bike is a bit older and you haven't removed the air box to clean the throttle bodies yet (I still have not done this, but plan to this winter) this tweak to the procedure may be worth trying. If it doesn't pan out you can always go back to the original way.
To view my "broken" Photobucket images: Firefox fix Chrome fix
#130 leclairk
FJR Pilot
Posted 09 November 2013 - 06:31 PM
I had the opportunity this afternoon to perform the Unauthorized TBS on my new to me 06. Let me just say HOLY CRAP!! What a difference! When I first hooked up the TBS tool my numbers were not too bad, my mechanic had done a TBS 500 miles ago. I went ahead and performed the unauthorized anyway. Very simple to to do. I have never done a TBS before and just bought a sync tool this week. I took it out for a short spin and oh my God what a difference. Like other people have said, the bike runs like a different machine. Riding at 75mph, 5th gear, approx 3800 rpm, almost zero vibration. I could feel a tiny bit of vibration in my feet but other than that, nothing! The bike is so smooth and SO AWESOME!!! I don't see how you could own this bike and not do this to your bike. It makes a huge difference. I was a little worried that some people might think it runs smoother even thought it really is the same, but there is no question the bike is smoother. Fred, you are a genius!
2006 FJR-ahh what a machine
2006 V-Strom DL100- RIP old red
2005 V-Strom DL650-sold
"Rarely have we seen a person fail who has thoroughly followed our path"
#131 ABQFJR
FJR Pilot
Posted 12 November 2013 - 09:56 AM
I must be one of the only people on this forum who noticed none, nada, zilch difference after doing the TBS, authorized or not. All these posts about people having a whole different bike after doing the RDCUATBS really depress me. I should stop reading them.
Carry on.
#132 Fred W
1 Wheel Drive
Posted 12 November 2013 - 10:25 AM
It would kind of depend on how far out of sync it was before the adjustment. If it was already good before hand it would be harder to make it much better, right?
That and how sensitive you are to things like vibration. Not everyone senses things like that in the same way.
To view my "broken" Photobucket images: Firefox fix Chrome fix
#133 HotRodZilla
GOD BLESS AMERICA
Posted 12 November 2013 - 06:51 PM
"Direct on the training and cutting off Gordon's head."
---One of my guys...03/31/2017
"...get the wind out of your vagina and mount up."
---FJROB 06/29/15
#134 MajBach
FJR Pilot
Posted 05 July 2015 - 11:52 PM
I'm going to add my observations to this rather old thread.
I ordered a Motion Sync Pro recently (as a side note, I wouldn't buy another. This unit does work but it doesn't show specific vacuums/pressure, it shows relative pressures. That is, you cannot tell when you're pulling say 10 mm Hg or 200 mm, only that #1 is higher/lower than #2 etc.) so I could start doing my own sync. I just turned 50,000 miles on mine and the last sync was, well....pre-10,000 miles.
This thread was rather lengthy and hard to read what with all the updates,links and references too differences between Gen I and Gen II. I was just going to do a sync at idle but after pulling everything apart, I went ahead and did the entire thing. Well, halfway through the anxiety was peaking as I had wished I had just left well enough alone and did the sync at idle. I seemed to knock everything out of whack and couldn't get things back to what they were when I started. At this point, I'm pot-committed obviously.
After several back-and-forths - not to mention a dozen or so re-reads of this thread, I somehow managed get all four synced within a mm of each other at both 4k rpm and at idle, I wasn't sure if it was due to being meticulous or just plain lucky but I was happy with the results and anxious to get out for a test run. Thats when the sh*t hit the fan...as it always seems to do.
Since we were having a record breaking heat wave here on Vanc Is, I was anxious to close my garage door that I had open to vent the exhaust. Well, one of the bungee cords I had attached to the tank to hold it up was on the slide bar of the garage door opener and while my back was turned, the garage door was pulling on the tank as it tried to close. The only thing holding it back were the wires for the fuel pump and fuel gauge. I don't need to tell you who won that battle.
I got the wires reattached and everything back together and didn't have the time for a ride, so...tomorrow.
Well, sorry to tell you, ABQFJR, but the results were truly unbelievable for me as well! And, it wasn't some expected or placebo observation either. This bike truly felt like a different bike and I would have noticed this in 100 feet of riding if had someone else had done the same thing to it without me knowing. Aside from it being long overdue the main reason I was motivated to perform this maintenance because I noticed a subtle/distinct unevenness at idle. This was remedied immediately and I observed the change as I was performing the sync itself. But the next thing I noticed was the surge was eliminated. My FJ always seemed to lurch forward or back whenever I rolled on the fuel or came off it. I just assumed it was the nature of the beast over the years and was accustomed to it. That was gone! Completely smooth transitions during power on or power off. *Smile on my face*
Next came shifting. How did this procedure make shifting from 5th to 4th at highway speeds approaching a stop(or ANY other shift for that matter) so much smoother? But it did. Significantly.
Finally, vibrations. I did not realize how my subconscious had either learned to tune out or ignore the vibrations that migrated from the engine through my hands and up my arms. But now that those vibrations are all but gone, and I am now aware that they were once there - in droves. Now, it's like resting my hands on a glass table.
Truly a different bike.I had no idea the improvements would be so pronounced. Don't what aspect of the entire procedure contributed to what improvement but thanks to all here -particularly Fred -that contributed to the cause which ultimately lead me to go ahead with it. Thanks
Incidentally, the Motion sync pro is calibrated in 1 cm increments and when I first synced at idle cylinders were within 1 cm of the 10th notch. I recall the the max difference was between one and three cylinders which was about 2cm. Once synced at idle, #1 and #4 were 2.5 cms higher than #2 and #3 at 4k. It took a lot of fumbling but I had them to within 1 mm of each other at 4k. Then I tried syncing them at idle again, but now I had all the bleed screws turned in and the idle screw turned all the way in. The idle sync was now WAY off. Again, after much fumbling I got them all synced but they were now about 1 cm higher than they were when I took the bike apart. I do not know the actual numerical value of the pressure (but I am going to go purchase a pressure gauge for the next sync). The other observation was that the bleed screws (or sync screws or whatever they're called) were in completely different positions than when I started, even relative to each other. So was the idle screw. At the start the screw that was out the most was 2 1/4 full turn and the least was only a 1/4 turn. Now they are all withing a half turn of each other. Finally, I also changed the plugs and ran some Sea Foam through the airbox during the tune. Again, don't know if they contributed to the improvement or how much.
#135 Fred W
1 Wheel Drive
Posted 06 July 2015 - 03:57 AM
@MajBach -
First off, glad to hear the sync was so successful, even with the little garage door SNAFU. So far I have had a few people that said there was not much of adifference, but most have noticed a lot of improvement like you did. I guess it all just depends on how far out of sync they are when you start.
Second, the fact that your gauge doesn't measure absolute values is insignificant. The Morgan Carbtune that many other folks use and love (including me) also does not measure inches of mercury, since it is just four metal rods sucked up into glass tubes. The entire point of a synchronization is just to balance the vacuums between cylinders under various conditions. You have no ability to change the absolute value of the vacuum. It will be whatever it will be at a particular rpm.
Third, I appreciate your feedback about the thread being confusing. Although I originally posted this as a "procedure", it was also under some significant amount of discussion with other people as to how well it would work, and the procedure did get changed slightly. I think that all one needs to read is the first post in the thread, as I have gone back and edited that first post to reflect the most recent information / theories / procedures.
I will now go back and post some sort of warning to that effect at the beginning of first post so maybe someone who comes along later won't be distracted by all the subsequent chatter.
FWIW - I also keep and host copy of the procedure on my FJR-NERD's Repository Web Site, (along with a few other useful procedures) which can also be accessed by clicking the little nerdy icon in my signature line,
To view my "broken" Photobucket images: Firefox fix Chrome fix
#136 sapest
FJR Pilot
Posted 06 July 2015 - 08:39 AM
#137 MajBach
FJR Pilot
Posted 15 July 2015 - 12:51 PM
Unfortunately, I need to make a bit of an update regarding my observations with my recent sync.
The other day I went for another drive, significantly longer and higher speed one than the one I had done when I posted my previous observations. I noticed the bike didn't seem quite as smooth as the stark difference I had seen immediately after the sync. But what really grabbed my attention was the apparent lag at highway speeds when I opened it up. At first it seemed like I had some power loss, especially when I noticed I had trouble passing an F-150. After that, I experimented downshifting to third and applying WOT from speeds upwards to 100 mph. It just seemed 'slower', smooth but slower. I wondered if I was imagining things and indeed I thought perhaps I had just OD'ed on buffalo wings at Dee's the night before and the extra baggage was starting to show. When I reached the city and made a few hard accels from a stop, the bike seemed normal. Then, I was climbing a mountain - smooth steady paved ascent about 2 miles long; I kept the bike in 2nd most of the way, revving it around 5-7000. Whenever I opened her, there was a definite lag. At first, it almost seemed like the clutch was slipping - that's the type of lag I am talking about - but there was no associated increase in rpm as you would expect in clutch slippage. Rather, I could hear the engine 'groan' and try to develop power but with without really grabbing,(not unlike the groan when you open up a normally aspirated engine too fast while it's still a little cold). After about a a second and a half, the rpms would pick up and she would run like normal. I stopped for a bite and let the bike cool and on the trip home the behavior was the same. Still, I wasn't convinced I wasn't imagining it all.
The two things that have keep me up at night wondering are: when I did the above sync, I adjusted the third cylinder screw even though that is the 'factory one' and you're supposed to leave it alone. Secondly, I had played around with the throttle body valves which is also something that isn't in the shop manual to adjust. Well, that was the entire point of this thread/procedure, right? And, it seemed worth it...at first. Now, I just want to put things back the way they were
Anyway, today I proceeded to do another sync but before I began I went and purchased a vacuum tester - one that I could determine if the third cylinder was drawing 25mm Hg as the Motion Pro carb sync tool just measures relative vacuums. Well, when I hooked it up to #3, it bounced around so erratically, that a specific reading couldn't even be guesstimated. The instructions state that it should hold steady and if it bounces around the 'carb' is out of whack. The other cylinders showed the same thing. Of course, I don't believe the bike is out of whack, Im probably using the wrong tool for the job or using it wrong. So, I proceeded to hook up the sync tool and was immediately surprised to see how the static positions were so different than when I left them. The Motion Pro has reference lines along the side that appear to be in 10mm increments. When I initially did this test, each cylinder was resting on the 7-8th notch and when I was done with the entire procedure, they were all steady on the 9th. Today, when I hooked it up, they were all on the 4th notch. That's more than can be attributed in a change to ambient air pressure I would think. Perhaps though, my idle was higher than when I finished as I think I can recall adjusting the idle screw to increase idle after I had done the sync. The #1 and #4 cylinders needed slight adjustment as they were high. Finally, all 4 were nicely synced when I revved right up to 6 rpm without load.
Tomorrow I leave for a week's drive down to Oregon and California. I'll see if there are improvements but in the meantime, I'd appreciate some input from the experts here.
Thanks,
#138 Fred W
1 Wheel Drive
Posted 15 July 2015 - 01:46 PM
Dude, you are over-thinking this thing way too much. And imagining things too, no doubt. Obsession is not a good thing.
Adjusting the 3rd cylinder screw is no different than adjusting the other three. It didn't cause your engine to sack out. What the absolute reading is on your vacuum gauge is not significant. You have no ability whatsoever to change that.
Take the ride and enjoy it and stop worrying yourself about nothing.
To view my "broken" Photobucket images: Firefox fix Chrome fix
#139 MajBach
FJR Pilot
Posted 15 July 2015 - 11:39 PM
well, you're probably right. I re-sync'ed it and didn't have to make much of a change. Tonight I went for a long ride and the bike seemed fine. Still seems sluggish from when I first bought it but perhaps it's the 50,000 age or mt ever-increasing fat ass.
Thanks again.
#140 bluesdog
FJR Commander
Posted 16 July 2015 - 12:46 AM
iirc, it took @ 3 or so sessions before I got mine synched up nicely. Coming up to +53K km now, and it pulls turbine smooth and strong to redline, and I'm still too chicken to WOT in first.
#141 Fred W
1 Wheel Drive
Posted 16 July 2015 - 03:52 AM
@majbach - Sometimes I think the same thing, that maybe the bike isn't quite as peppy as it used to be. Then I do a little acceleration testing (on a closed test track, of course! ) through first and second gears, look down and see "ticket me now" speeds reached in only a couple of seconds and realize, I've just become used to the raw power that this bike produces over time. Once you become accustomed to it, and it no longer scares the bajeebers out of you every time you whack the throttle open, you do lose a little bit of the initial adrenaline rush. That doesn't mean that the bike is getting any slower...
To view my "broken" Photobucket images: Firefox fix Chrome fix
#142 MajBach
FJR Pilot
Posted 28 July 2015 - 07:52 PM
Well you have to understand that the inner workings of what is going on is new to me. If this was normally aspirated, I may not be as out to lunch. Don't forget, you did say "It's much better for folks to be actually thinking (you remember how to do that?) about what it is they are doing, or adjusting, or attempting to do, and consider the ramifications and consequences, rather than just blindly going out and following procedures from some knucklehead chump that says: Hey This is the next best thing since sliced bread."
Anyway, I have been revisiting this procedure after coming back from a 3000 mile road trip last week and not being happy with the smoothness of the bike and reading into this thread and others to a little more depth. I was hoping to try and do another sync but this time at idle like you suggested in your most recent update for a Gen Ii. I closed off the bleeder screws and brought the idle right down then used a throttlemeister to hold an idle. I hooked up my sync tool and the manifold were way off. So,I have a few questions I hope you can answer:
- You state to sync the 2-3 adjustments first but how do you determine whether you should adjust the 2-3 to match the other two rather than adjust the other two to match the 2-3?
- In your Gen II procedure, you suggest to adjust the idle first then close off all the bleed screws ( I thought someone else mentioned to try and bring the idle screw all the way out and hold idle using the throttle - I'm not sure which is best) but there is a problem with this as you will have to shut off the bike to adjust the 2-3 and it would be near impossible to get the same throttle when you re-start.
- I fail to understand what is really happening mechanically when you adjust each throttle plate screw. I would presume youre just adjusting the angle of the butterfly valve and with this set up, youre adjusting two at a time. Is this correct? If so, at idle aren't all the valves supposed to be fully closed? Why cant we just back off the screws (or turn them all the way in - whichever the case may be) and then reverse direction until there the movement makes a difference? You'd know then that the valves are all fully closed.
- Finally, and this is a bit outside the box from what we are doing, but correct me where I am wrong: The throttle body valves open in order to allow more air in. In a normally aspirated engine, the increase air flow creates a low pressure and sucks in more fuel. But in a fuel injected engine, isn't that fuel metered depending on what the throttle position sensor says? And, isn't the TPS calibrated to a position set of one of the butterfly valves? In other words, by adjusting the valves positions, are we not in effect screwing up that calibration thereby changing the amount of fuel that is metered for a certain amount of air (throttle position)?
****
Since writing the above, Ive gone down and successfully synced the beast. All four screws are adjusted in, the master idle screw is in just enough to keep the bike running around 900-1000 and all four read very close to each other - at idle, at 4-5k without a load and at 4-5k with a load. Success? I hope so and the bike sounds noticeable smoother since I started. Now here is what I don't understand: why bother screwing around with the bleed screws at all? why not leave them closed and adjust the master idle until I get 1100?
Can someone explain to me the difference between adjusting throttle valves and the bleed air and why does the shop manual state not to ever adjust the former? Why then are they there?
(Why didn't I leave well enough alone? I always have to tinker.)
#143 Fred W
1 Wheel Drive
Posted 29 July 2015 - 04:14 AM
Wow... lots of good questions. Let's see if I can answer some.
Let me start off by describing the linkage adjustment. The four throttle body plates are on independent shafts that are each connected through the screw adjustable mechanism. The throttle cable is on the #3 shaft, and on 1st Gens that is where the mechanical idle adjuster is, which is just a screw adjustable stop. 2nd Gens have an additional air bypass circuit for for idle adjusting (more on that later)
When you are adjusting the center screw between the #2 and #3 TBs you are actually moving 1 & 2 in reference to 3 & 4. What you want to match when you are done adjusting that screw is #2 to #3. The other ones do not really matter at that point. Once you are happy with that you move on to the outer two. When you adjust the left side screw between the #1 and #2 TBs, you are actually moving just the #1 plate in reference to #2, #3 & #4. Likewise, when you adjust the one on the other side you are moving #4 in reference to #1, #2 & #3.
No, after everything is adjusted perfectly the butterfly valves are not fully closed at idle. There is actually a secondary screw stop on each TB (one that we never touch) that ensures the valves do not close fully. The air required for the bike to idle is a sum of the air passing through the slightly open butterfly and any bypass air (air screw and idle adjust).
By eliminating the air screw bypass (closing all 4 all the way) we have just the throttle plates and the idle adjuster air, which makes the small opening of the plates extremely important to the total air, and therefore the balance between cylinders, at idle
Some other bikes have you adjust the TB plates with a feeler gauge, ensuring that each is open exactly (mechanically) the same amount at fully closed. We don't have good access to our throttle bodies (it's a real pain to get at them) so we are doing the UA TBS instead to get them synchronized.
As mentioned above, the Gen 2 warm idle adjuster is an adjustable air bypass. Here's a thousand words to describe it below:
The idle adjust screw is attached via a short cable to the air bypass mechanism (highlighted). When you turn the screw you allow more or less bypass air from the inlet tube (#9) to the four distribution tubes that go off to the individual throttle bodies (#11 x 4).
Theoretically when you adjust that bypass air it would be adding or subtracting an equal amount of bypass air to all 4 TBs, but being a mechanical device that may or may not be the case. Therefore, it is best to have the idle screw adjusted as close as possible to its final position while adjusting the balance or else the balance may be knocked out when you subsequently adjust the idle speed.
Idle speed should be 1000 to 1100 rpm. 1100 seems to work best overall and I use that as my target.
You have been thinking!
The answer is yes sort of. Yes, the TPS (Throttle Position Sensor) is one of the devices that the ECU uses to determine injector duration (how much fuel is injected). And the TPS is located on the left end of the throttle shaft (it's #15 in the diagram above), so when we adjust the linkages we may slightly change the TPS position. But the actual amount we are varying the throttle shaft is very small, smaller than you would be able to adjust the TPS position by loosening the screws and turning the TPS body (that;s how it is adjusted). Any change in TPS voltage will be too small to be significant.
Another great question. The manufacturer either sets the relative throttle positions mechanically during assembly, or maybe on a flow bench prior to installing it on the bike, for precise alignment of the throttle plates. They say that they should never need to be mechanically adjusted after that, and that you should only adjust the air screws for balance at idle. But we owners have noticed that this does not always result in the least possible vibration at higher rpms.
The air screws, providing a fixed quantity of bypass air at all rpms, have little to no effect on balance at anything above about 3000 rpm. Therefore, if you want to affect the balance above that you need to alter the throttle plate positions slightly to achieve it
You really have been paying attention. And I agree 100%. I've come to the conclusion that you could just close down all 4 air screws fully and adjust the throttle plates for balance, and if you can achieve an adequate idle speed with the idle adjustment then there is no need to ever open the 4 air screws at all. But because of the design, you will probably not be able to reach the minimum idle speed with all the air screw air subtracted from the total. That's why you'd need to open all 4 screws an equal amount ( usually ~ 3/4 turn) and then re-balance the 4 air screws, so that you can achieve the 1000 to 1100 rpm warm idle speed within the adjustment range of the idle adjuster. This applies to both generations.
Hopefully some of the above helps you understand what's going on a bit better.
To view my "broken" Photobucket images: Firefox fix Chrome fix
#144 ionbeam
2 FUN
Posted 29 July 2015 - 05:16 AM
TPS: If you go to diAG and read diAG code 01 for the TPS you can read the actual TPS value the ECU sees. With the throttle closed you should read 15 - 17 (throttle opening in %, the throttle plates have to be cracked enough to maintain idle air flow) with the throttle fully open you should read 97-100 (100% throttle opening with the throttle pinned open) These numbers can vary a bit and you may see a wide open reading of 101 or 102 which is nothing to worry about.
Verity your plugs are OK, I had an issue with my #3 plug cap repeatedly wanting to pop off, not enough to cause a misfire but enough to cause a lack of engine smoothness.
If you aren't having luck fixing the "not being happy with the smoothness of the bike" in the engine, some people have had luck with retorquing the engine mounting bolts. Loosen them slightly and then retorque following the sequence specified in the FSM.
As compelling as dual ENGINE BALANCERS sounds, including little degree marks on the adjusters, they do not actually tune the engine's mechanical balance, all they do is adjust the balancer gear lash.
You have pulled in the clutch while at speed to confirm that the lack of smoothness is the engine and not something in the wheels/chassis?
#145 Fred W
1 Wheel Drive
Posted 29 July 2015 - 05:41 AM
Good point. Even when it is perfectly adjusted, there is still some vibration that remains unbalanced by the balance shafts.
Doing a TBS can help reduce vibration, but some of it is always there, just to let you know you have 150 ponies whirling away between your knees...
To view my "broken" Photobucket images: Firefox fix Chrome fix
#146 MajBach
FJR Pilot
Posted 23 August 2015 - 06:44 PM
Haven't had a of opportunity to review this until today. Thanks for taking the time to respond in detail and your explanations certainly clear up most of my questions. i particularly benefited from how you described how the the throttle body plates and adjusters work.
Thanks again
#147 lnewlf
FJR Commander
Posted 24 August 2015 - 10:22 AM
finally did Fred's TBS....couldn't get #1 perfect...if I set it even with #2 at idle it pulled to hard at higher rpms so I left it slightly lower at idle and from 2K up they all pulled very close....but
when I opened the air screws @ 1 turn, idle sync was all screwed up and higher rpm sync was not as good either so I left them closed..I didn't like how loose the screws seemed either-wondered why they hadn't already fallen out. With them closed idle was 1200 with the idle knob [Genll] set in the middle of it's range..
no time for a test ride yet-hope it runs as good as it did before....smooth as buttah and fast as a violated simian...
#148 Fred W
1 Wheel Drive
Posted 24 August 2015 - 03:07 PM
I hope it works out for you, too.
It sounds, from your description, a bit like maybe you have some air leaks in the throttle bodies. Maybe the shaft bearings are getting worn and admitting a bit of extra air at the high vacuum of idle. You wouldn't be the first, especially if you have accumulated as many miles as I assume that you have by now
To view my "broken" Photobucket images: Firefox fix Chrome fix
#149 lnewlf
FJR Commander
Posted 25 August 2015 - 03:56 PM
Well, that was fun......the reason I was motivated to do Fred's TBS was because the idle was creeping up to almost 1500..... I had previously checked all the usual stuff-lube the cables, adjust slack and even back out the idle knob to the point where the screw fell out..[not recommended].
I was satisfied with the result of the TBS altho the lowest I could get the idle was 1200 with the air screws turned full in..
took her for a test ride and about 20 miles away realized that the idle was now about 2500 !! fun ride back to the garage.
got under the tank and after a half hour of scratching my nutz I noticed that a screw that secures the bracket that clamps the throttle cables just above the lower pulley had backed out about 1/2 inch an was preventing the pulley from going all the way to it's stop. Like an idle adjustment screw, the further out it got, the faster the idle... beautiful. Weaseled a long screwdriver in there and tightened it back down with a drop of blue Loctite.
I never touched that screw and it had Yammies blue dot on it...this could have worked out bad...bet I'm the only one this has happened to....
#150 FlyWheel
FNG
Posted 19 November 2015 - 07:39 PM
Anyone got anything to add?
+
#151 Auron
Auron
FJRForums' Red-headed stepchild
Posted 22 November 2015 - 09:12 AM
Is there any reason this wouldn't work just well on any other I-4? I've got a 600 that's pretty darn buzzy and this mod worked wonderers on my AE.
#152 FJRMGM
FJRMGM
Posted 22 November 2015 - 03:02 PM
Is there any reason this wouldn't work just well on any other I-4? I've got a 600 that's pretty darn buzzy and this mod worked wonderers on my AE. </p>
</blockquote>
Should work on all inline fours that you can sync.
I now live in motorcycling paradise - NW Arkansas!!
#153 dmsantam
FNG
Posted 24 November 2015 - 07:10 PM
I did this on my 2001 FJR about a month ago, before a 3,000km trip. it greatly improved the vibration at around 4,500rpm in 5th gear, which is where i cruise at down the highway.
#154 Auron
Auron
FJRForums' Red-headed stepchild
Posted 26 November 2015 - 07:57 AM
There seems to be a great variation on how people interpret a buzzy bike. It's usually dismissed as a personal thing like windscreens, but I'll bet it becuase some bikes are just synced better than others.
#155 SCB
SCB
Training Pilot
Posted 04 December 2015 - 05:17 AM
I'd like to add my experience to this excellent thread...
As a bit of background, 5 years ago when I decided to buy a GenI FJR I rode 4 or 5 different 04/05's. Within the first 100 yards of the test drive of the bike I ended up buying I remember thinking 'This is the one I'm going to buy.' It just seemed to run better/smoother than any of the others. I've always wondered if it really was any different or if I was just ready to buy a motorcycle that day.
Over the proceeding 5 years/35,000 miles I've done most of my own maintenance including a couple TBS's and have been satisfied with the results. I had followed the idea of the UA TBS and specifically this thread with interest as many guys have been so happy with the results, but I had just never felt comfortable with doing it myself. Then, about a week ago I happened to re-read post #1. Thanks to Fred's excellent summarizing/simplifying I felt like I finally really understood and could handle performing this procedure.
To make a long story short, when I got in there and got the Carbtune hooked up, guess what? They were damn near even already! So I took a look at Yamaha's little white 'We can tell if you've touched this!' stripe on the adjuster screws and guess what? Somebody beat me to it! A 5 year old question in my mind had finally been answered! I now believe this bike did actually run better/smoother than the other FJR's I had ridden thanks to a PO (there had been 2) taking the time to perform this procedure. Actually #4 had gotten just a bit low, not surprising as it had been at least 5 years since the UA TBS had last been performed, so I tweaked the screw, finished the rest of the procedure, buttoned it back up and took it out for a test drive.
I do think it runs a bit smoother (again!) so that's nice and a better understanding of my bike is an added benefit. And thanks again to Fred for his time spent editing this post and to all who contributed to the knowledge base. This really is a great community!
#156 NTXFJR
FJR Squadron Leader
Posted 07 December 2015 - 06:42 PM
I did this procedure on my bike yesterday. The vacuum tweaks were a real pita for me to get them right, but with a little patience, I did end up with some great readings. I set the air screws at 1 turn afterward. Bike is running better than ever both city and power slabbing it.
Many thanks to Fred for posting this!!
And I would recommend not forgetting to replace the rubber port caps when done. Don't ask me how I know......
Patience is a virtue only when no one is blocking FJR nominal
We travel not to escape life, but for life not to escape us.
IBA # 65427
Craig
#157 nick
nick
Training Pilot
Posted 29 May 2016 - 10:32 AM
Hi Guys,
I have been trying to apply the above procedure to my 2013 model, but the idle speed seems to be controlled by the ECU on this model - at the time I was doing it, I phoned up an acknowledged expert over here (in the UK) and he wasn't sure as had not done one, and another had said that it was the ECU that controlled idle on this model... I didn't have time to get to the bottom of the issue at that time but now want to do the job.
So, can anyone confirm whether this procedure needs to be modified for the 2013 model ( it's Gen 4 in the UK but maybe Gen 3 in the US - whatever, it's the 2013 - 2015 model)
Thanks,
Nick
#158 ionbeam
2 FUN
Posted 29 May 2016 - 10:41 AM
Yes, the procedure needs to be updated for the '13 and up. The idle is indeed controlled by the ECU and needs a computer interface ($600 USD) to adjust the idle speed or it would need to go to a dealer. I'm sure Fred W will be along.....
#159 Fred W
1 Wheel Drive
Posted 30 May 2016 - 03:46 AM
To view my "broken" Photobucket images: Firefox fix Chrome fix
#160 Queensland Ken
FJR Squadron Leader
Posted 30 May 2016 - 04:46 AM
In the service manual, it suggests that if you cannot get the sync within the 1cm you have to clean the throttle bodies, then gives you the procedure.
The sync on my project FJR changed quite considerably after I cleaned the bodies.
2014 AE aka the Aussie ES
2013 MG Stelvio
2011 Spyder RT-S Limited Edition
2007 GSX 1400
2002 TL1000R
#161 Constant Mesh
FJR Commander
Posted 31 May 2016 - 01:01 PM
I'm of the opinion it's counterproductive to adjust the throttle valves. If they were perfectly clean (no crud buildup on the edges) and the throttle bodies were nice and clean inside an adjustment might offer an improvement.
But once crud begins to appear it has to affect the air flow for the small valve openings which are available for no-load conditions.
The valves are barely open for no-load conditions. Even at a 65 mph load on level ground the throttle valves are not open very much.
When there is a crud buildup in the air stream the adjustments will be affected by the crud variation from cylinder to cylinder. That effect will be most prominent for small valve openings. Once the valves are opened a lot more the crud's effect on air flow will be negligible.
My experience with these adjustments has been unsatisfactory. I wished I had never touched them.
After an adjustment I think I see improvement but very quickly I realize I was seeing a mirage.
Regrettably the FJR engine is a bit rough just above 4K rpm. You can't adjust it out. It's a feature of the engine.
The designers have acknowledged this by changing the gearing (slowing the engine) on the '06 and now again in 2016.
#162 Fred W
1 Wheel Drive
Posted 01 June 2016 - 10:11 AM
You are the only person who has reported a bad experience. I made mention of the cruddy buildup being a possible issue earlier in the thread. But I am still of the opinion that adjusting the throttle plates on 1st and 2nd Gen bikes is a highly productive way to reduce engine vibrations, even if they are somewhat dirty.
The sooty buildup is going to be relatively even on all 4 throttle plates. If that were not the case then this procedure would not work at all, and my experience is that it does significantly reduce the vibration, especially at or around 4k rpm and above. The soot is going to have the biggest effect on the air flow when the throttle is mostly closed. Every time that I have done the procedure I have always checked to be sure the vacuum stays mostly constant in all 4 cylinders as the throttles are opened, and that has always been the case, even when my throttle plates were quite dirty.
Once you have eliminated the bypass air from the 4 air screws, you will have to open the throttle more than normal just to maintain something close to idle speed.
On 1st Gens you can try to do that by cranking down on the idle speed adjuster, but the 2nd Gens have another 4 port bypass valve for adjusting the idle speed, so you need to find another way to slightly open the throttle and hold it steady at a reasonably low rpm.
I haven't done this procedure on any 2nd Gens lately , but I would think a good way to go about it on one would be to disconnect the 4 vacuum tubes that go from the idle adjuster to the 4 throttle bodies and plug those port on the TBs and also close down all 4 air screws. Make all you throttle linkage adjustments in that state (with the throttle held slightly open), and then re-install the idle adjuster tubes and open the 4 air screws 1 turn each, and re-adjust the air screws to compensate for any unevenness of the idle adjuster.
To view my "broken" Photobucket images: Firefox fix Chrome fix
#163 jammess
FJR Pilot
Posted 13 June 2016 - 07:58 AM
All this is very interesting but you don't suppose those 4 throttle bodies are matched on a flow bench in which case maybe one should leave the throttle valve linkages alone especially if Yamaha says so? If these TBs are matched on a flow bench they were clean at the time so all one should have to do is squirt some cat converter friendly carb cleaner in the TBs to restore to original matched condition. Just maybe this is all you really have to do or should do for that matter. The air bypass screws on a TB are really just fine adjustments while the TB valve adjustments are the course adjustments that are typically set at the factory on a flow bench to create a matched set and are not adjusted in the field.
Edited by jammess, 13 June 2016 - 08:20 AM.
#164 Fred W
1 Wheel Drive
Posted 13 June 2016 - 08:50 AM
Then don't do it. For those of us that have made the adjustment and improved the way the bike runs, I guess it doesn't much matter how the throttles were originally set.
To view my "broken" Photobucket images: Firefox fix Chrome fix
#165 jammess
FJR Pilot
Posted 13 June 2016 - 11:22 AM
Hi FNG, that's good advice. Maybe just run a bottle of Techron thru it and call it good.
For me this is my first multi-cylinder machine after many years on beemers beginning with a new '77 R75. Plan to fetch my nearly new 2010 FJR next weekend so for me going from a flat twin to a multi I doubt if I would notice vibration anyway. Maybe in a few months in which case I'll maybe give your sync method a try but for now there is much I'm going to have to get used to. I'm really looking forward to getting aquatinted with this fine motorcycle.
I know on an oilhead it is a no no to tweek the TB stop screws but there are those of us that have done it. With only two TBs you sync just above idle by adjusting the throttle cables (one for each TB) which is kind of the same as adjusting each throttle plate on a multi. On the oilhead the throttle stop screws are the ones adjusted on the flow bench and are not to be touched or there goes the warrantee.
I use a sync tool called a Harmonizer which has only two ports but is just about as good a tool for carb or TB sync that i have seen. The guy that makes the Harmonizer is in the process of developing a 4 channel tool which would be great for one of these multis. Look on the advrider forum under venders to find the Harmonizer.
Edited by jammess, 13 June 2016 - 12:21 PM.
#166 Fred W
1 Wheel Drive
Posted 13 June 2016 - 12:05 PM
Yeah, that'll fix 'er right up.
To view my "broken" Photobucket images: Firefox fix Chrome fix
#167 kblackburn
FNG
Posted 07 August 2016 - 04:47 AM
Fred W.
Many thanks for your post,
I have in the past had a vfr750 (v4) and the only way to balance those was as per throttle plates.
So now been the owner of a fjr1300 2002 gen1, which I balanced on the air screws, and thought that it was smooth as, but suffered from surging at constant speed, making what is a very good bike a bit of a handfull, adjusted the co via the dashboard, to smooth out the surge, to some extent.
So today I have fitted the g2 throttle tamer, and carried out the unauthorised tbs, what a bike, this is how they should leave the factory, 5th gear/ 1500 rpm, butter smooth in traffic and pulls without any hesitation or surging, brilliant, and fuel consumption of 51.14mpg.
kev
#168 mcatrophy
Privaliged to ride a 2018 FJR1300AS
Posted 07 August 2016 - 09:12 AM
51.14 mpg (UK) = 42.58 mpg (US), which makes quite a difference to your bragging rights
mcatrophy
2018 FJR1300AS - YCC-S Rules!
2014 FJR1300AS 2010 FJR1300AS 2006 FJR1300AS '02 Trophy 1200 '01 Bonneville '55 Tiger Cub
Some FJRForum contributions.
My web site
#169 kblackburn
FNG
Posted 07 August 2016 - 10:56 AM
mcatrophy,
no braggin intended, so what does your bike return as fuel consumption ?, just so I have some figure to base mine against, to know wether it's any good.
#170 ionbeam
2 FUN
Posted 07 August 2016 - 11:19 AM
'burn, it's apples to oranges between your '02 and mcatrophy's '14. The overall gear ratio has been changed and Yamaha has recalibrated the fuel injection mapping a number of times. Also, the '13 and up have coil over plug ignition and you have a dual coil, wasted spark system. With all the advancements many of the '13 and up FJRs get fuel economy (US measure) of >46 mpg.
Riding style and riding environment also play a big role in gas mileage. In the USA our fuel contains 10% ethanol in almost all locations which does nothing good for mileage. On my '04 riding alone I would get between 34 to 38 mpg. With pillion and less aggressive riding, even doubling the load on the bike we would get 40 - 42 mpg. There is one fellow I sometimes ride with solo and he goes 40 mph all the time, every place regardless of the speed limit and with the same '04 I have seen 48 mpg.
If your bike runs well and you are happy with it you only need to keep track of mileage for gauging gas stops and as an indicator that it might have a problem developing which needs looking into.
Increasing the CO causes your FJR to run a little richer which causes the engine to very slightly bog and this softens the abrupt fueling feel and improves lean surging at low, steady speeds. Putting a G2 on a standard concentric pulley makes you have to turn the throttle tube farther to get the engine to speed up which gives you the feel of better control at low throttle openings. This is not the intended purpose of the G2, the G2 was intended to cancel the effects of the non-concentric throttle pulley on the '06 engine.
#171 mcatrophy
Privaliged to ride a 2018 FJR1300AS
Posted 07 August 2016 - 12:17 PM
mcatrophy
2018 FJR1300AS - YCC-S Rules!
2014 FJR1300AS 2010 FJR1300AS 2006 FJR1300AS '02 Trophy 1200 '01 Bonneville '55 Tiger Cub
Some FJRForum contributions.
My web site
#172 kblackburn
FNG
Posted 07 August 2016 - 12:28 PM
mcatrophy,
That's some detail, all credit to you. I'll keep stum.
#173 Fred W
1 Wheel Drive
Posted 07 August 2016 - 04:06 PM
I can't seem to get any more than abou 44 mpg on my 3rd Gen, and was a fairly consistent 40-42 mpg on my 1str Gen. Both in USA MPGs.
But you know, it really doesn't bother me in the least when I can whack the throttle open and pass 4 or 5 cars at a time on the 2 lane back roads...
To view my "broken" Photobucket images: Firefox fix Chrome fix
#174 kblackburn
FNG
Posted 07 August 2016 - 10:28 PM
So fuel consumption, seems to be about the same as Fredw,
I neglected to say that I had reverted back to stock co settings ( the settings that were on the bike, when I got it ) so I was pleasantly suprised to find the surging has been elimenated, by doing the tutbs, and the fitting of the g2 throttle tamer.